In this tutorial, we are going to walk you through how to setup abandoned cart emails in Shopify using a simple built-in email function, as well as Shopify’s marketing automations.
What exactly is an abandoned cart?
We’ve all been that customer that’s added a product to their shopping cart (with the intention of purchasing the product) but hasn’t actually gone through with the purchase for whatever reason.
We also know that for small eCommerce businesses, it can be frustrating when potential customers land on your Shopify store, selects a product to buy but don’t end up completing the purchase, resulting in the product staying in their cart.
This is what we call an abandoned cart.
There are many reasons why a potential customer doesn’t go through with purchasing your product, however we are here to tell you that it is possible to recover these abandoned carts and make a sale!
It is really quite simple to setup and manage automatic abandoned cart recovery emails through Shopify’s marketing automations.
If you’re a new or existing ecommerce business and want to get started with Shopify, we recommend checking out our in-depth Shopify beginners video tutorial here to equip you with everything you need to know about getting started with Shopify.
Read more: How to Install Facebook Pixel to Shopify and track conversions.
How to set up an Abandoned cart Email in Shopify?
In this tutorial, our aim is to show you two straightforward methods on how you can set up an automated abandoned cart email inside Shopify, subsequently driving more conversions for your online store.
Let’s go ahead and dive into how to set up your abandoned cart email inside of Shopify using two different methods!
1. How To Set Up An Abandoned Cart In Shopify – Method #1

The first method to setup up an abandoned cart email within Shopify is by simply using the built-in email function that Shopify offers.
This method is super easy to set up. Follow these easy steps below to get started:
- Login to your Shopify store account dashboard.
- Scroll all the way down to the left-hand sidebar and click on ‘Settings’.

This will bring up your Shopify store details and settings.
- Find ‘Checkout’ over on the left-hand sidebar within your settings.

- Within ‘Checkout’, head down the page to the title ‘Abandoned checkout emails’.
- Simply tick the box next to ‘Send abandoned checkout emails automatically’ to enable this feature.
- Below this, there are a few simple setting options that you can choose depending on your business
For the purpose of this abandoned cart email recovery tutorial, under ‘Send to’ we’re going to select the ‘Anyone who abandons their checkout’ option, as we want to send our abandoned cart email to anyone who abandons their checkout.
- Below ‘Send after’, make sure you select ‘10 hours’ as this is the recommended option.
Before we show you how to customize this email, make sure you save these changes.
- Head up to the top of the page.
- Select ‘Save’ in the right hand corner.
Now you’re ready to customize your email! Follow the steps below to find out how:
- Click on ‘Customize email’ in the upper right-hand side of the page.
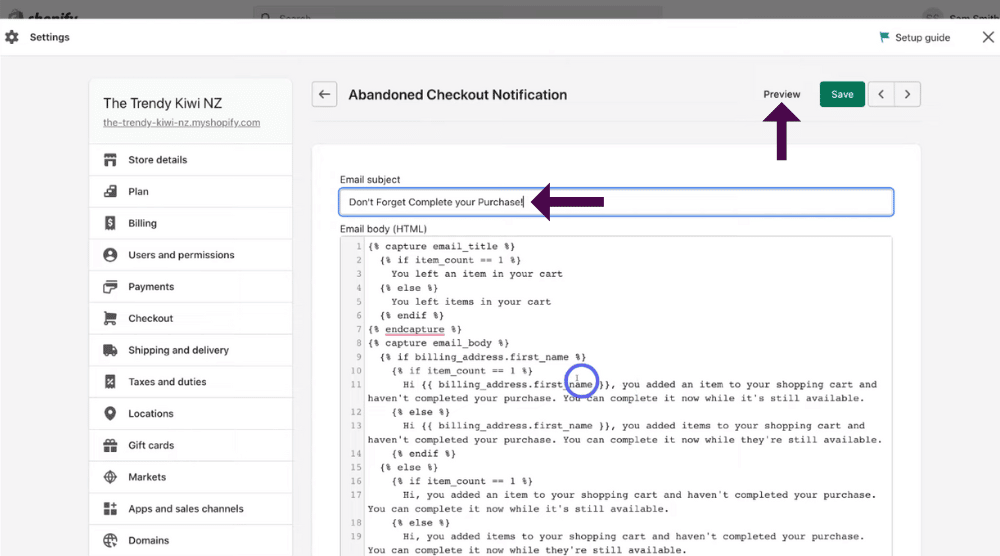
This is where you can make small customizations to your abandoned cart email (see screengrab).
To change your email subject:
- Head over to ‘Email subject’.
- Simply type in what you want the subject line of your abandoned cart email to be below the email subject header.
For the purpose of this tutorial on how to setup an abandoned cart email in Shopify, we’re going to add ‘Don’t forget to complete your purchase!’.
Once you’re happy with your email subject:
- Navigate down below the ‘Email body’ header.
- Here you can simply customize the default text to what you want your email body to be in your email.
However, it’s important to mention that you shouldn’t change or mess around with any of the code within the brackets here (see screengrab).
If you want to make any changes, just change the text of your email.
Once you’ve made these changes, you can preview what the email will look like for customers that abandon their cart.
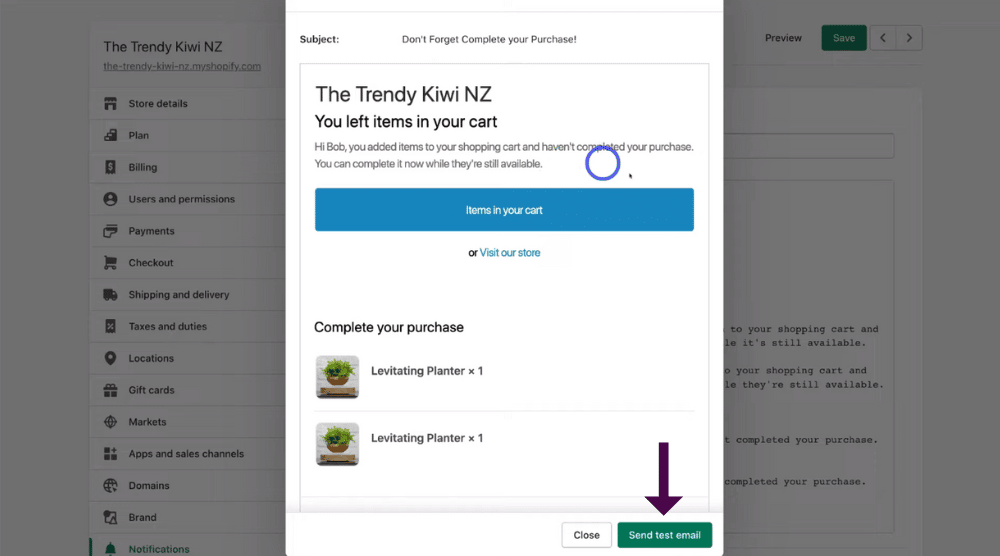
To preview what this email will look like in your customer’s inbox, you can send yourself a test email.
- Simply click ‘Send test email’.
Once you’re happy with your abandoned cart email:
- Click ‘Save’ in the upper right-hand corner.
And congratulations!
It’s as easy as that.
By setting up this abandon cart email within Shopify, we can guarantee you’ll drive more conversions to your Shopify store.
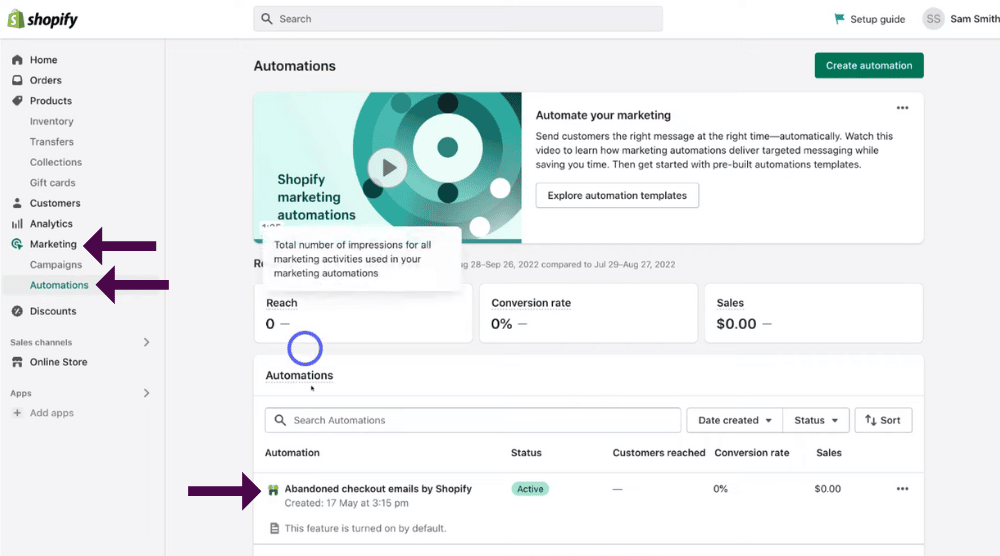
Once your emails are set up and sent to potential customers, you can test and preview the performance of these emails.
You can do this by:
- Navigating over to ‘Marketing’ on the left-hand side bar.
- Select ‘Automations’.
- Under ‘Automations’, you’ll see your abandoned checkout email is active
- Simply click on your automation to preview basic performance analytics
You can also watch our tutorial on How to set up Google Analytics on Shopify.
And that concludes how to setup abandoned cart in Shopify through their easy built-in function!
Read more: Shopify email marketing tutorial for beginners.
2. How To Send A Shopify Abandoned Cart Email – Method #2

The second method of setting up an abandoned cart email sequence is within Shopify’s marketing automations.
To get started with this method:
- Make sure you’re still under ‘Automations’ within your Shopify store.
- Within ‘Automations’, head over to ‘Create automation’ in the top right-hand corner.
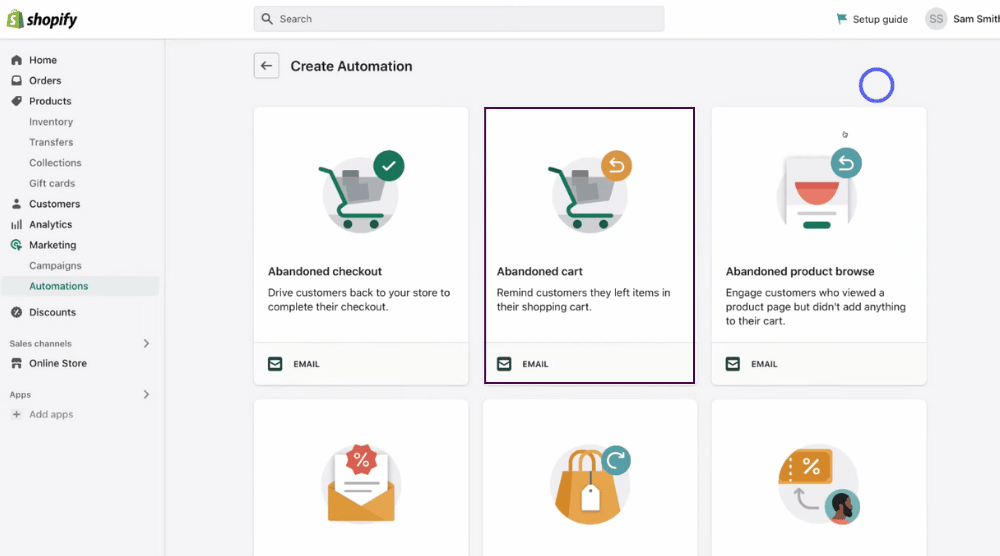
- Select ‘Abandoned cart’.
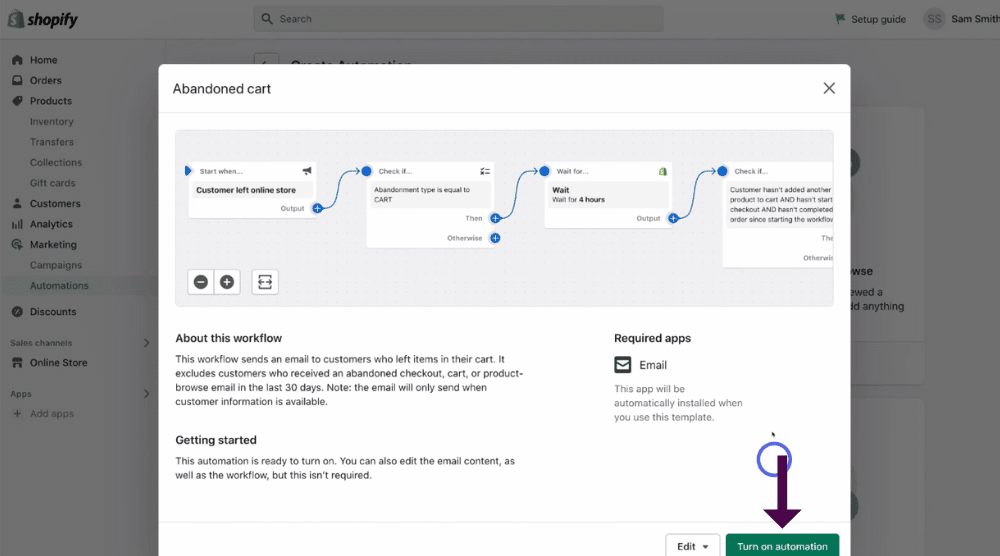
This will then take you to the abandoned cart email sequence that you can create
From there, you can then start creating email sequences. You can do this by:
- Clicking ‘Turn on automation’.
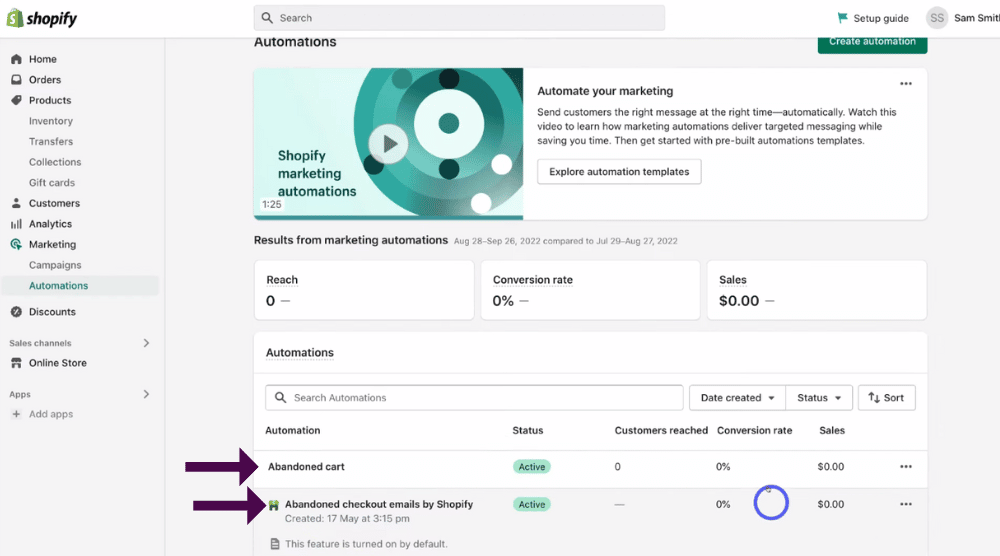
As you can see, we now have two automations that are active (see screengrab).
Our two automations are:
- The automation we just turned on.
- The one we created earlier (within the first method).
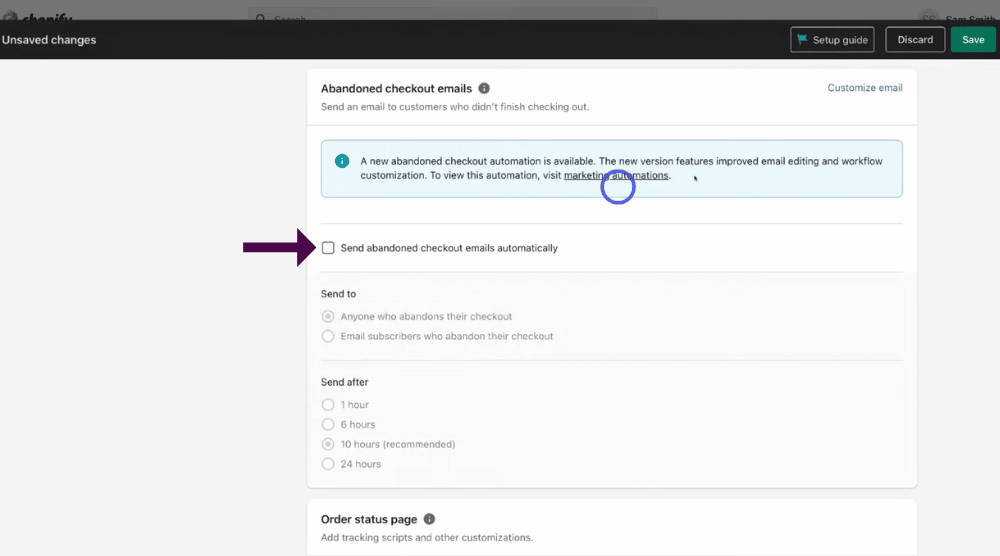
Firstly, let’s quickly turn off the automation that we created during the first method.
To do this:
- Scroll down and deselect the ‘Send abandoned checkout emails automatically’ option below ‘Abandoned checkout emails’ (see screengrab).
- Click ‘Save’ and exit out of this.
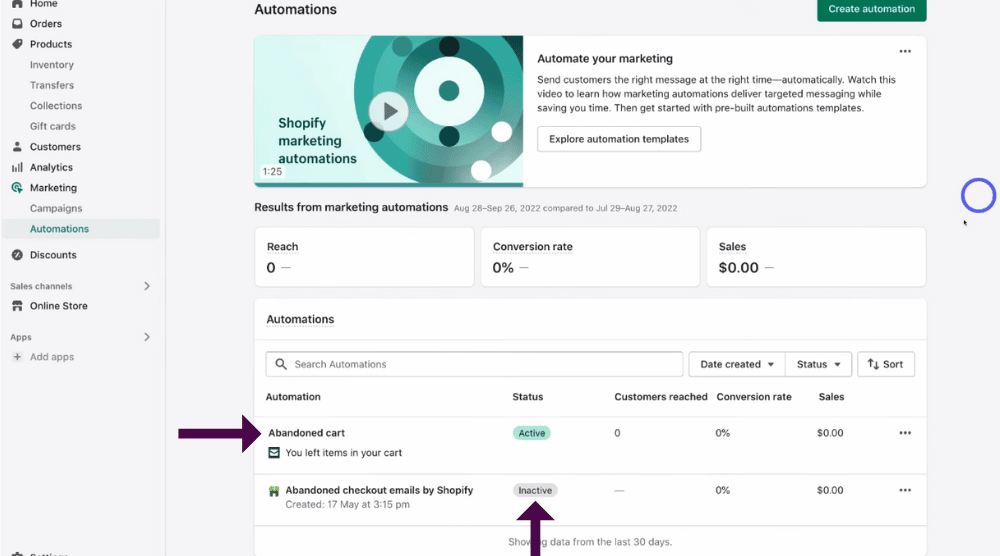
- You’ll then see that the automation you just turned off will show as ‘Inactive’.
The reason we turned off this abandoned cart email is that we just activated this new abandoned cart email automation.
However, let’s continue with the second method to setup and edit abandoned emails within Shopify’s marketing automations below:
- Click on the email automation that we’ve just activated again to see the performance of your email (like we showed you earlier).
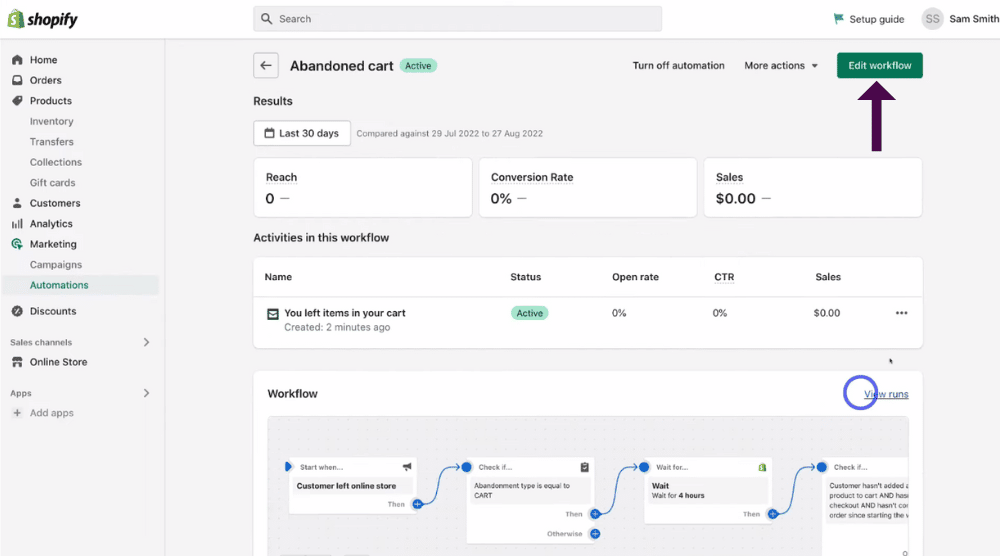
Next, we’ll show you how to edit the workflow you’ve just created:
- Simply click ‘Edit workflow’ in the upper right corner.

We’ll now walk you through some conditions within this banner card workflow that we just activated
- This is the trigger over here, which starts when a customer leaves an online store
- The next condition is going to check if the abandonment type is equal to the cart
- Then Shopify is going to wait four hours.
- Following this, the next condition checks if the customer hasn’t added another product to cart, hasn’t started checkout and hasn’t completed an order since starting the workflow.

Additionally, we have more conditions following this (see screengrab).
In order for this email to be sent, all these conditions need to be met.
Furthermore, you can change and edit these conditions to suit you.
- Come down and click ‘Otherwise’.
This will then allow you to create another flow from this abandoned cart workflow if this condition isn’t met.
However, we’re going to keep it simple.
To see what the email looks like:
- Click on the last condition ‘Send marketing email’.
- Come down & Click ‘View email’.
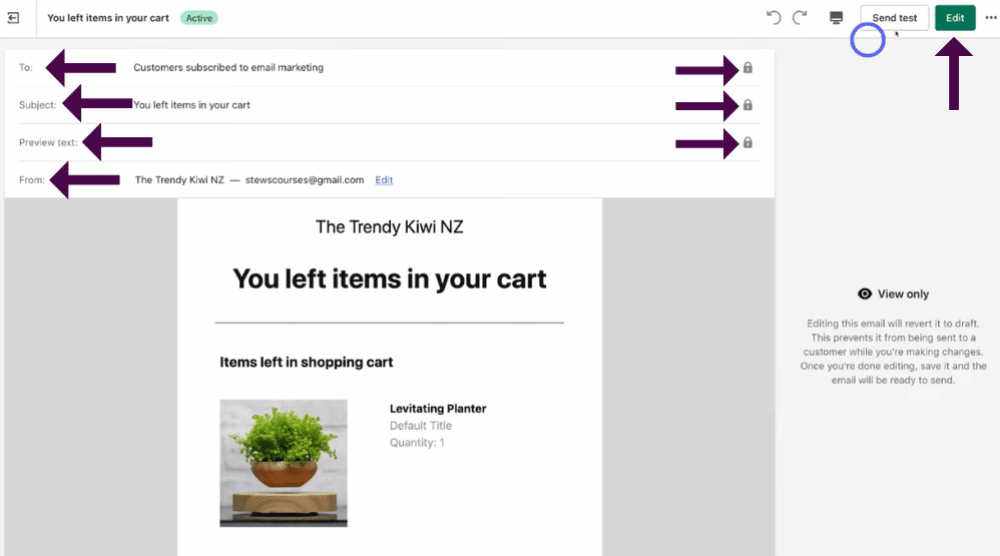
This will then bring up a preview of what the email will look like, and what your potential customers will receive IF they meet all those conditions (that we showed you earlier).
Within your preview you can further customize each of these items within your email.
You can:
- Choose who you want to send the email to.
- Pick your subject line.
- Add a preview text.
- View the ‘From’ address.
Next to these items, you’ll notice a little lock icon (see screengrab).
This is because this email workflow is currently active.
However, if you want to pause this email flow and start customizing the email:
- Simply click ‘Edit’ up in the right-hand corner.
- Select ‘Continue’.
This email then reverts back to a draft, meaning customers won’t receive your email until you make it live again.
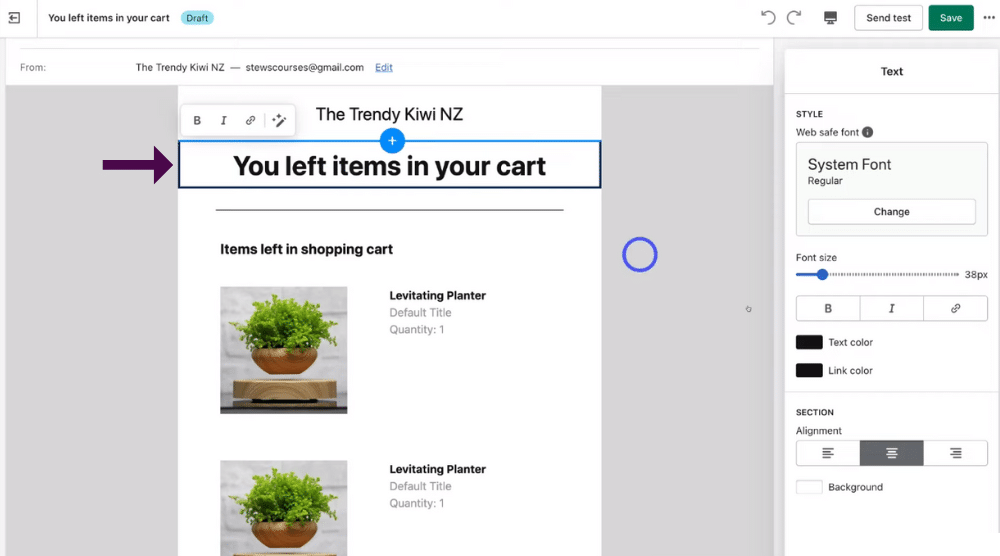
You can then further customize this email campaign and the blocks within your email:
- Select the block or element you want to edit.
We’ll go ahead and select this text ‘You left items in your cart’ at the top (see screengrab).
- This will then bring up basic formatting options above the text.
- Over to the right-hand side, you have more customization options (see screengrab).
- Here you can change the font, the font size and again the basic formatting options we saw above the text.
- Additionally, you can change the text color, link color, and section alignment.
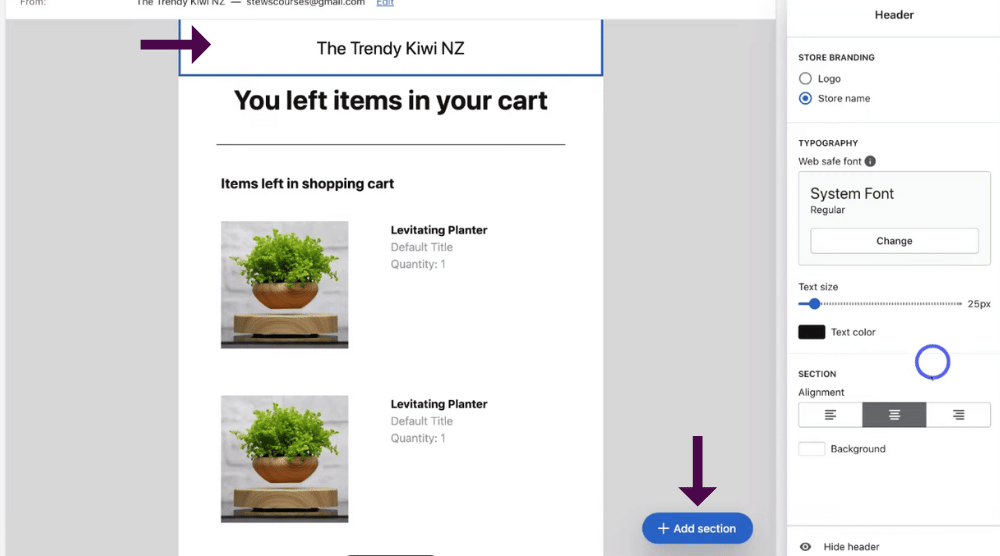
Now, let’s show you a different example below and how you can edit your header in your email:
- Click on the header block element. For ex ‘ The Trendy Kiwi NZ’ (see screengrab).
- Within the header element, navigate over to the right-hand side.
- Select ‘Store name’ to choose your store name as your header OR
- Alternatively, you can select ‘Logo’ to upload the logo of your business.
- Again, you’ll see those basic customization options down below
Additionally, you can actually add additional block elements or sections to your abandoned cart email:
- Click on ‘Add section’.

- This will then bring up all the different sections you can add (see screengrab).
For example, you could add text, a button, an image divider, a discount or even a gift card to entice this potential customer to follow through with this purchase.
You can also add a product, an image with text, multi-column or express checkout.
You can also read our beginner’s tutorial on How to use the Shopify discount code.
This method really allows you to get creative and customize your email the way you want in order to really attract the customer in, so take the time and go through these steps to setup your email to your liking.
Once you’re happy with your email and have finished editing (and you’ve saved this email) your email will be ready to start sending!
Now, it’s important to note that there are two main differences between the two abandoned cart email methods that we’ve just shown you.
Again these are:
1. The built-in email function.
This method is limited to the overall customization of your email, and you have limited control over the conditions of that email being sent.
2. Shopify’s marketing automations and abandoned cart workflow.
This method basically allows you to customize the entire workflow and all the different conditions.
In addition to this, you have a lot more control over the overall look and style of your email.
However, before you make your email live, it’s important to preview what it’s going to look like on both computer and mobile for your potential customers. This can easily be done by:
- Clicking on the computer or mobile icon in the top right-hand corner (see screengrab).
For the purpose of this tutorial, we’ll go ahead and click on mobile.
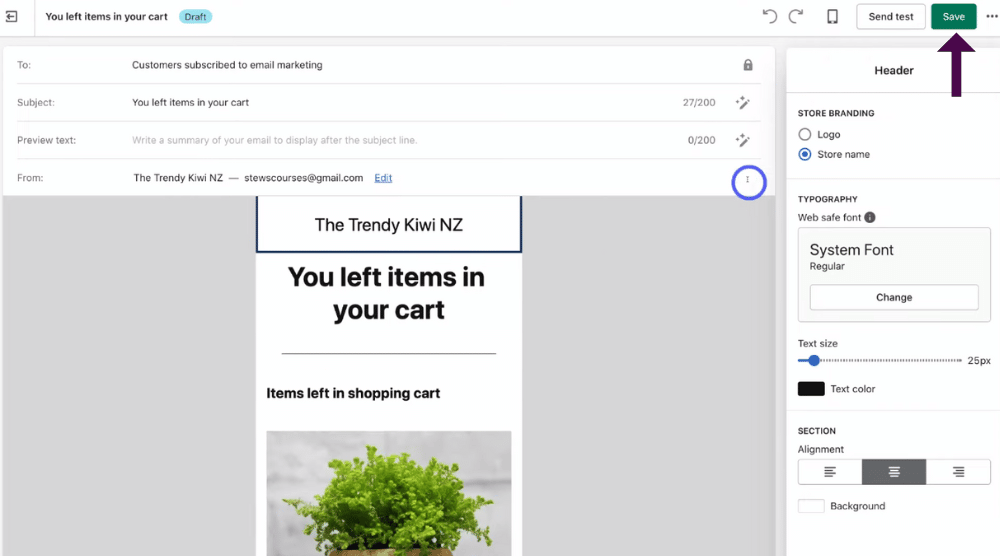
And this is what our abandoned cart email will look like if a potential customer is opening up this email on their mobile!
Once you’ve made all your changes and are happy with your abandoned cart workflow:
- Simply navigate up to and click on ‘Save’.
Next, we’ll exit this and head back to the ‘Automations’ section of our dashboard.
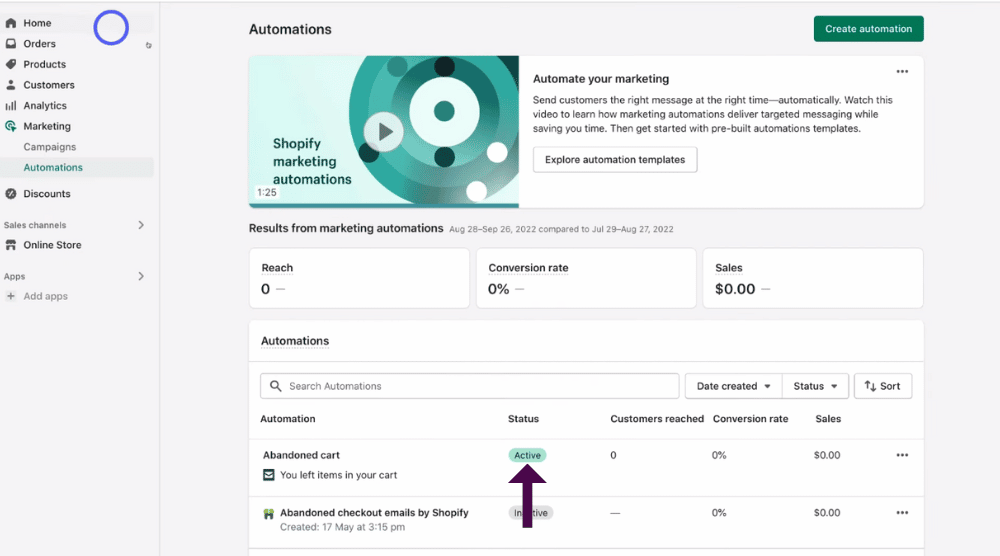
You can now see that the abandoned cart email workflow that we just created and edited using Shopify marketing automations is active again (see screengrab) and the earlier abandoned cart email that we created within Shopify has been deactivated.
And there we have it!
That is everything you need to know about both methods that you can easily use to set up your abandoned cart email.
Read more: How To Connect Shopify to Facebook Shop
How to set up Shopify Abandoned Cart Email (Video Tutorial)
Remember, the built-in Shopify email feature is very basic, however, a bonus of using this method is that it is super simple to set up (in just a few clicks).
If you want more customization options to your entire workflow and abandoned cart email flow, we suggest opting for the second method within Shopify’s marketing automations feature.
However, that concludes this brief Shopify abandoned cart tutorial for beginners!
You should now be well-equipped to set up this process with both methods so you can drive more conversions on your website.
If you’re still unsure of this process, we recommend checking out our full in-depth video tutorial below, where we walk you through step-by-step how to create abandoned cart emails to assist with abandoned cart recovery using Shopify!

