Ready to add a Google Sites Contact Form to your website?
Google Sites is a free website builder that allows you to create a website without any coding skills.
Small businesses love Google Sites as there are many templates to choose from, meaning you can create a site that is uniquely yours!
Additionally, you can also use Google Sites to create a blog or portfolio.
The Google Sites Contact Form is a crucial part of your website.
Why? Well, without it, many users would not be able to contact the website owner.
A contact form allows a website visitor to enter a message to the website owner in a quick, easy, and efficient manner!
Sounds ideal, right?
Read more: Google Sites 101: The Ultimate 2023 Guide for Google Sites

Service Business Google Sites Template
Ready to start a service business and need a conversion-focused website? Get our stunning customizable Google Sites website template for service-based businesses. Lead generation form included and more! *Claim 15% off each template at checkout: 15OFFGSITES

Online Store Google Sites Template (Ecommerce)
Ready to launch your online store and need a conversion-focused website? Get our stunning and responsive customizable Google Sites Ecommerce template and start selling online! *Claim 15% off each template at checkout: 15OFFGSITES
Steps for Adding a Contact Form to Google Sites
This Google Sites tutorial will teach you how to add a contact form on Google Sites through Google Forms.
And the best part? It’s all free!
1. Get Started with Google Sites

To follow this Google booking form tutorial, you’ll first need a Google Sites website.
Don’t have one? Watch how to create any kind of website with this tutorial!
Read more: Google Sites 101: The Ultimate Guide for 2023 (Tips & Hacks)
Next, we’ll explain how to embed a contact form on Google Sites.
- Head over to the Contact Us page on your website.
- Now, click on ‘Insert’ (refer to the screengrab).
- Locate and select ‘Forms’.
Stew’s #1 Recommended eBook for every small business owner.

Go Digital Now - The ULTIMATE Small Business Playbook
The one book that every small business owner must own… Actionable ebook to launch, navigate and transform your small business online so that you can absolutely THRIVE in a digital world!
2. Create a Contact Form with Google Forms

- Visit your Google Drive
- Click on New > Google Forms

- Name your Google Form. For this Google Sites tutorial, we’ll name it ‘Contact Us’
- Add a form description (check the screengrab)
- Hit the ‘+’ icon on the right-hand side
- Choose the type of answers. We currently have ‘Multiple choice’ selected. We’ll change it to ‘Short answer’
- In the first field, type in ‘Name’. Turn on ‘Required’ if you want the answer mandatorily
- Duplicate the field and rename it ‘Email’. Keep ‘Required’ turned on
- Duplicate the field again and rename it ‘Phone number’. We won’t turn on ‘Required’ for this field
- Now, tap the ‘+’ sign again
- Select ‘Paragraph’ this time
- Type in ‘Message’ in the field. We won’t turn on ‘Required’ for this field either
- Remove any other default question from your Google Sites booking form

We now have a total of four fields on our Google Sites Contact Form.
Using this form, visitors can enter their name and email as well as leave their phone number or a message if they like.
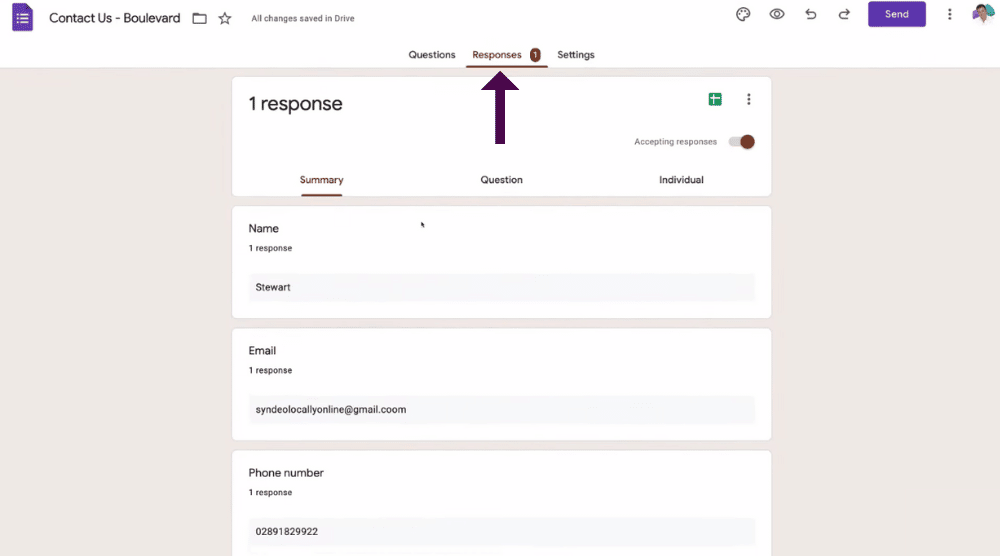
Now head over to ‘Responses’ and ensure that you have ‘Accepting responses’ turned on.
You can also create a spreadsheet and collect all your responses within it.
If you’re using a customer relationship management (CRM) software and wish to email the responses instead, use Zapier to connect Google Forms with your CRM.
Check out my separate tutorial on how to link Zapier with HubSpot CRM
It covers:
- What is Zapier?
- How to use it?
- How to connect it with Google Forms?
- How to connect it with HubSpot?
So, if your business is already using HubSpot CRM, I can guarantee you’ll benefit from the above tutorial!

Now take these actions:
- Head over to ‘Settings’
- Tap on ‘Responses’
- Under ‘Requires Sign-in’, turn off the restriction (refer to the screengrab)
- Send a copy of responses to the responders if required

- Name the Google Sites Contact Form in the top-left corner so that you select the correct form while embedding it on your Google Sites website
- Customize the theme by tapping on the color pallet icon. For this Google Sites tutorial, we’ll add a header image. You can also change the font style & theme color
- Preview the contact form (located next to the color pallet icon)
- Notice that visitors have to sign in with their Google account. To remove it, head back to the form

- Tap on ‘Settings’
- Scroll down to ‘Presentation’
- Locate ‘Restrictions’
- Turn on ‘Disable auto-save for all respondents’
- Preview your form again.
And you’re now ready to learn how to embed your Google Sites contact form on your Google Sites website!
Read more: Create A FREE Online Store with Google Sites
3. Add a Contact Form to Google Sites

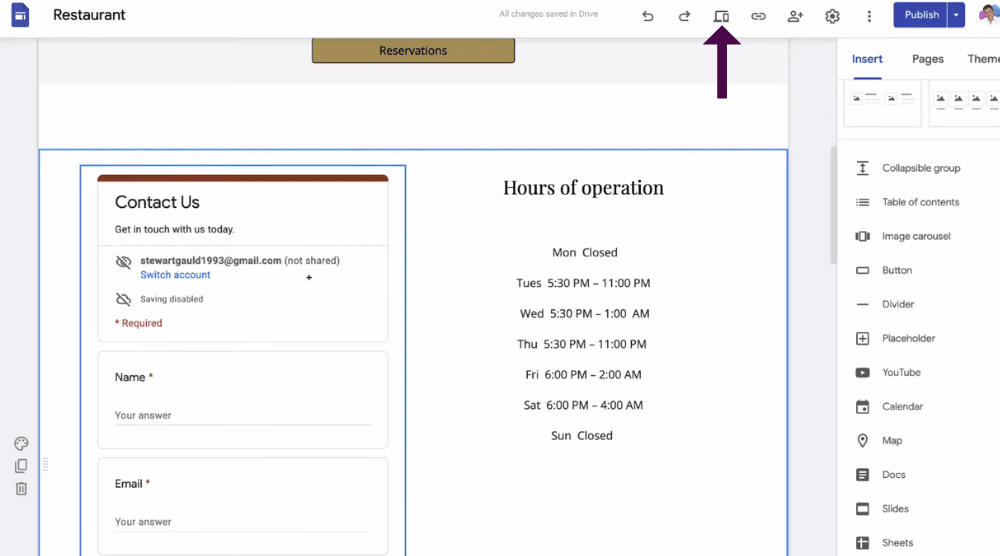
- Head back to your website
- Keep the contact page selected
- Select Insert > Forms

- Pick the newly created Google Sites contact form. If you can’t see the form, you might have created it under a different Google account.
- Find the location where you want to add the Google booking form
- Click on your form
- Hit ‘Insert’

- Drag and drop the Google Sites booking form to its appropriate location
- Preview your Contact Us page
- Exit the preview. Go ahead and fill out the form to make sure it’s working correctly
- Hit ‘Submit’

- Head back to your Google form
- Select ‘Responses’. You’ll find the response here
And that’s how you embed a contact form on Google Sites!
If you are interested you can also learn how to create and add booking forms to your Google site (3 methods).
Read More:
Google Sites Contact Form: Easy to Use! (Video Tutorial)
The importance of booking forms on websites cannot be overstated.
A contact form is a great way to connect with your website visitors and potential customers – it’s a simple but necessary way to get feedback and have a conversation.
Basically, without this form, you are missing out on a big opportunity to connect with your visitors!
Remember, the Google Sites contact form is easy to locate, easy to use, and ideal for creating a form on your Google Sites website.
Check out our easy-to-follow video guide below.
Frequently Asked Questions
Is The Google Contact Form Free?
Yes! Google Sites is a completely free website builder, including Google Forms.
Can You Add Google Forms To Your Google Site?
You can easily add a Google Contact Form to your website, as well as a Google Doc, Slide, Sheet, or Chart.
Where Should You Put Your Google Form?
It’s important to think about where you’re placing your Google Form. Make sure it’s easy to find.
I recommend placing your form close to your homepage’s main menu or footer.


4 comments
Thank you SO much for these clear, helpful steps, which worked seamlessly!
You are more than welcome 🙂
Thank you so much, very helpful
You’re very welcome Irene.