Table of Contents
What Is 1Password?
Are you tired of creating and managing multiple passwords?
1Password is one of the best password managers to store all your sensitive information.
We all have unique passwords for everything!
Websites, accounts, mobile access, computer access and more.
I can guarantee that you have forgotten your passwords on more than one occasion.
What if you could safely manage ALL your passwords and other sensitive information in one convenient place?
Never forget a password again.
In this easy-to-follow guide, you’ll learn how to use 1Password to safely store and manage all your sensitive information, passwords, documents, and more.
Why Do You Need 1Password?
Cybersecurity is a key concern for both individuals and businesses.
Since the pandemic began, cyber crimes have increased by a whopping 600% as reported by PurpleSec.
And according to Cybint, nearly 43% of cyber-attacks are targeted at small businesses.
Password managers like 1Password help you:
- Structure your personal and business online security
- Safely store all your sensitive information like accounts, passwords, and more – all in one place
- Track breaches and other security issues
How to use 1Password?
Therefore, this 1Password tutorial for beginners will help you optimize your online security.
1. Get Started with 1Password

For this tutorial, we’ll use the web version of 1Password.
However, there are three more versions available:
- Desktop application
- Browser extension
- Mobile apps (both iOS and Android)
Whichever version of 1Password you decide to install, the features and user interface will remain the same.
To get started with the web version, type in 1password.com in your browser or visit their website here.
You’ll arrive at 1Password’s homepage.
2. Check Out the Pricing Options

- On the homepage, select ‘Pricing’
- Notice that 1Password does not offer a completely free plan
But for this 1Password tutorial, we’ll sign up for the 14-day free trial instead.
You can do so for both Personal & Family and Team & Business plans.
The table below shows the key differences between both plans:
| Personal & Family | Team & Business |
| Starts at $2.99 per month | Starts at $7.99 per month per user |
| Single-user access | Multi-user access |
| Ideal for individuals (subscribe to 1Password Families at $4.99 a month to share with a family of five) | Ideal for businesses (small businesses can opt for Starter Pack at $19.95 a month designed for up to 10 users) |
If you have a small team of up to 10 members, a flat fee of $19.95 a month is a great deal.
You can protect your entire organization by securing passwords, accounts, client information, licenses, agreements, and other sensitive information.
Refer to the screengrab to learn more about each plan.
To explain how to use 1password, we’ll choose the Personal & Family plan (also ideal for small businesses).

- Click on ‘Personal & Family’
- Hover over to the first plan which is meant for personal use
- Select ‘Try FREE for 14 days’
This plan is perfect for freelancers and even small business owners.
In the latter scenario, you can appoint one person to manage all the sensitive information.
That said, you can go for the most appropriate plan for your family or business requirements.
3. Complete the 1Password Sign-up

Next in our 1Password tutorial, we’ll create an account.
- Enter your name
- Type in your email
- Hit ‘Create Account’
- Locate a six-digit verification code in your inbox
- Copy the code and add it under ‘Enter code’
- Hit ‘Next’
4. Add Your Master Password

As mentioned, 1Password is one of the best password managers to store all your sensitive information. And you need just one master password.
- Go ahead and enter your master password (at least 10 characters)
- Click ‘Next’
- Add your card details for payments after the free trial
- Alternatively, you can choose ‘Create Account and add card later’. We’ll opt for this as this is just an example account.
- Notice the plan details below
5. Download the Emergency Kit (Secret Key)

If you lose your password and cannot access your account or you need to recover your account because of any other reason, you’ll need the secret key.
This is a secret code given by 1Password that only you will know.
Go ahead and download your emergency kit that contains the secret key.
We suggest making a PDF printout of the emergency kit and storing it someplace safe.
6. Explore Profile Settings

After downloading the emergency kit, you’ll arrive inside your 1Password account.
- Click on your profile (top-right corner)
- Select ‘My Profile’
- Notice your email and secret key (hidden). Do not show your secret key (in the PDF) to anyone.
Now in this 1Password tutorial, we’ll show you how to add an extra level of security to your account via two-factor authentication.
7. Activate Two-Factor Authentication

- Click on ‘More Actions’ (see left)
- Choose ‘Manage Two-Factor Authentication’ from the drop-down
- Tap on the ‘Set Up App’ button
- Install an authenticator app as directed by 1Password. When you scan the QR code, it will be saved to the authenticator app.
- Alternatively, you can insert the key manually.
- Hit ‘Next’
- Copy a six-digit authentication code from the authenticator app.
- Enter the code and hit ‘Confirm’
- Click on ‘Done’
You’ve successfully activated two-factor authentication for 1Password.
Head back to your account dashboard.
8. Create Vaults

It’s time to store passwords, documents, and other sensitive information on the best password manager app by using vaults.
To do that:
- Click on ‘New Vault’. Consider each vault a private location to store your confidential information. You can create separate vaults for passwords, accounts, contracts, etc.
- Name your vault – Passwords, for example
- Add a description (optional)
- Choose a different icon if you like
- Hit ‘Create Vault’

- Select ‘View Vault’
- Click on the drop-down at the top. From the given options, you can view all the vaults or individual vaults you’ve created.
- Notice the options on your left: All Items and Favorites. There is obviously nothing here because this is just an example account.

On the left-hand-side menu, we have ‘Watchtower’ below Favorites.
This is where you’ll find compromised websites, reused passwords, weak passwords, unsecured websites, and two-factor authentication.
To identify the vulnerable passwords, for instance, navigate over to the right-hand side and select ‘Check now’.
10. Manage Categories & Items

In this step of our 1Password tutorial, we’ll introduce you to categories. This is where you can manage all your different items within categories.
- Navigate over to ‘All Items’
- Click on it
- Tap on the ‘+’ button (check the screengrab)
- Pick ‘Password’ from the options
Let’s say that you want to save login details for a website.
This could be a site that you log into every day.
By storing the password here, your login credentials will be auto-filled every single time.

So, go ahead and:
- Name your password. For this 1Password tutorial, we’re going to add our own website name – Syndeo Media.
- Enter your password and website URL
- Head over to ‘label’ and rename it as ‘Username’. Next to that, enter your username.
- Add additional labels, notes, tags, etc. (optional)
- Hit ‘Save’ (bottom-right-hand corner)

You’ll see the newly created password in ‘All Items’.
Apart from that, a new category called ‘Passwords’ has been added to the menu.
You can edit the item anytime you want by clicking ‘Edit’ in the bottom-right corner.
And by using the same process ny clicking “+” , you can add more passwords to this vault.
What if you want a separate vault for your credit card information?
Here’s what you’d need to do:

- Head back to the 1Password dashboard
- Click on ‘New Vault’
- Name the vault – Credit Cards (Personal)
- Add details about this vault under ‘Description’
- Change the icon
- Hit ‘Create Vault’ and then ‘View Vault’
Now, if you tap the drop-down above, you’ll find three vaults:

- Personal (this is a default one)
- Passwords
- Credit Cards (Personal)
Within the credit card vault:

- Tap on the ‘+’ button
- Choose ‘Credit Card’ this time
- Add your credit card details
- Hit ‘Save’
Similarly, you can create another vault for Credit Cards (Business).
Now that you understand how to store and manage sensitive information within 1Password, we’ll cover the chrome extension in the next step.
11. 1Password Chrome Extension

Now, we’ll explain how to use 1Password to auto-fill information to save time when login into websites/accounts.
- Head over to chrome.google.com/webstore
- Type in ‘1Password’ in the search bar
- Click on the 1Password extension (the one with over two million active users)
- Hit ‘Add to Chrome’
- Select ‘Add extension’
- Click ‘Sign In’

- Choose your account
- Enter your password
- Click ‘Sign In’
- Enter the two-factor authentication code
- Hit ‘Confirm’
The 1Password chrome extension has been successfully installed!

Now, we’ll head over to Syndeo Media – the website for which we stored the credentials in the best password manager.
Notice that if you click on the username field, the chrome extension will suggest the Syndeo Media login credentials.
Click on it and the details (username and password) will be automatically filled. You can then select ‘Log In’.
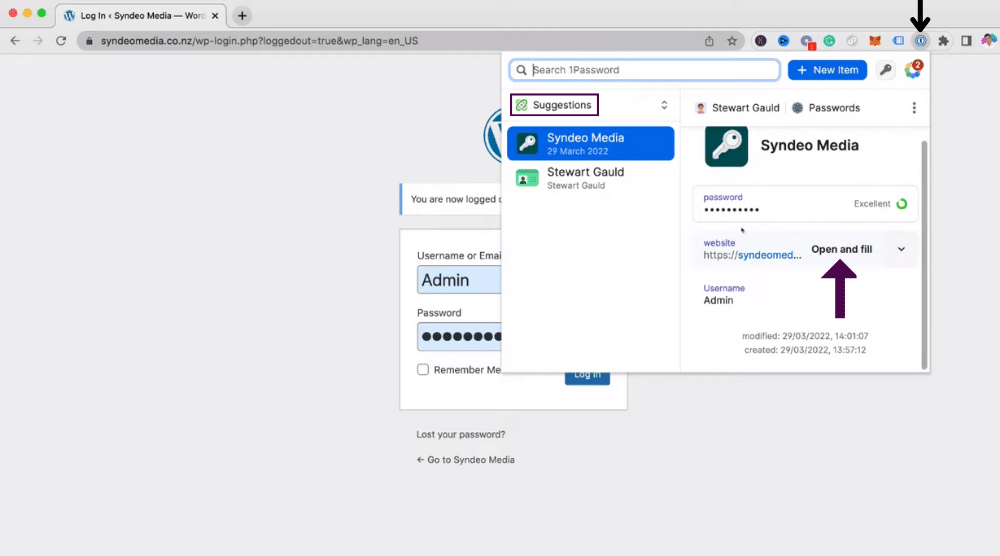

In case the information does not autofill, you can take the following actions:
- Click on the extension
- Under ‘Suggestions’, ensure that the website is selected.
- Copy the password and username from here
There is a third way which includes the following steps:
- Click on the extension
- Ensure that your website is selected
- Head over to the URL
- Click on ‘Open and fill’
This will open a new tab and your login credentials will be automatically filled.
When you log in the first time, 1Password will remember the information for the next time.
Also read: How to use Toggl Track
More Software Reviews: How to use WooCommerce
Top 5 Ways to Create Business Videos
1Password Tutorial for Beginners (Video Guide)
1Password is one of the best password managers.
You can safely store all kinds of confidential information like passwords, credit card information, licenses, agreements, etc.
And you’d just need to remember only one master password.
In case you lose it, you have a secret key provided by 1Password in the PDF form that only you have access to.
Use that key to restore access to your 1Password account.
Features like two-factor authentication and an emergency kit make it a highly secure and reliable password manager.
Apart from that, 1Password saves you a great deal of time by auto-filling the information (login details, credit card details during checkout, etc.)
Check out our full video guide below to help you get started with 1Password.

5 comments
Hello! I’ve been reading your site for a long time now and finally got the bravery to go ahead and give you a shout out from Dallas Texas! Just wanted to say keep up the fantastic job!
This information is invaluable. How can I find out more?
Hey Bobbye,
Make sure your watch our video!
Keep this going please, great job!
Thanks!