Are you in need of a create a free website with canva for your small business but don’t know where to start?
Well, you’re in luck!
In this tutorial, we are going to show you how to create a free website for your business using one of our favorite online tools, Canva.
You may have already heard of Canva.
Canva is an impressive, powerful, and free graphic design tool that allows anyone to easily create any type of design that you can imagine!
In addition to all of this, did you know that you can now create a professional, functional, and free Canva website in minutes?
Canva actually allows you to take all your designs, then transform these designs into a visually stunning website!
Essentially, Canva is a completely free all-in-one graphic design tool that allows anyone to simply create any type of graphic that they can think of.
You can create graphics and designs from logos, social media posts, presentations, marketing materials, newsletters and more.
However, in this Canva website guide, our focus is to share how to create a free website with your Canva designs in just a few minutes.
Read more: Top 10 website builders for Small Businesses.
How To Create a Free Website With Canva?
Let’s go ahead and convert your designs into a fully functional free Canva website!
1. Getting Started With Canva

Get started with Canva for FREE here
*The link above is an affiliate link, which means we will get a commission if you upgrade to a paid plan (with no extra cost to you). This helps support our education-based website and we thank you in advance!
Firstly, you’ll need to log in to your account to access the free Canva website feature.
If you currently do not have a Canva account:
- Simply click here
That’s going to take you to Canva.
Go ahead and sign up for free and we’ll meet you inside your Canva account.
If you’re completely new to Canva, you can watch our complete Canva beginners guide here to help you get started!
2. Canva Website Templates

Once you’ve signed up and signed into your Canva account, you’ll arrive on your Canva homepage.
Again, we want to focus on showing you how to create a free website with Canva for your business.
Canva offers a variety of website templates to use when creating your website. To locate these:
- Simply navigate up to the search bar and type in ‘Website’.
- Navigate down and click on ‘Website’.
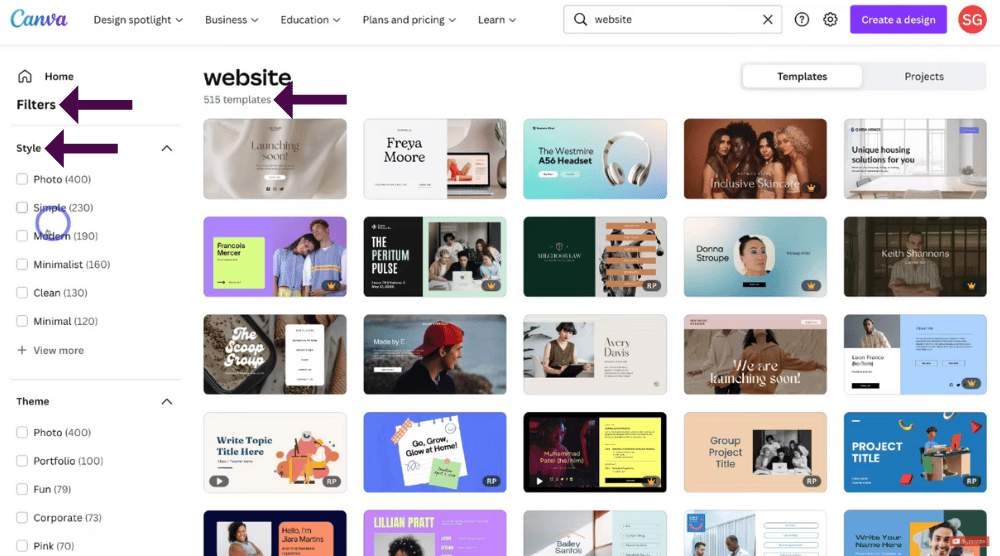
Canva will then generate over 500 premade website templates that you can choose from and customize the way that you like!
These website templates are organized into categories for your convenience.
You can filter these templates and then pick one for your brand.
- Navigate over to the left-hand sidebar.
- Under ‘Filters’ you have ‘Style’.
This is where you can filter through the premade website templates based on the style that you like.
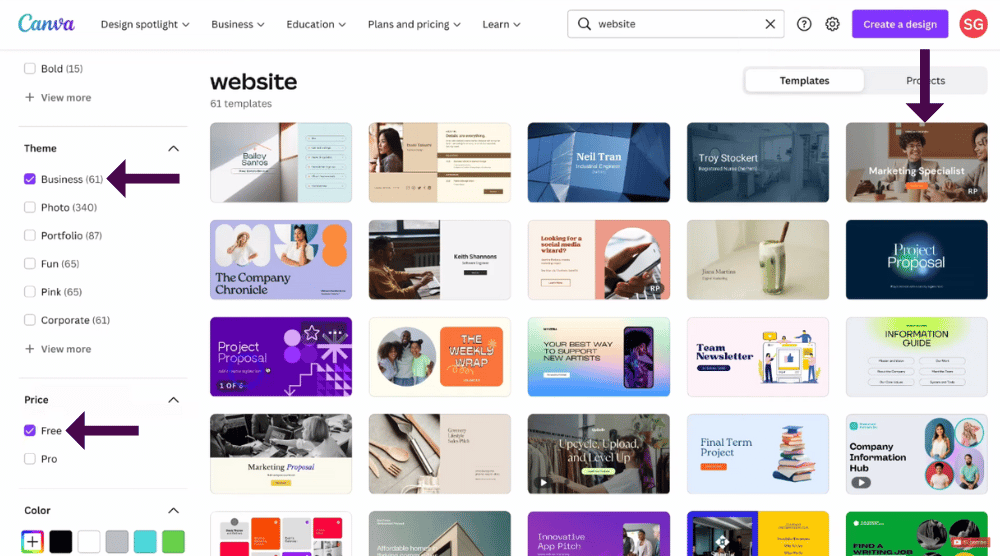
- Navigate down further and choose from a specific template ‘Theme’.
- Click on ‘View more’ under ‘Themes’ to view all the different types of pre-made website themes
We’re going to go ahead and select ‘Business’ because we want to create a website for our small business.
However, you can choose any of the styles or themes.
Once you’ve chosen your theme:
- Navigate down and click on ‘Free’.
As we are just focusing on showing you how to create a free website with Canva in this tutorial, this will ensure that you are only choosing from free premade website templates.
- Simply look through all the different pre-made website templates that Canva has generated.
It’s important to note that when you hover over some templates, you’ll see ‘This template contains paid elements’ pop-up.
This means that some of the templates have paid elements.
You can choose to delete those elements, or you can pay for those elements.
So within Canva, you have access to paid elements and templates as well as free elements and templates.
Again, as we are focusing on creating a free Canva website, you want to make sure you delete any paid elements from your chosen template.
We like the look of this pre-made template up here because we want to create a website for a digital marketing agency, so we’ll select this template.
Select a template you like the look of.
Once you’ve selected your chosen template, it will generate the pre-made template that you selected.
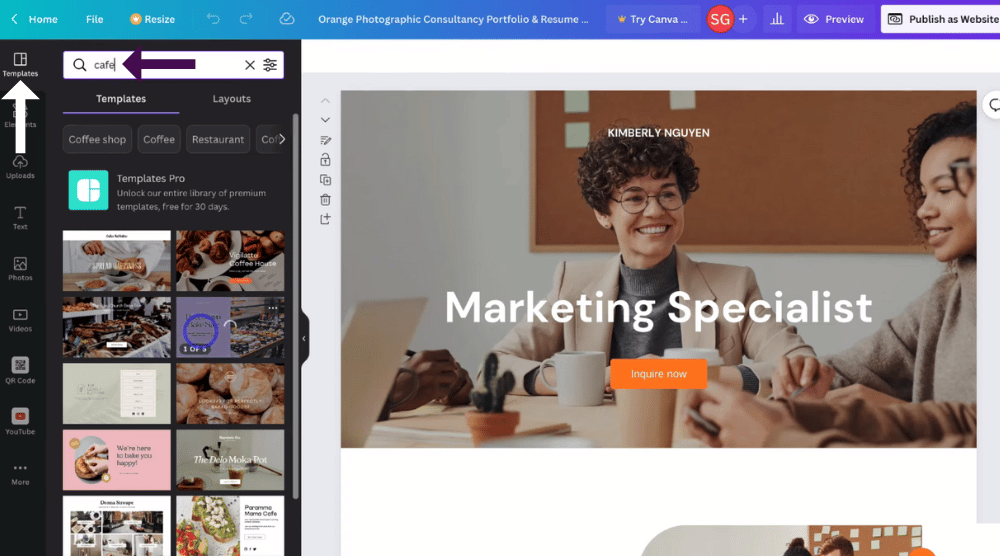
If you’re not quite happy with your chosen pre-made template after Canva generates this for you, follow these steps:
- Navigate over to the left-hand sidebar to your search bar next to ‘Templates’.
- Search for a specific template type based on the type of website that you want to create.
For example, if you type in ‘Cafe’, Canva will generate cafe website templates that you can choose from.
For the purpose of this Canva website guide, we’re creating a digital media and marketing agency website, so we’re happy with this marketing specialist website template.
3. Preview the Canva Template (Before Changes)

Before you start customizing your website template, you can preview what the website template will look like.
- Navigate up to ‘Preview’ in the upper right-hand side of the screen.
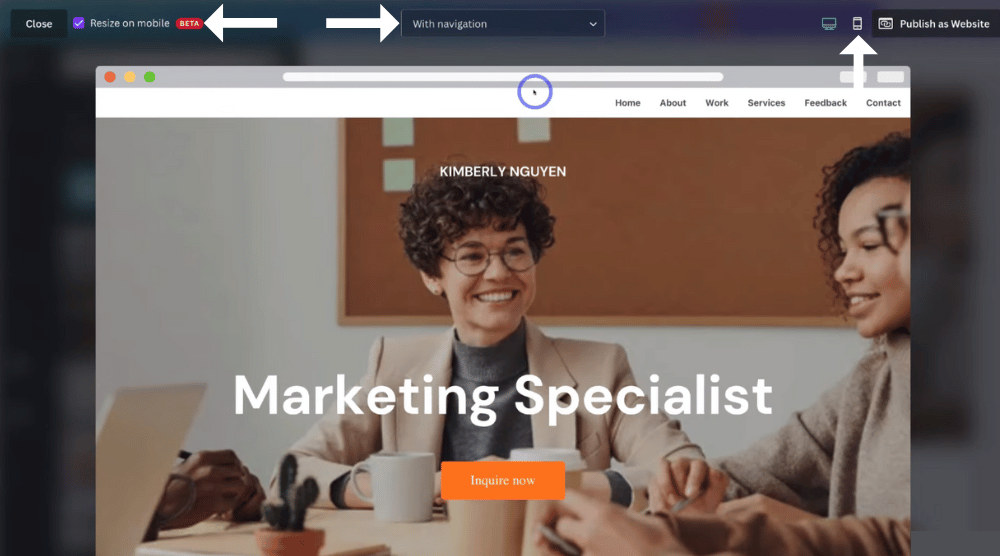
This is where you can preview what the website template will look like for your visitors online.
- Click on ‘Without navigation’.
- Select ‘With navigation’.
This is important, as it’s going to allow your website visitors to easily navigate through each of the different sections of your website.
As you can see, this is a single-page website.
Single-page websites are ideal for small businesses that want to enhance user navigation.
Your website visitors can simply scroll through each of the different sections on your website, or they can click on the navigation items in your primary menu
- Navigate over to the left-hand side.
- Make sure ‘Resize on mobile’ is selected.
When this is selected, Canva will automatically ensure that your website is responsive across mobile devices.
Once you’ve selected this:
- Click on the Mobile icon in the upper right-hand side of the screen to preview what your website will look like on mobile devices.
We recommend taking the time to preview what your website will look like across desktop and mobile.
Once you’ve done this:
- Navigate up to ‘Close’.
Once you’ve finished customizing your website, you can go ahead and preview your website one last time using the same process before publishing your website online.
4. Change Brand Kit Colors

The first thing you want to do when customizing your website template is to change the overall brand colors of your website.
- Simply click on any of the elements.
For example, we’re going to click on this orange header on our website
- Navigate up to the text color
This will then bring up a new left-hand sidebar for your colors.
- Navigate over to this left-hand side to ‘Document colors’.
These are the colors that currently make up your website.
You can actually create your own brand colors for your website by following these steps:
- Come down and click on ‘+ Add your brand colors in brand kit’.
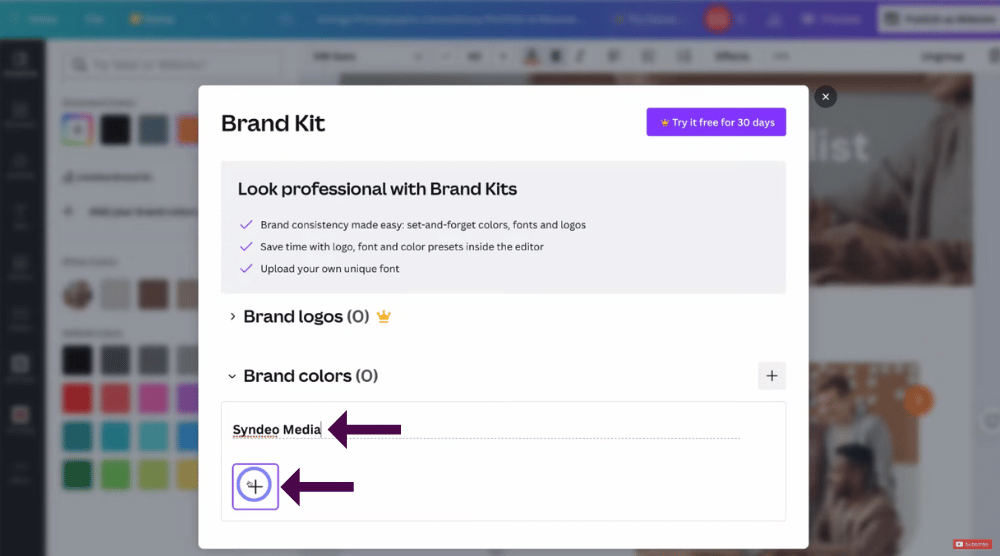
This will allow you to easily change the global colors of your website.
- Navigate down to ‘Color palette’.
For the purpose of this tutorial, we’re creating a website for ‘Syndeo media’, which is a digital media and marketing agency.
We’re going to change ‘Color palette’ to ‘Syndeo media’.
Once you’ve named your new color brand kit:
- Come down and click ‘+’ to add a new color.
It’s important to note that with Canva you can add up to three brand kit colors completely for free!
However, if you want to add additional colors (more than three) to your brand kit, you’ll need to upgrade to the paid plan.
We’re going to quickly go ahead and add three colors based on our brand.
Once you’re happy with your three colors:
- Simply navigate up to ‘Exit’.
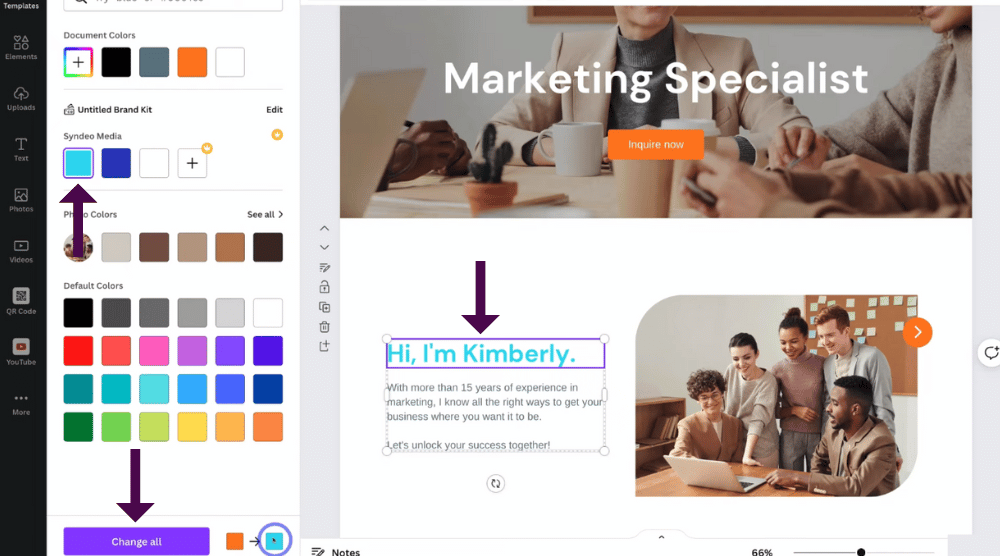
Now you can change your colors on your website.
For example, we’re going to change all the orange text within our website template to this blue color over here
- Simply click on the new color over on the left-hand sidebar that you want to change the current color too. For us, the Blue color.
- Navigate down and click on ‘Change all’.
For us, that’s going to change all the orange text elements to our chosen blue color.
Now if we navigate through our website, you’ll notice that all our text headers are this blue color.
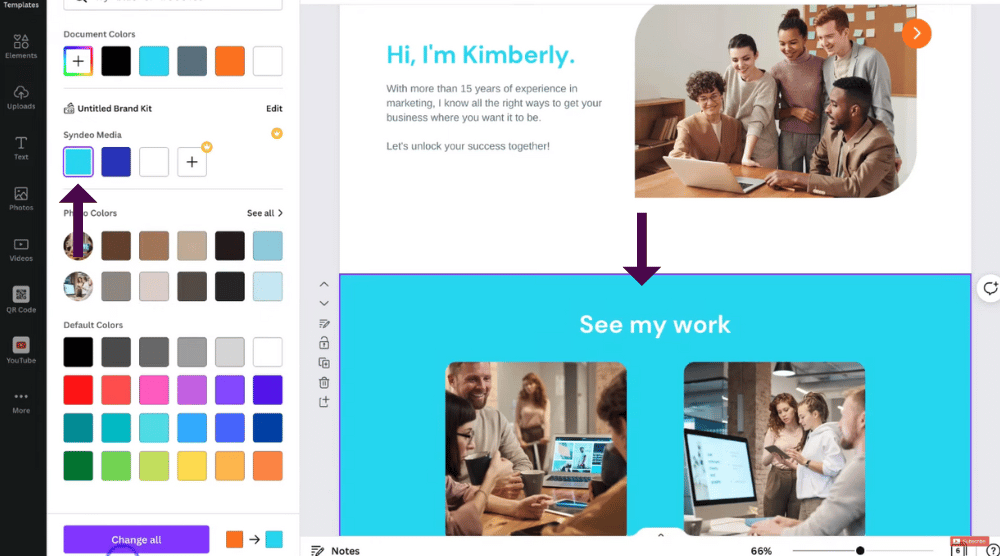
Now let’s change our orange background, as well as our other orange elements.
- Simply click on the background.
- Navigate up to the orange color icon i.e A on at the top.
- Change the background color to our chosen blue color.
- Come down and click ‘Change all’.
Now all the elements within our website are this blue color!
You can now go ahead and change all your website colors the way you want using this simple process.
5. How To Customize Canva Website Template

The next step is to actually customize each of your website pages and add your own content.
To do that, let’s start at the top of the website page:
- Click on any of the elements that you want to customize.
For example, we’re going to click on this text element i.e Kimberly Nguyen, and change this to our business name which is ‘Syndeo media’
You’ll notice you have these formatting icon options up above that you can change.
- Font.
- Size of the font.
- Color.
- Bold.
- Italic.
- Alignment.
- Effects (to change the text effects).
Let’s go ahead and change our text element to our business name ‘Syndeo media’.
- Simply click on this text element and add your business name.
Now we’ll go and change the size of this text element:
- Click the size icon, or
- Simply drag out the edges of the element.
Additionally, you can:
- Click on the element and drag the element to any destination on your page.
Go ahead and play around with these formatting options and the location of all your text elements.
We’re also going to go ahead and change the name of another element i.e Marketing Specialist to ‘Digital marketing and media’
We’re now happy with this text element.
6. Add Internal Links (Internal Navigation)

Now we’re going to show you how to add internal links to your website.
We will continue with our chosen website and use our ‘Inquire now’ button as an example.
We want to make sure that this button sends the visitor who clicks on this button to a specific destination on our website.
To do this, we will:
- Navigate down and click on our ‘Inquire now’ button.
We’re going to change this button to ‘Strategy session’.
- Drag out the sides to make sure that the text fits inside the button.
- Move our button so that it’s centered.
To link the button:
- Make sure that you have the button selected.
- Navigate up to and click on these three dots
- Come down and click on the ‘Link’ icon.
Here you have the option to link an external link in the search bar.
This means you can send your website visitors to an external link when they click on this button.
Alternatively, you can link a page within your website.
Let’s say that you want people to be sent to the ‘Contact’ page.
- Go ahead and simply click ‘Contact page’.
That’s going to link this button to the contact section of your website.
Once you’re happy with adding any internal links to your buttons:
- Click ‘Done’.
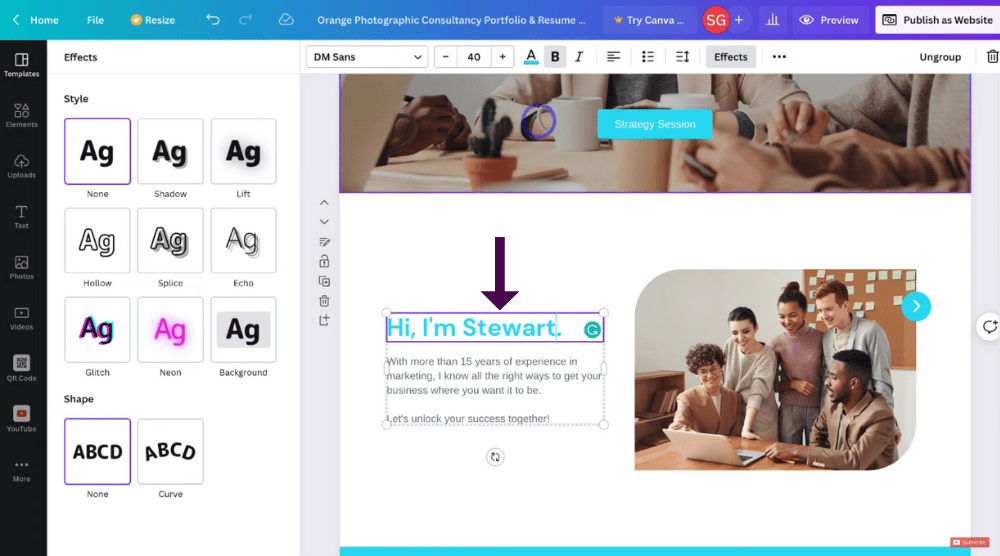
You can then continue navigating down your page and customize each of these different elements.
For example, we’re going to change ‘Kimberly’ to ‘Stewart’
Remember you can customize each of your text elements using the formatting options up above that we mentioned earlier.
You can fully customize all your elements using the process we just explained, which is again:
- Navigate through each of your website pages.
- Click on all the different elements.
- Replace the default text with your own text.
Read more: How to make a logo for free using Canva.
7. Replace Images
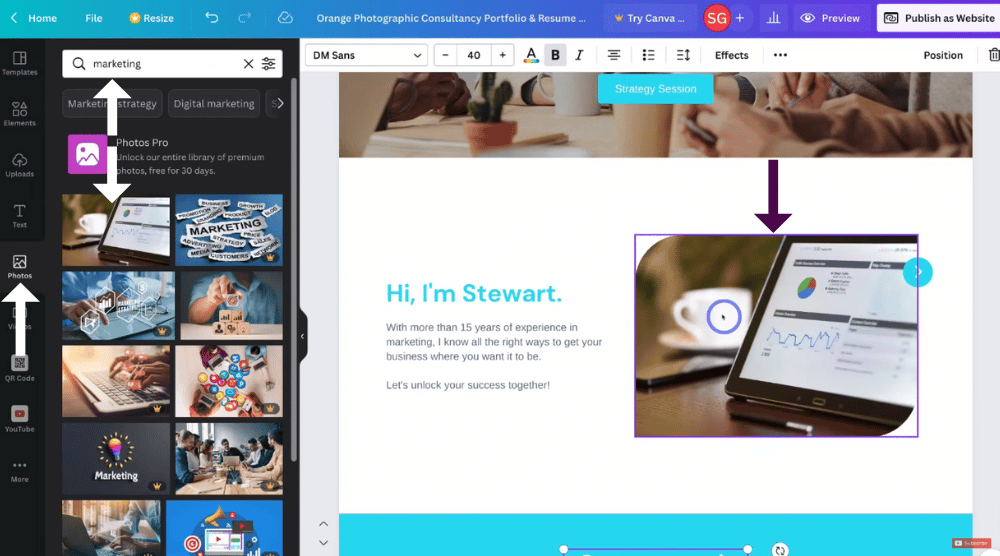
You can additionally replace the template images within your website template.
For example, let’s go ahead and replace this image
To do this:
- Navigate over to the left-hand sidebar.
- Click on ‘Photos’.
If you can’t see ‘Photos’ on the left-hand side:
- Simply navigate down to and click on ‘More’.
- Locate and click on ‘Photos’.
- Type in a keyword related to the type of photo that you want to find in the photo ‘Search bar’.
We’re going to add ‘Marketing’.
Canva will then generate photos related to the keyword you typed in.
You’ll notice that each of these images, they are either free or paid.
If an image has a crown icon on the preview of the image, that means it’s a paid element or paid image.
This means you will need to pay for that image if you want to use it.
If you’ve upgraded to Canva pro, then you can use any of these paid elements!
We’re going to use this free image.
- Click on the image.
- Drag and drop the image to replace one of the default images on your website.
Take your time to navigate through each of your website pages to simply replace the default content.
Again, you can do that by:
- Click on an element or image and replace the existing image.
You can also upload your own images or videos to add to your website.
- Navigate over to ‘Uploads’ and choose an image or video you want to upload.
8. Add Elements To Your Free Canva Website

This is the same process for your elements:
- Click on ‘Elements’ over on the left-hand sidebar.
- Type in a keyword for example, ‘Marketing’.
You can see that Canva will generate elements or images in relation to the keyword that you added
- Simply click an element you like.
That’s going to add that element to your pages.
Again, you can play around with the formatting options
To delete an image or icon:
- Select the images that you want to delete.
- Click ‘Delete’.
- You can then add a new image or element to replace the default images and elements on your website.
9. Embed a Youtube Video Into Canva

Additionally, you can add a Youtube video onto your website.
- Navigate over to the left-hand side to ‘Youtube’.
- Search for the Youtube video that you want on your website.
If you can’t see Youtube:
- Simply come down and click on ‘More’.
- Locate and click on the ‘Youtube’ icon.
- Search for the Youtube video that you want to embed in the search bar. For us, ‘Syndeo Media’
Here is the Youtube video that we want to embed on our website page
To embed a Youtube video:
- Simply click the video and drag it onto your website page or
- Click on the video.
That’s going to add the Youtube video to your page.
Once the video is on your website page:
- Go ahead and resize your video element if you like.
We’re now happy with that.
Now when website visitors arrive on this section of our website, they can watch this Youtube video.
This video could be about the consultation that we offer.
Let’s continue with this tutorial on how to create a free website with Canva.
10. How To Add Videos In Canva

Let’s say you wanted to replace your default images with videos. What you can do is:
- Either upload your own videos by clicking ‘Upload’ in the left-hand sidebar, or
- Navigate down to ‘Videos’.
- Type in a keyword.
We’re going to type in ‘Advertising’.
This will then bring up relevant videos to that keyword.
- Navigate down and select any video you like the look of
Remember, some of these are paid videos and then some of them are free.
- Click on the image of the video that you like.
- Drag and drop the video onto the default image to replace the default media with this video.
Once you’ve dropped the video on your website:
- Double-click on the video to change the positioning of the video (if you like).
Remember, Canva works by dragging and dropping the different elements from the left-hand side onto your website.
It’s that easy!
Read more: How to make video ads with Canva
11. Add External Links (Other Online Destinations)

Let’s now link one of our buttons to an external booking form.
- Select the button you want to link to an external link. For us, ‘Book a consultation’
- Navigate up to and click on these three dots
- Click on the ‘Link’ icon.
- Type in or paste in the link you want to add to your button
For example, you could create a form using Google forms completely for free.
If you’re interested in learning how to create a Google form for free, click here.
This will take you through the process of creating a Google form so that you can capture specific information from your website visitors.
However, let’s continue with our Canva website guide below
Additionally, you can add an external booking page
For example, we could use Calendly to create a form that our website visitors can use to book a strategy session with us.
You can Read our beginner’s guide on How to use Calendly.
These are just examples of linking to an external destination.
Because this button is a ‘Book a consultation’ button, we’re going to link to our ‘Calendly strategy session’ and then press ‘Enter’.
And just like that, the link has been added!
Now we’re just going to remove the underline of our button ‘Book a consultation’ that we just changed.
- Navigate back up to your formatting options and click on the ‘Underline’ icon to remove the underline.
Again, take the time to customize this information and add your own contact information.
Read more: How To Add a Contact Form on Google Sites
12. Add Free Canva Website Pages

You can also add additional pages to your website for free by following these easy steps:
- Navigate down the bottom.
- Click ‘Add page’.
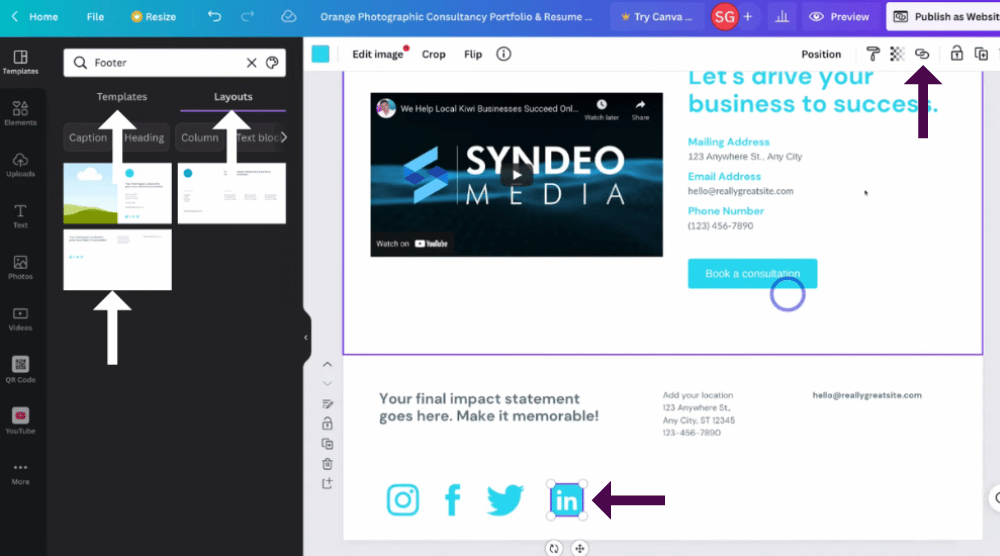
- Scroll up to ‘Templates’ on the left-hand sidebar.
- Click on ‘Layouts’.
Canva will generate specific layouts that you can add to your website page
- Navigate up to just below ‘Layouts’.
- Scroll across all the different elements.
For example Map, contact, footer, mock-up, agenda and article .
We’re going to navigate across and click ‘Footer’ to add a footer.
We like the look of this footer down here, so we’re going to go ahead and add that one
This footer has a lot of white space down the bottom
To get rid of this and to make the page smaller:
- Simply drag the bottom and resize it to your liking.
We’re happy with that sizing for our footer
We can also resize the elements on our new footer.
- Highlight all the elements you want to resize. For ex, Social media accounts.
- Simply drag them out to make them bigger or smaller.
Next, we’ll link each of these elements to our social media, as they are social media icons.
- Simply click on the element. For ex, Linkedin
- Navigate up to the ‘Link’ icon.
- Add your profile to each of the social media accounts using the same process as we did with external links earlier.
It’s as simple as that to link your social media!
We also want to move our ‘Email address’ element to a different place on our footer.
- Click on the email address icon. For example, hello@reallygreatsite.com
- Drag and place as your liking
13. Add Google Maps To Canva

Next, follow these steps below to add a map to your website so people know where to find your business:
- Navigate over to ‘More’ on the left-hand sidebar.
- Select ‘Google maps’.
- Type in your business destination in the search bar. For us, ‘Syndeo media’
For the purpose of this tutorial, we’ll go ahead and click this map and add this map.
As you can see, that’s going to add the map to this specific destination.
This is just a random map that we have added, however, what you want to do is make sure that you find your business map and embed that into your website.
Now we have our business address and then we have the map over here
We’re now happy with our footer!
Again, you can come down and add additional website pages if you like, however, we’re happy with the new website that we just created.
Remember, it’s as simple as that to customize premade website templates by simply clicking on each of the elements and replacing the default media or text with your own content.
14. Canva Grid View

Grid view allows you to view your entire website in a ‘Grid view’
To enable grid view, follow these steps:
- Navigate down to the very bottom right-hand side of the screen.
- Click on ‘Grid view’.
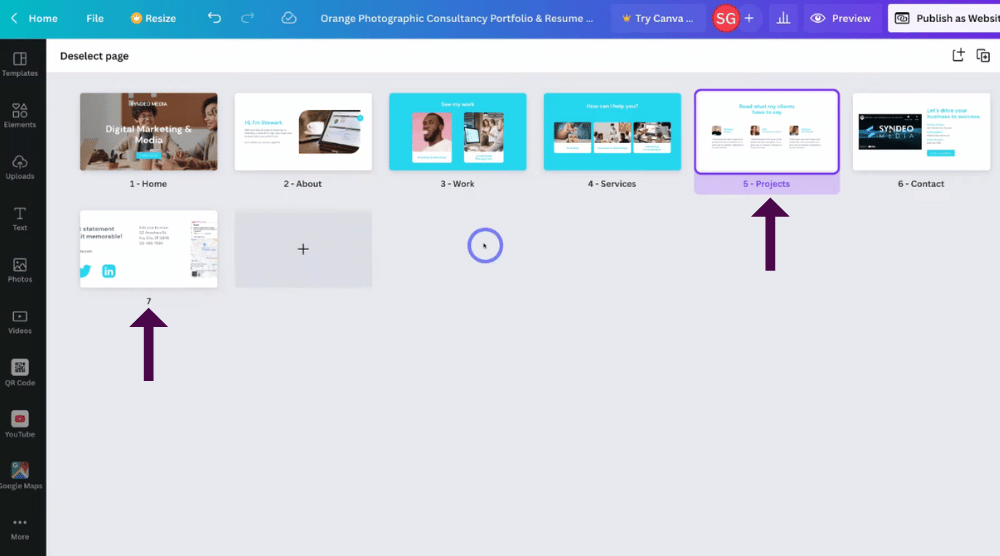
Our website shows, home, about, work, services, feedback, contact, and then a seventh page (which is our footer).
Yours will show all of your premade website pages, as well as the pages you added.
If we want to add the footer into our primary menu:
- Come down and select the footer page which has the title ‘7’.
- Add ‘Footer’.
However, because your footer does not appear in your primary menu, we’re going to leave that for now and simply change some of the names for these sections of our website.
- Navigate over to the page name that you want to change.
- Type in the new name.
For example, we’ll navigate over to ‘Feedback’ and replace it with ‘Projects’.
Now in our navigation, we’ll see projects rather than feedback.
We’re happy with all these other website pages.
You can simply go ahead and customize the names of each of your pages to reflect your business and brand.
This is where you come in if you want to rearrange each of the pages.
- Drag and drop the pages into a different order on your website.
Additionally, you can create a new page from here.
Once you’re happy with that:
- Navigate down and select ‘Close grid view’.
15. Preview (After Changes)

Before you go ahead and publish your new website, you should preview what your website will look like across all devices after you’ve made those customizations.
- Navigate up to ‘Preview’.
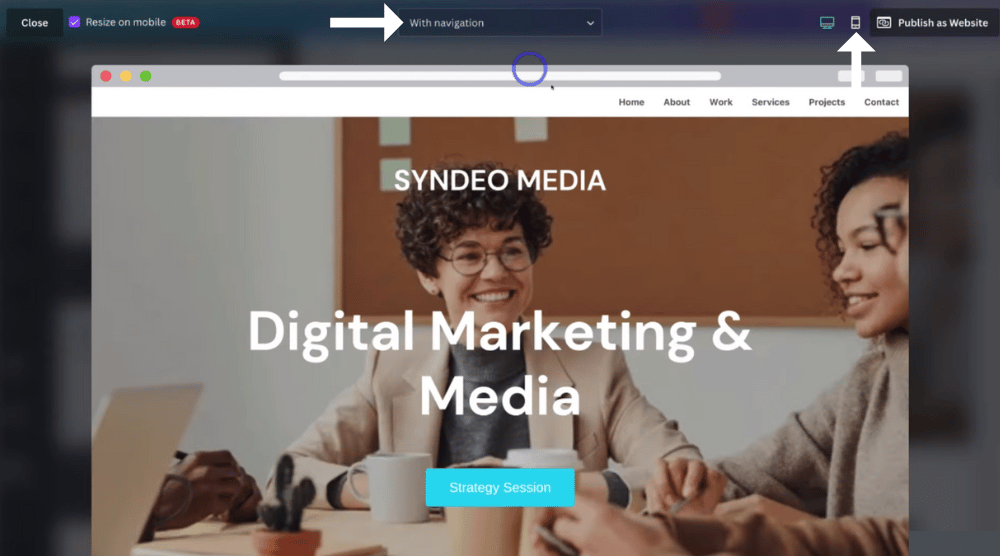
- Navigate up to ‘Without navigation’.
- Select ‘With navigation’.
As you can see, these are our navigation items: Home, About, Work, Services, Projects, and Contact
Again you want to preview your website on mobile to make sure that your website is responsive.
To do this:
- Click the ‘Mobile’ icon. (To view the website is responsive on mobile)
When you’re happy with your website:
- Simply click ‘Close’.
16. Publish Your Free Canva Website!

- Navigate over to ‘Publish as website’.
- Simply come down and make sure that you have ‘Resize on mobile’ selected.
- Click on ‘Without navigation’ and ensure that you have ‘With navigation’ selected
Remember, this is going to make it a lot easier for your website visitors to navigate through your website and find the information that they’re after.
With the free version of Canva, you can create up to five websites completely for free!
Additionally, you can choose to use a free domain.
You can purchase a new domain through Canva, or you can use an existing domain if you already own a professional domain name.
Watch: How to choose a domain name for your small business.
We’re going to select ‘ Free domain’ for now.
- Navigate down to continue.
You can see down here we’re using one premium image.
You’ll be asked to pay for that image if you’re using the free version of Canva.
If you’re using Canva pro, then you can use all the paid elements, videos, and photos within your website.
Because we’re using the free version, we want to delete this image, as we don’t want to pay for it.
- Find the image.
- Delete it.
We’ve now quickly gone ahead and removed that paid element, so now we can continue for free
- Click ‘Continue’.
17. Add Your Custom Canva Website URL

- Navigate up to your URL.
- Click the pencil icon.
- Add your business name or your website name.
For us, it’s ‘Syndeo media’.
- Come down to ‘Browser tab preview’.
- Click on the pencil icon.
We recommend adding your business and brand name again here, For us, it’s ‘Syndeo media’
18. Change Favicon

- Navigate next to the business name that you’ve just added.
- Here you have the option to change the website’s favicon Icon (see screengrab).
This is the little icon that appears in your browser.
You can change this by:
- Clicking on this icon.
- Select ‘Choose files’
- Press ‘Done’.
That’s going to replace the default Canva favicon with your own branded favicon. You can now see ours
- Come down and describe your website.
- Go ahead and add a brief description.
- Come down to ‘Permissions’.
This is where you have the option to tick ‘Enable password protection’.
This means no one can access your website unless they have the password to be able to access your website.
This is ideal if you have some form of paid community and you only want specific people to be able to access your website.
Below this, you can tick ‘Hide my website from search engines’.
However, because we want to create a public website that anyone can access, we’re going to disable both these options by keeping them unselected.
Once you’ve gone through all the permissions and are happy with them:
- Come down and click on ‘Publish’.
Give Canva a moment to create your new website.
Congratulations!
Just like that your new website is now live online for people to discover your brand and your business online!
- Simply click on ‘View website’.
19. Test Your New Free Canva Website Online!

And we’re almost at the end of this tutorial on how to create a free website with Canva!
All you need to do now is test your new website.
We’re happy with our new website (see screengrab).
We can also click on ‘Strategy session’ at the top
Scroll down to see we have a video over here that we can play,
If we navigate down further, we also have the Youtube video down that visitors can watch that we have added.
That’s going to take our visitors down here where they can then book a strategy consultation with us
If they click on ‘Book a consultation’, that’s going to take them to the Calendly form that we linked to that button
Let’s head back to our Canva website.
If we scroll down further, we have the footer that we added, as well as our social media icons and we also have this map that shows the direction of our business
And it’s as simple as that to create a responsive and functional free website with Canva for your business.
That brings us to the end of this brief tutorial on how to create a free website with Canva!
Create a Free Website With Canva (Video Tutorial)
If you’d like to know more, feel free to check out our detailed Canva website guide in the video below, where we discuss in depth how to create a free website with one of our favorite tools, Canva!

