Table of Contents
Every business needs a professional email address for its team members to know how to create free business email.
However, new businesses may not have the funds to invest in paid email service providers such as Google Workspace, Outlook for business, Yahoo and others.
If you’re in a similar situation, then worry not, we have you covered!
How to Create a free business email with Zoho Email ?
Today, we introduce a free business email provider called Zoho Mail.
With Zoho Mail, you can set up and create up to five professional business emails for free!
Hence, without further ado, let’s understand how you can leverage this free business email service.
1. Getting Started with Zoho Mail
Get started with Zoho Mail for FREE here
*The link above is an affiliate link, which means we will get a commission if you upgrade to a paid plan (with no extra cost to you). This helps support our education based website and we thank you in advance!
In this how to create free business email, Let’s get started with the first step of our Zoho Mail tutorial, simply head over to the Zoho website here official website if you haven’t done so already.
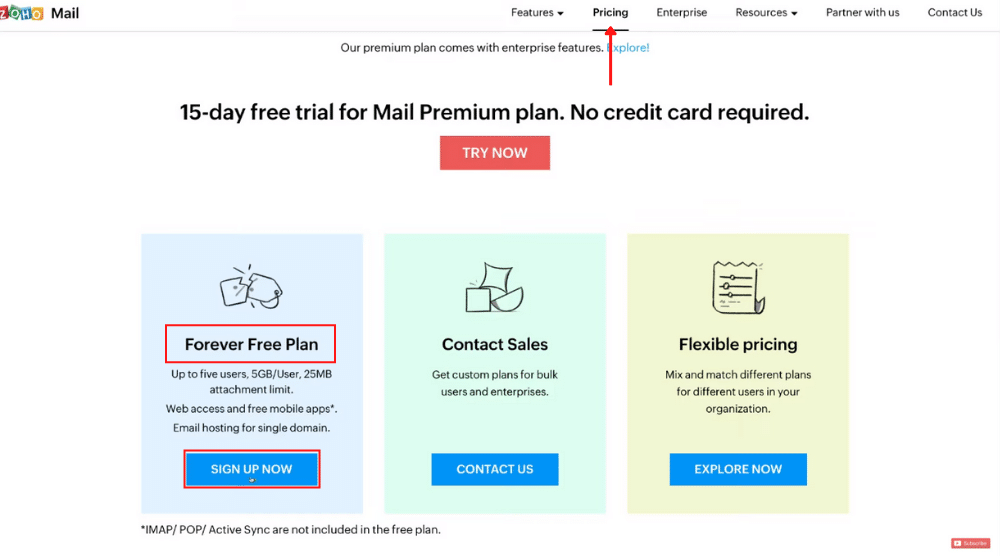
Go to ‘Pricing’ and scroll through the paid plans until you find the free plan.
As mentioned earlier, you get five business emails under the free plan.
Each user receives 5GB of storage as well as a 25MB attachment limit. Additionally, the free business email plan gives you access to free mobile apps.
It’s safe to say that Zoho Mail is ideal for small businesses that do not require more than five business emails and do not require more than 5GB of storage.
In fact, the majority of small businesses only need a single domain.
As you might’ve noticed – you still need a professional domain name (more on that later). Click ‘Sign Up Now’ under the ‘Forever Free Plan’.
Now, enter the following personal information:
- Name
- Email Address / Mobile Number
- Password
Feel free to go through Zoho Mail’s privacy policy and terms of services before hitting ‘Sign Up’.
Depending on whether you used email or phone number to sign up, you’ll receive a verification OTP (check your phone or email address for this code).
Go ahead and paste that code. Click ‘Verify’.
Welcome to Zoho Mail!
Read more : How To Use Zoho for Email Marketing Campaigns
2. Setting Up Your Zoho Mail Account
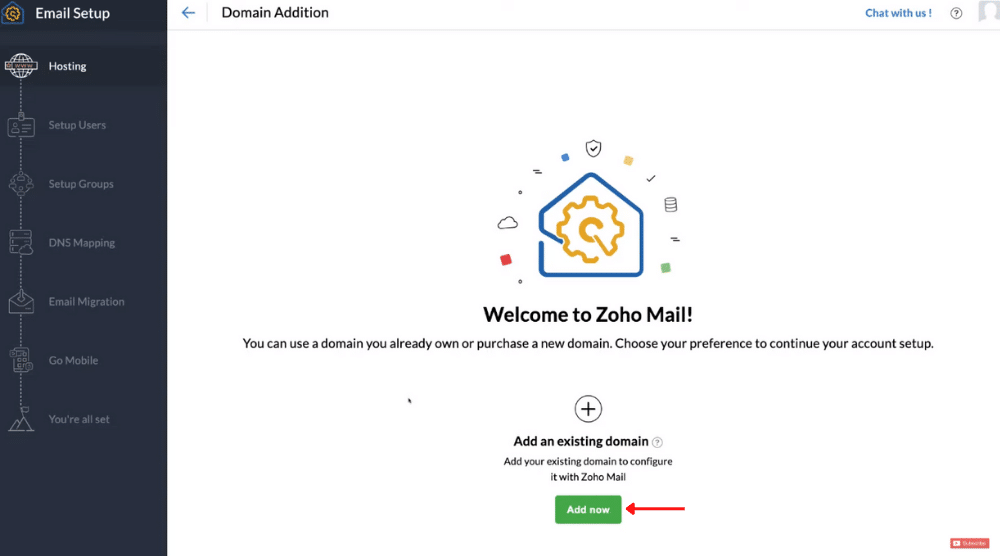
Click ‘Add Now’ and add your domain and organization name. If you don’t own a domain already, we recommend using HostPapa or Only Domains to purchase a domain name for your business (if you’re not sure how to choose the right domain for your business, check out this tutorial here).
Thanks to the top-notch 24/7 customer support, we advise using HostPapa – especially if you’re a complete beginner.
However, in this Zoho Mail tutorial, we’re going to use Only Domains, which is another great option.
Only Domains is essentially an all-in-one domain management system with many pricing options.
Now, once you’ve added your domain and organization name, click ‘Add’.
Follow the steps below to finish setting up your Zoho Mail account:
- Click ‘Proceed to domain verification’
- Copy the TXT Value and head over to your domain provider (Only Domains in this case)
- Select ‘Domains’ on your left and click ‘My Domains’
- Locate your domain name and click ‘DNS Settings’
- Click ‘Edit Zone Records’
- Next to ‘New Record’ select ‘TXT’ from the drop-down
- Within ‘Host’ add the ‘@’ symbol
- Under ‘Content’, paste the code that you copied earlier
- Click ‘Add’
- Head to your Zoho Mail account and click ‘Verify TXT Record’
Congratulations! You’ve successfully verified your domain ownership. All you need to do now is click ‘Create’.
Note: The process of finding your DNS record is going to be slightly different if you’re using any other hosting provider. However, the process of updating your DNS record is exactly the same.
You can now start adding five users to Zoho Mail for free, which is the subject of our next section in this Zoho Mail tutorial.
Read more : How To Use Zoho CRM
3. Adding Users to Zoho Mail
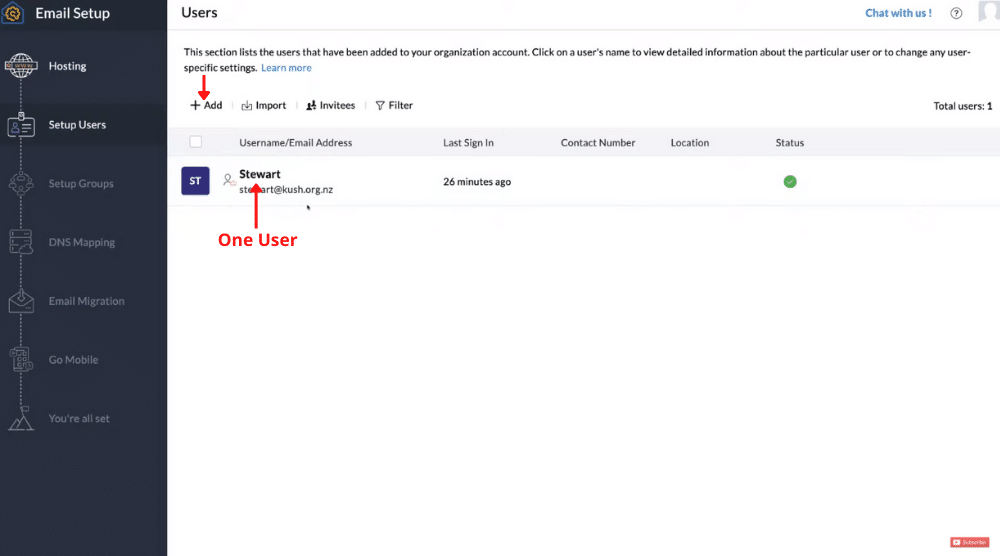
To add more users to Zoho Mail, simply navigate to ‘Add’ and then enter the first name, last name, username, and password of the user.
You have the option to upload the profile picture of the new user or you can leave this option for the team member to complete.
Zoho Mail will ask if you want to force users to change their password upon their first login. Keep that option selected. Click ‘Add’.
Mission accomplished!
As you can see, this new user has their own, free professional email. Now, you can send the new username and password to each of your team members.
Read more : How To Use Zoho Social
4. Creating Email Groups
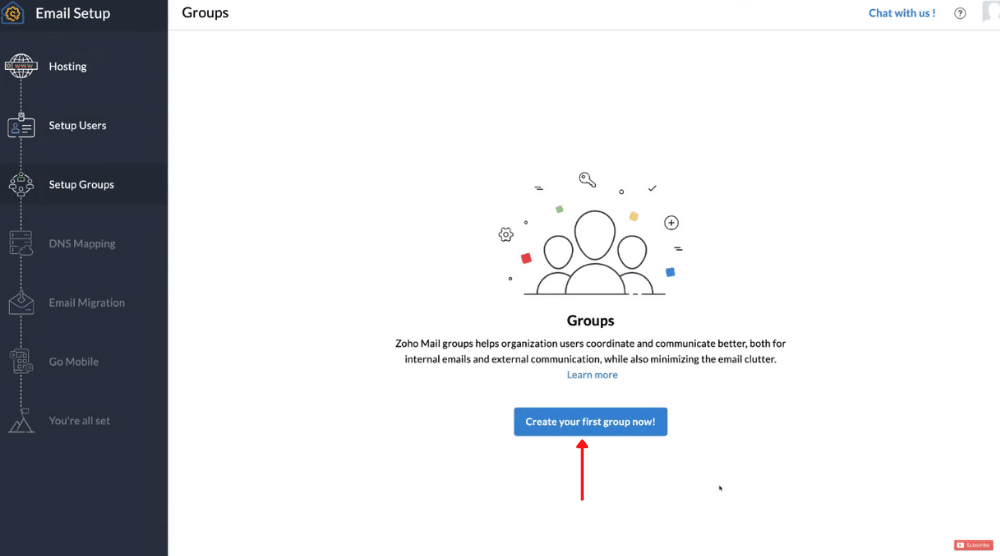
There are emails that you may want specific groups to receive – such as support group email, sales group email, office group email, etc.
Follow these steps below:
- Click ‘Create Your First Group Now’
- Add a group name, group email address, and group description
- Select who can send emails to this newly created group
- Choose if you want to enable Streams for this particular group
- Add a profile picture for the group if you like (optional)
- Hit ‘Proceed’
You can now start adding members to this email group by clicking ‘Add’. From the drop-down select ‘Add all organization users’ (for the purpose of this Zoho Mail tutorial). Click ‘Create’.
And, just like that your new email group has been created!
Read more : Zoho Desk | Best Customer Service Software for Small Teams
4. Verifying DNS Mapping
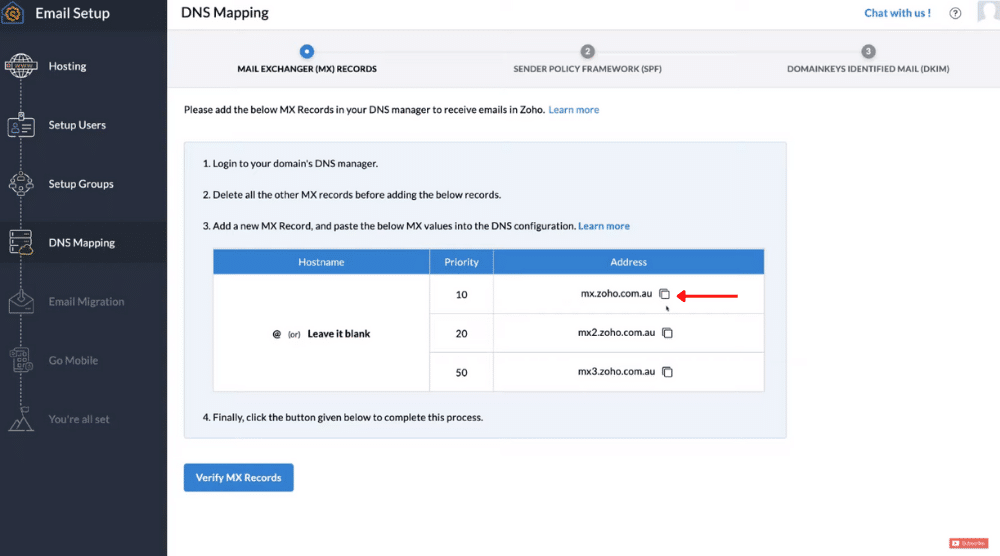
Now, you need to head back to your domain provider and update your DNS records, which would allow you to start receiving emails in Zoho. Remember the Priority ‘10’ and copy the address next to it.
- Under ‘Domain Info’, locate ‘New Record’
- Enter ‘@ symbol in the ‘Host’ field
- Select ‘MX’ from the drop-down adjacent to it
- Paste the address
- Type ‘10’ in the ‘Priority’ field
- Click ‘Add’
Follow the same process for adding the second and third MX records. Once you’ve done that, click ‘Verify MX Records’.
The verification can take 24 hours to complete. In case you’re not verified, contact your domain provider and double-check the information. They can also help you with this process.
Read more : Zoho Projects | Online Project Management Software
5. Configuring SPF Record
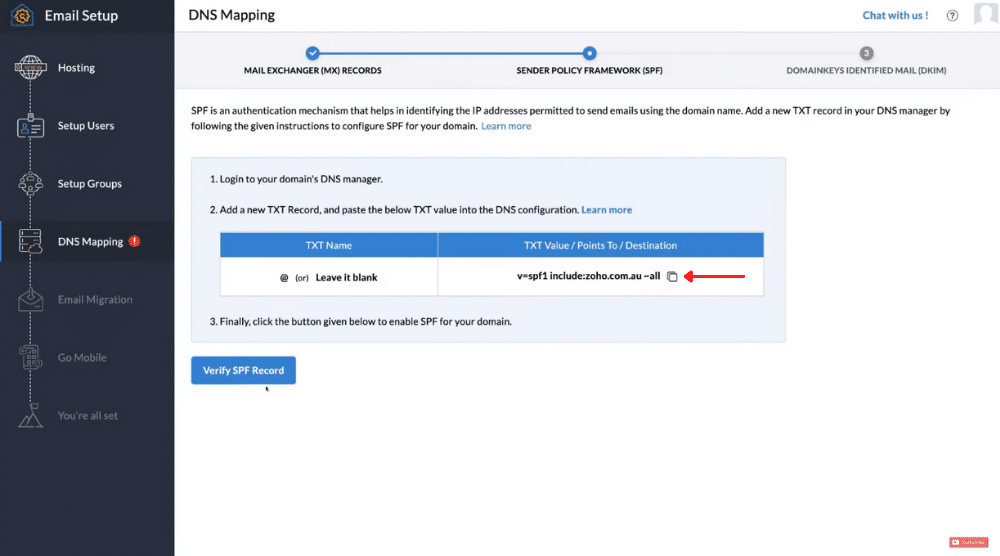
Now, head back to your domain provider, and under ‘New Record’, paste the ‘@’ symbol, select ‘TXT’ from the drop-down, and paste the address in ‘Content’.
Hit ‘Add’. Now, head back to Zoho and click ‘Verify SPF Record.
Read more : How To Use Zoho Mail
6. Updating DKIM Record
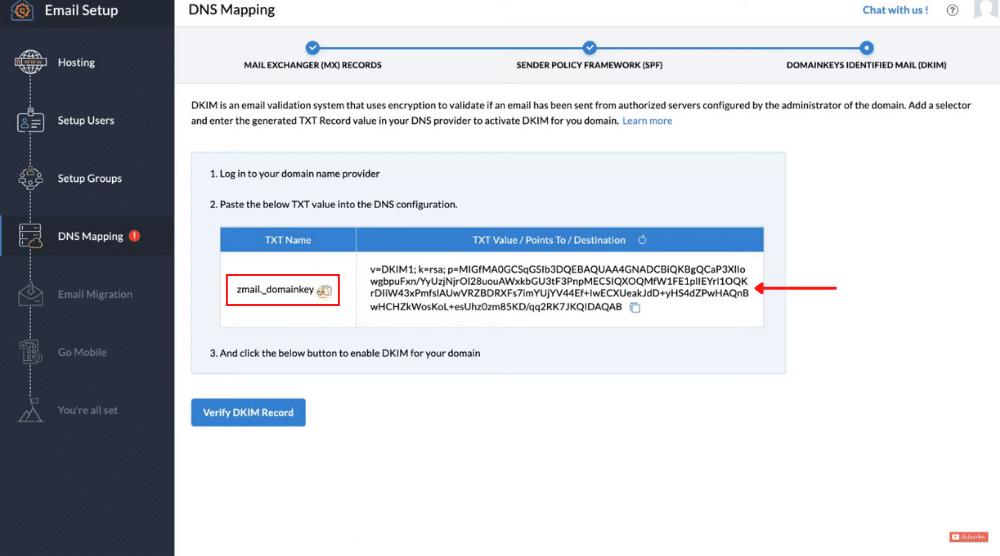
For ‘Host’, paste the value you copied earlier. Select ‘TXT’ from the drop-down again.
From your Zoho Mail account, copy the TXT Value this time. Paste this value in the ‘Content’ field in your domain provider.
Hit ‘Add’.
Navigate back to your Zoho Mail account and click ‘Proceed to Email Migration’.
This is where you can migrate data from your previous email services (free or otherwise) by selecting ‘Start Data Migration’.
Select your previous email service provider in the subsequent step.
However, we’re not going to do that in this Zoho Mail tutorial.
Instead, click on ‘Proceed to Mobile Configuration’.
This is where you can download Zoho mobile apps. Click ‘Proceed to Setup Completion’.
Read more: Zoho CRM Tutorial for Beginners
Zoho Mail Tutorial (Video Guide)
You’ve successfully completed the initial setup of your Zoho Mail account.
This is how you create free business email for your small business. Remember, you can connect up to five users with this free business email provider.
It’s time to enjoy all the awesome features offered by Zoho!
If you want to learn more about all the features within Zoho mail, then check out the tutorial below.
Also, if you can follow this complete Zoho mail setup guide through our video tutorial below.
This will help ensure that you have covered all the appropriate steps. Enjoy!


