Table of Contents
In this WooCommerce tutorial for beginners, you will learn how to create an eCommerce website on WordPress.
Do you run a WordPress website and want to start listing and selling products?
WooCommerce is your solution!
WooCommerce powers about 12% of eCommerce sites on the internet.
Its free eCommerce plugin seamlessly integrates with WordPress.
This plugin allows you to list and sell products directly on your WordPress site.
WooCommerce Tutorial for Non-Techies (2022)
If you are completely new to eCommerce and egar to learn how to use WooCommerce, then this tutorial is for you.
Let’s go ahead and get you started with Woocommerce.
1. Login to WordPress
The first action that you need to take in this WooCommerce tutorial is to log in to the backend of your WordPress website.
Now, before you start using WooCommerce, you need a few things:
- A reliable web hosting provider
- A domain (Example: www.yourbusiness.com)
- WordPress as the content management system (CMS) for building your site
Once you have these three, you can then install the free WooCommerce plugin.
Subsequently, you can start adding products to the WordPress website.
But if you don’t have a hosting provider, a domain, and a WordPress website, we recommend watching this tutorial first.
The above tutorial will walk you through our recommended web hosting provider called HostPapa, choose a domain name, and explains how to create a professional WordPress website.
However, if you already have a WordPress website, proceed with the next steps below:
Read more: How To Make A Premium Small Business Website
2. Install the WooCommerce Plugin

- Click on ‘Plugins’
- Select ‘Add New’
- Type in ‘WooCommerce’ in the search bar
The official WooCommerce plugin has over five million downloads and scores of positive reviews (refer to the screengrab).
However, before installing this plugin, it’s best practice to backup your WordPress website just in case the WooCommerce plugin clashes with the current theme, WordPress version, or the existing plugins.
Watch this tutorial to learn how to backup your WordPress website.
After creating a backup:
- Click ‘Install Now’
- Hit ‘Activate’
You’ll arrive at the WooCommerce installation wizard.
Read more: How To Backup Your WordPress Website
3. Complete the WooCommerce Setup

In this part of our WooCommerce tutorial, we need to fill out our business information regarding our online store.
- Add the address line 1 and 2
- Type in the country or region
- Select the city and postcode
- Enter your email
- Hit ‘Continue’
WooCommerce will now ask your permission to share non-sensitive data for improved features.
Click ‘Yes, count me in!’.
To complete the WooCommerce setup, follow these steps:
- Select the industry. For this WooCommerce tutorial, we’re choosing ‘Fashion, apparel, and accessories’
- Click ‘Continue’
- Pick the type of products – physical products, for example. However, to choose the other product types like subscriptions, memberships, bookings, bundles, and customizable products, you need a premium plan.
- Hit ‘Continue’
- Select the number of products that you want to list. For this WooCommerce tutorial, we’ll go for 1-10.
- Under ‘Currently selling elsewhere?’, choose ‘No’. Any of this information can be modified later on.
- Hit ‘Continue’
- Check the box that says ‘Add recommended business features to my site’.
- Click the drop-down next to the box to see the recommended business plugins like Jetpack, MailPoet, WooCommerce Payments, and Google Listings and Ads. You can also install them later.
- Hit ‘Continue’
Read more: Best Web Hosting for Small Business
4. Select the Website Theme
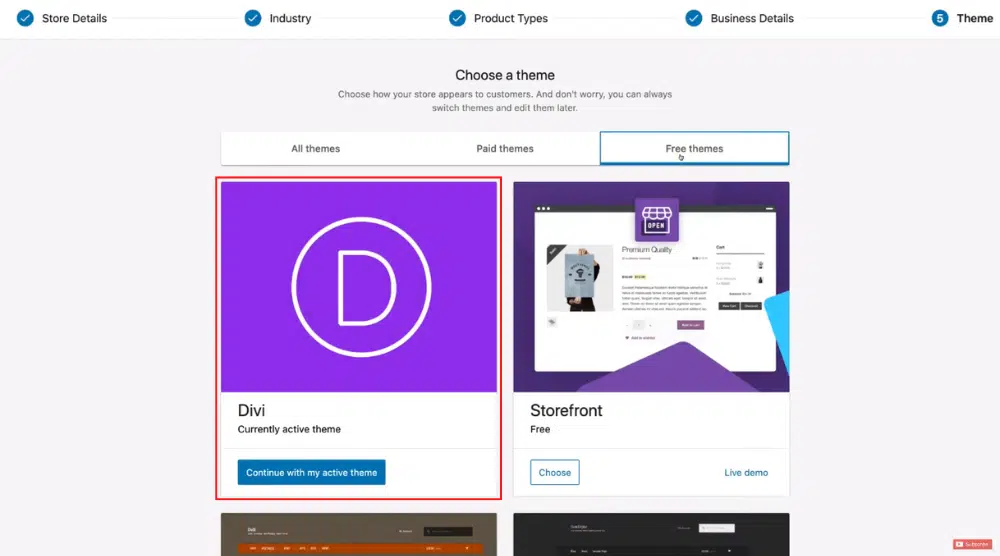
It’s time to select a theme for your online store in this WooCommerce tutorial. A theme determines the layout, look, and feel of your eCommerce store.
- Point your cursor to ‘Free themes’
- View the themes by clicking ‘Live demo’
- Select ‘Choose’ if you like a theme
Remember that, you can always change the theme at any time you want.
In this WordPress eCommerce tutorial for beginners, we’re going to use Divi Theme.
The Divi theme is extremely easy to use, offers premade templates, and has a visual drag-and-drop builder, that anyone can use.
If you wish to learn more about the Divi theme, we recommend this tutorial.
This tutorial explains how to use the Divi theme to create a premium website.
Hence, we’re going to stick to our current Divi theme for this WooCommerce tutorial.
After selecting the theme, you’ll be back to your WordPress dashboard.
Read more: Best WordPress Theme for Beginners
5. Configure Settings

- On the WordPress dashboard, keep ‘WooCommerce’ selected.
- Click on Settings
- Ensure that your store information is accurate
- Navigate over to ‘General options’
- Select the selling and shipping locations if you like. However, we’re going to keep the default settings as we’re selling the products internationally.
- Enable taxes and coupon codes. During checkout, taxes will be calculated automatically while coupon codes will apply when a customer has a discount code.
- Select a currency. In this WordPress eCommerce tutorial for beginners, we’ve selected the New Zealand dollar ($).
- Hit ‘Save changes’
Read more: How To Use Shopify Discount Code
You’ve successfully configured the general settings. Next to ‘General’, we have ‘Products’.

- Under ‘Shop page’, make sure you have ‘Shop’ selected.
- Next to ‘Add to cart behavior’, choose ‘Redirect to the cart page after successful addition’.
This means that when a visitor adds a product to the cart, they will be directed to the cart page.
The other option is ‘Enable AJAX add to cart buttons on archives’.
If you select it, the visitor will stay on the same page upon adding a product to the cart and a ‘View cart’ button will appear.
We’ve opted for the redirect option in this WooCommerce tutorial.
Now, check out these product options below:
- Keep the placeholder image settings as it is.
- Choose the appropriate weight and dimensions unit depending on your country.
- Enable product reviews if you like
- Check the box that says ‘Show verified owner label on customer reviews’
- Enable ratings on reviews. This is great for social proof and will help drive more sales.
- Hit ‘Save changes’
Note that most of these settings can be kept default and you can modify any of these later on.
Read more: Best WordPress Hosting for Small Business
6. Configure Shipping

After general and product settings, we need to configure Shipping settings.
To do that:
- Click on ‘Shipping’ next to ‘Products’ (refer to the screengrab)
- Select ‘Add shipping zone’. It’s a geographic location with unique shipping rates and shipping methods.

- Type your country name in the ‘Zone name’ field. We’ve added New Zealand.
- Under ‘Zone regions’, we’ll select all of New Zealand again.
- Tap on ‘Add shipping method’. Pick any of the three shipping methods: flat rate, free shipping, or local pickup. For this WooCommerce tutorial, we’ll keep ‘Flat rate’ selected.
- After choosing the shipping method, click on the ‘Add shipping method’ button.
- Under ‘Flat rate’, click on ‘Edit’.
- Change the tax status to none.
- Set the flat shipping rate (cost) at NZD 10.
- Hit ‘Save changes’

By following a similar process, you can add multiple shipping methods for different zones.
Of course, you can add more shipping zones or countries where you intend to sell your products.
Also, there is another plugin you can install called Woocommerce Shipping that can be used as a shipping solution for your online store.
However, we’re not going to cover it in this tutorial.
7. Finish the Payment Setup

Once you’ve added the shipping zones and methods, you can proceed to set up payments.
- Tap on the ‘Payments’ tab next to ‘Shipping’ at the top
- Enable any of the payment methods depending on the nature of your online store: WooCommerce Payments, Direct bank transfer, Check payments, and Cash on delivery
- The most streamlined method is using WooCommerce Payments, which is a free plugin. It accepts debit cards, credit cards, and other payment methods.
- Next to WooCommerce Payments, hit ‘Install’
- You wll taken to Woocommerce ‘Payments’ plugin (left-hand side) and complete the initial setup in just a few steps. All you need to do is add your personal information.
Once the payment setup is complete, you can start using WooCommerce Payments.
Now, follow these steps below:

- Navigate back to “Woocommerce” (left-hand side)
- Select ‘Settings’
- Tap on ‘Accounts & Privacy’ next to ‘Payments’
- Next to ‘Guest checkout’, check the box that says ‘Allow customers to place orders without an account’
- Also, enable the second option which is ‘Allow customers to log into an existing account during checkout’ (this is for existing customers)
- Navigate over to ‘Account creation’.
- Check the box that says ‘When creating an account, automatically generate an account username for the customer based on their name, surname, or email’.
- Also enable ‘When creating an account, send the new user a link to set their password’. Creating an account will then be extremely easy for customers.
- Under ‘Privacy policy’, type in your registration privacy policy and checkout privacy policy. You can, of course, keep the default policies and edit them later on.
- Leave everything under ‘Personal data retention’ as default.
- Hit ‘Save changes’
8. Manage Email Notifications

- Click on ‘Emails’ next to ‘Accounts & Privacy’ (refer to the screengrab)
- Observe the various email notifications under ‘Email’: new order, canceled order, and failed order.
- The recipient of the above email notifications is the store owner, i.e., you. Check the recipient(s) column.
- To customize the notification message and the recipient, click on ‘Manage’
- Observe the various other email notifications like completed order, processing order, and refunded order. The recipient of these is the customer.
- Again, to change the recipient or the notification message, click on ‘Manage’.
- Remember to save changes

Let’s move on to ‘Integrations’ in this WordPress eCommerce tutorial for beginners.
You can locate it next to ‘Emails’ on the top.
This is where you’ll find MaxMind Geolocation.
However, we’ll skip this for now and hover over to ‘Advanced’.
- Under ‘Page setup’, keep the Cart page, Checkout page, and My account page as default.
- Next to ‘Terms and conditions’, select your terms and conditions page. It could be a guarantee, refund policy, or other critical information that customers should know.
The last Setting, we want to discuss is ‘Multi-currency’.
Once you set up WooCommerce Payments, this is where you can enable multiple currencies.
9. Add Products

Now that we’ve configured Settings, it’s time to add products in this WordPress eCommerce tutorial for beginners.
To do that:
- Click on ‘Products’ (left-hand side)
- Select ‘Add New’
- Enter the name of your first product. For this WooCommerce tutorial, we’ve added a product called Vertical Bar Necklace.
- Type in the product description and edit it using the formatting options.
- Add media – a product image, for instance

- Enter the regular price and sale price. This will let your customers know that the product is discounted.
- Click on ‘Inventory’ below ‘General’
- Add your stock keeping unit (SKU)
- Choose the stock status (in stock, out of stock, on backorder)
- Click on ‘Shipping’ below ‘Inventory’
- Add the weight and dimensions
- Click on ‘Linked Products’ below ‘Shipping’
- Add a product to upsell or cross-sell. This strategy will boost your sales and profit.
- Add product categories, tags, and the product image on your right. The image you’ve added will act as a primary image.
- Type in the product title and alt text (the latter is important for SEO)
- Click ‘Set product image’
- Scroll down to ‘Product gallery’ and add multiple product images. We recommend adding 3-4 images at least.
- Add a product short description (refer to the screengrab)
- Hit ‘Publish’ (right-hand side) when you’re ready to go live. You can also preview or save it as a draft.
- Click ‘Visit Site’ (top-left corner) to view your eCommerce site.
Read more: How To Create a WordPress Website using Elementor Cloud
10. Add ‘Shop’ to Your Primary Menu

Notice that we don’t have the ‘Shop’ option on our website’s primary menu yet.
We’re going to add it next in this WooCommerce tutorial:

- Head back to your WP dashboard
- Select Appearances > Menus
- Locate the ‘Shop’ page under ‘Pages’. Click on it.
- Tap on the ‘Add to Menu’ button
- Notice that the shop page has been added to our menu (see right)
- Drag and drop the page to change the sequence if you like. For instance, you can place the shop page under Home. On your website, it will then appear next to Home.
- Select ‘Save Menu’ (bottom-right corner)
- Navigate back to your WordPress site

You will now notice the Shop page on the primary menu.
If you click on the product, it will take you to the product page.
Read more: How To Get A Free SSL Certificate for WordPress
11. Change the Shop Page Position

- Visit your dashboard
- Click on Settings > Reading
- Under ‘Your homepage displays’, ensure that you have ‘a static page’ selected.
- You can change the homepage to ‘Shop’ as well. If your WordPress site purely functions as an eCommerce store, it will be a wise move. However, if the online store is just an addition to your WordPress site, leave the Homepage as ‘Home’.
- Save changes
Read more: Elementor Tutorial for Beginners
12. Alter the URL Structure

- On your dashboard, select ‘Settings’
- Click on ‘Permalinks’
- Ensure that ‘Post name’ is selected.
- Save changes
By doing so, the URL will include the product name in it.
Such a URL will look a lot cleaner to prospective customers.
From the upper-left-hand corner, you can click:

- Visit Site – this will take you to the homepage
- Visit Store – this will take you directly to the eCommerce store
Read more: How to Create a Free Website with WordPress
13. Customize Shop & Product Pages

Notice that our Shop page has a standard appearance right now.
To customize it:
- Visit your dashboard
- Select ‘Pages’ and click on ‘Shop’
This is where you can customize the Shop page using either the WordPress default editor or the Divi Builder.
However, in this WordPress eCommerce tutorial for beginners, we won’t dive into the design aspect of creating an attractive online store.
*The link above is an affiliate link, which means we will get a commission if you upgrade to a paid plan (with no extra cost to you). This helps support our education-based website and we thank you in advance!
We hope this tutorial helped you understand how to list and sell products on a WordPress site using the WooCommerce plugin.
