Facebook Pixel is a tracking code that when added to your Shopify store helps you build super-targeted audiences.
The Facebook pixel enables you to track visitor actions and events like ad conversions on your eCommerce store, and thus gives you access to valuable customer data.
This tutorial will help you maximize your sales by explaining how to install Facebook Pixel on Shopify.
The Facebook Pixel setup for Shopify has changed over the years, which is why you want to read this updated tutorial.
Installing Facebook Pixel, the right way is also essential if you engage in Facebook ads, so that you can optimize your campaign performance, enhance ad targeting, and measure the success of your Facebook ads.
Facebook Pixel Setup for Shopify: 6 Steps Guide
Let’s begin with our Facebook Pixel Shopify tutorial 2022!
1. Getting Started

Before we go ahead and explain how to add Facebook Pixel to Shopify in 2022, you first need to create:
- Facebook Business Page
- Business Manager
- Facebook Ad Account
- Facebook Pixel
If you haven’t created a Facebook Business Page yet, watch this tutorial to learn how.
We also have a separate beginner’s tutorial on Facebook Business Manager, if you don’t have that already.
Within your Facebook Business Manager, you need a Facebook ad account.
Again, if that’s something you don’t have, the Facebook Business Manager tutorial linked above also explains how to create one.
After completing these steps, you can move on to creating a Facebook Pixel.
Before that, you need to visit the Facebook Ads Manager.

To do that:
- Head over to your browser
- Type in business.facebook.com/adsmanager
By doing so, you’ll arrive at your Ads Manager account.
Read more: How To Create a Facebook Business Page
2. Visit Facebook Ads Manager

- Next to ‘Campaigns’, you’ll see your ad account (top-left corner)
- Make sure you have the right account selected
- Click on three horizontal lines below the home icon on your left. That will open up a menu
- Tap on the ‘All tools’ button
- Locate ‘Events Manager’
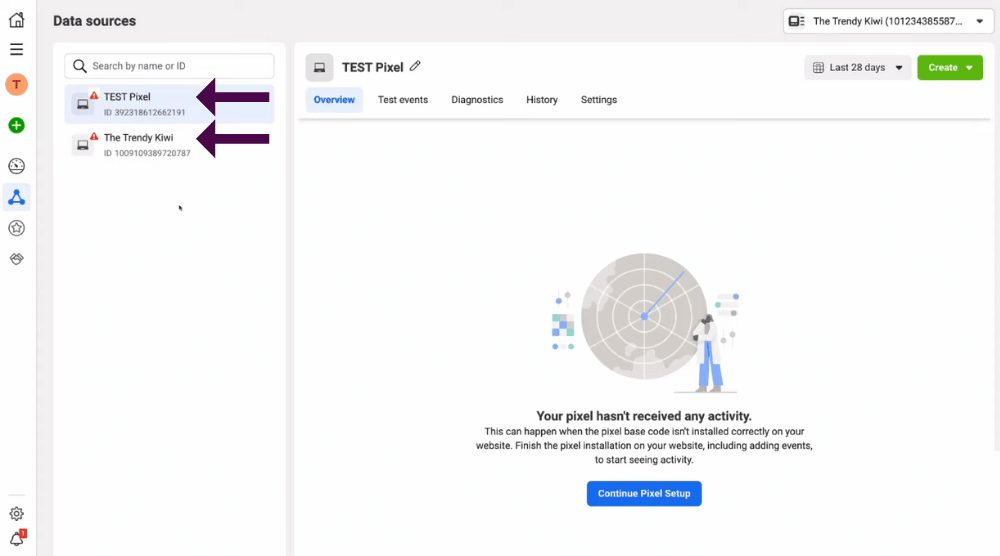
This is where you can create and manage your Facebook Pixels.
Refer to the screengrab.
As you can see, we have two Pixels in this account.
Read more: How To Connect Shopify to Facebook Shop
3. Create a Facebook Pixel

Now, before we explain how to integrate Facebook Pixel on Shopify, we need to create the Pixel first.
To do that:
- Click on ‘Connect data sources’ (see left-hand menu)
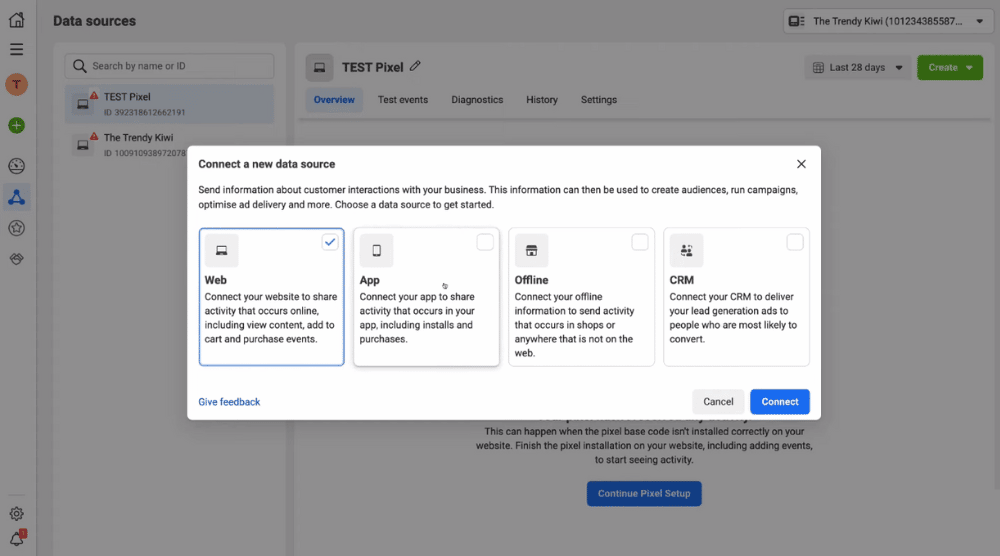
- Choose ‘Web’ from the options and hit ‘Connect’
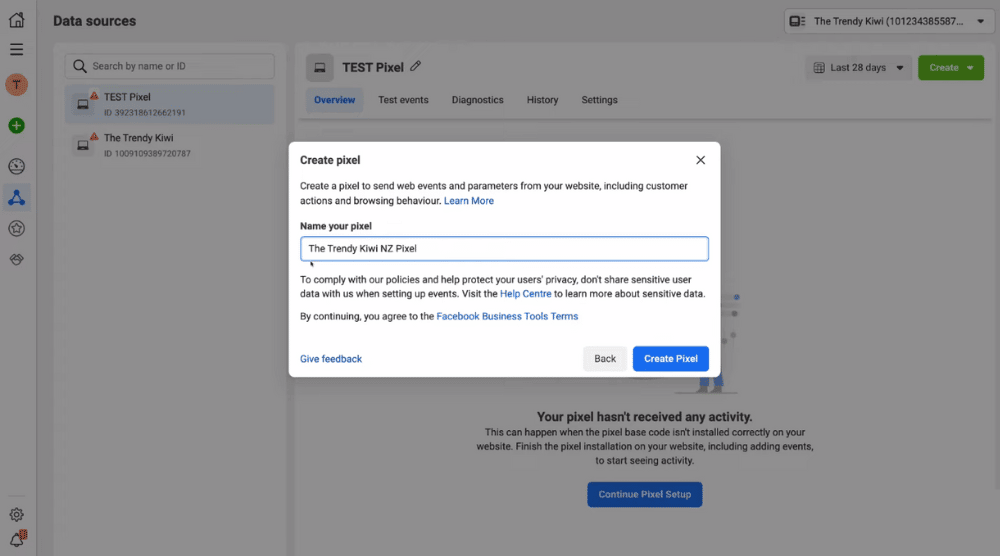
- Name your new Pixel. For this Facebook Pixel tutorial, we’ll name it ‘The Trendy Kiwi NZ Pixel’. This is what our Shopify store is also named.
- Tap on ‘Create Pixel’
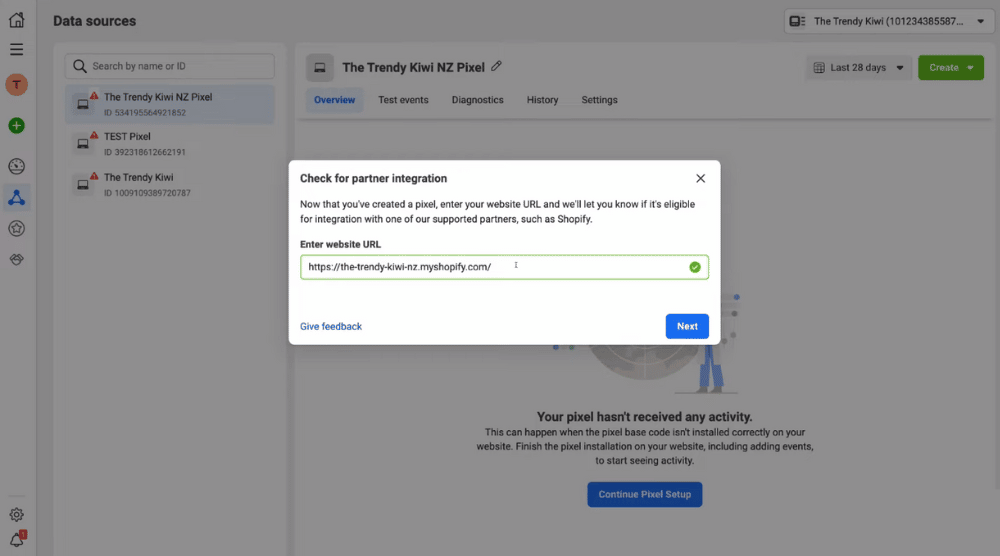
- Add your Shopify store URL
- Click on ‘Tick’. If you see a green tick, it means you’ve entered the URL correctly.
- Hit ‘Next’
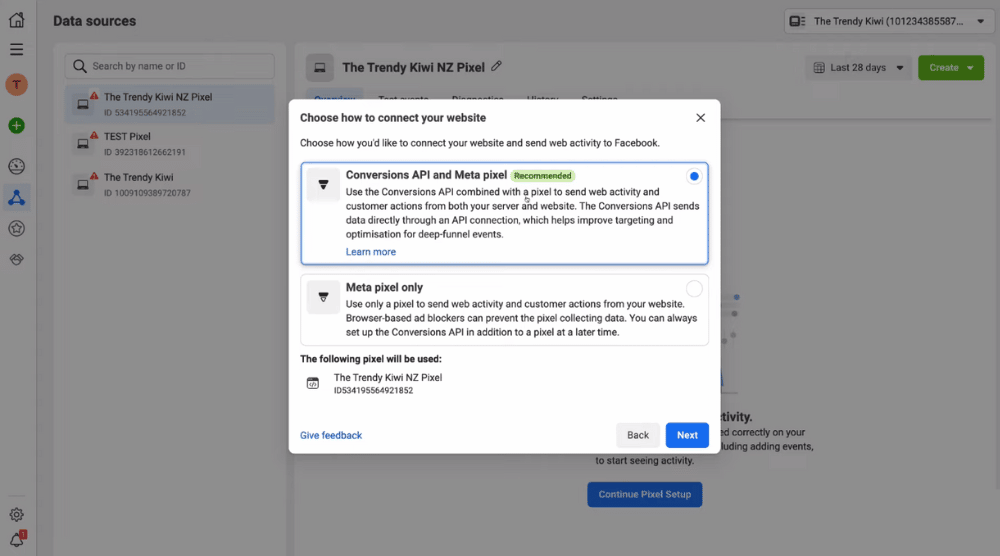
- Make sure that ‘Conversions API and Meta pixel’ is selected. This will essentially provide us more data.
- Hit ‘Next’ again
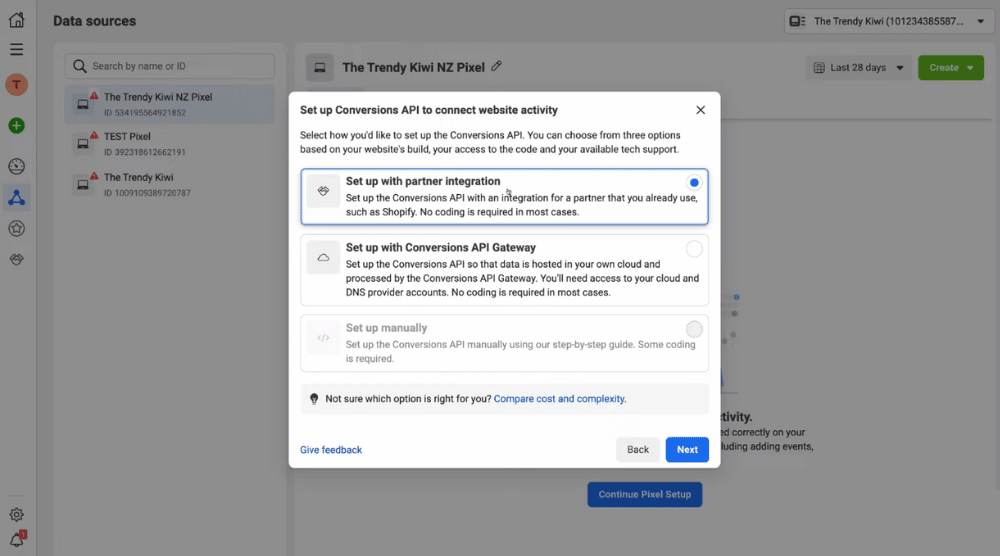
- Make sure that ‘Set up with partner integration’ is selected. Hit ‘next’. This is a simple technique of integrating Facebook Pixel with Shopify without using code.
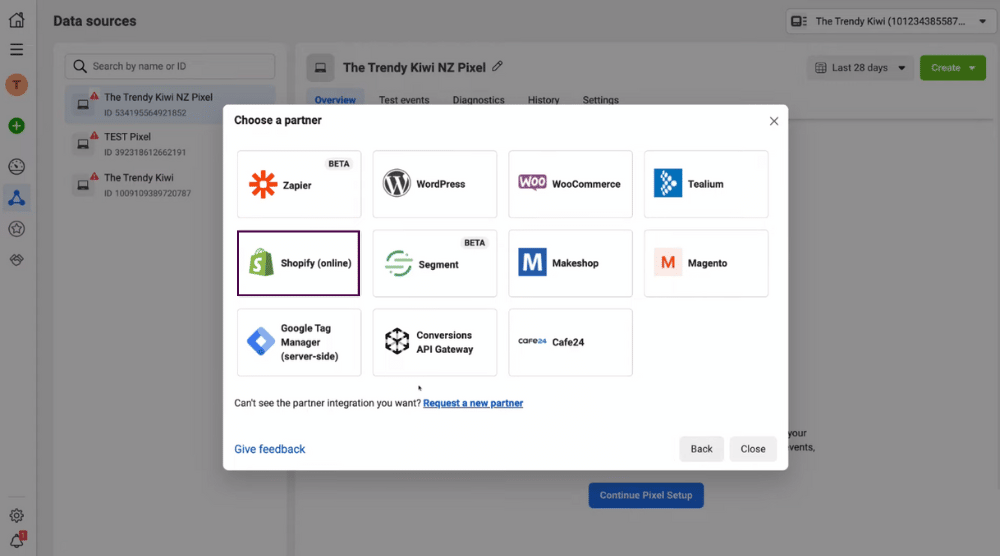
- Under ‘Choose a partner’, select Shopify
We now need to connect our Shopify account to Facebook.
Go ahead and log in to your Shopify backend.
Read more: How To Add Facebook Pixel to Wix
4. Arrive at Your Shopify Store
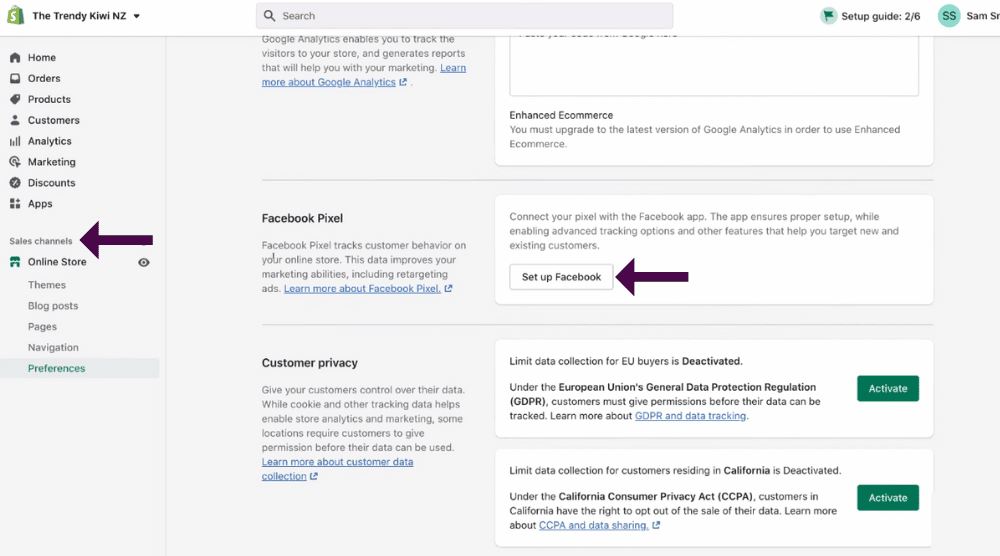
- Inside your Shopify backend, hover over to ‘Sales channels’ (see left)
- Click on ‘Online Store’ below it.
- Choose ‘Preferences’ from the options
- Scroll down and locate ‘Facebook Pixel’ on the right-hand side
- Tap on ‘Set up Facebook’
5. Connect Facebook to Shopify
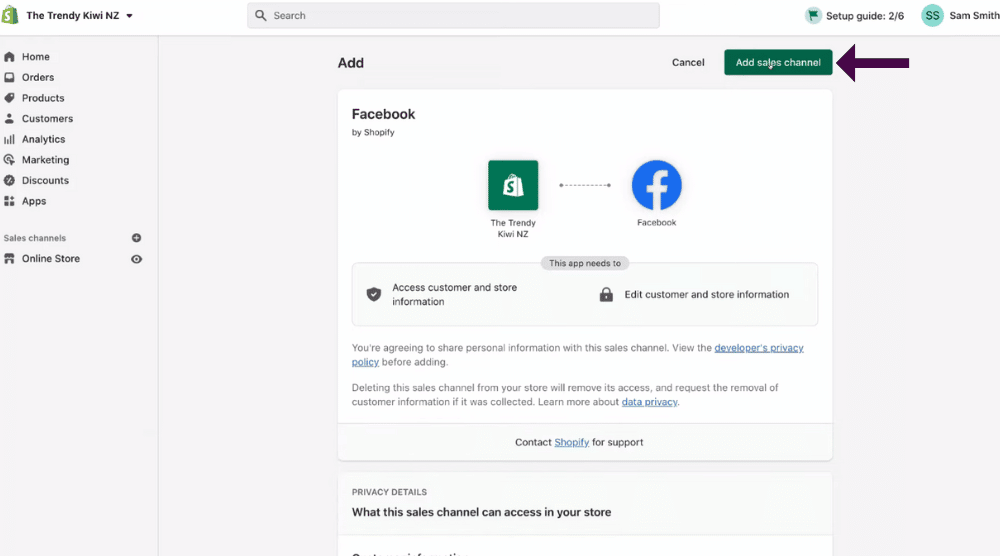
- Select ‘Add sales channel’ (refer to the screengrab)
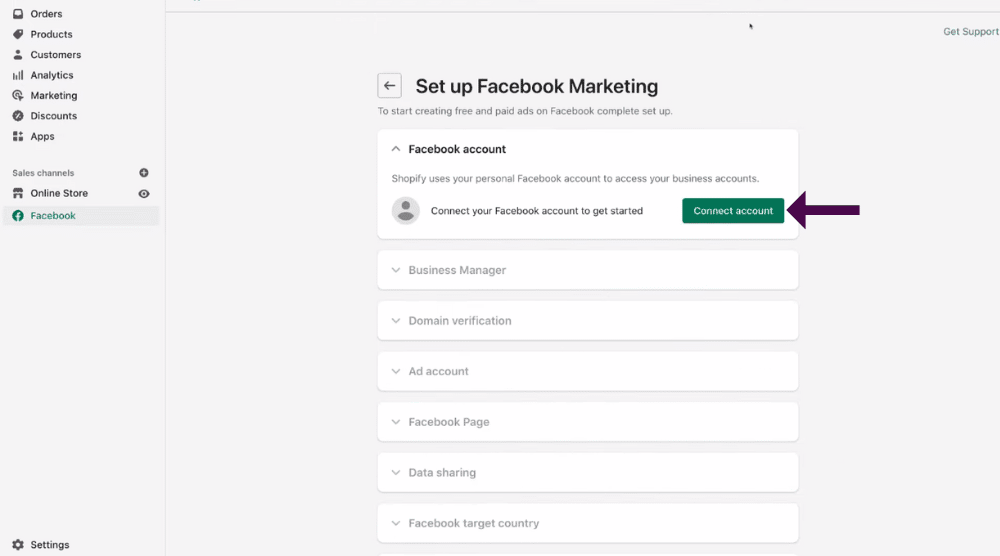
- Under ‘Set up Facebook Marketing’, click on ‘Connect account’. This will allow you to connect your personal Facebook account with Shopify. That said, your account should be associated with Facebook Business Manager.
- Make sure that your personal Facebook profile is selected
- Enter your password
- Click ‘Continue’ and hit ‘Continue’ again
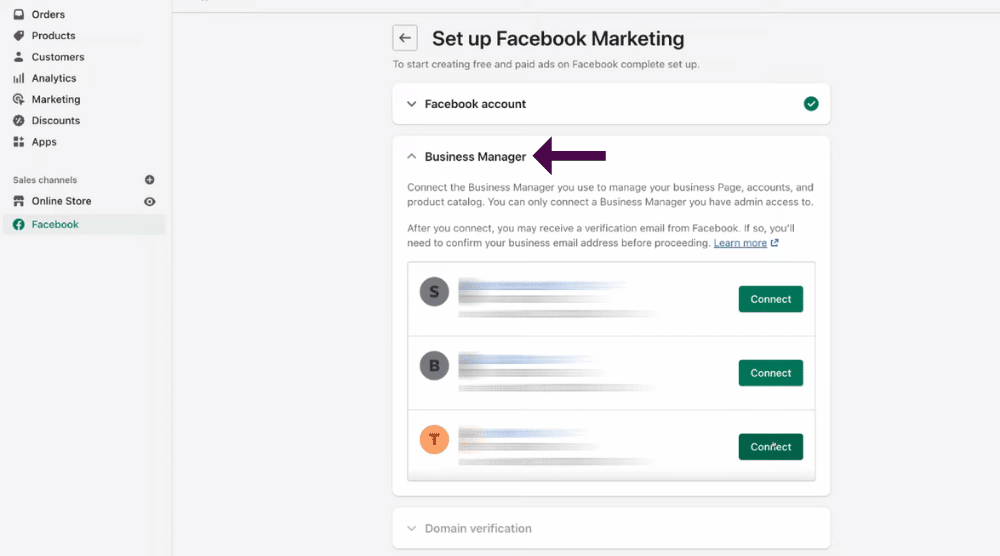
- After connecting your personal profile, select the Business Manager under ‘Set up Facebook Marketing’. The Business Manager must be associated with your ad account as well as the Pixel you created earlier.
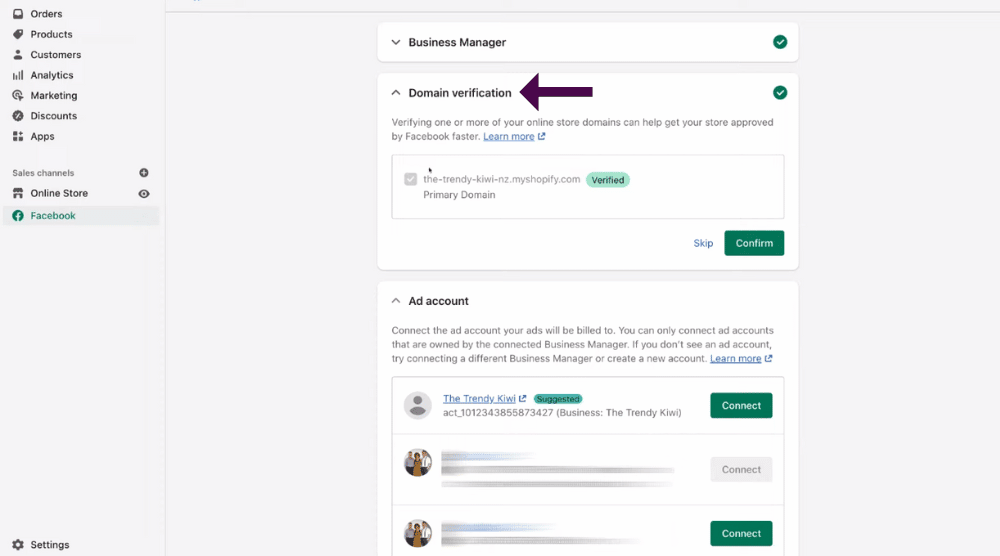
- Next, verify your primary domain under ‘Domain verification’. Refer to the screengrab. Simply click on your domain and hit ‘Verify’.
- Tap on the ‘Confirm’ button.
- Add the ad account that you used to create the Facebook Pixel.
- Hit ‘Connect’
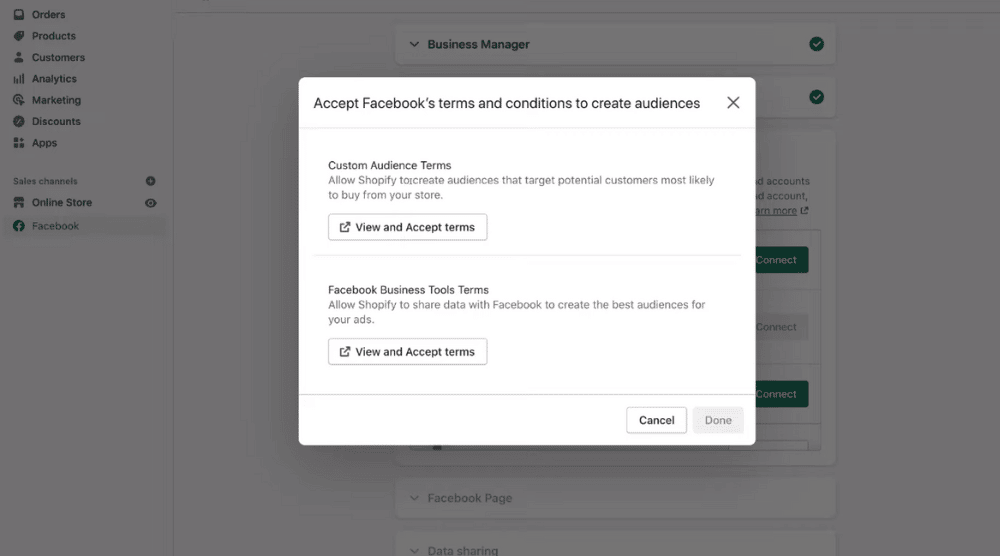
- Under ‘Custom Audience Terms’ and ‘Facebook Business Tools Terms’, click on the ‘View and Accept terms’ buttons. Accept the terms for each and hit ‘Done’.

- Next, connect your Facebook Business Page
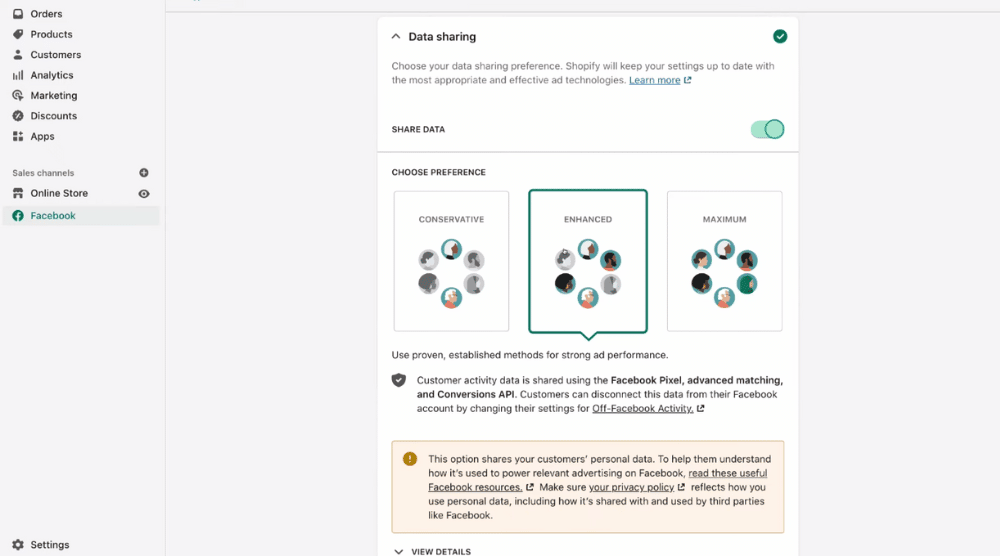
- Under ‘Data sharing’, choose either enhanced or maximum. You can always change your preferences at any time.
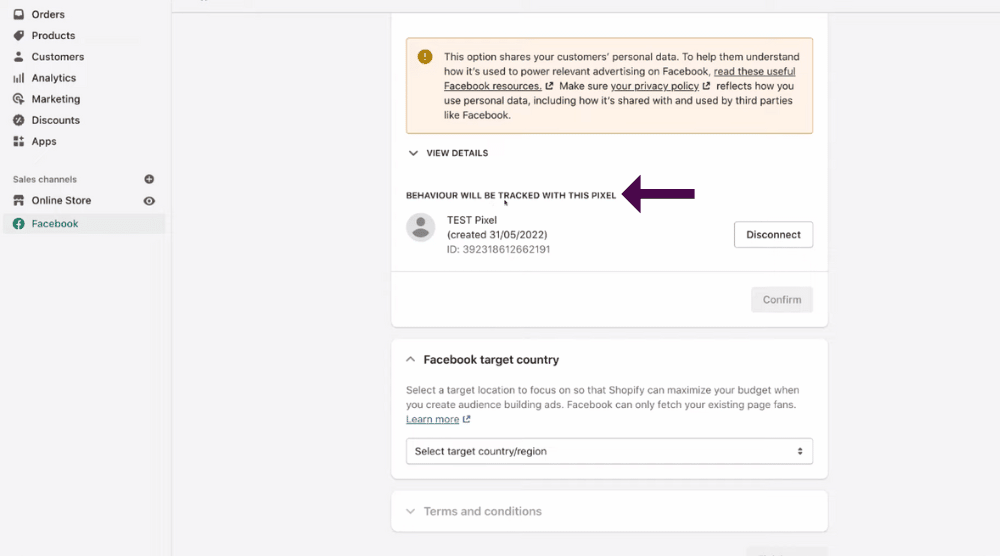
- Scroll down to where it says ‘Behaviour will be tracked with this pixel’ and ensure that the correct pixel is selected. In case it’s not the right pixel, click on ‘Disconnect’. Select ‘Disconnect’ again.
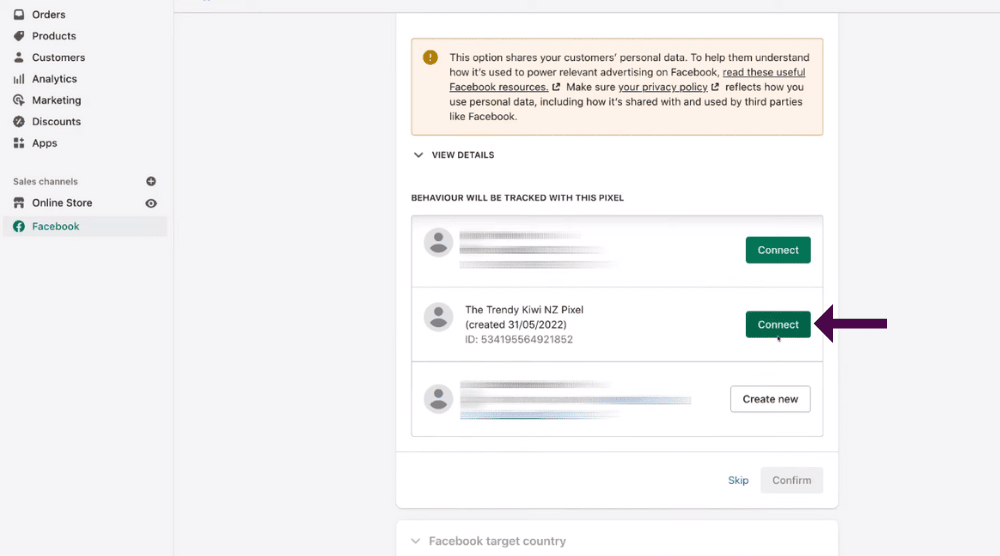
- Go ahead and install the intended Facebook Pixel by clicking on ‘Connect’
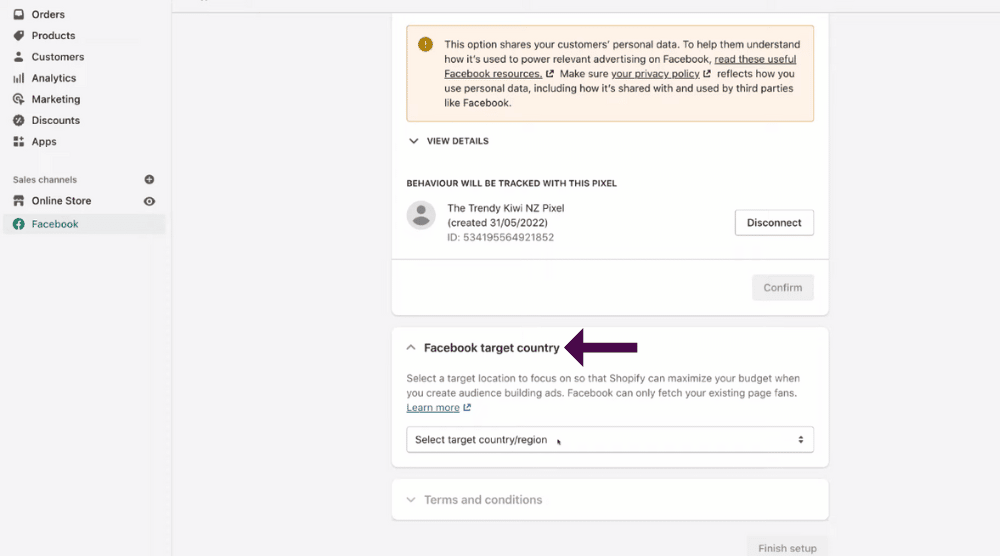
- Under ‘Facebook target country’, select the target country or region for your Facebook ads. For this Facebook Pixel tutorial, we’ll choose ‘New Zealand’. We recommend connecting the main country that you target here.
- Under ‘Terms and conditions’, hit ‘Accept’
Once you’ve completed the setup, click on ‘Finish setup’.
Congratulations!
You’re now equipped with the process and knowledge of Facebook Pixel setup for Shopify.
Read more: How To Use Facebook Business Suite
6. Verify & Test Pixel

Now, head back to your Facebook account where we left off at the beginning of this tutorial (refer to the screengrab to see exactly where).
Back inside your ads account and under Events Manager:
- Check the box next to ‘I’ve completed the setup on Shopify’.
- Hit ‘Next’
You now want to test whether the Facebook Pixel works properly on your Shopify store.
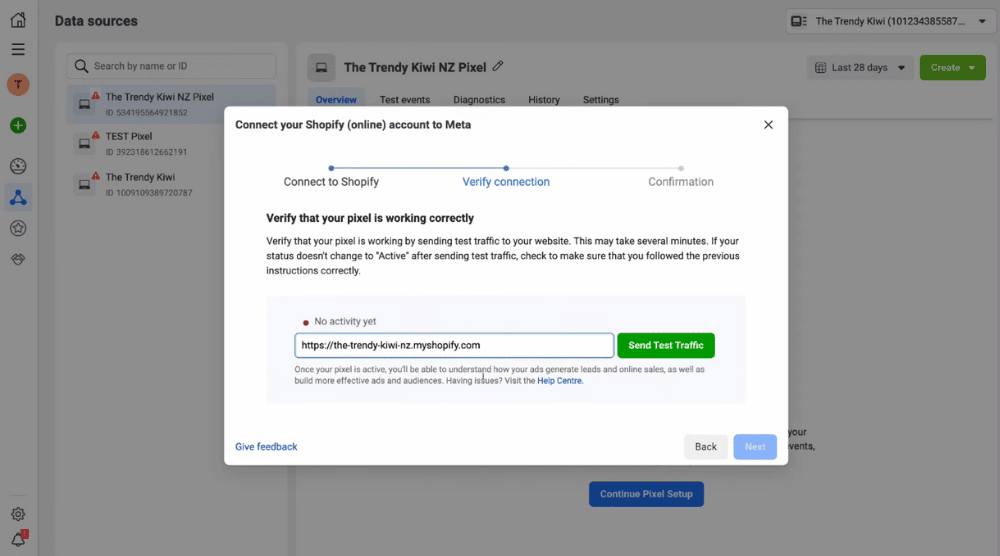
To do that:
- Enter your Shopify store URL in the ‘Verify connection’ step
- Click on ‘Send Test Traffic’
That action will take you to your Shopify website.
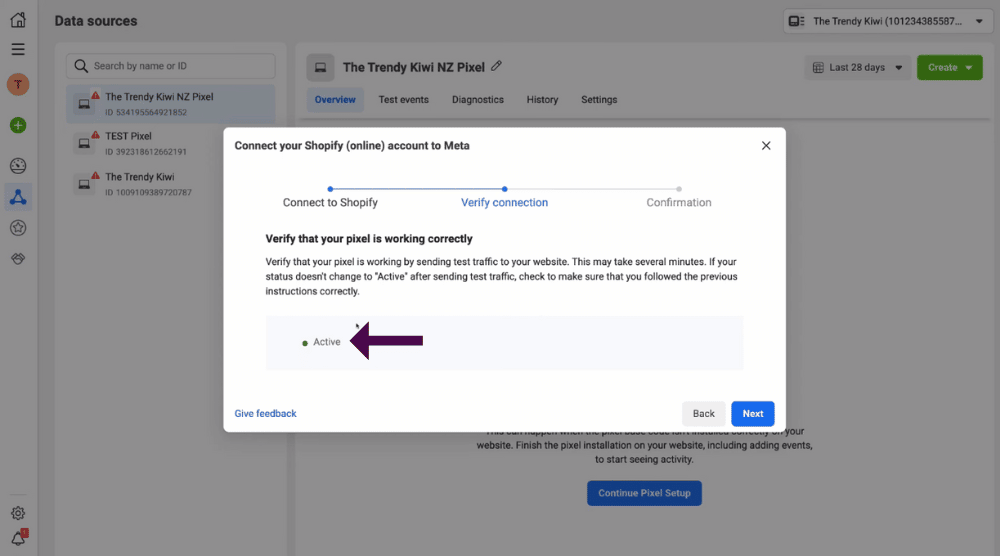
Now head back to Facebook and see if the pixel has been verified.
When you do that, you should see ‘Active’ on the screen. Hit ‘Next’.
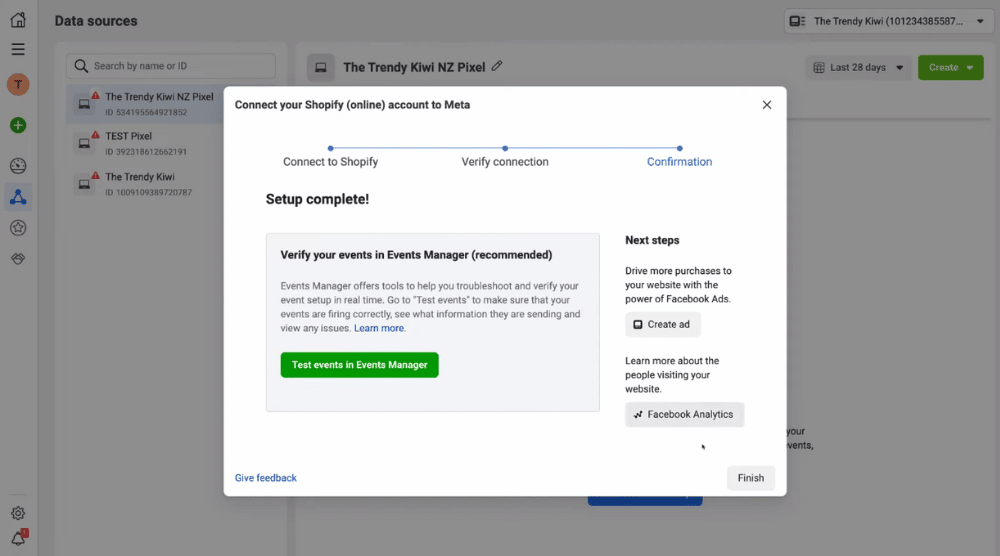
To ensure that all the events on your Shopify store are being tracked properly, click on ‘Test events in Events Manager’ in the ‘Confirmation’ step.
Alternatively, you can select ‘Finish’ or another method you can use.
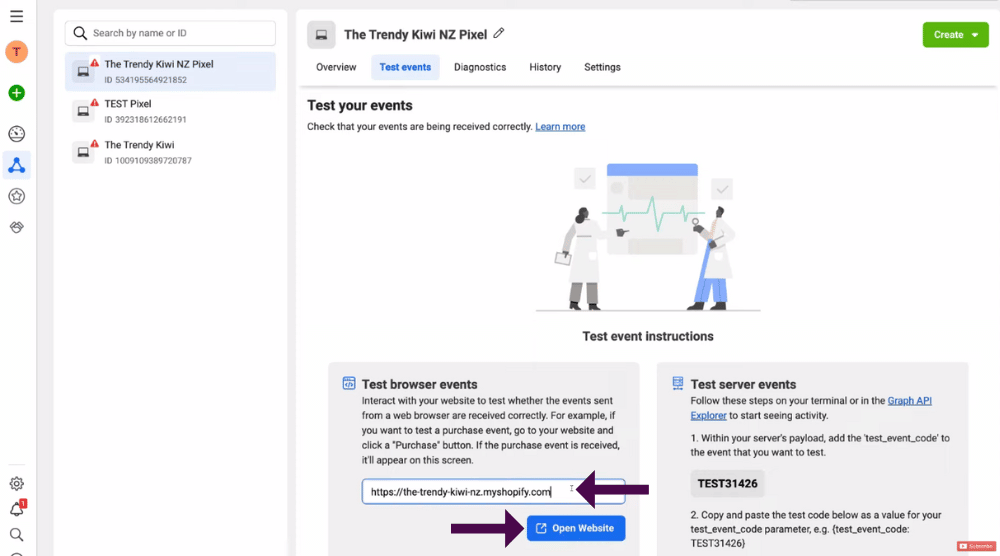
- Navigate over to ‘Test events’ (refer to the screengrab).
- Under ‘Test events’, move your cursor to ‘Test browser events’
- Add your website URL
- Click ‘Open Website’

- On your Shopify store, you want to visit each website page
- Also, click on individual product pages on your site
- Move products to your cart and initiate checkout
- Take as many actions as you can to ensure that your Facebook Pixel is picking up each one of them.
- Also, make sure that the ad blocker is turned off. Otherwise, it wouldn’t work.
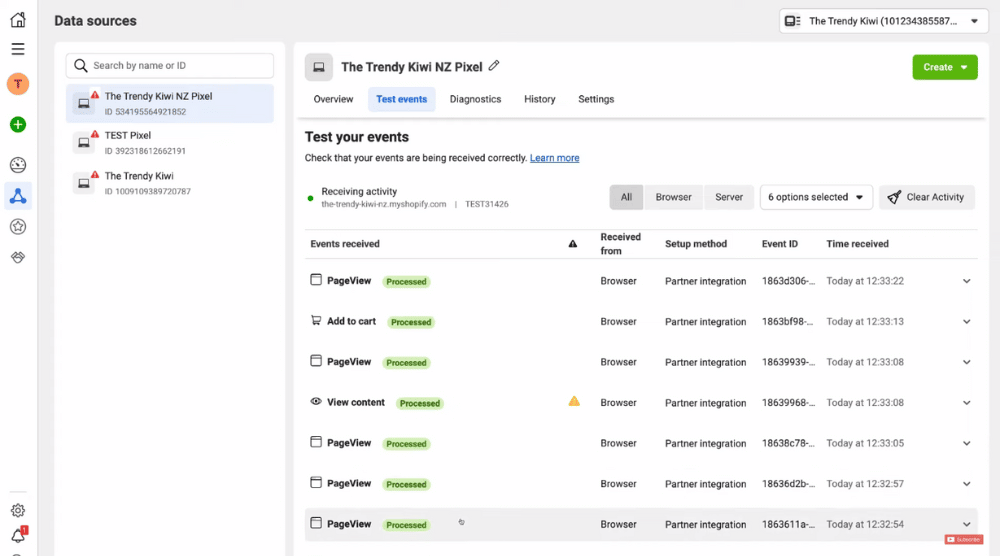
- Back inside Facebook, you should see all the actions and events under ‘Events received’.
It means you’ve successfully learned how to install Facebook Pixel on Shopify.
It’s that simple!
Read more: How To Use Meta Business Suite
Install Facebook Pixel on Shopify (Video Tutorial)
That wraps up our updated Facebook Pixel tutorial for Shopify.
Check out our video guide for extra help completing this process!
Enjoy!
