Table of Contents
HubSpot is an all-in-one business software that offers a suite of tools designed to streamline marketing, sales, customer services, and operations.
Small businesses, in particular, use HubSpot’s free CRM (customer relationship management) to manage their contacts, employees, suppliers, clients, tasks, deals, and more.
However, what many people are unaware of is HubSpot’s website builder.
This tool lets you create and launch a professional business website in minutes.
Therefore, in this beginner’s HubSpot website builder tutorial, we’ll reveal how you can create a HubSpot website.
We’ll do so by using HubSpot’s Content Management System (CMS) Hub Starter, which is suitable for small businesses.
How to Create a HubSpot Website?
Let’s launch into our 2022 HubSpot CMS guide, which will guide you with the steps in creating a HubSpot website with HubSpot’s Website Builder.
1. Get Started with HubSpot CMS

Get started with Hubspot for FREE here
*The link above is an affiliate link, which means we will get a commission if you upgrade to a paid plan (with no extra cost to you). This helps support our education-based website and we thank you in advance!
- Visit HubSpot CMS
- To utilize HubSpot website builder, you first require HubSpot free CRM. This is for those that currently have not signed up to HubSpot.
Read more: How To Use HubSpot CRM
2. Sign Up for HubSpot’s Free CRM

Within your CRM dashboard, you can access your website.
It’s important to know how HubSpot free CRM works before you go ahead and engage in building a website with HubSpot’s website builder.
If you currently don’t have a HubSpot account and are completely new to HubSpot’s CRM, we strongly advise checking out this tutorial first.
After watching that tutorial, you can continue with this comprehensive HubSpot CMS hub review.
A CMS is a place where you can create as well as manage all your digital content.
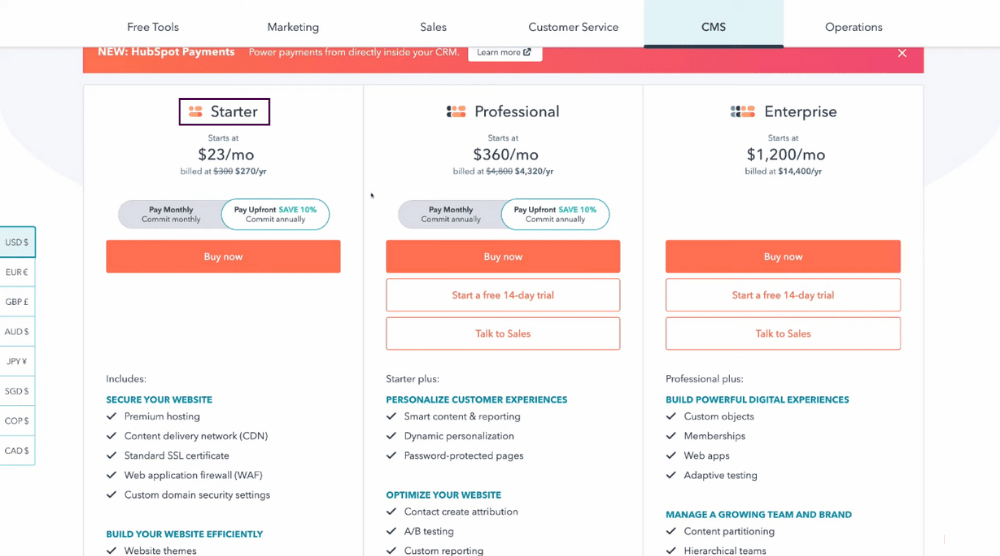
To sign up, simply click ‘Buy Now’ (refer to the screengrab).
Don’t worry as you don’t have to pay anything just yet unless you decide to upgrade your plan.
Let’s meet you inside your HubSpot CRM dashboard!
Read more: HubSpot Tutorial for Beginners
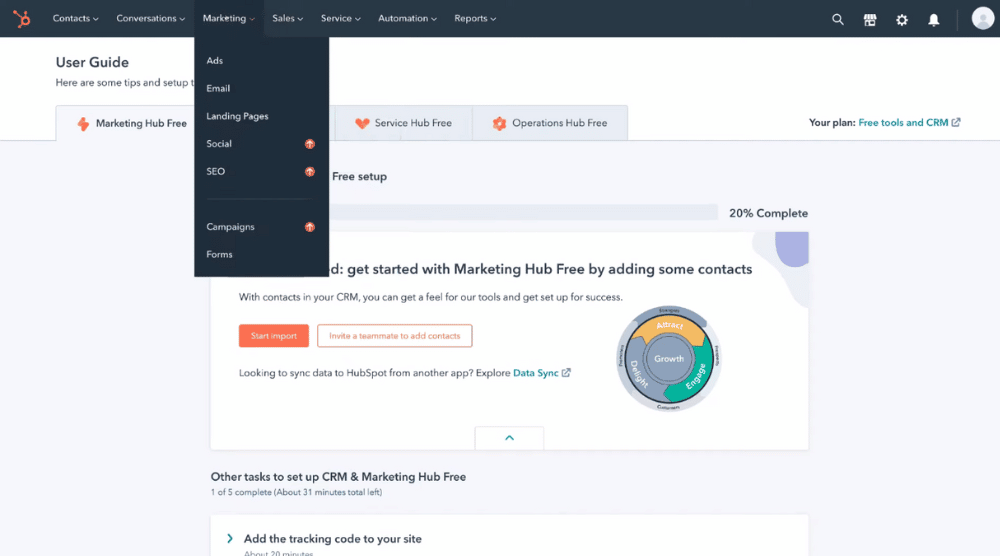
After you finish the HubSpot signup, you’ll find yourself inside your dashboard.
Notice all the features at the top of your dashboard: contacts, conversations, marketing, sales, service, automation, and reports.
We’ve covered all these features in the HubSpot tutorial for beginners that we mentioned before.
You’ll find the ‘Website’ feature under ‘Marketing’.
However, we can’t access it yet as we’re using the free HubSpot version.
Hence, the option is not visible right now.
IMPORTANT: Recently HubSpot launched a completely free version of their website builder. You can check that out here.
Read more: HubSpot CRM App Tutorial
4. Sign Up to the CMS Hub (Pricing)

To enable the website feature:
- Click on your account (see top-right corner)
- Select ‘Pricing & Features’
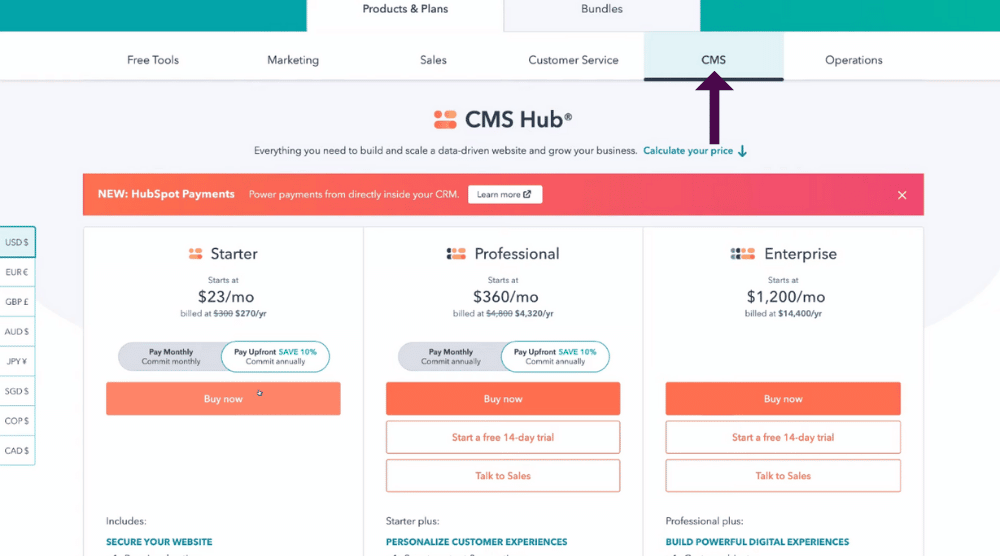
- Choose ‘CMS’ under ‘Products & Plans’
- Notice the three CMS plans: Starter ($23/month), Professional ($360/month), and Enterprise ($1200/month).
- We’ll focus on the CMS Starter for this HubSpot website tutorial, which is sufficient for small businesses.
- Observe the features offered by CMS Starter, including content strategy, Google Search Console integration, search engine optimization (SEO), A/B testing, custom reporting, and more.
- Check the screengrab to see detailed pricing options and the features
A great benefit of using HubSpot website builder is that all the extensive tools and features needed to run a business are already integrated with your website.
Since you need a Starter CMS plan (at the minimum) to build a website, all the premium features are also available at your disposal.
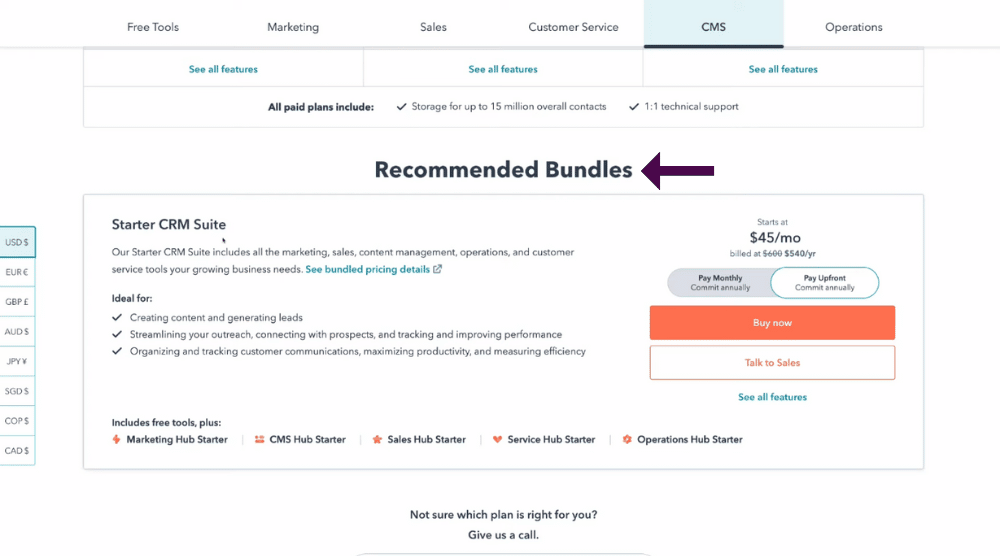
Now, scroll down to ‘Recommended Bundles’ and locate the Starter CRM Suite.
This all-in-one option allows you access to not just the free tools, but also the Starter versions of the marketing, CMS, sales, operations, and service tools (hub).
The bundled packages are an excellent alternative if you’re planning to leverage HubSpot for managing your business all in one product.
However, for this HubSpot CMS guide, we’ll keep our focus on the CMS Starter plan.
Now, let’s dive into these actions:
- Hit ‘Buy Now’ under ‘Starter’ (refer to the screengrab). Alternatively, you can also opt for a free 14-day trial with the Professional or Enterprise CMS plan. But we’ll create a fresh CMS Starter account in order to explain how to create a HubSpot website.
- Next, add your details and move forward with the signup, post which you’ll enter the HubSpot CMS dashboard.
Read more: How To Use HubSpot Meeting Scheduler
5. Website Pages vs. Landing Pages

After upgrading to CMS Hub Starter, you can start building your HubSpot website.
- Tap on the ‘Marketing’ tab
- Notice that the ‘Website’ feature is now visible.
- Click on ‘Website’ to find ‘Website Pages’ and ‘Blog’
In case you don’t see these options yet, we recommend waiting a few minutes and refreshing the page.
Go ahead and choose ‘Website Pages’.
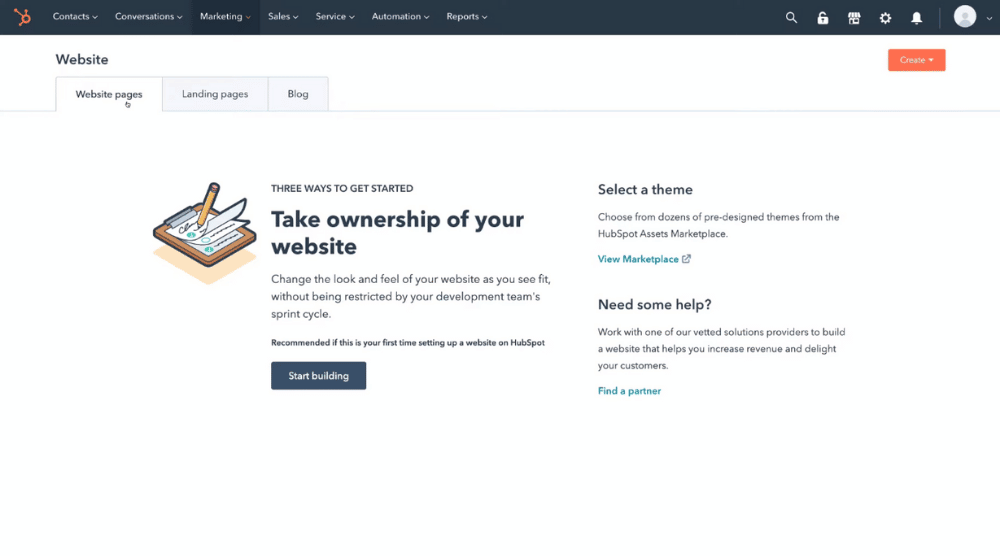
Here you can create:
- Website pages
- Landing pages
- Blog
We should mention that landing pages are different from website pages.
Website pages are a part of your core website that will last you a lifetime.
Examples are the homepage, contact page, about us page, product pages, services page, etc.
These are your site’s pillar pages.
On the other hand, landing pages are designed to have a single-focus CTA (call-to-action).
For instance, you can build compelling landing pages to capture contact information, generate leads, drive sales, and other specific objectives.
In other words, these are standalone web pages created for achieving specific goals.
Businesses use landing pages to drive and convert paid traffic.
If you wish to design beautiful landing pages with HubSpot-free CRM yourself, we recommend looking into this tutorial.
Read more: How To Create A Landing Page with Hubspot
6. Set Up Your Website

- Under ‘Website pages’, tap on ‘Start building’ (see the screengrab)
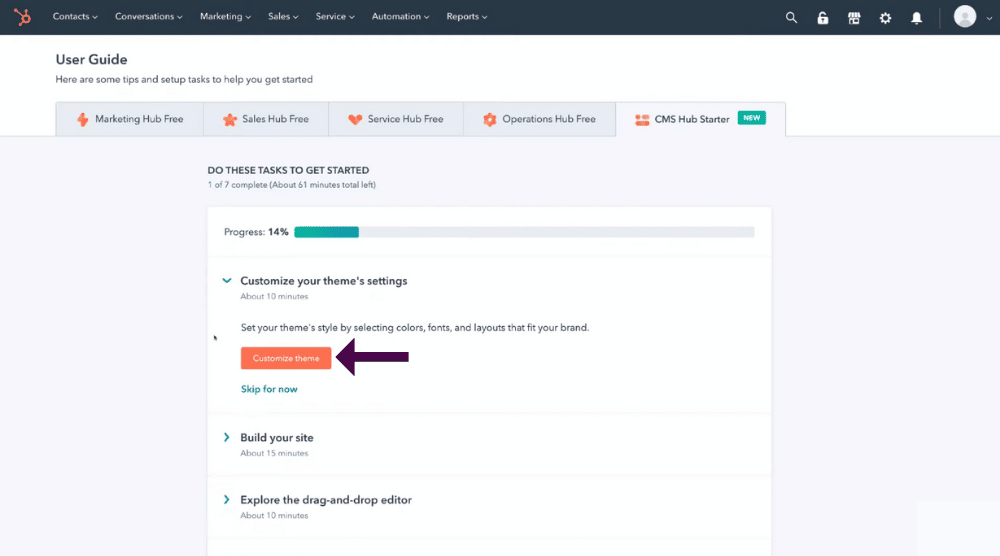
- Select ‘Customize theme’ under the ‘CMS Hub Starter’ tab. This is where you can edit the layout, design, style, and font of your website.
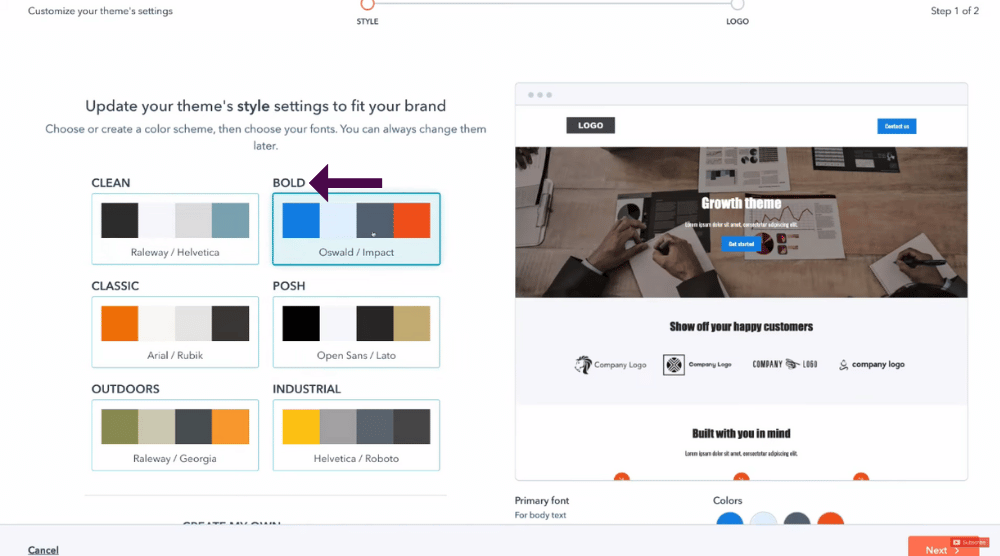
- Next, choose a global color style for your HubSpot website theme that fits your brand. It’s possible to change the theme settings later on. For this HubSpot CMS Hub tutorial, we’ll pick ‘BOLD’.
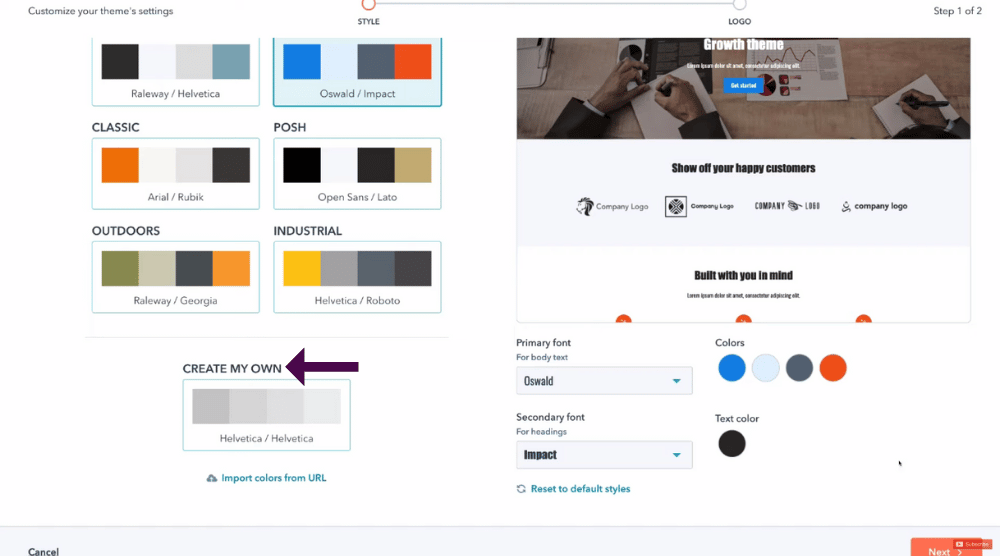
- Scroll down to ‘CREATE MY OWN’ if you prefer to create your own global color style.
- Choose a primary font for body text. Remember, all these changes will be applied to your HubSpot website globally.
- Check out the right-hand-side preview to see the changes.
- Now, pick a secondary font from the dropdown. This will be applied to your headings.
- Change the color of different elements on your site based on your branding requirements. For instance, blue is for links and buttons while grey is for borders.
- Change the text color, if required. We’ll keep the default black color for the text.
- Hit ‘Next’
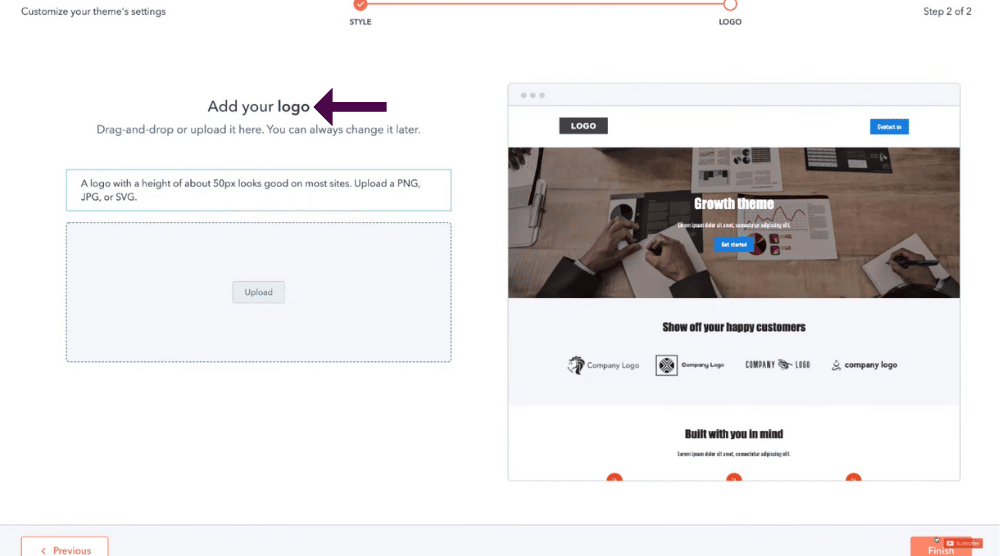
- Upload your logo. If you don’t have one, watch this tutorial to create a free business logo with Canva.
- Alter the height and width of your logo, if required
- Hit ‘Finish’
Read more: Canva Free Logo Maker
7. Build Your Website

- Click on the ‘Build site’ button (see the screengrab)
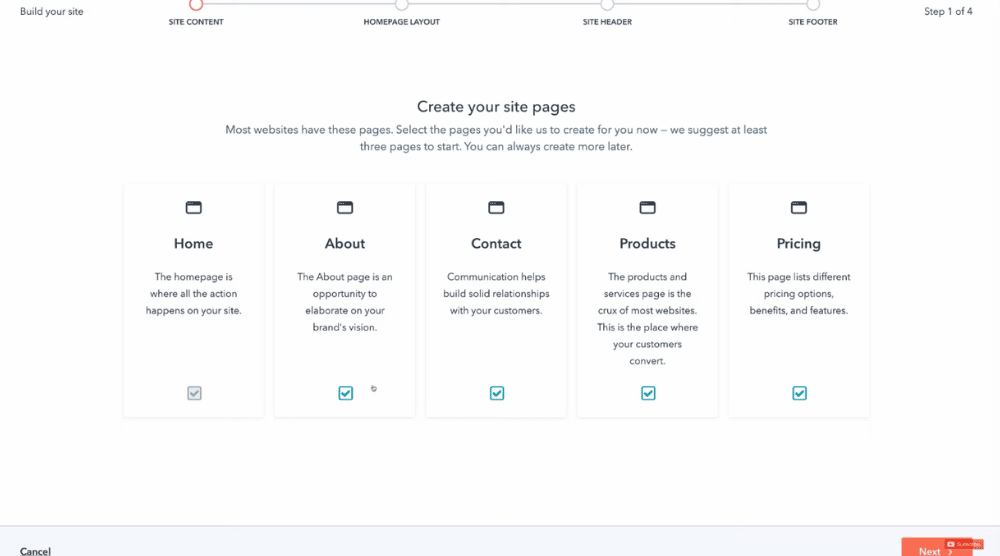
- Add your core website pages. The HubSpot CMS has selected all the pages by default, namely: pricing, products, contact, about, and home. You can also add more pages later on. Unselect the ones you don’t need.
- Click ‘Next’
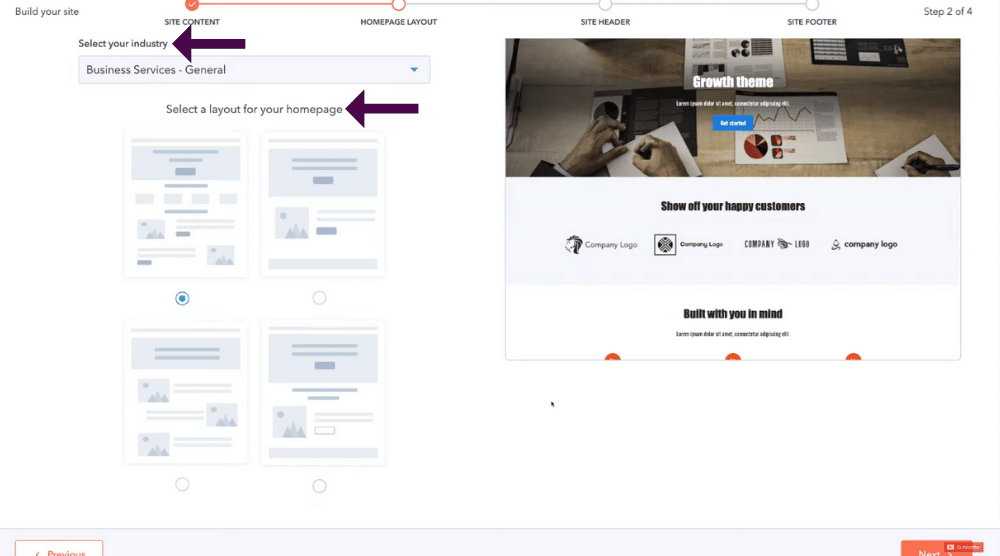
- Choose your industry
- Select the layout and photos for the homepage
- Hit ‘Next’
For this HubSpot CMS guide, we’ll build a site for a digital media & marketing agency.
Now, follow these steps:
- Select a global site header. For this HubSpot website tutorial, we’ll choose the first header layout, which is also the most common one. In this layout, the logo is left-aligned whereas the menu items (website pages) are located right next to it. Refer to the screengrab.
- Click ‘Next’
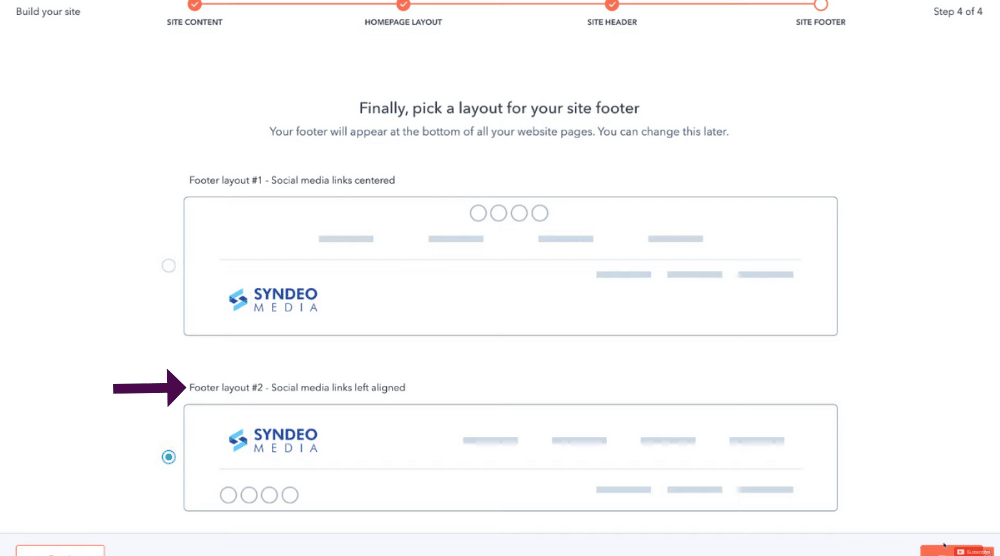
- Choose a global site footer. Again, ‘global’ means the footer will be visible on every page of your HubSpot website. For this HubSpot website builder tutorial, we’ll go with Footer layout #2.
- Tap ‘Finish’
Give HubSpot a moment to load your website pages.
8. Customize Website Pages

Using HubSpot’s visual drag-and-drop editor, we’ll now explain how to customize your web pages.
- Click ‘Start demo’
- Skip or watch the tutorial offered by HubSpot. Hit ‘Let’s go’
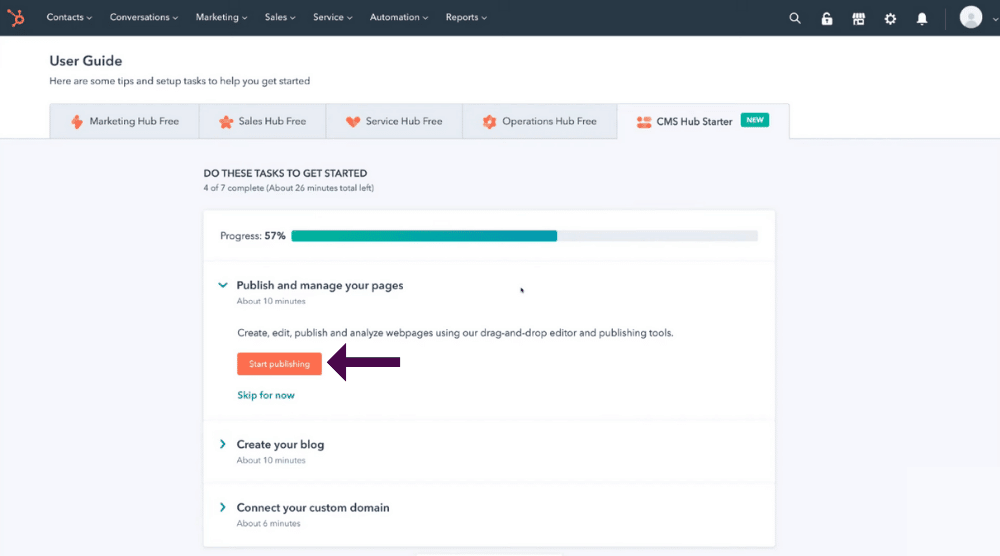
- Tap on ‘Start publishing’
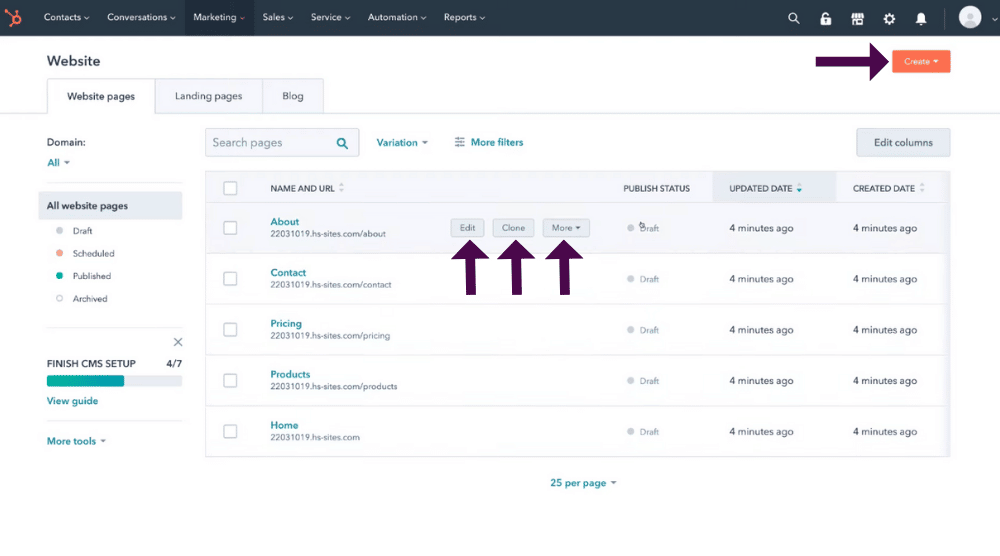
- Keep the ‘Website pages’ tab selected. This is where you’ll see your website pages chosen earlier. They are not currently live.
- By clicking ‘More’ and selecting ‘Publish’ (next to each web page), we can launch them for the world. But we do need to customize them before that.
- You can also clone any website page. This is an excellent method to quickly create web pages where you just have to change a few details except for the layout and style. The cloning method is highly recommended for building product pages.
- To add a new page, tap on ‘Create’ and pick ‘Website page’ from the dropdown.
Now, in this HubSpot CMS guide, we’ll walk you through the steps to edit the homepage.
To do that:
- Hit ‘Edit’ adjacent to homepage
- You can now either customize your homepage content from scratch or select a HubSpot website template. We suggest using a template if you are a beginner.
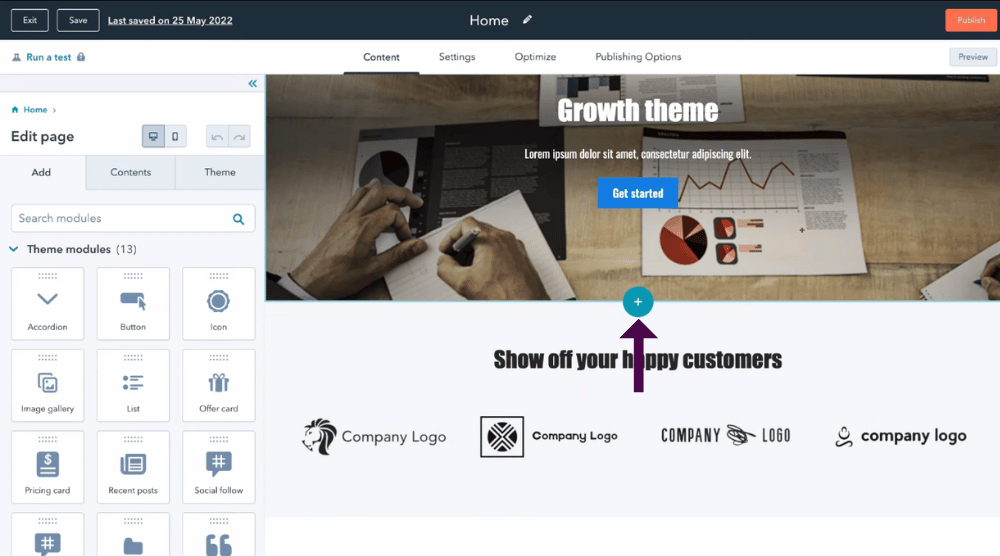
Before that, let’s understand the HubSpot website page structure.
- Your entire web page can be broken down into sections (the blue boxes, check the screengrab).
- To add a new section, simply hit the blue ‘+’ sign either above or below an existing section.
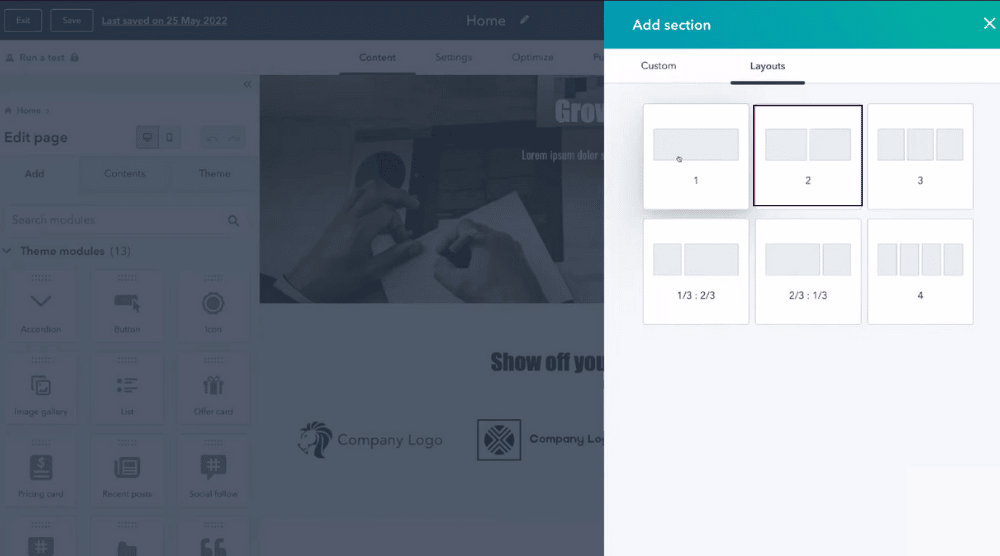
You can now pick a premade theme and layout for the section.
For this HubSpot CMS Hub tutorial, we’ll choose a two-column layout.
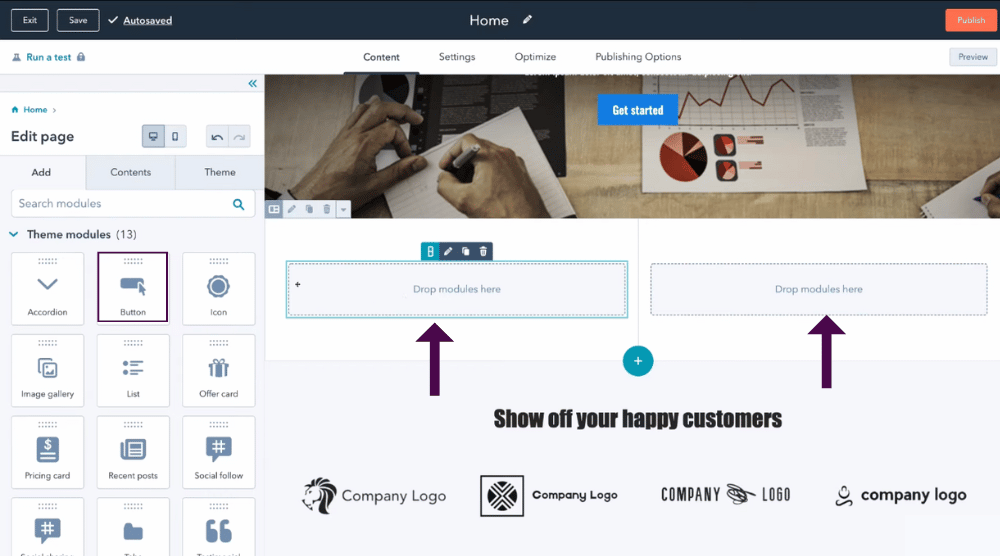
To these two columns (or rows), you can now start dragging and dropping the modules.
The default theme modules are located on your left. Examples of modules include buttons, social follow, icons, image galleries, lists, pricing cards, testimonials, tabs, recent posts, etc.
They are essentially the features you want on your HubSpot website.
- Go ahead, drag and drop a button to column one. Notice that the style, font, and color of the button are the same as other default buttons on the page. It’s because these are theme elements or modules.
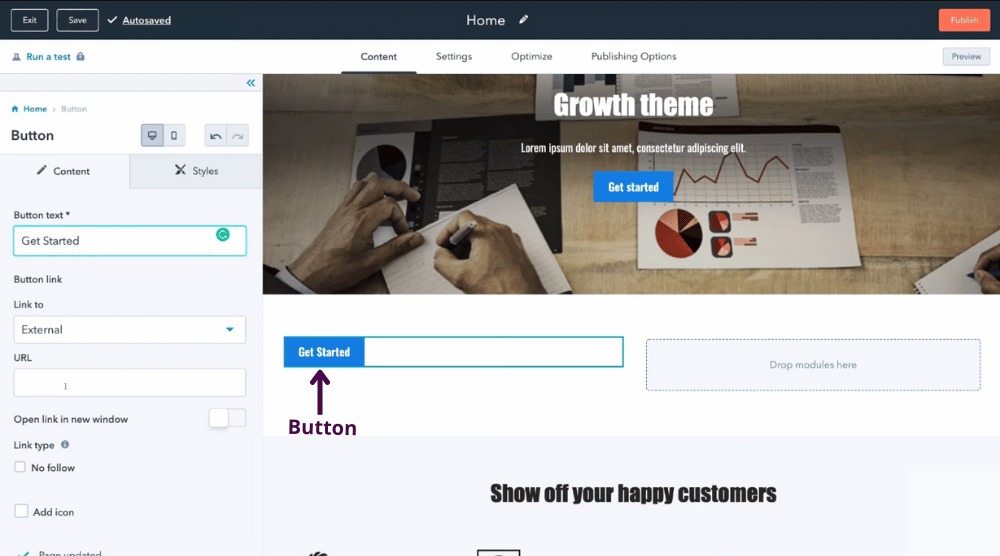
- On the left is where you can edit the content and style of the button (or any module).
- For instance, you can change the button text and add a button link to another website page.
- Under ‘Style’, you can edit the border, background, text, and alignment of the button. Make sure the changes fit your overall branding.
- You can undo/redo any edits
- Save changes (top-left corner)
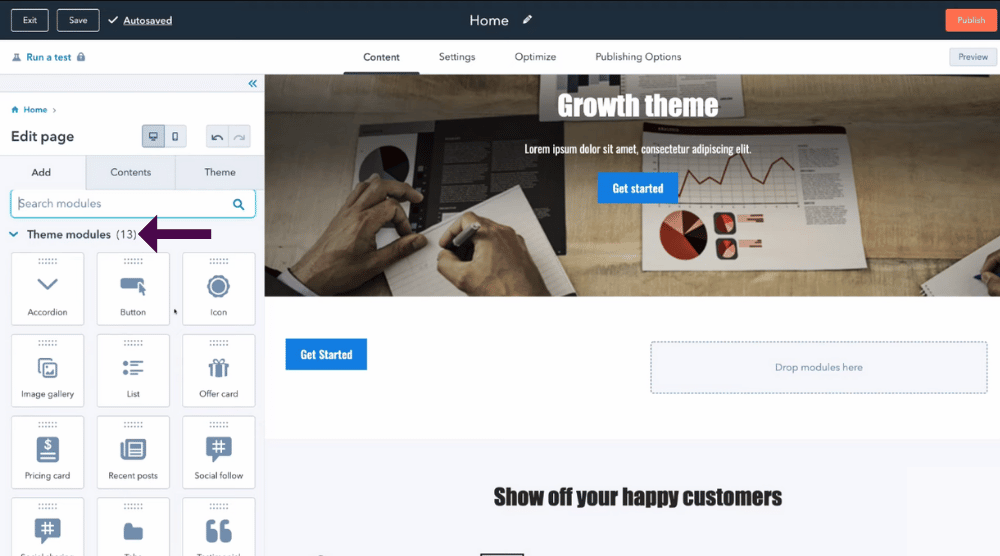
Similarly, you can embed more elements onto your HubSpot website.
Now, if you tap the dropdown next to ‘Theme modules’, the common modules will reveal themselves.
These are standard modules that are not customized to your HubSpot website theme.
The process of adding and customizing the standard elements is the same as theme elements.
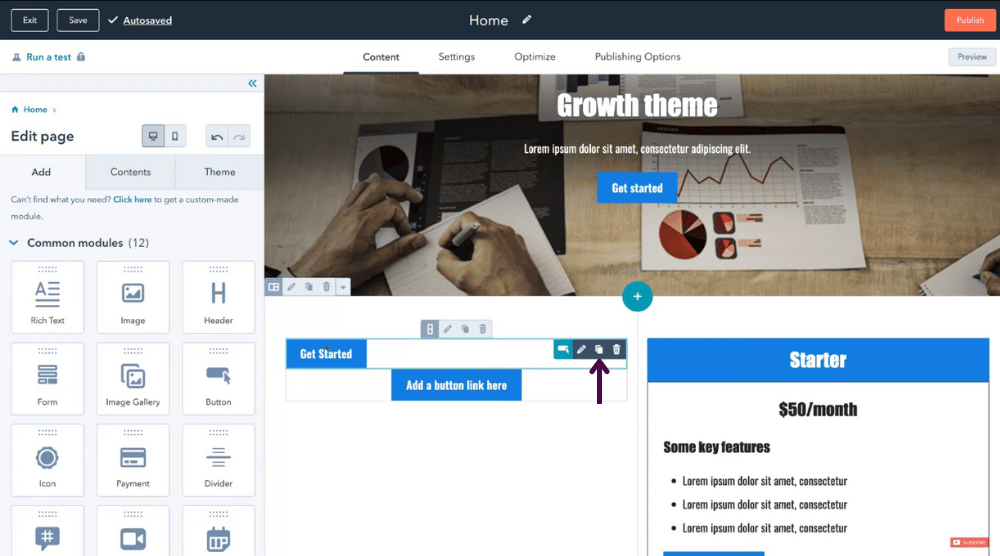
Each module can be duplicated or deleted when required.
Those options can be seen in each module.
Also, each of these modules can be repositioned on your website page.
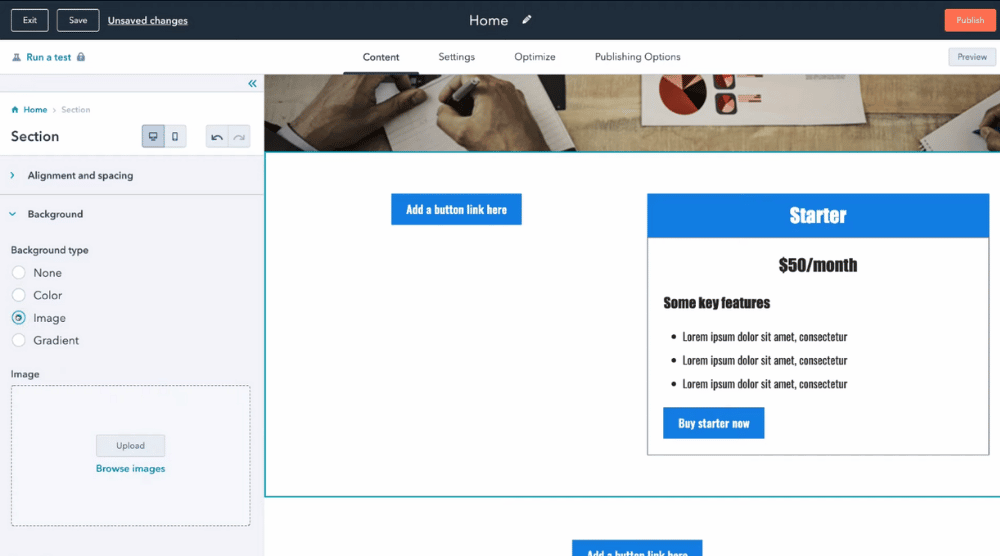
Now, to customize a section:
- Click on the required section
- Hit the pencil icon
- Change the alignment, spacing, background, etc. on the left
- Add an image or change the background color
It’s pretty easy!
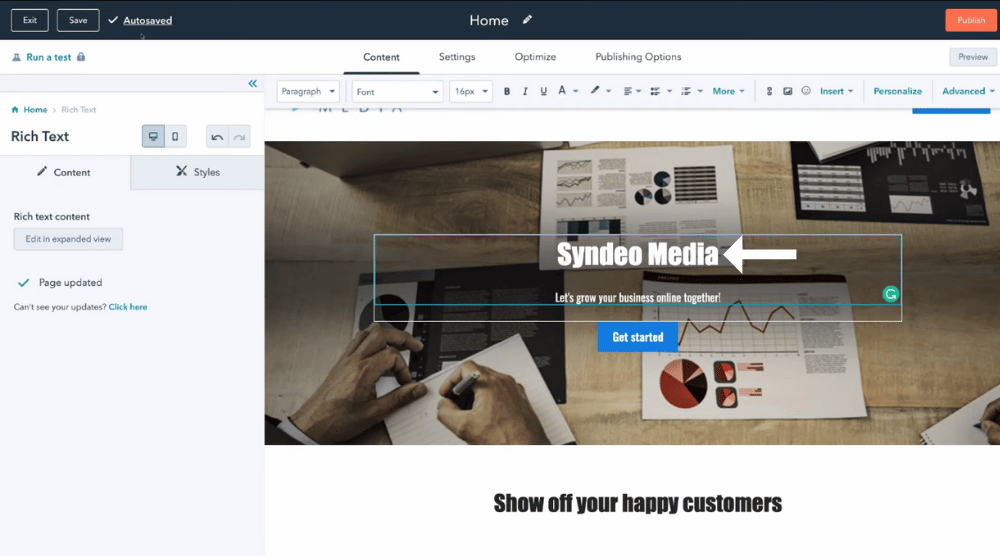
To edit the existing modules, click the module > change the content.
You can also view the formatting options like color, font, alignment, etc. at the top (refer to the screengrab).
Even though your changes are going to be automatically saved, you can also save them manually by clicking ‘Save’ in the top-right corner.
Also, by hitting ‘Preview’ (top-right corner), you can analyze what your HubSpot homepage looks like on different devices.
That said, we wouldn’t recommend checking site responsiveness using this method.
Instead, you can copy the shareable link (top-right corner) and mail it to yourself.
Now, check to see if your new website is responsive across different browsers and devices.
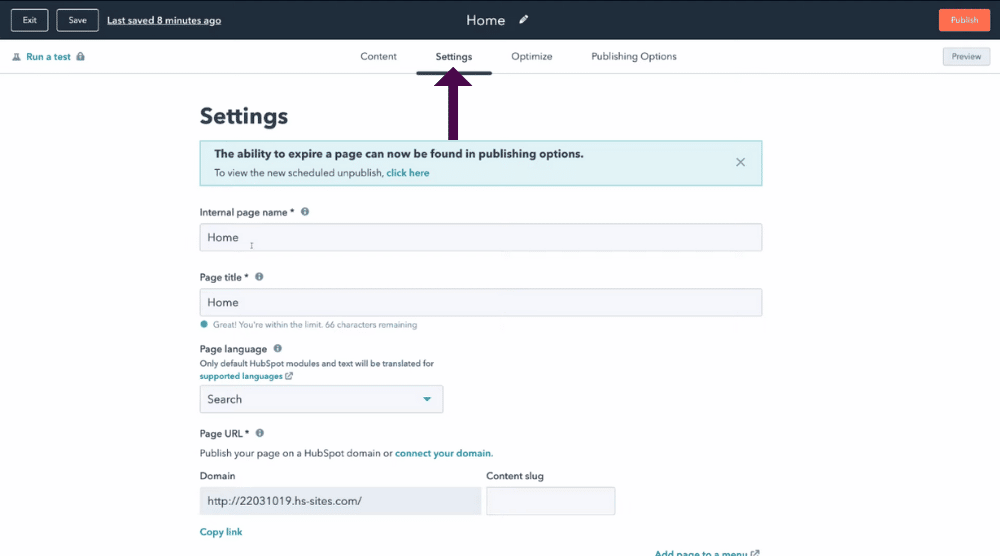
To finish customizing the homepage:
- Head over to the ‘Settings’ tab adjacent to ‘Content’ (see the screengrab)
- Edit the internal page name (for admins), page title, page language, page URL, etc. We’ll keep the default settings for this HubSpot CMS guide.
- Keep the content slug empty for the homepage.
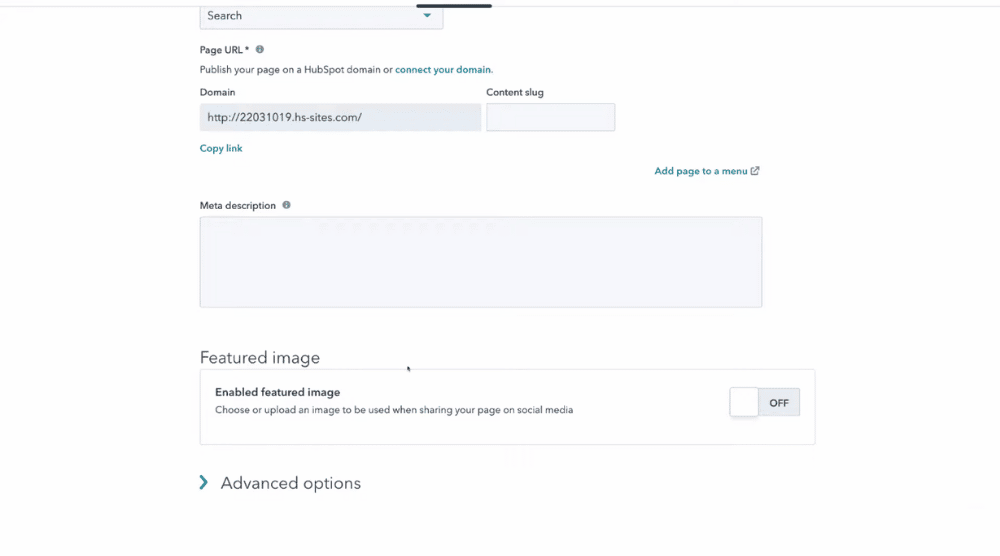
- Enter the meta description (useful for SEO). This is what appears in the search results under the meta title. Since it’s a homepage, the meta description can include details of your business. But if it were a services page, it would include details of your service(s).
- Turn on the toggle and upload a featured image. If not for all the pages, you must include a featured image for your homepage. We’ll upload our logo as the featured image.
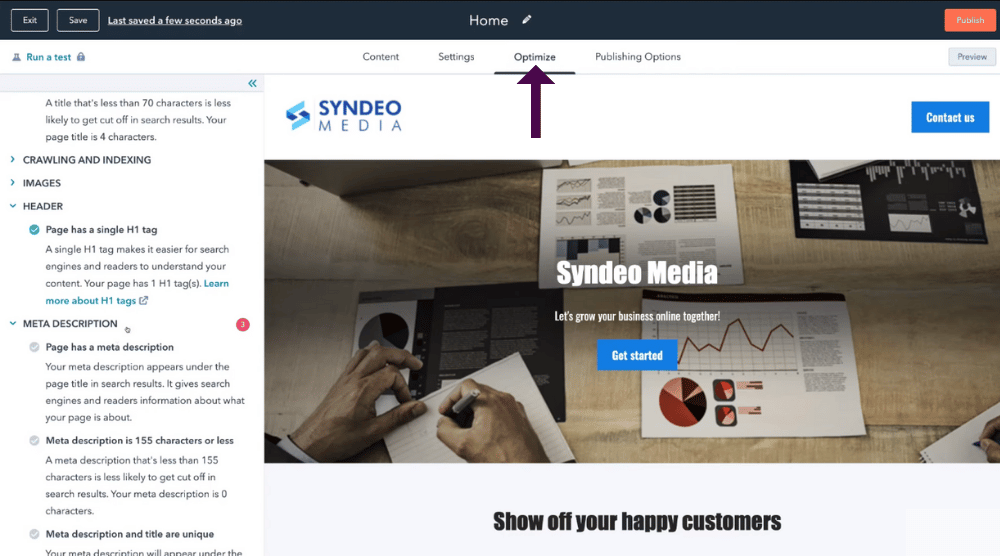
Using the HubSpot CMS Hub, you can also optimize your site per the SEO parameters.
To do that, navigate over to ‘Optimize’ next to the ‘Settings’ tab.
Take the time to go through each SEO element, such as mobile-friendliness, title, images, crawling and indexing, etc.
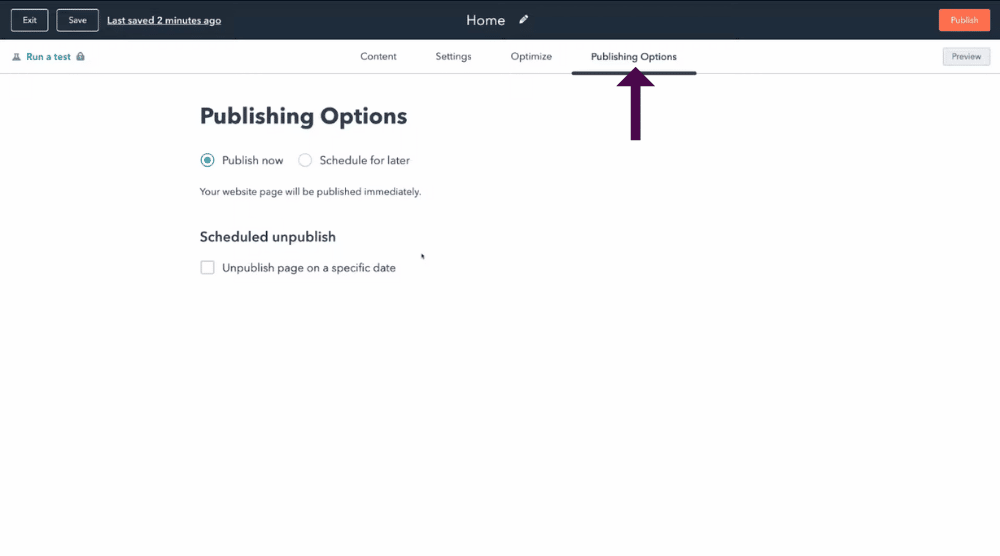
Next to ‘Optimize’, we have ‘Publishing Options’. This is where you can:
- Schedule publishing for later
- Publish the HubSpot website right now
- Unpublish the site
- Tap on ‘Exit’
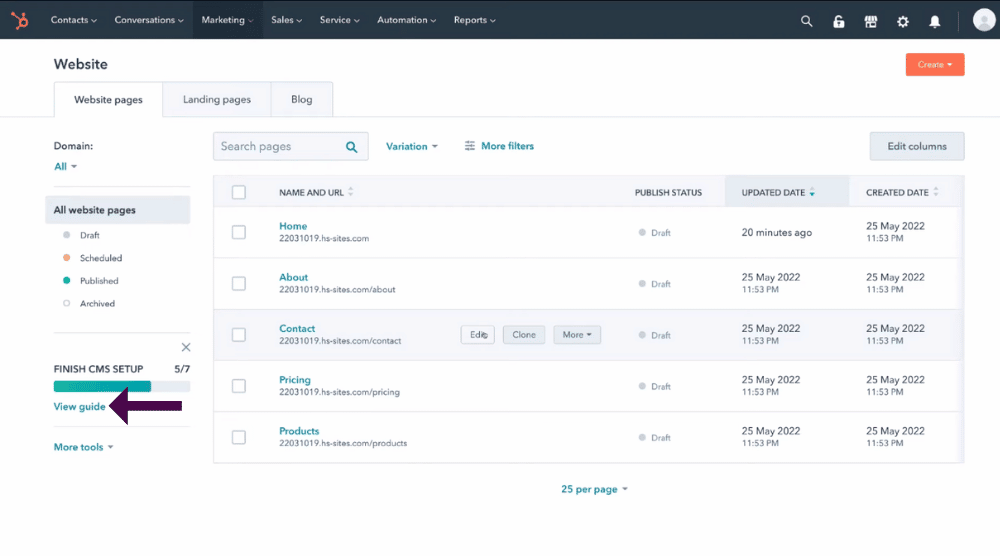
You’ll arrive back at the ‘Website pages’ dashboard.
Use the same process explained to customize the other pages.
Congratulations!
You’ve successfully learned how to create a HubSpot website. We now want to address some additional points before we wrap up this tutorial.
To ensure that you’ve completed everything before publishing your site:
- Hover over to ‘Finish CMS Setup’
- Select ‘View guide’
9. Add Blog (Optional)

- Click on ‘Marketing’
- Select ‘Website’ and choose ‘Blog’ or Click on “Create blog” (Refer to the screengrab)
This is where you can consistently create and publish your blog posts.
They could be about industry trends, product news, general educational content, and anything that’s relevant to your brand.
Remember: Blogging is an organic SEO technique, crucial for ranking higher on search engines like Google.
10. Add Custom Domain (Optional)

Your site has a HubSpot domain by default.
To add a custom domain:
- Navigate back to ‘Finish CMS Setup’
- Click ‘View guide’

- Tap on ‘Connect domain’ under ‘Connect your custom domain’
HubSpot also offers you a free SSL certificate, which gives tells your website visitors that your website is secure.
Read more: How To Get A Free SSL Certificate for WordPress
11. Publish Website

For this HubSpot website tutorial, we’ll publish the newly-built site with the default HubSpot domain name.
After customizing each web page, you can also publish your website pages one by one as explained earlier.
Once you do that, your entire HubSpot website and website pages can be found online!
With this, we conclude our HubSpot CMS guide for beginners!
I hope you got value.
Hubspot CMS Hub Guide (Video Tutorial)
Check out our full video below that will give you an additional layer of confidence and guidance when building your website with HubSpot.
Enjoy!

