
Table of Contents
Have you ever tried booking meetings, appointments, or some kind of event through email?
Messy right!?
It can be incredibly time-consuming with the back-and-forth emailing trying to arrange a date, time, and location that suits everyone!
This is where an online scheduling tool like Calendly comes in.
Did you know that you can create tailored and professional appointment scheduling forms with Calendly?
And did you know you can then easily embed these forms directly onto your WordPress website?
And what’s even better?
You can do this completely for free!
In this brief Calendly tutorial, we’re going to share how you can embed a custom appointment scheduling form onto your WordPress website.
This will allow you to streamline your appointment scheduling process!
Read more: WordPress tutorial for beginners.
How To Embed Calendly on WordPress
Alright, let’s dive into this short Calendly and WordPress step-by-step tutorial for beginners!
Don’t have a WordPress website?
Learn how to create one for free down below.
1. Getting started

- Sign in to your Calendly account
- If you don’t already have a Calendly account, simply head over to Calendly.com and click ‘Get started’.
- This will automatically redirect you to your account
We’ll go ahead and meet you there.
Also read: How To Add Anchor Links to WordPress
2. Inside your Calendly dashboard

Once you’ve logged into your account, you’ll arrive at your dashboard (see screen grab).
If you navigate over to the left-hand side, you’ll see a default appointment scheduling form (if this is your first time signing into Calendly).
If you are completely new to this appointment scheduling software, we recommend watching our complete Calendly tutorial for beginners.
We provide an in-depth beginners guide that will help you set up and use Calendly, and also how to create your first appointment scheduling form.
Let’s continue below:
It’s important to note that Calendly’s free plan only allows one event type to be activated at a time.
As you can see from the screen grab, we already have an active appointment scheduling form for a strategy session (created in the tutorial linked above).
This is a 30-minute one-on-one strategy session.
- Navigate down to your form and click on ‘Share’.
Also read: How To Add Instagram Feed to Your WordPress Website
3. Options for embedding on your WordPress website

How can you embed this form on your WordPress website?
All you need to do is:
- Navigate over to ‘Add to website’.
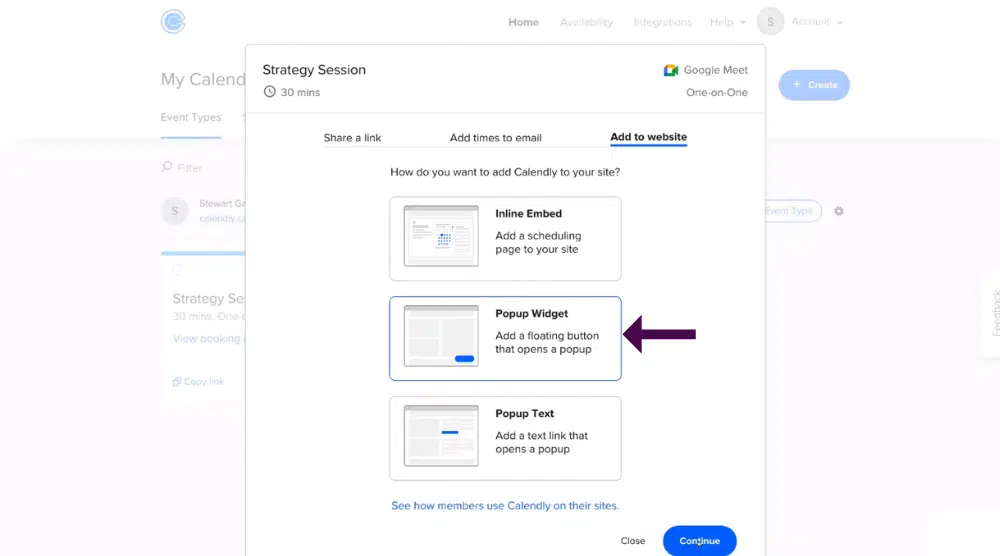
You have three options for embedding Calendly onto your website: (see screengrab)
- Pop-up text: You can add a text link that opens a pop-up
- Pop-up widget: You can add a floating button that opens a pop-up. This will be a button on your website pages. People can click the button and your calendly form will open.
- Inline embed: You can add a scheduling page to your site. If you provide a specific page where people can schedule appointments on your website, you can directly embed the form onto that page.
Now, what we’re going to show you is how to embed your form by using the Inline embed.
Go ahead and simply select this option, come down and click ‘Continue’.
Also, read: How to Add Facebook Messenger Chat to WordPress
4. Inline embed

Next, if you head over to the left-hand side, you’ll see ‘Booking page settings’.
Note: You can and should customize the look of your booking form to flow with the rest of your website pages.
If you navigate down, you can edit your form by changing the background color text, color, and button and link color if you want.
You can also always change this at any time so don’t worry if you’re not sure.
Once you are happy with your form colors, complete these steps:
- Navigate down and click ‘Copy code’ (see screengrab).
- That’ll copy your entire code snippet
In addition to WordPress, you can also embed Calendly on other popular and easy-to-use website builders like Wix and Squarespace. However, today we’re just going to focus on WordPress.
Once you’ve selected to copy your code
Head over to your WordPress website in a new website tab or window and log in.
Once you’re in:
- Simply navigate over to the left-hand side and locate ‘Pages’ (see screengrab)
- You can either click on ‘All pages’ to choose a page that you already have and want to embed your form on.
Or
- You can go ahead and add a new page by clicking ‘Add new’.
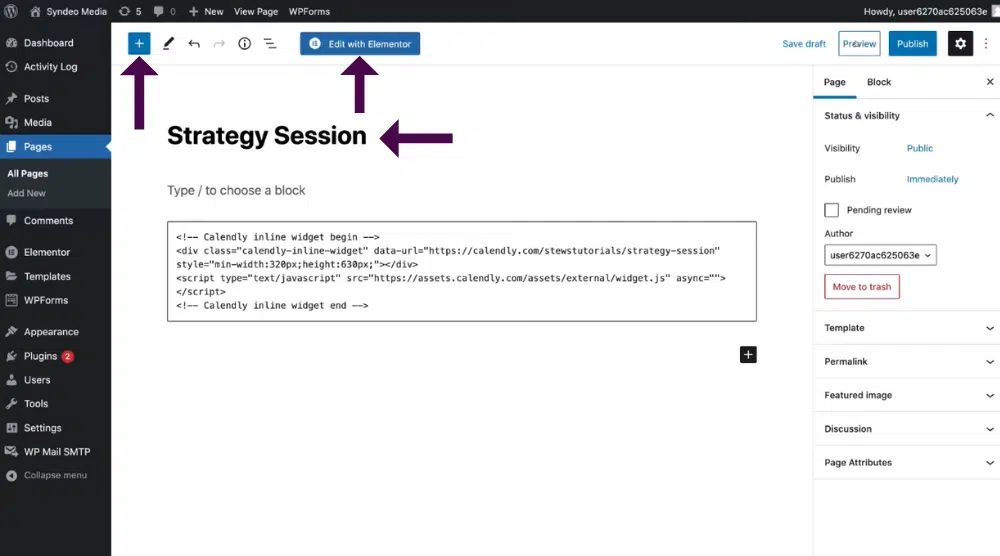
For the purpose of this Calendly tutorial, we’re going to add a new page and call it ‘Strategy session’.
- You can go ahead and name your page accordingly, In our case “Strategy session”
Next, you’ll need to locate ‘Custom HTML’. To do this:
- Navigate up to ‘Blocks’ (the ‘+’ button on the left upper-hand side of the page).
- Type ‘Custom’ in the search bar.
- Then click and drag ‘Custom HTML’ onto your blank page.
- Finally, come down to ‘Write HTML’ and simply paste in the Calendly code that you copied earlier!
Before you go ahead and publish your new page and your new form on your page, you can preview what your form will look like. This can be done by:
- Clicking ‘Preview’ on the upper right-hand corner of your page.
If you use a page builder like Elementor, you can click on ‘Edit with elementor’, located in the upper section of your page.
Elementor is one of the easiest WordPress page builders.
If you don’t use Elementor but would like to learn more about how you can create your own professional and stunning WordPress website using Elementor, check out our beginner’s guide here.
Recently, Elementor has also launched a new service called Elementor Cloud, which is an all-in-one, easy to use website building platform.
Read more: Creating your WordPress website through Elementor cloud.

Now that you’re in Elementor, follow the steps below (see screengrab).
- Click ‘Elements’ on the left hand side.
- Then type in ‘Code’ in the search bar.
- Click on ‘HTML’ and simply drag and drop that block in your page (wherever you want to add your form).
- Then, under HTML code (on the left-hand side bar) simply paste in the Calendly code.
- This will then embed the calendly form (see screengrab ).
Finally, all you need to do next is scroll down and click on ‘publish’ to publish your new page.
This means that now (for example) when a visitor lands on our example ‘Strategy session’ page, they can directly and easily book a strategy session with us on this page through this appointment scheduling form.
It’s that easy!
Also read: How to Create a Popup Form in WordPress
5. Pop-up Widget
Now we will show you how you can create an alternative option – How to embed your form using a ‘Pop-up widget’.
Navigate back to Calendly and follow these next steps:
- Within Calendly, press back again until you get to that page we saw earlier that showed three ways to embed your form.
- Now, select ‘Pop-up widget’.
- Come down and ‘click continue’

- Firstly, change the name of your button text that will appear on your website pages, In our case ” (see screengrab).
- For the purpose of this Calendly tutorial, we’re going to call this ‘Book strategy session’.
- You can customize the colors of the button that will appear on every page of our website.
Make sure that your button style is similar to your website theme!
- Then come down to ‘Booking page settings’:
Again, this is where you can customize the booking page so it seamlessly fits in with your website theme.
After you are happy with all your button settings:
- Come down and click ‘Copy code’.

Once you’ve done this, navigate back to your WordPress website.
This time, we’re going to use a plugin to install the button on every page of our website.
When you’ve logged into your WordPress dashboard again:
- Simply navigate over to the left-hand sidebar and press ‘Plugins’.
- Click ‘Add new’
- Navigate up to the upper right-hand side of the page and click ‘Search plugins’ in the search bar.
- Type in ‘HFCM’
- Come down and you’ll see the ‘Header Footer Code manager’ pop-up (see screengrab)
- Click on ‘Install now’.
- Simply click ‘Activate’.

Once the plugins have been installed:
- Scroll back down on the left-hand sidebar until you see ‘HFCM’.
- Click on ‘HFCM’
- Select ‘Add new’.
Now it’s time to name your snippet! We’re going to call this ‘Strategy session’.
Next, on the same page, you’ll see just slightly below your snippet name the header ‘Site display’.
This is where you have the option to add this button to specific areas of your website.
We want this button to appear site-wide, so we’re going to keep it sitewide selected, however, you can change it to suit you from the drop-down menu.
We can also exclude pages and posts over here (see screengrab)
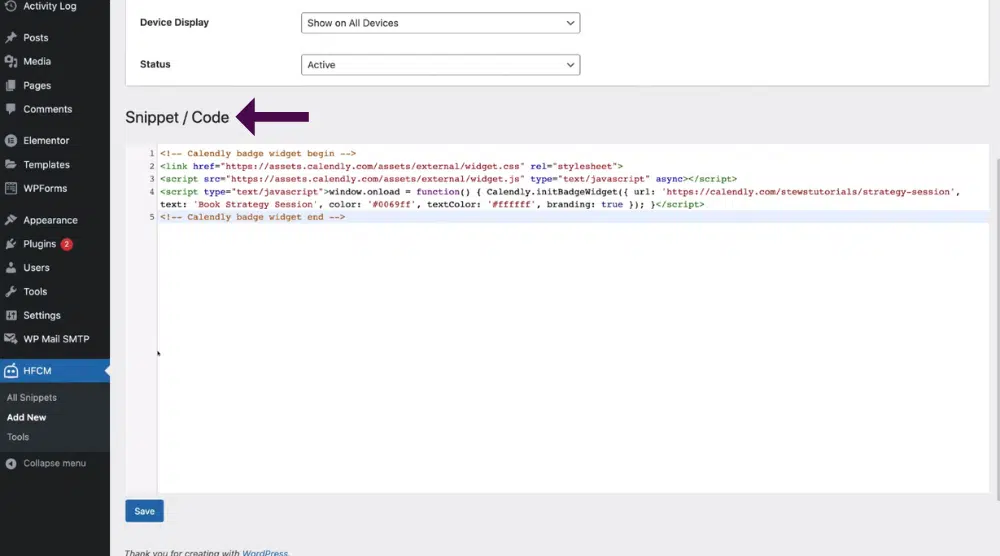
From here:
- Simply scroll down to where it says ‘Snippet code’.
- Then you can go ahead and paste in your Calendly code
- Scroll down again to the bottom of the page and click ‘Save’

Once you’ve done that, scroll back up to the very top of the page and go ahead and view your new button on your website:
- Just click your website name in the upper left-hand corner and select ‘Visit site’.

Right, now that you’re on your website, you’ll see down in the bottom right-hand corner your new button that you’ve just embedded.
For us, it’s on every page of our website. (see screen grab)
As you’ll notice, in our case it has ‘Powered by Calendly’ because we’re using the free version of Calendly.

If we click on our ‘Book strategy session’ button, that’s going to generate our scheduling form.
From here, any visitor can now schedule this type of appointment with us.
And that’s a wrap!
Also read: How to Install Facebook Pixel on WordPress
Custom Appointment Scheduling Form (Video Tutorial)
We have now provided you with everything you need to know for you to embed custom scheduling forms (in two different methods) directly onto your Wordpress website using Calendly’s appointment scheduling forms.
You can also check out our video guide below on how to embed Calendly forms on your Wordpress website.
