Are you thinking about building an app for your small business but you don’t have the budget or the knowledge on how to get started?
Well, you’ve come to the right place! You can actually make a mobile app for free with a no-code app builder with one of the best app makers called Jotform.
Jotform is ideal for any type of small business looking to simply create a dynamic and feature-packed mobile app completely for free!
Let’s launch into this Jotform tutorial and walk you through this simple step-by-step process of how you can make a mobile app for free for your small business.
Additionally, if you’re wanting to grow a strong online presence for your small business and you currently do NOT have a website.
You can check out our Top 10 Website Builders for Small and Medium Businesses here to decide which tool is best for you and your business.
How To Create A Mobile App for FREE with Jotform?
Let’s begin.
1. Getting Started With Jotform

In order for you to create a free mobile app for your small business, you’ll first need to sign up with Jotform.
- Simply head over to your browser and type in Jotform.com, or click here
Jotform is known as a powerful form builder. Jotform has done a great job with releasing a powerful free app builder that also integrates seamlessly with powerful forms that you can use inside your app
Apps are great for small businesses looking to create an online environment for returning customers, as well as for selling products and services to a loyal community.
Additionally, apps can also be a simple and convenient solution for accepting bookings.
Essentially, apps are a great option for creating a more personal online environment with your customers.
Apps are extremely popular and are used by big corporations such as HubSpot, so you can engage with your customers from anywhere in the world on your mobile device!
Read more: HubSpot CRM App Tutorial.
2. Pricing

Before we get started, It’s important to note that the free plan allows you to access all the features that are available, and is definitely suitable for businesses just getting started
However, there are small limitations such as:
- A five-form limit.
- A maximum of 100 monthly submissions on your app form.
- Jotform Apps
Let’s dive in and share how you can simply create a free mobile app in just a few minutes using Jotform!
Once you’ve arrived at the Jotform website:
- Simply navigate up to and click on ‘Products’.
- Locate ‘Jotform apps’.
- Come down and click ‘Get started now’.
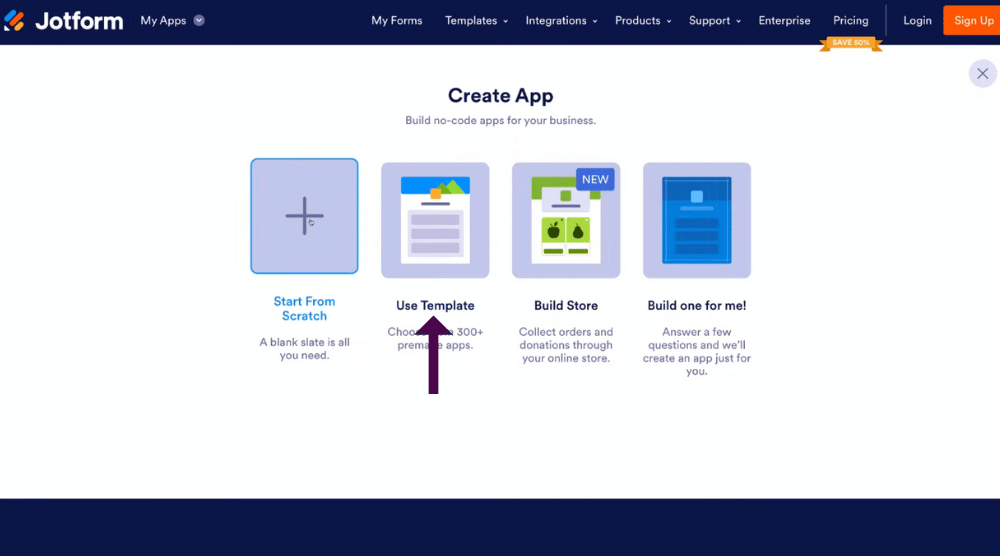
That’s going to generate these four options (see screengrab).
Simply select which option you want to go for.
For the purpose of this tutorial, we’re going to choose from a pre-made template.
This is ideal if you have zero experience when it comes to building an app!
Once you’ve had a bit more experience with navigating through an app builder like Jotform, you can always create an app from scratch within Jotform in the future.
To create an app from a premade template, follow these steps:
- Click on ‘Use template’.
3. App Templates

That’s going to take you to over 300 pre-made templates that you can choose and then build from.
- Scroll through all these different templates (and select ‘Preview’ to preview each app template).
- Navigate back up to the top and type a keyword in the search bar that’s related to your business.
Jotform will then generate templates related to that keyword.
For example, you could type in ‘Yoga’, ‘Restaurant’, ‘Construction’, or ‘Dentist’, and the relevant templates will appear for you.
Alternatively:
- Navigate over to ‘Categories’ over on the left-hand sidebar and select a category that best represents your business.
For example:
- We’re going to navigate up to ‘Search in all templates’.
- Type in ‘Agency’.
- Hit ‘Search’.
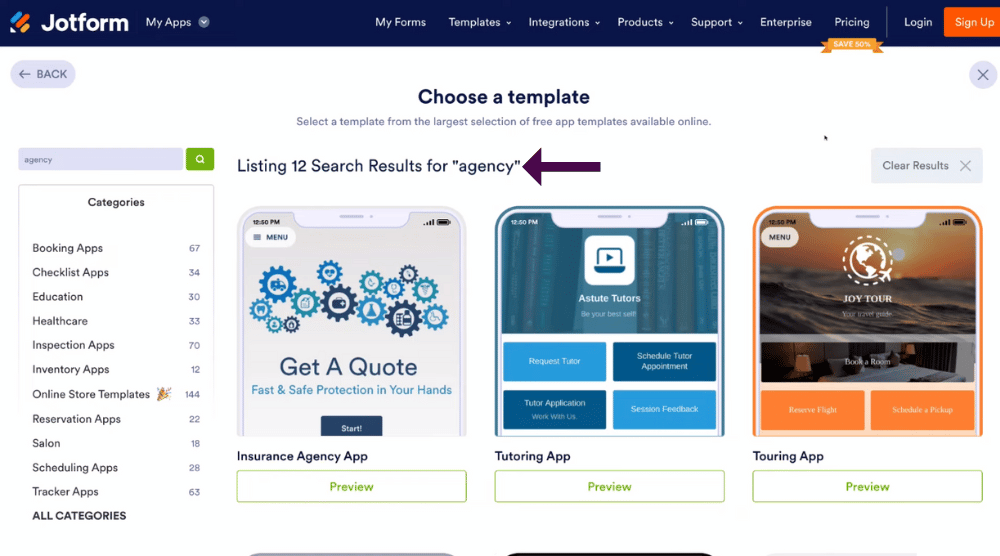
As you can see, 12 relevant app templates have been generated for the search term ‘Agency’ (see screengrab).
Go ahead and type in the relevant search for you, then:
- Simply scroll through all the different templates and select the one you want to use for your business.
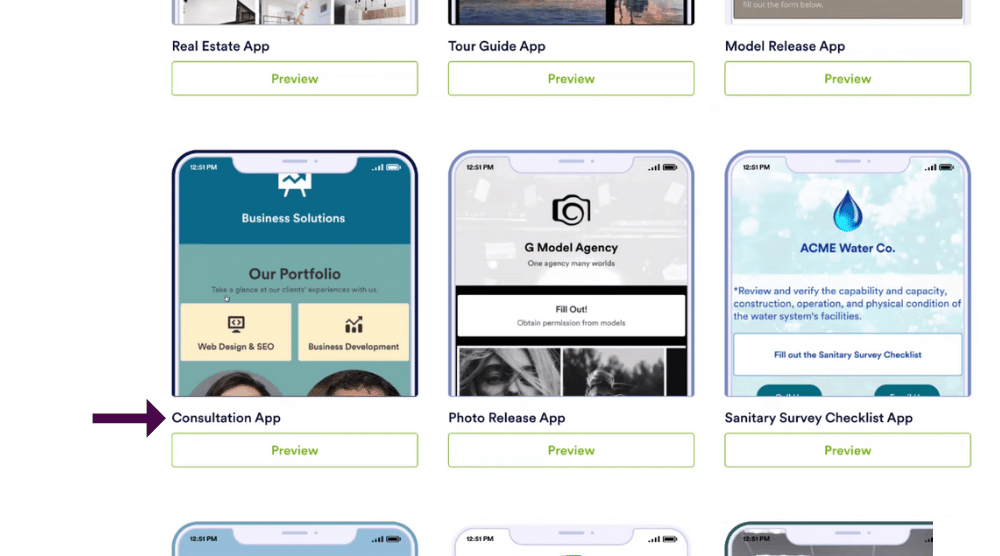
For the purpose of this tutorial, we’re going to navigate down and use this ‘Consultation’ app (see screengrab).
You can also preview what the app will look like by:
- Clicking ‘Preview’ on each app.
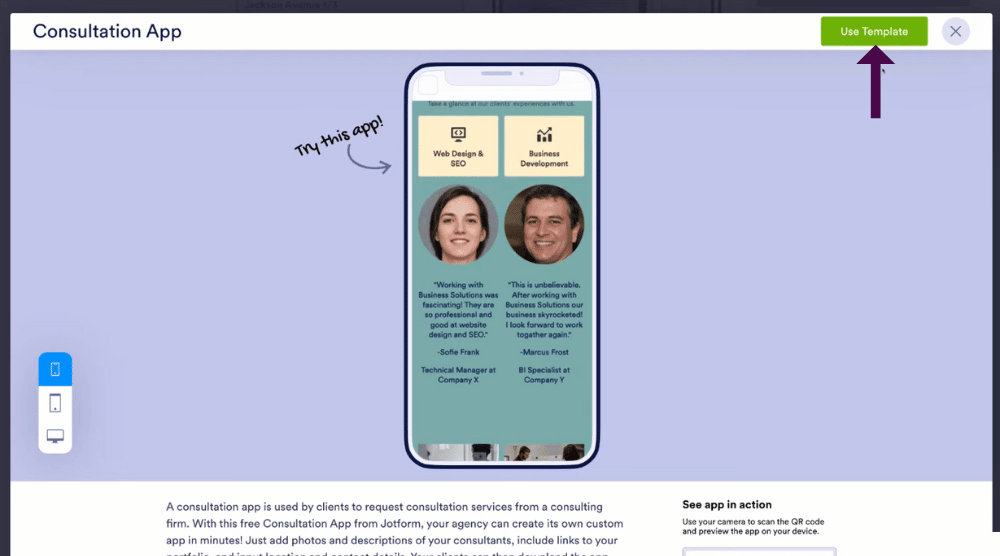
That’s going to generate a dynamic preview of what this app template will look like (see screengrab).
From here you can:
- Scroll through the app to see if you like the way the app template has been designed.
Once you’re happy with your chosen app template:
- Simply navigate up to ‘Use template’.
4. Customize The App Template

This takes you to the simple, visually engaging building experience for building your app.
You can edit your template by following these steps:
- Hover over each of the different ‘Elements’ on your form.
- Simply click on the element you want to change.
For example: If we click on this ‘Text element’ here (see screengrab) we can simply replace the content within this default app template section.
Up above this template section, you’ll see basic formatting options that you can leverage also
When you’ve finished making changes:
- Simply click ‘Done’ (the ‘tick’ logo next to the text).
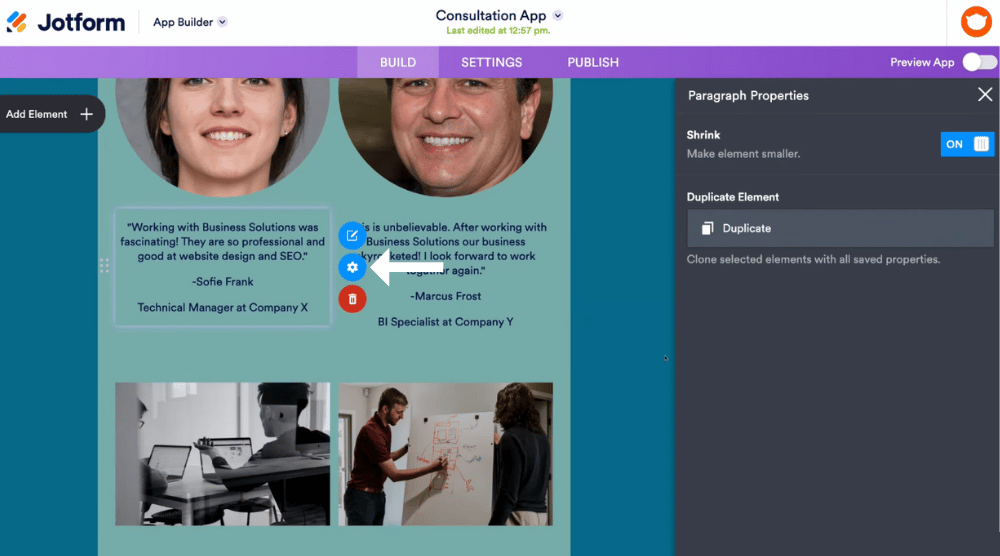
- You can also click on ‘Settings’ below.
That’s going to generate additional properties over on the right-hand side (see screengrab).
- Exit out of this when you’ve finished customizing these properties by pressing the ‘x’ button in the right side of the screen.

Follow these steps to replace the logo on your template:
- Scroll up to the top of the page.
- Simply click on the ‘template logo’
- Navigate over to ‘Icon’ in the right-hand sidebar.
- You can change the color by simply selecting either ‘Icon color’ or ‘Background color’ depending on what color you want to change.
- Navigate down further and select another icon from the options provided.
At the moment, we have this icon selected (see screengrab) for our logo.
However, we want to replace this icon with an image.

To do this:
- Navigate up to ‘Image’ next to ‘Icon’.
- Click ‘Remove icon’.
- Click ‘Upload file’.
Here’s our agency logo that we want to use (see screengrab).
Go ahead and locate your logo:
- Come down and click ‘Open’.
Here, you can adjust your logo size. We’re going to go slightly larger.
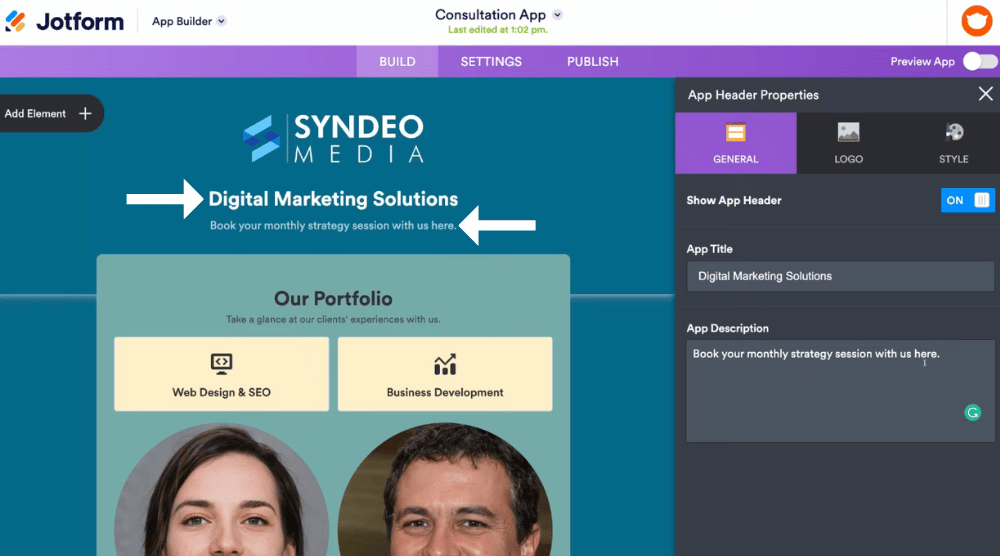
Once you’re happy with your logo size, you can also change your App title.
Follow these steps to find out how:
- Navigate over and click on the bit of text under your new logo on your app template. This is called your ‘App title’.
- Simply change the content to what you like here, (or)
- Navigate over to the right-hand side.
- Under ‘App title’ you can go ahead and replace this text. For us ‘Digital Marketing Solutions’ (see screengrab)
- Under ‘App title’ you can come down and add an ‘App description’ if you like. For us ‘Book your monthly strategy session with us here’
For the purpose of this Jotform tutorial, we’re creating an app that allows our customers to book their monthly strategy sessions with us.
This would be a private app for only our customers that currently work with us.
Later on, we’re going to show you how you can make your app public or private.
Take the time to navigate through the rest of your app.
To do this:
- Simply click on each different element.
- Navigate over to the right-hand sidebar.
- Add your own content and replace the default content.
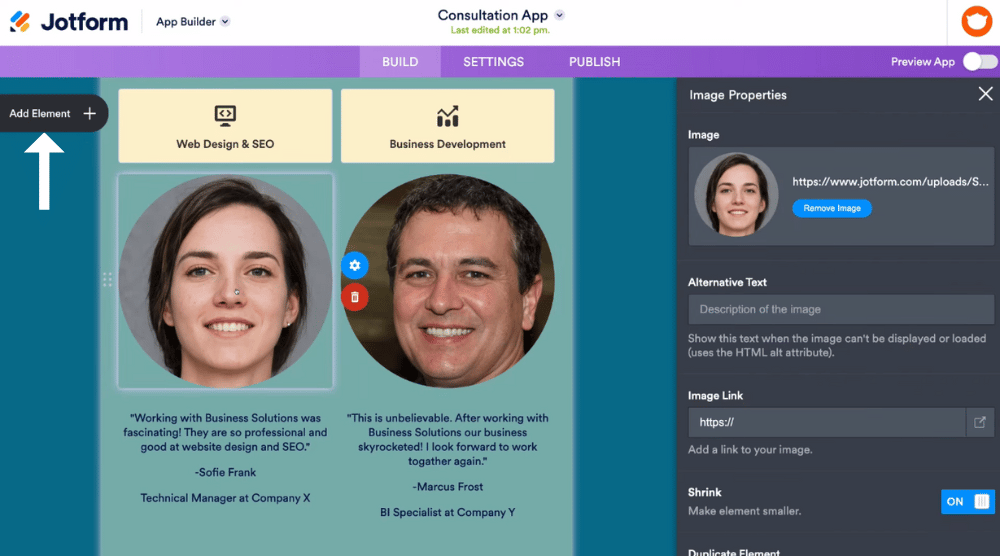
Once you’re happy with your existing elements and how they look, you can add new elements.
- Navigate over to the left-hand side.
- Click on ‘Add element +’. (see screengrab).
- This is where you can simply drag and drop the different elements into your app
5. Create App Form

In addition to their free app builder, Jotform is primarily known as a popular platform where anyone can make easy, customizable forms without any code required, similar to Google forms.
Find out more about how to use Google forms here.
Additionally, you can actually add a form to your Jotform app.
- Simply click on ‘Form’.
- Drag that form into your app.
- Drop it into the location where you want to add that form.
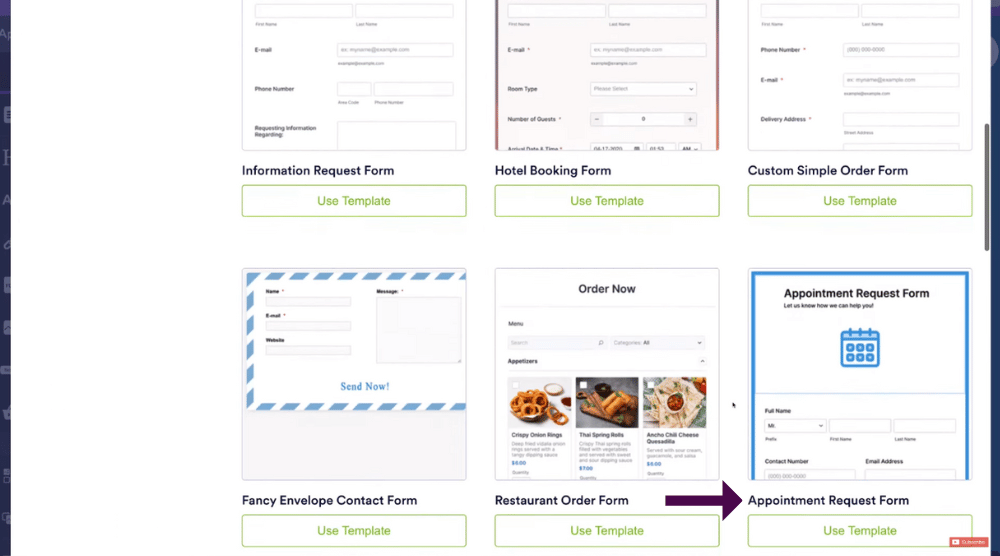
This is where you can preview the different form templates that you can add to your app.
For the purpose of this tutorial, we’ll show you how to add an appointment request form to your app.
- Navigate down and click on ‘Appointment request form’ and use this form template.
- This will automatically add your form to your app page.
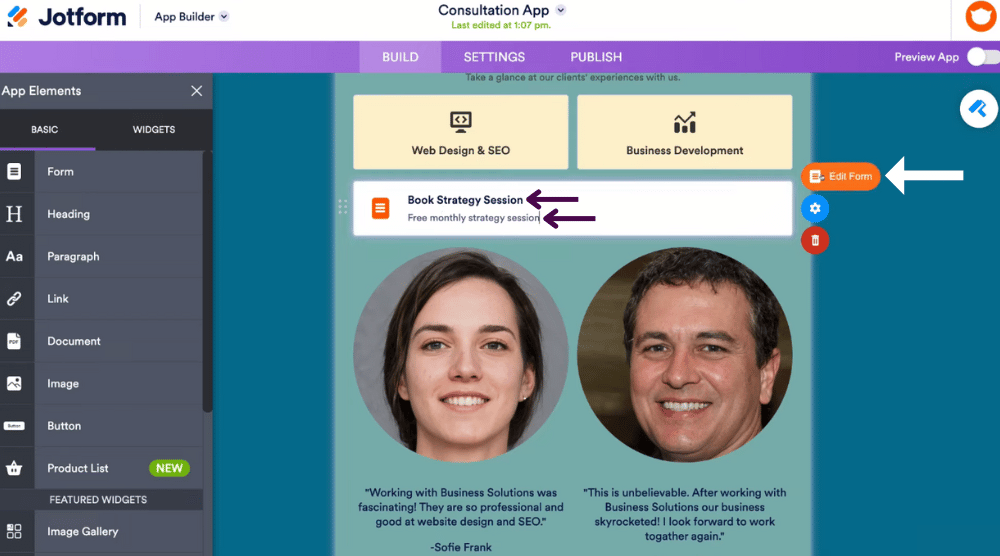
- Simply click on your form (on the app page).
- You can change the title. For this Jotform tutorial will change to ‘Book strategy session’
- Add a description. For this Jotform tutorial will change to ‘Free monthly strategy session’
If you want to move your form to another area of your app:
- Click on your form element.
- Drag and drop to where you want it to go.
To edit your form, all you need to do is:
- Navigate over to the right-hand side and click on ‘Edit form’.
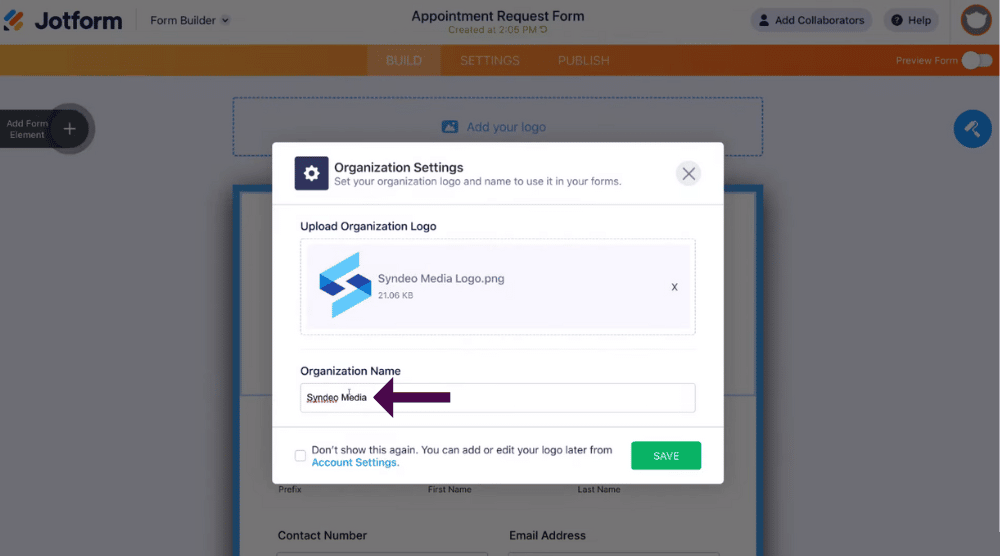
- Go ahead and upload your organization logo.
Here’s our logo (see screengrab).
- Come down and add your business name under ‘Organization name’. For us ‘Syndeo media’.
- Click on ‘Save’.
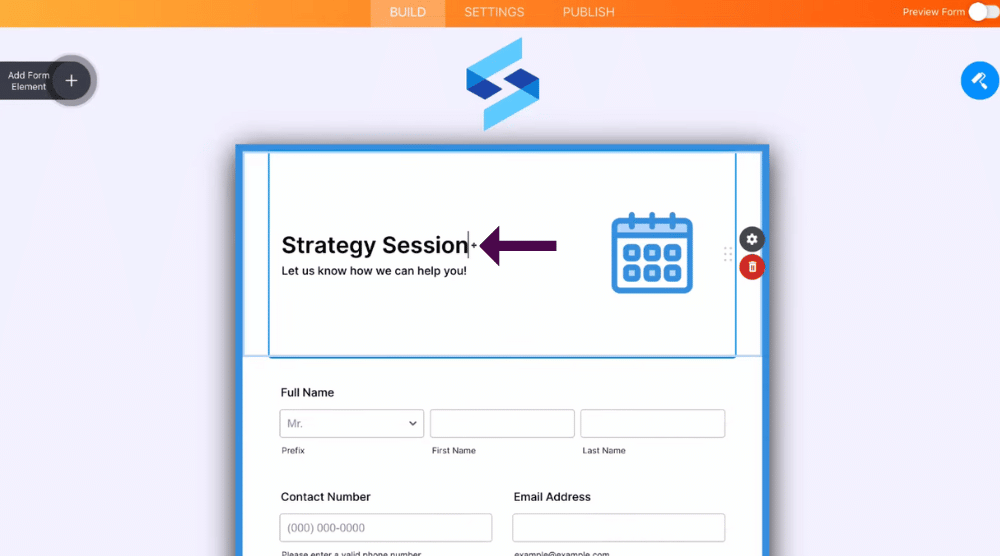
- You can then customize all the different elements on your form.
For example, you can:
- Simply click on your form title and change the title.
We’re going to change ours to a ‘Strategy session’ (see screengrab).

Once you’re happy with your form title:
- Navigate down to the form fields.
You can actually customize each of these fields. For example, let’s change our ‘Address’ element.
- Come down to and click on ‘Address’.
- Navigate over to ‘Properties’ on the right-hand side.
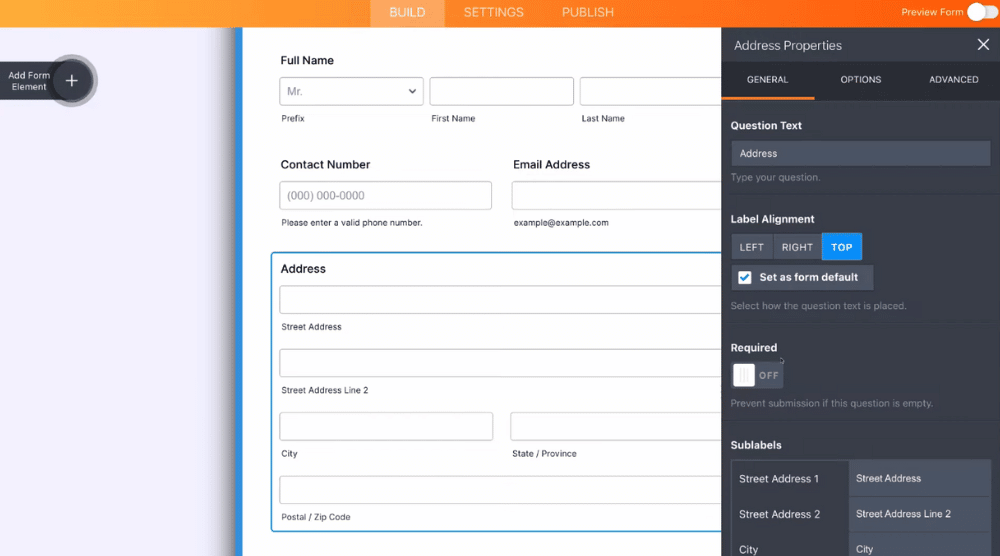
- Here you can change the ‘Question text’.
- Navigate down to ‘Alignment’ and change the alignment.
- Below ‘Alignment’, you can choose if certain elements are required by simply selecting or deselecting ‘Required’.
- You can also change the sub-labels over here (see screengrab).
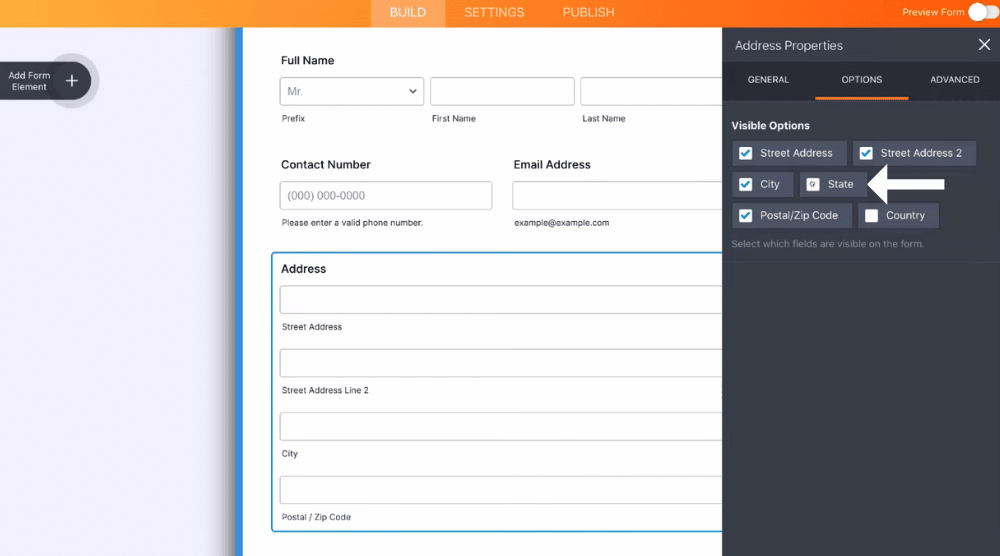
When you’ve completed all of these settings and like the way it looks, you can follow these steps to further customize your form:
- Navigate up to the top.
- Click on ‘Options’.
- You can then choose which fields are visible.
For example: If you turn off ‘State’, that’s going to remove the state option (see screengrab).
- Head up and click on the ‘X’ to exit out of these properties.
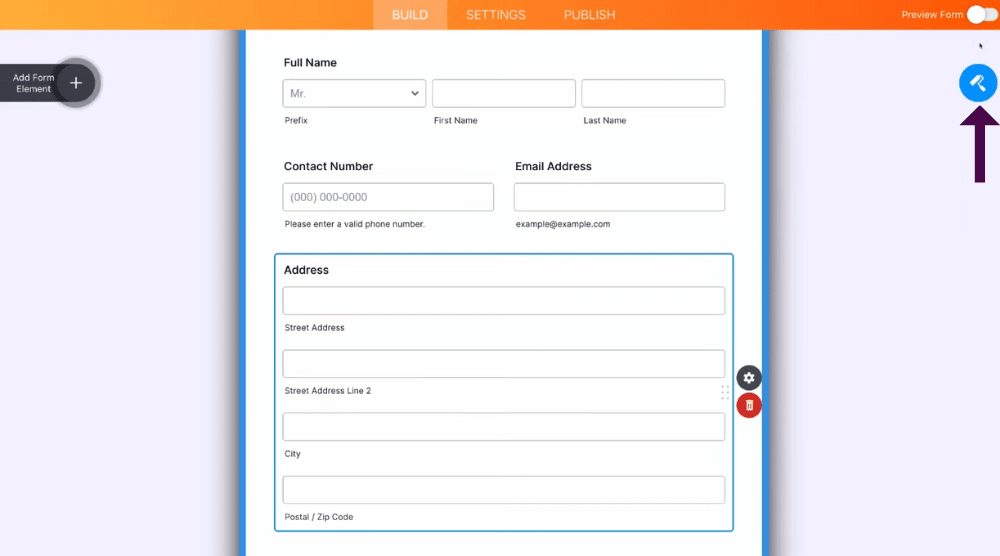
You can then click on the ‘Form designer’ button (see screengrab)
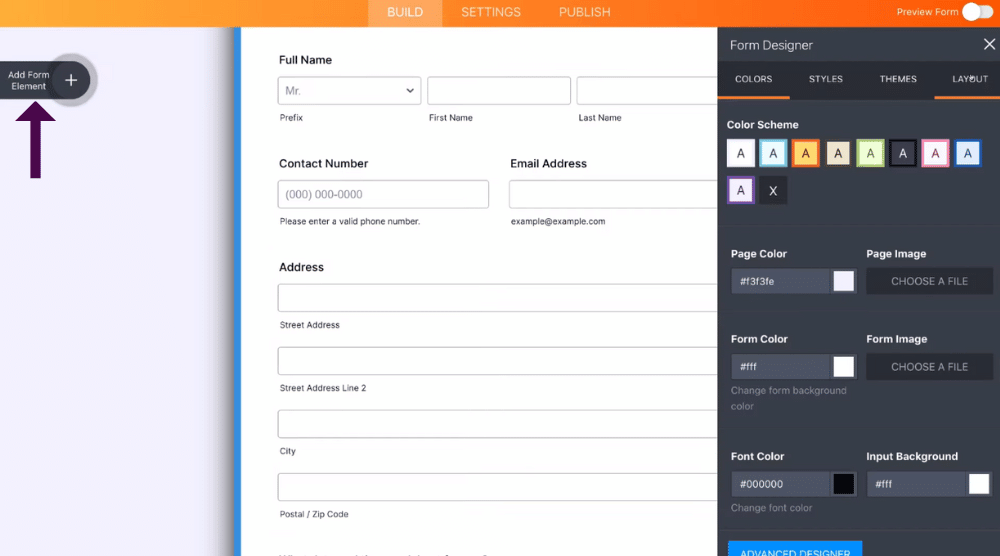
Here you can change the overall form color scheme, styles, and theme.
Because each business is completely different in terms of colors, branding, and the features that you want to add within your form and within your app, you’ll want to take the time to go through each of these different elements.
We’re going to keep the form the same as we’re happy with this theme.
You can add additional form elements by following these easy steps:
- Navigate over to the left-hand side.
- Click on ‘Add form element +’.
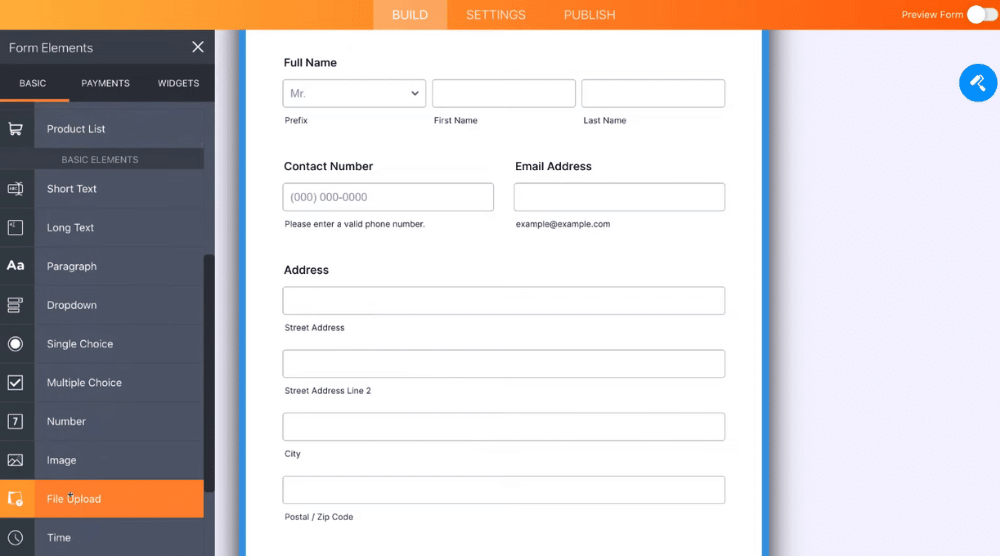
For example, you can add ‘File upload’ if you need a customer to upload information about their business.
Here you can also add an ‘Image’ or ‘Elements’ (like multiple choice or single choice).
There are truly unlimited options in terms of customizing your form!
Once you’ve finished adding any additional elements to your form:
- Navigate up to the top and click ‘X’ to exit out of this.

- Navigate over and select the ‘Preview form’ button in the upper-right-hand corner.
You can click on this ‘Preview form’ option to preview what your form will look like on a mobile device.
This is going to be a form that’s embedded into your mobile app, so you want to make sure that the form is responsive on a mobile
Once you’re happy with how your form looks on mobile:
- Exit out of the ‘Preview form’.
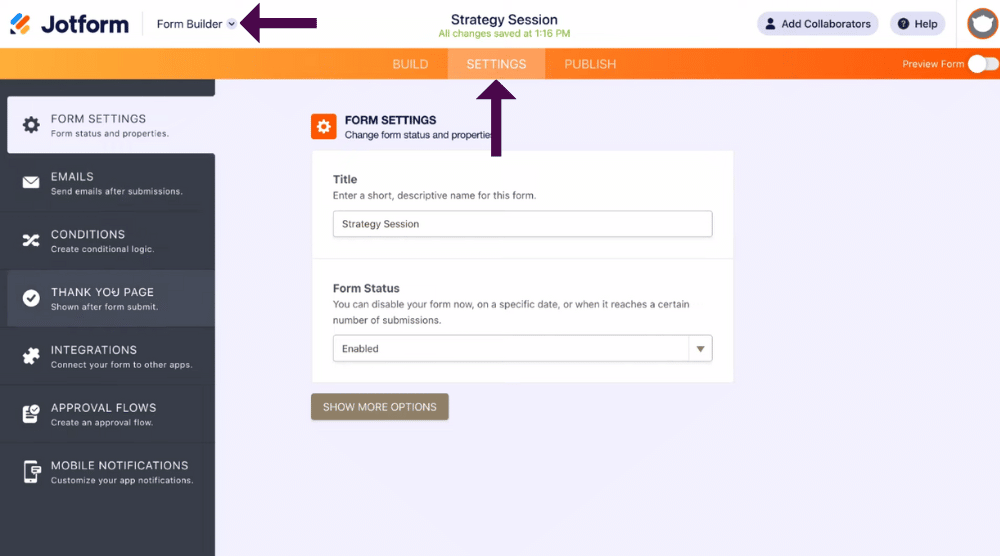
- Navigate over to ‘Settings’.
This is where you can set up all these important settings as you can see on the left-hand sidebar.
Take the time to go through all these settings and customize them to your liking.
Once you’ve done this:
- Navigate up to and click on ‘Form builder’ on the upper left side of the screen.
- Click on ‘App builder’.
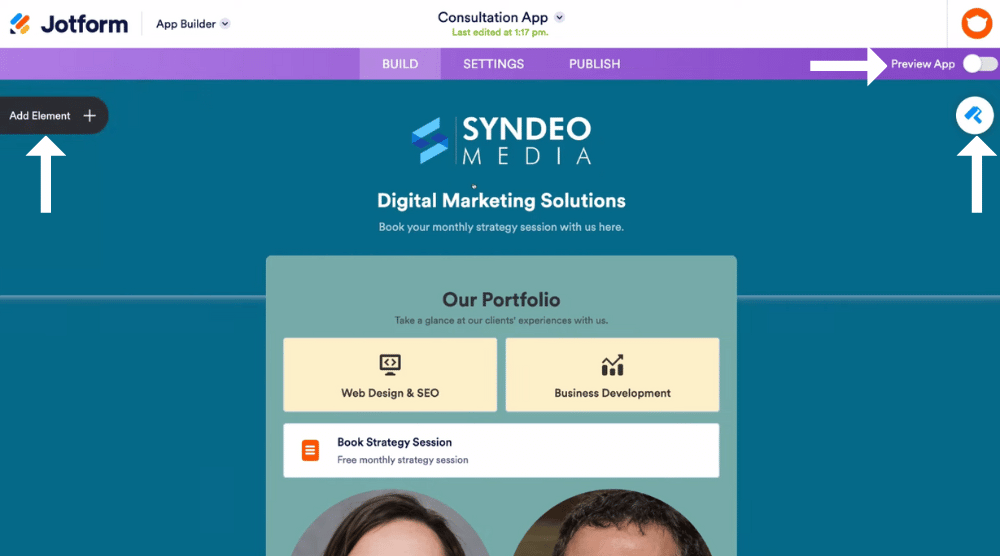
That’s going to take you back to the free mobile app builder, where you can continue customizing the template you selected.
Again, what you want to do is make sure that you click ‘Add elements’ to add anything that’s relevant to your business.
Every business is different, so take the time to play around with each of these elements and features.
Again, similar to forms, what you can do is further customize within the App designer.
- Navigate over to the right-hand side and click on ‘App designer’ again.
- Select ‘General’.
- Come down and change the color scheme if you like.
- Further, customize the theme colors for this app.
- Add an app background image.
- Next to ‘General’, you’ll see ‘App layouts’.
- Click on this if you want to play around with different app layouts.
We’re going to keep the current ones selected.
When you’ve finished customizing within the App designer, exit out of ‘App designer’.
Now you can go ahead and preview what your app will look like.
- Click ‘Preview App’ in the right upper corner.
As you can see, we can preview what our app will look like, change the orientation and make sure that our app displays nicely in the different orientations.
6. App Settings

Follow the steps below to navigate around your app settings:
- Exit out of ‘App preview’.
- Navigate over and click ‘Settings’ next to ‘Build’.
- Within settings, you can select to disable your app now, or on a specific date.
We’re going to keep our app-enabled.
- Below that, you have the option to enable or disable the ‘Continue Forms Later’. Will keep ‘enable’
Basically, the app allows users to save their submissions and complete them at a later date.
- Below ‘Continue Forms Later’, you’ll see ‘Add to home screen Modal’.
- Make sure this is selected as ‘Enabled’.
Basically, this allows users to add your app to their home screen.
- You also have the option to enable or disable the ‘Progress bar’.
This lets users see their progress on forms that they’ve started.
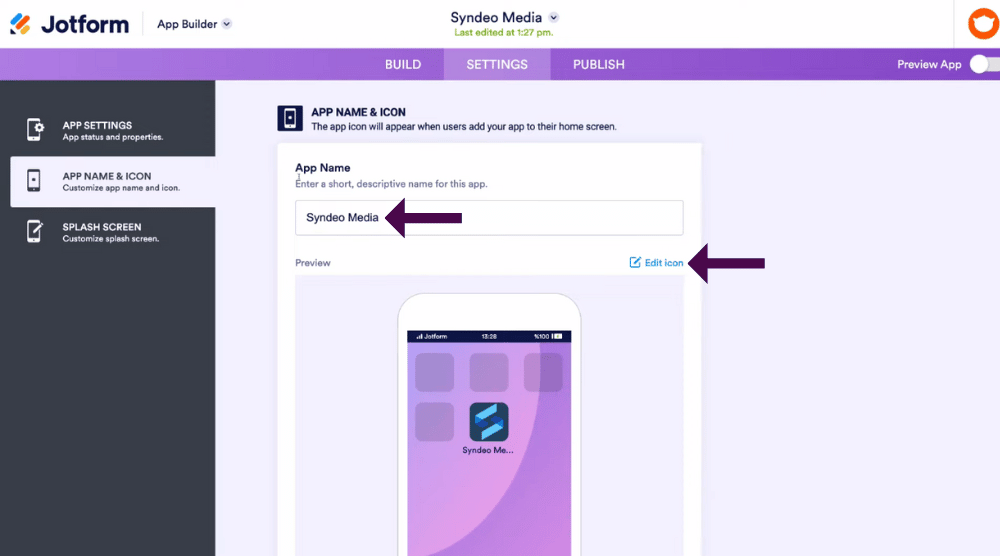
- Navigate over to the left-hand side and click on ‘App name and logo’.
This is how your app is going to appear on mobile devices when the app has been installed.
Here you can also change the ‘App name’ to your business name.
For us, will name it ‘Syndeo Media’
We’ll go ahead and do that now.
You can also:
- Edit the icon.
We’re going to remove this logo and change it to just the icon of ‘Syndeo media’
Here’s our logo icon (see screengrab).
Once you’re happy with your logo, follow these steps to continue:
- Exit out of ‘App icon properties’.
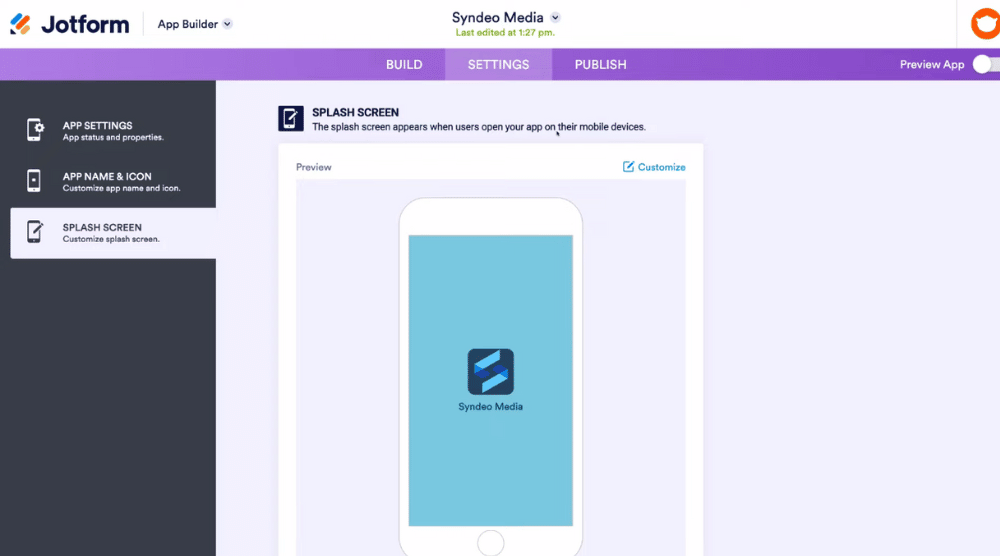
- Navigate over to the left-hand side and click on ‘Splash screen’.
The splash screen appears when users open your app on their mobile device, it’s basically the loading screen.
You can go ahead and customize this if you like.
We’re happy with the splash screen.
Then what you want to do is:
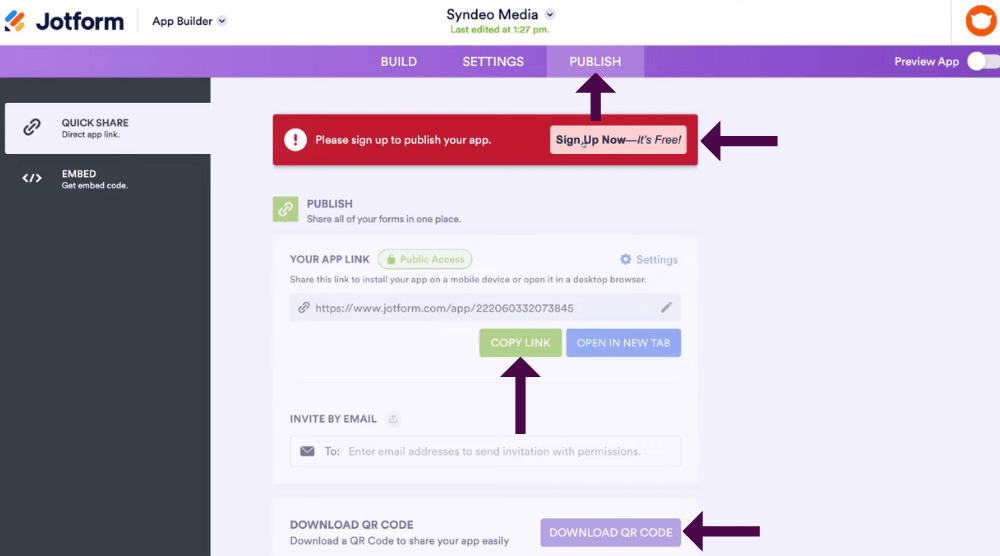
- Navigate over to ‘Publish’.
- Publish (Share App)
Finally, once you’ve taken the time to customize and create your app using Jotform’s intuitive free app development software, it’s time to publish your app.
Fortunately, Jotform makes it super easy for your customers and users to get your app!
However, they won’t find your app in the app store on Android or iOS.
There are three ways users can access your app:
- You can send a link to your customers. That link is going to allow your customers to open up your app.
- You can embed the code onto your website so that your visitors can get your app.
- You have the option to download a QR code to share your app easily. This is great because then you can download the app and you can embed that app onto physical marketing materials or across your different social media channels.
You can read our article to know How to create a QR code for FREE for your business.
If you see this notification up here (see screengrab), that just means you haven’t signed up for free just yet.
We’re going to quickly sign up and then meet you back here.
Go ahead and sign up for free if you currently have not signed up.
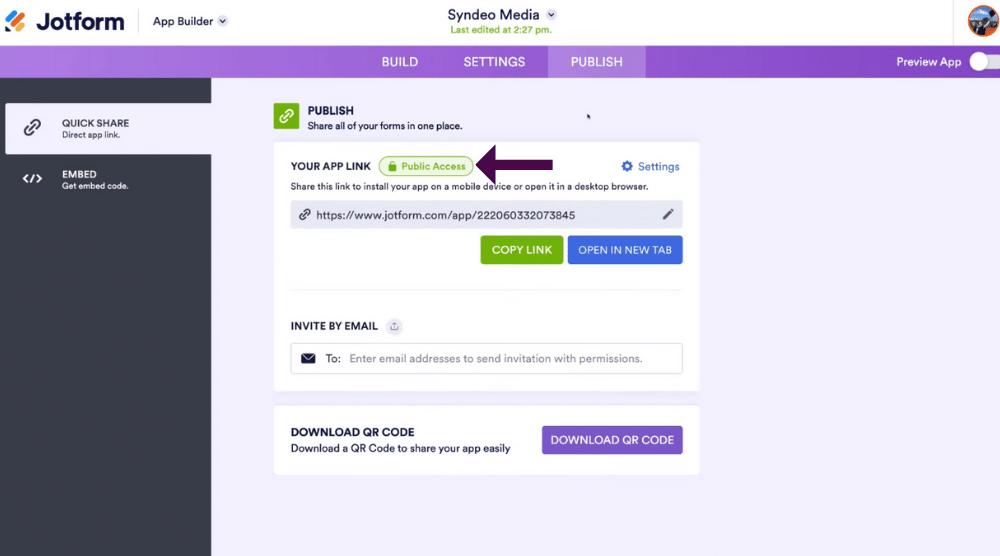
Once you’ve signed up, you’ll now see that notification has changed to ‘Public Access’ (see screengrab).
Now you have the option to customize the accessibility of your app.
- Click on ‘Public Access’.
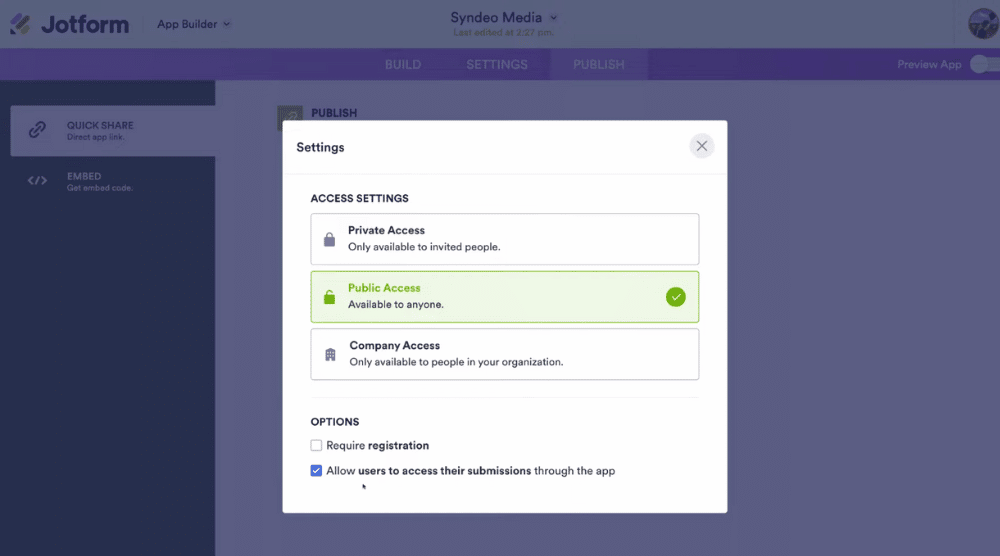
- You now have the option to switch your app to Private if you like, by simply clicking ‘Private Access’.
This means only people that you invite can access your app.
Currently, we have public access turned on.
- You also have the option to turn on the ‘Company access’.
This means it will only be available to people in your organization.
This could be an internal app for only your team to use.
You’ll see two basic options below that you can either select and deselect to turn on or off:
- Require registration.
We’re going to keep that turned off.
- Allow users to access their submissions through the app. (Will keep ‘turn on’)
7. Test The App With Mobile

We’ve almost completed explaining how to make a mobile app for free using Jotform’s free app builder!
Let’s make sure it’s all looking good and running smoothly.
Follow these steps to test your app:
- Navigate up to ‘Exit’.
- Come down and click on ‘Download QR code’.
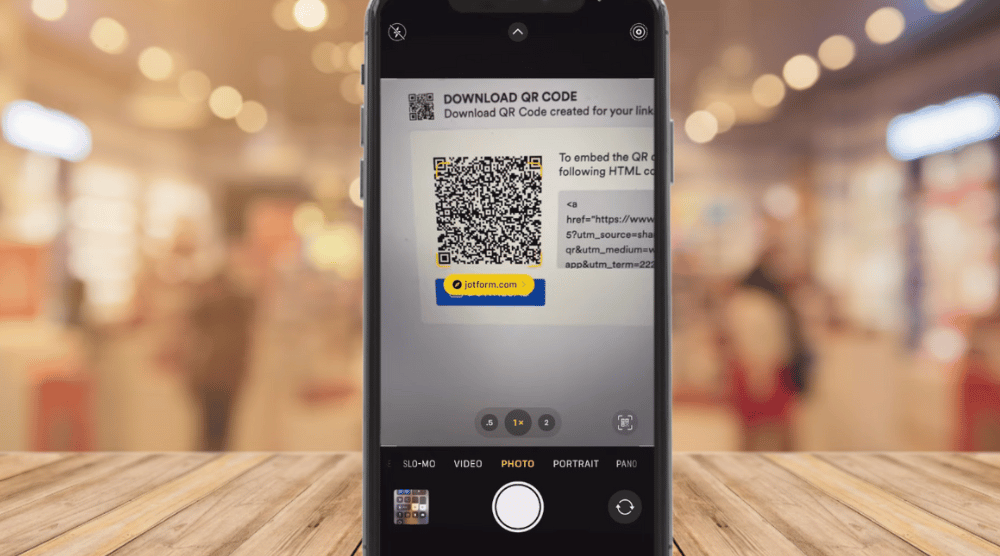
- If you open up your phone, you can go ahead and scan this QR code (see screengrab).
- Click on the link.
When your visitor either clicks on a link or scans the QR code, that will take them to your app online.
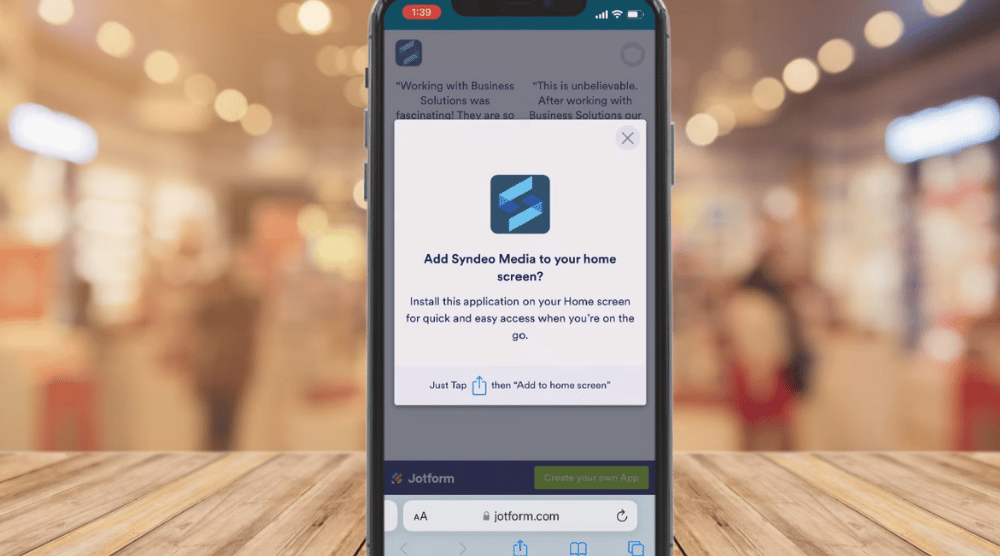
Because we enabled ‘Add to home screen Modal’ that’s going to allow your visitors to simply tap and add this to their home screen (see screengrab).
To do this:
- Go ahead and tap this symbol down here.
- Click ‘Add to home screen’.
- Then ‘Add’.
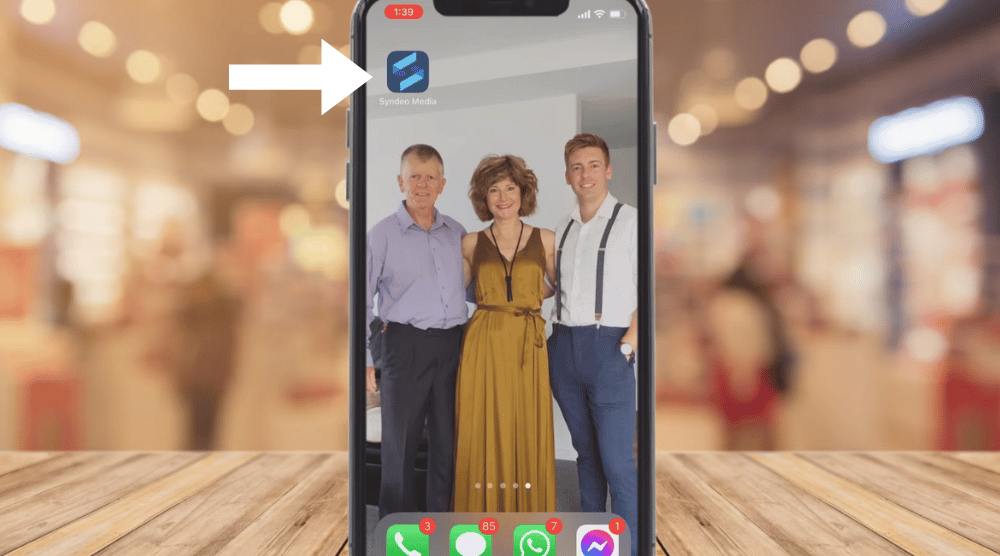
As you can see, we now have ‘Syndeo media’, the free mobile app we created on our phone (see screengrab) on our homescreen!
To access your app, follow these steps:
- Click on the app on your homescreen.
- That will then generate that splash screen.
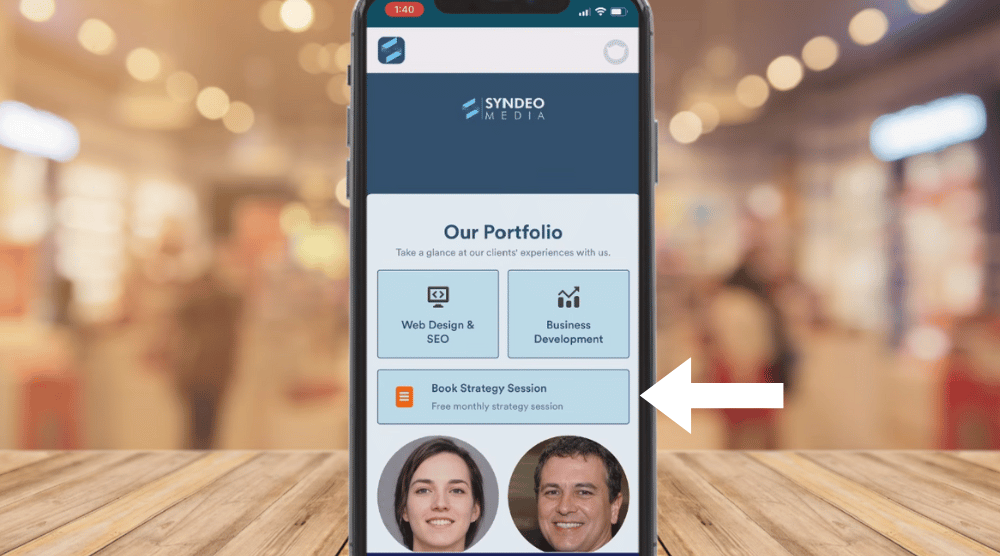
- Then it will take you to your app.
Once you’ve done this, you can:
- Click on the form that you created. i.e ‘Book Strategy Session’
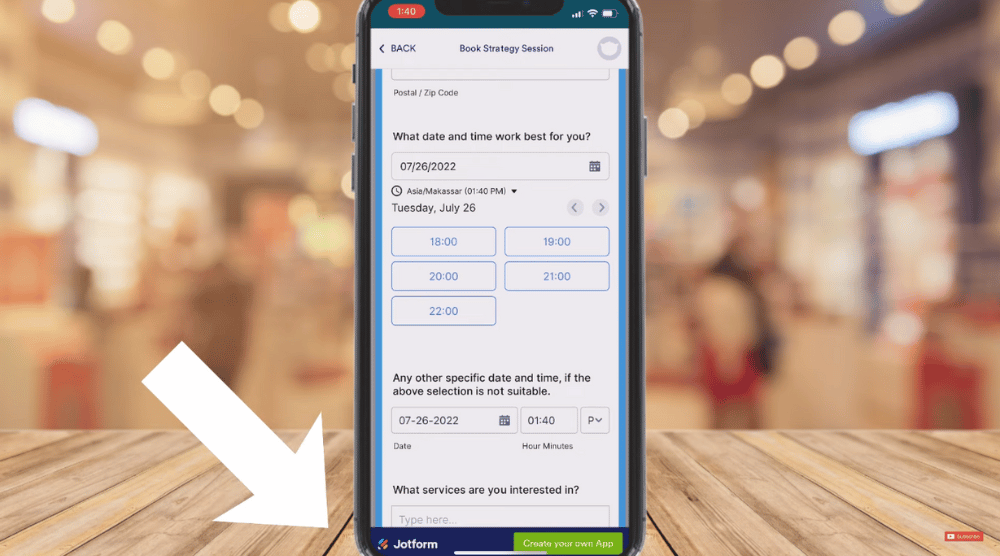
That’s going to take our customers to this form (see screengrab).
It’s important to note that with the free version of Jotform, you’ll always have ‘Jotform’ branding on the bottom of your app.
If you want to remove this branding, you’ll need to upgrade to a paid plan.
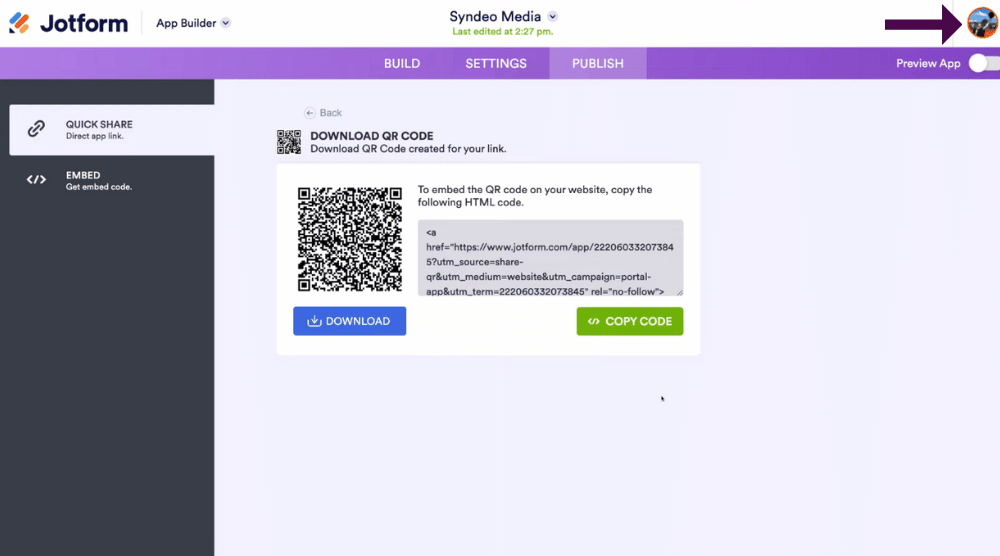
Now back to the web version of Jotform!
- Navigate and click on your profile in the upper right-hand corner.
This is where you can view all your submissions.
- Click ‘View all’ to see all the limitations of the free plan.
As you can see, we’ve used 0 out of 100 submissions on the app form (see screengrab)
You’ll also see ‘Upload space’ and ‘Payment submissions’.
The free plan allows you to have up to 10. We also have access to up to 1000 ‘Form views’.
That is it for this Jotform tutorial helping you create a mobile app and a form within your app for your small business completely for free!
We have covered all you need to know about Jotform and how you can make a professional app for free.
We hope you are now well equipped to use this free app builder tool for you and your small business.
Make a Free Mobile App With Jotform (Jotform Video tutorial)
Feel free to watch our full video tutorial on how to make a mobile app for free with Jotform below.

