Do you want to learn how to setup HubSpot CRM to manage your leads and contacts for your small business?
In this updated CRM implementation guide, we’re going to show you just how easy it is to set up and configure your HubSpot CRM account correctly, so you can make the most of all of HubSpot’s impressive CRM features and tools.
What is a CRM?
Essentially, a CRM (customer relationship management) system is an online all-in-one platform that allows you to manage and organize your customers, leads, deals, team, and sales processes.
A CRM lets you keep everything customer-related (such as communication, tasks, data, sales, emails, and more) in one place.
By using a CRM, you’ll notice you and your team are more efficient, organized, and productive!
Read more: Top 5 free CRM for small businesses
What is HubSpot CRM?
HubSpot is a popular, impressive, and dynamic marketing, sales, CMS, and service online platform that we love and promote often.
In particular, we love what their easy-to-use and powerful CRM platform offers for small businesses.
With HubSpot’s free CRM plan, you’re able to add an unlimited number of users, and a whopping 1 million contacts!
In addition to this, they provide an amazing range of dynamic features such as email tracking, landing pages, a sales pipeline, live chat, email and meeting scheduling, templates, integrations, and more.
This is more than sufficient for small businesses, and trumps any other CRM platform (in our opinion) in terms of how many incredible features you can access – all for free!
This HubSpot CRM implementation guide will show you how to setup a HubSpot CRM account initially so you can integrate your small business with Hubspot CRM!
How to configure HubSpot CRM
With over 150,000 users worldwide, there’s a good chance you’ve already heard of HubSpot and the amazing CRM features and tools they offer.
However, there are so many small businesses just getting started that don’t know where to begin or how to setup a CRM within this dynamic platform.
If this is you, then you’ve come to the right place!
In this CRM implementation guide, we’re going right back to the basics.
We’re going to walk you through how to setup HubSpot CRM for your small business, so you can manage and foster relationships with your leads, contacts, team, and sales in one place.
How To Setup HubSpot CRM?
Let’s get stuck into this HubSpot CRM implementation guide and learn how to setup HubSpot CRM for your small business!
1. How to get get started with HubSpot CRM
Before we get started with this tutorial on how to setup HubSpot CRM, you’ll first need to sign up and create an account with HubSpot.
Get started with HubSpot for FREE here.
*The link above is an affiliate link, which means we will get a commission if you upgrade to a paid plan (with no extra cost to you). This helps support our education-based website and we thank you in advance!

To sign-up to HubSpot’s CRM:
- Click ‘Get started free’ on the HubSpot CRM
- Type in your personal details or
- Click to sign up with your Google account.
For the purpose of this tutorial, we’re going to show you how to sign up with Google.
- Select your business Gmail account.

- Choose the industry that your business is in.
HubSpot will then give you an ‘Industry’ suggestion.
However, if this suggestion isn’t quite the right category, you can choose another more appropriate industry type.
To do this:
- Click ‘Search all Industries’.
We’re going to choose ‘Marketing and advertising’ as this is the correct industry for our business (see screengrab).
- Add your job role in your business.
We’re going to click ‘Director’.
- Click ‘Next’.
- Add the name of your company.
- Click ‘Next’ again.
- Choose how many people work in your company.
We’re going to click ‘Two to five’.
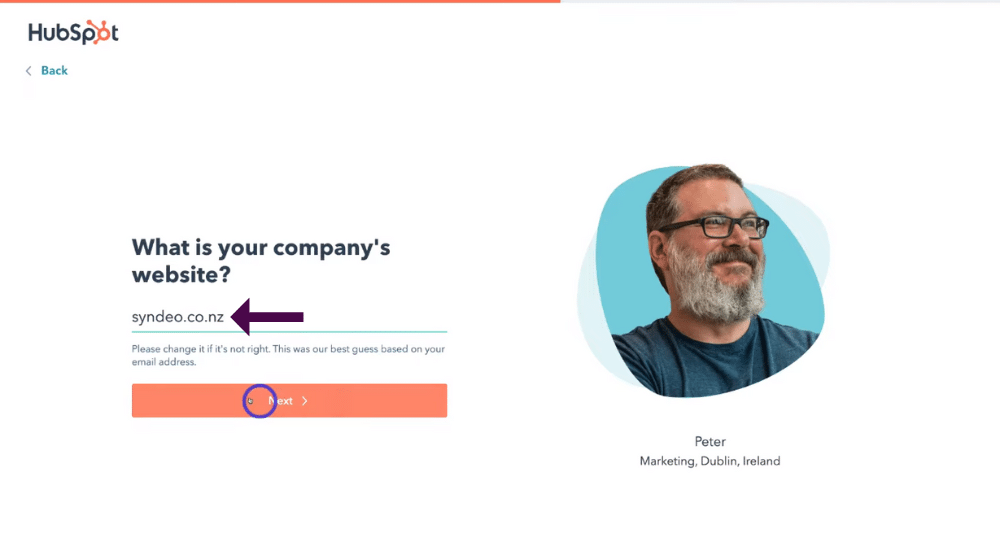
Add your company’s website domain.
For us it will be syndeo.co.nz
HubSpot will automatically suggest the domain based on the business email you typed in at the beginning.
Don’t have a professional domain name for your business?
Read our tutorial here on how to choose the best domain name for local businesses.
Additionally, if you’re just starting out you might not even have a website for your business.
Did you know you can create a website directly inside HubSpot completely for free through their CMS hub?
Check out our full article on how to create a website in HubSpot.
However, let’s continue with this tutorial on how to setup HubSpot CRM.
Once you’ve added your domain name:
- Click ‘Next’.
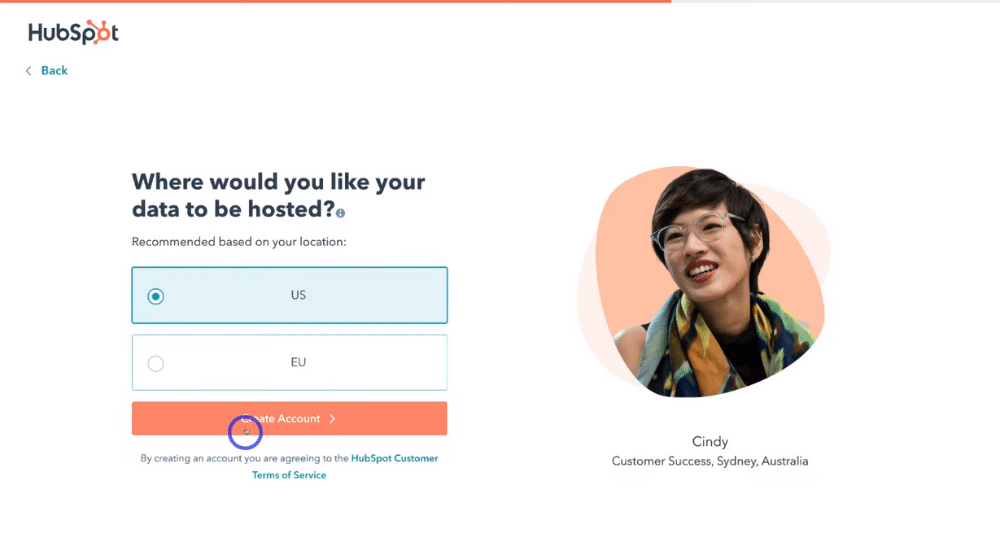
- Choose where you want your data to be hosted.
This is the closest to where your business operates.
- Select ‘Create account’.
- Select the option that best suits how familiar you are with HubSpot.
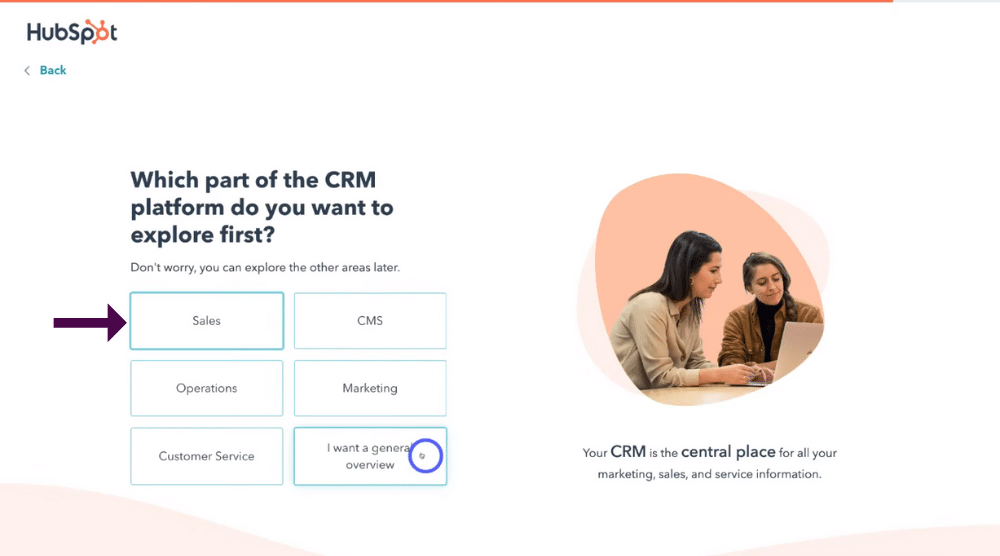
- Select the correct area within HubSpot’s CRM platform that you want to explore first.
We’re going to click ‘Sales’.
And there we have it!
You’ve now created your free HubSpot account.
2. HubSpot dashboard – settings
The next step is to finish the initial integration of HubSpot and your business.

To do that:
- Head up to the top right hand corner.
- Click the ‘Settings’ icon (see screengrab)
This is the place where you’re able to set up and configure everything correctly within your HubSpot account.
3. Personal account preferences
Firstly, you’ll want to set up your profile correctly.

Follow the steps below to do this:
- Make sure you’re under your ‘General’ settings.
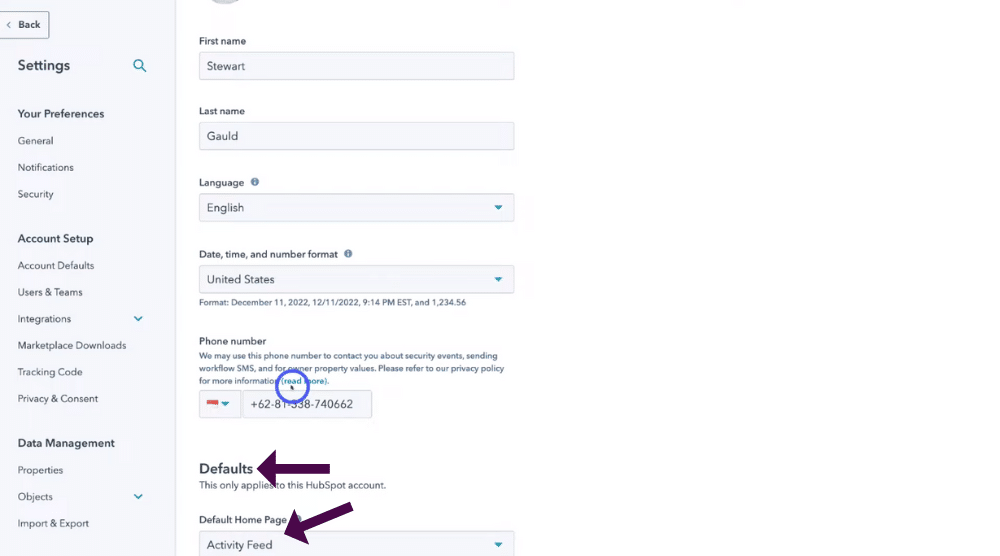
- Under ‘Profile’, you’ll see all your personal information (see screengrab).
- Scroll through and type in all the correct personal information for your business.
Once you’ve done this:
- Scroll down under ‘Default home page’ under ‘Defaults’.
- Choose the best-suited option for you (see screengrab).
This is the default homepage that you’ll see when you arrive inside your HubSpot account.
We’re going to select ‘Activity Feed’.
This means that when we go to our HubSpot dashboard, we’ll see all the different activities and tasks that are important to us within HubSpot.
- Simply click ‘Save’ once you’ve chosen your default home page.
Read more: How to create a sales pipeline in HubSpot
4. How to connect the email to HubSpot
Once you’ve checked and changed all your personal information, you’re ready to connect your business email to HubSpot!
This is important to do as it means you can send and schedule your emails, log email replies, suggest follow-up tasks and capture contact details, all within your CRM.
By doing this, you won’t need to use different apps such as Gmail or Outlook to communicate with your contacts.
As a result, this will save you time and keep you organized!
We use Gmail for our business emails, so we can simply connect our Gmail business account directly within HubSpot.

To connect your emails to HubSpot:
- Scroll back up to the top of the page.
- Click ‘Email’ next to ‘Profile’ (still under your ‘General’ settings).
- Under ‘Email’, click ‘Connect personal email’.
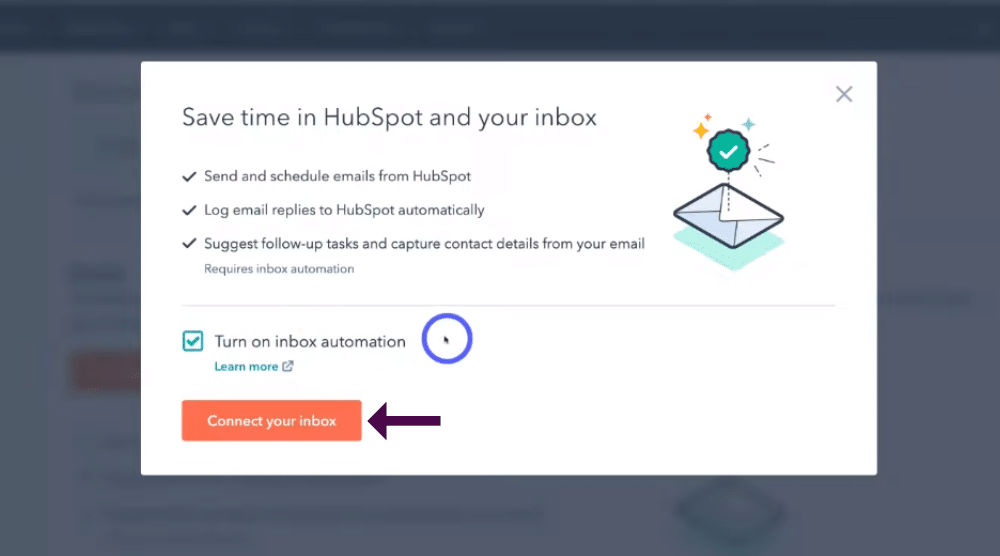
- Click the ‘Turn on inbox automation’ box (see screengrab).
- Select ‘Connect your inbox’.

- Add your email address under ‘Email address’.
- Click ‘Next’.

As you can see, our email is ‘Hosted by Gmail’ (see screengrab).
- Click ‘Connect to Gmail’.
- Select ‘Continue’.
- Select the correct business Gmail account.
- Click ‘Allow’.
HubSpot will then take a few seconds to verify the connection.
- You’ll then have the option to download the extension for Gmail and Outlook.
Essentially, this extension allows you to access CRM tools and features directly inside your inbox.
However, we’re going to skip that and select ‘No thanks’.
And as you can see, our email is currently connected! (see screengrab).

Here you’re able to:
- Select to turn on or off ‘Inbox Automation’.
- Remove this email address.
- Install the extension.

Once you’ve done that:
- Scroll down and click ‘Include unsubscribe link’.
This means you’ll stay compliant with local spam laws.
- Click ‘Add email alias’ (see screengrab) to add an email alias if you wish.
- Select ‘Edit email signature’ to edit your signature.
- Click ‘Save changes’.
We recommend taking the time to add an email signature, as it means your emails will look more professional.
Don’t have a business email?
Learn how to set up a professional business email with Gmail using Google Workspace here
5. HubSpot calling
This is where you can set up calling through HubSpot.
HubSpot calling means all your conversations are in one place!

To set up HubSpot calling:
- Head back up to the top of the page.
- Click ‘Calling’. Next to ‘Email’.
- Select ‘Get started’.
However, unfortunately, you’re not able to access this feature on the free plan.
6. How to connect your Calendar to HubSpot CRM
You’re able to seamlessly connect your calendar with Hubspot’s CRM in order to keep track of all your different CRM activities.

To do this:
- Click ‘Calendar’ next to ‘Calling’.
- Select ‘Connect your Calendar’.
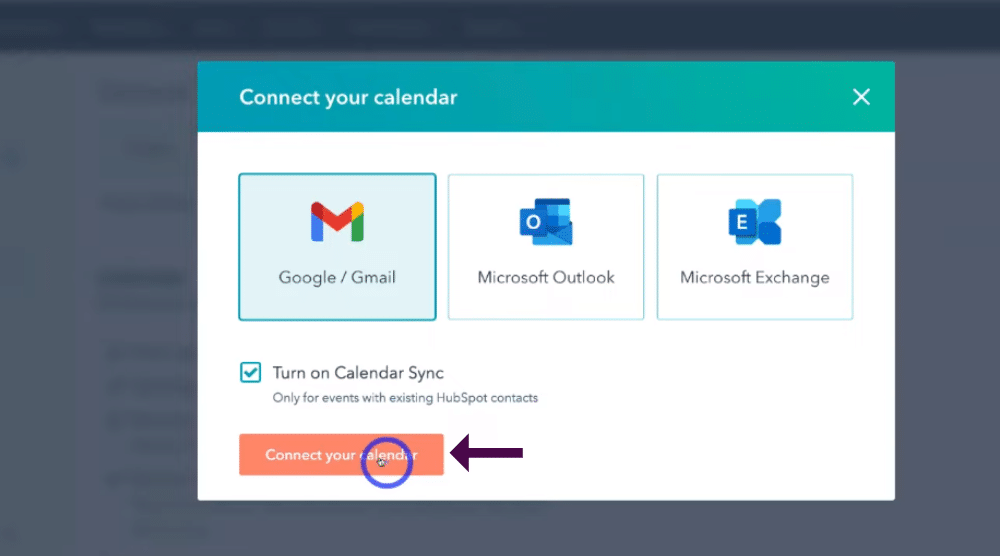
- Choose your correct calendar provider (see screengrab).
Again, we use Gmail so we’re going to click ‘Google’.
- Simply click ‘Connect your Calendar’.
- Click ‘Accept and connect to Google’.
And it’s as easy as that!

Now our calendar is connected with HubSpot CRM (see screengrab).
However, it’s important to note that you can only connect one calendar on the free plan.
Once you’ve connected your calendar:
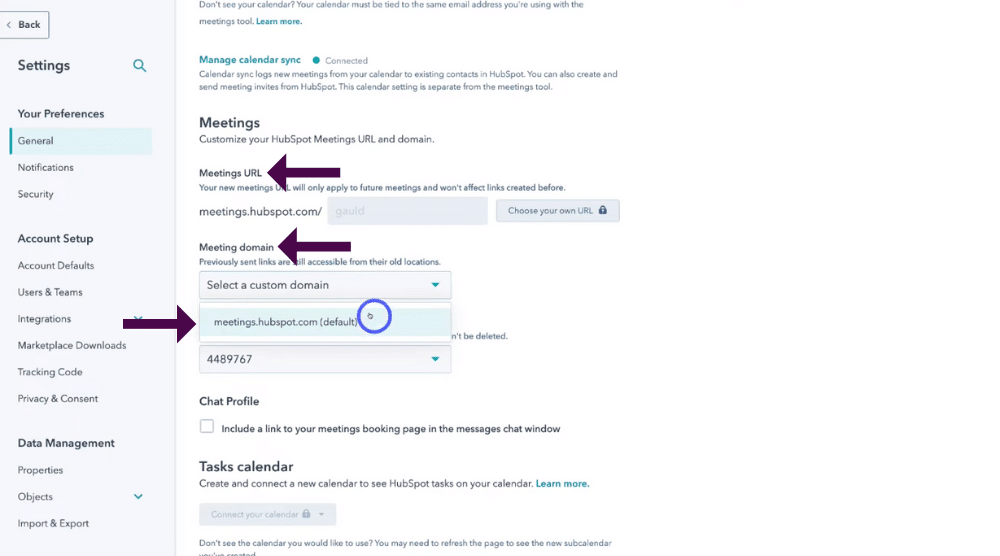
- Navigate down to ‘Meetings’.
You’re able to make a meeting landing page within HubSpot’s CRM to streamline the process of setting up meetings.
You can read our beginner’s guide on How to create a landing page within HubSpot
- Under ‘Meetings URL’, you’ll see your meeting link.
You can send this link to your contacts in order to arrange a meeting (see screengrab).
Unfortunately, you can’t edit this link.
- Below ‘Meetings link’, you’ll see ‘Meeting domain’.
- Click the drop down arrow.
We’re going to use this default meeting URL for now (see screengrab).
- Scroll down and click ‘Save’.
Read more: How to use HubSpot’s meeting scheduler
7. Task Preferences

Once you’ve finished connecting and setting up your calendar:
- Navigate up to the top of the page.
- Click ‘Tasks’ next to ‘Calendar’.
This is where you can choose personal preferences for your tasks within your account.
This is just the default information that you can change when you create individual tasks.
However, this default information will appear when you create a new task.
We’re happy with this default information, but feel free to change this if you’d like.
8. Notification Preferences

Once you’ve finished customizing these general preferences:
- Click ‘Notifications’ under ‘Your Preferences’ on the left-hand sidebar (see screengrab).
This is where you’re able to set up personal preferences in regard to notifications from HubSpot.
- Under ‘Email’, simply enable to disable email notifications.
If you turn this on, you’ll receive notifications in your inbox.

- Below this, you’ll see a list of what topics you can choose to get notified about (see screengrab).
- Simply click on individual topics to expand notification preferences regarding that topic.
For example, let’s navigate down and click ‘Deals’.
- Tick ‘Deals assigned to you’ to get a notification when a deal is assigned to you
- Select ‘Deal stage updates’ to receive a notification when a deal stage has been updated.
- Click ‘You’re mentioned on a deal record’ for any notifications mentioning you on a deal record.
These are all personal preferences, however, we recommend taking the time to go through all these different topics to manage email notifications based on you and your business.
When you’re happy with your email notification preferences:
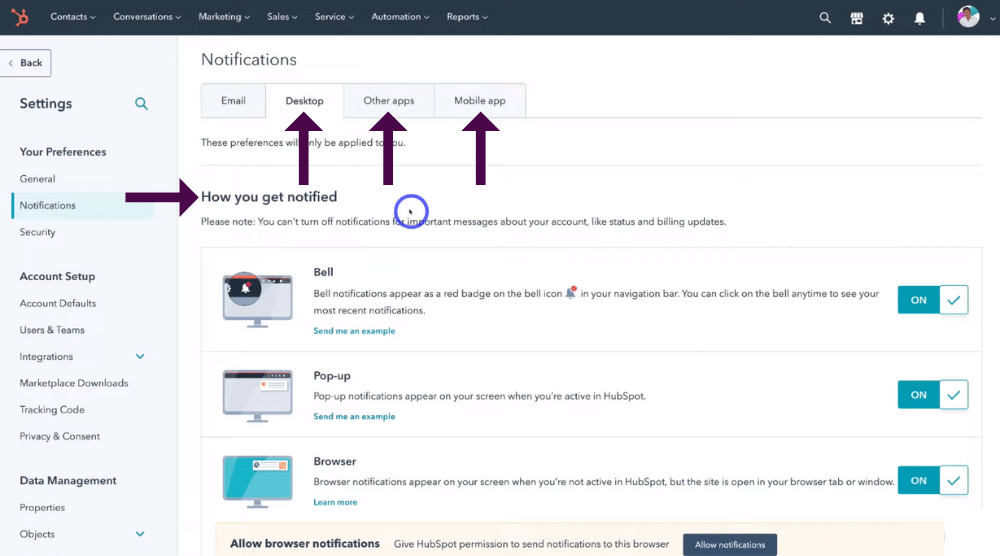
- Navigate up to ‘Desktop’ next to ‘Email’.
This is where you’re able to choose the type of notifications that you want to receive on your desktop (see screengrab).
Again, take the time to go through these preferences one by one.
- Next to ‘Desktop’, you’ll see ‘Other apps’.
These are settings for any notifications you’d like to receive from other apps that you can connect with inside HubSpot.
- Next to ’Other apps’ you have ‘Mobile apps’.
Here you can manage notifications through the HubSpot mobile app.
Want to learn more about the HubSpot mobile app?
Check out our HubSpot CRM app tutorial, where we walk you through how to use the app for your CRM-related activities.
However, let’s get back to this tutorial on how to setup a CRM with HubSpot.
9. Personal account security

Once you’ve carefully gone through and managed your email, desktop, other apps, and mobile notifications:
- Head back to the left-hand sidebar.
- Click ‘Security’ below ‘Notifications’.
This is where you have the opportunity to enhance the security of your account.
- Scroll down and click ‘Set up two-factor authentication’ below ‘Two-factor authentication.
Once this feature is enabled, you’ll have to give two types of identification every time you log in to HubSpot.
Take the time and go through all these security settings carefully.
10. HubSpot account details
When you’ve gone through all your security settings for your CRM account, it’s time to set up your account.
Essentially, this is how your business works with HubSpot.

To do this:
- Click ‘Account Defaults’ below ‘Account Setup’ on the left-hand side bar.
- Add in your company account details under ‘General’ (see screengrab).

- Click ‘Security’ next to ‘General’.
- Tick ‘Require two-factor authentication’ for all your team.
This will protect the security of your HubSpot CRM at an account level.
Once you’ve done that:
- Tick ‘Allow HubSpot employees to access your account for support and assistance’ under ‘Account access’.
However, if you have different security preferences, you can disable this option, meaning your employees won’t have access to your account.
11. How to setup account branding
Now you’re ready to set up branding for your HubSpot account!

Simply follow these steps below:
- Click ‘Branding’ next to ‘Security’.
- Select ‘Create a new brand kit’.
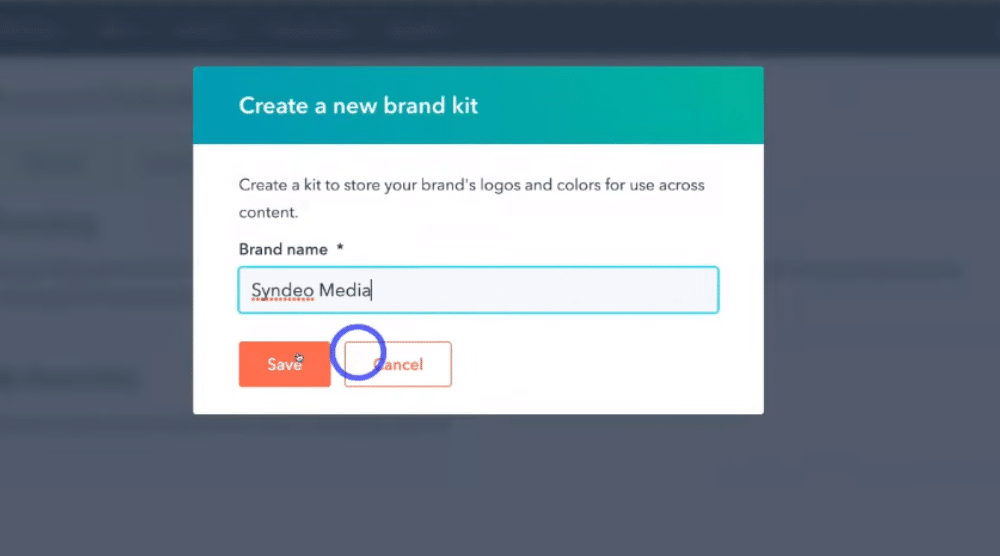
- Type your brand name below ‘Brand name’.
We’re going to add our business name (see screengrab).
- Click ‘Save’.

- Select the asset you just created.
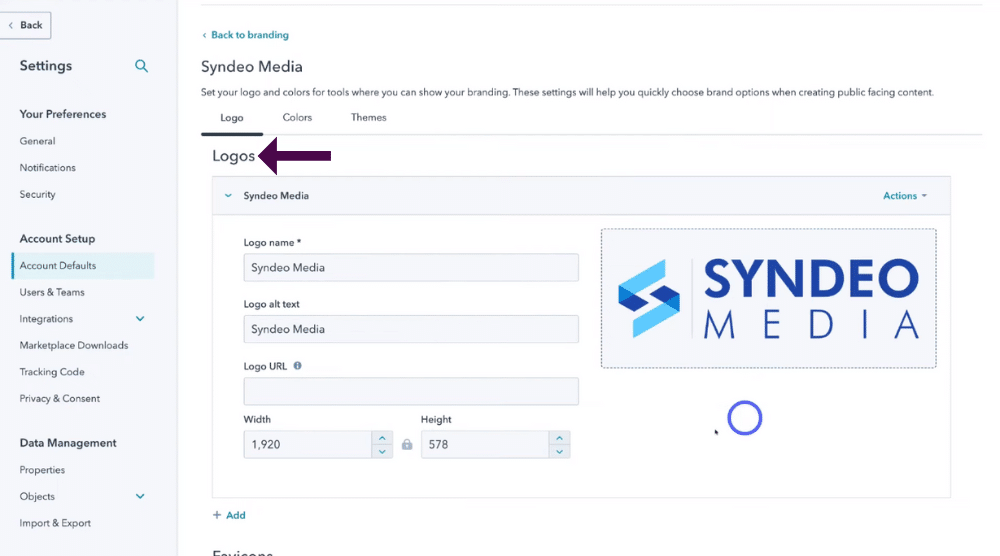
Next, you can add your logo.
To do this:
- Click ‘Add’ under ‘Logos’.
- Type in your logo name under ‘Logo name’.
- Add your logo alt text below ‘Logo alt text’.
- Click ‘Browse images’.
- Choose the logo you want to use.
- Click ‘Open’.
One of the logos we’re going to upload from our list.
If you don’t already have a logo for your small business, you can create one completely for free with the graphic design platform Canva!
You can read our beginner’s guide on How to make a logo for free with Canva
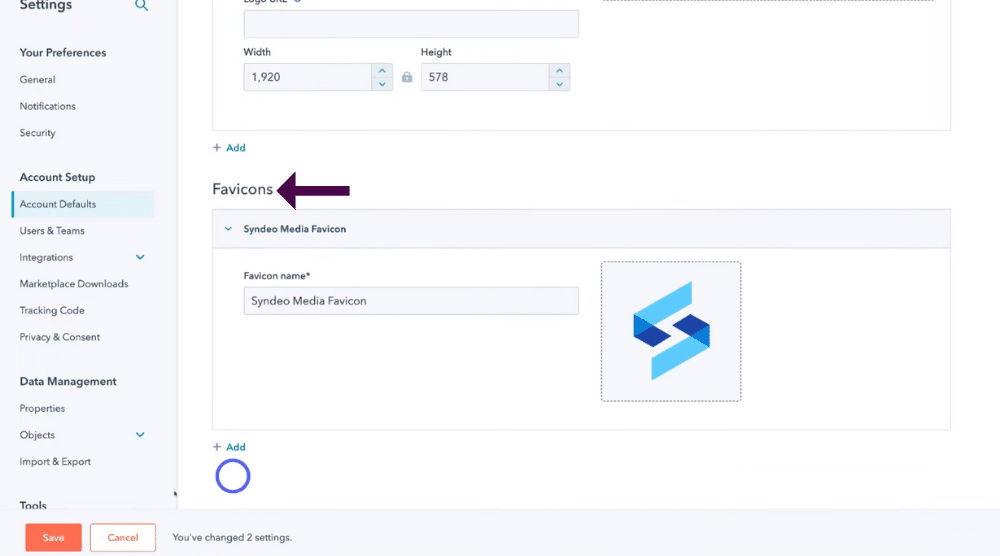
Additionally, you can add a favicon:
- Scroll down to ‘Favicons’.
- Type in your favicon name.
- Click ‘Browse images’.
- Choose your favicon.
- Click ‘Open’.
Here is our favicon (see screengrab).
- Click ‘Save’ at the bottom of the page.
Once you’ve uploaded your logo and favicon:
- Scroll back up to the top of the page.
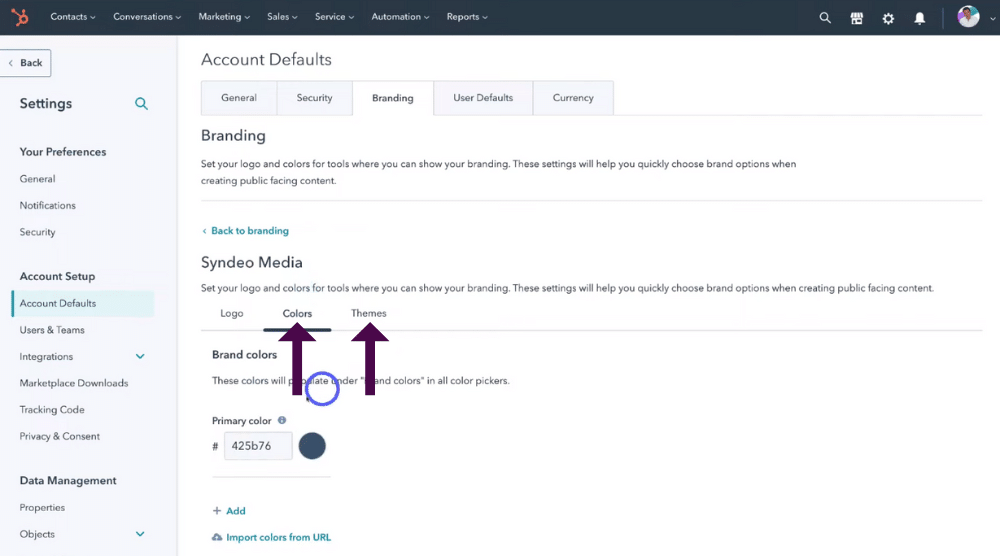
- Click ‘Colors’ next to ‘Logo’.
- Add your primary brand color under ‘Brand colors’ (see screengrab).
- Click ‘Import colors from a URL’ if you like.
When you’re happy with your brand colors:
- Click ‘Themes’ next to ‘Colors’.
This is where you can start using one theme across your brand.
- Select ‘Set theme’ to choose a theme from the marketplace.
However, we’re going to leave that for now.
12. HubSpot user defaults and currency

This is where you can simply set defaults for any users you add to your account.
- Navigate over to ‘User Defaults’.
- Simply go through all these users defaults settings and change any information if needed.
- Navigate over to ‘Currency’ next to ‘User Defaults’.
This is your account currency (see screengrab).
We’re happy with ‘US dollar’, however, you can change this to suit you and your business.
Read more: How to use Freshworks CRM
13. How to add users and teams to HubSpot CRM
Once you’ve made your way through your user defaults and currency preferences, you’re ready to start adding users (your team members).
You can also create teams within your CRM and give specific members access to different features depending on their role if you upgrade to a paid plan.

To add users and to your HubSpot CRM:
- Navigate over to ‘Account Setup’ on the left-hand side bar.
- Click ‘Users and teams’.
- Make sure you’re under the ‘Users’ heading (see screengrab).
- Click ‘Create user’.
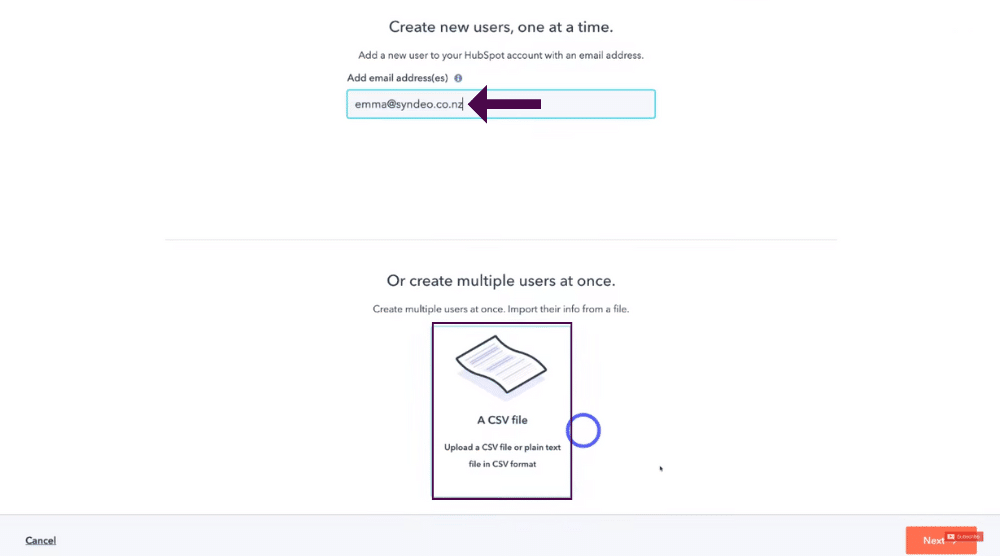
- Simply type in the email address of your team member below ‘Add email address’.
We’re just going to add one user for now (see screengrab).
Additionally, if you want to create multiple users at the same time:
- Simply come down and click ‘Upload a CSV file’.
Once you’ve added your users:
- Scroll down and click ‘Next’.
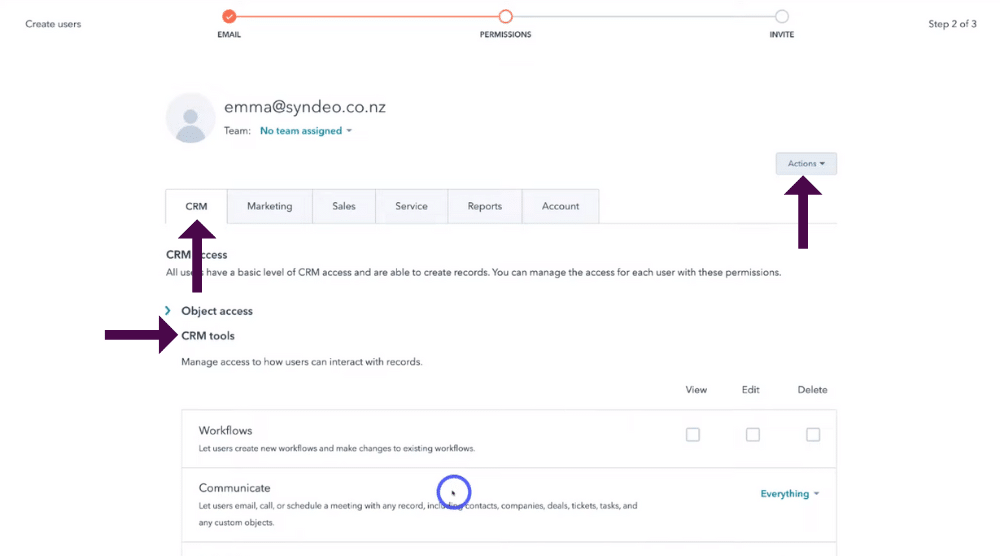
- Simply make your way through all of these different features within your HubSpot CRM (see screengrab).
You can manage the user’s access (that you’ve just added) to each of these different features.
For example, let’s click on ‘CRM tools’ under ‘CRM access’.
- Here you can simply tick or untick each heading depending on what level of access you want them to have (see screengrab).
This is purely based on your organization and preferences for the amount of permission you want your employees to have.
Next, you can make individual users a super admins if you want a user to have full control over their HubSpot account.
Simply:
- Scroll back up the page.
- Click ‘Actions’.
- Select ‘Make super admin’.
However, we’re going to leave this for now.
- Come down and click ‘Next’.
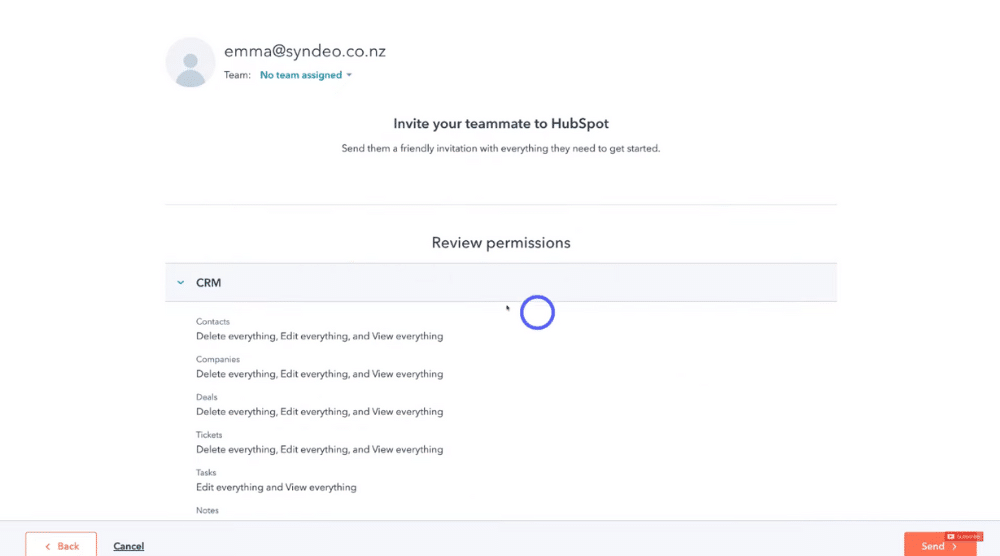
- Review the permissions you’ve just customized (see screengrab).
- Click ‘Send’.
That will then send an invite to the new team member you just added so they can access their HubSpot account!
- Simply click ‘Done’.
Now you’ll notice your new member within your account.
You can also manage all your users here.
14. HubSpot Integrations

Next, you can set up specific integrations within your HubSpot CRM.
- Simply click ‘Integrations’ below ‘Users and teams’ on the left-hand side bar.
Unfortunately, most integrations are only available for paid plans, however, you can use a free tool like Zapier to integrate your favorite tools with HubSpot.
For example, if you already use an email marketing platform such as MailChimp, you can use Zapier to connect both HubSpot and MailChimp together to seamlessly integrate the data!
Want to learn more about Zapier and how you can connect Zapier with apps such as MailChimp and HubSpot? Watch our complete beginners guide here.
You can read our blog How to use MailChimp for email marketing
However, let’s continue with this tutorial on how to setup HubSpot CRM for your small business.
15. Privacy and Consent
The next step in this HubSpot CRM implementation guide is to show you how to setup your privacy and consent settings within your account.
If you collect data from people in the European Union, you’ll need to comply with the GDPR.

You can do this by:
- Clicking ‘Privacy and consent’ under ‘Account Setup’ on the left-hand side bar.
- Click ‘Enable GDPR tools’ (see screengrab).
- Select ‘Yes enable GDPR tools’
16. Data Management

Next, you can create or manage properties such as ‘First name’, ‘Lead status’ or (other properties that store information about objects in HubSpot).
To do this:
- Head back to the left-hand sidebar.
- Under ‘Data management’, click ‘Properties’.
Simply customize all these different properties based on your personal preferences, or based on the type of information you want to collect for these specific objects.
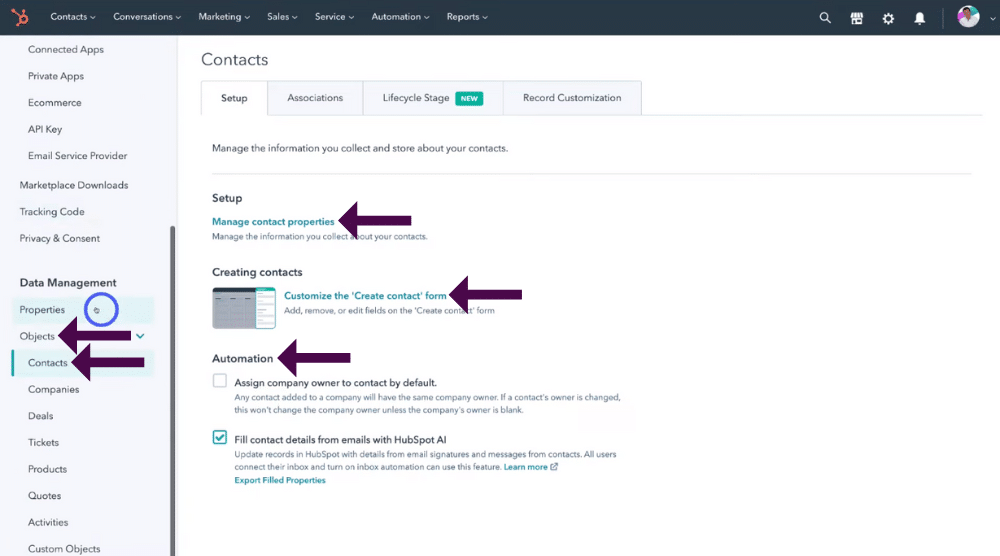
To manage the different objects:
- Navigate back over to ‘Data management’ on the left-hand side bar.
- Click ‘Objects’.
- Choose the specific object you want to manage.
For example:
- Click ‘Contacts’.
- Select ‘Manage contact properties’ to set up any contact properties you need in order to manage all information you collect about your contacts.
This is completely based on your personal preferences and what works best for your business.
- Click ‘Customize the create contact form’.
This lets you choose what fields you can add when creating a new contact.
Below this, you can enable or disable basic automations (see screengrab).
We recommend taking the time to play around with these different objects and properties under ‘Data management’.
17. Connect communication channels

When you’ve customized these object and property settings:
- Head back to the left-hand sidebar.
- Under ‘Tools’, click ‘Inbox’.
- Select ‘Inboxes’.
- Within ‘Inboxes’, simply click ‘Connect a channel’.
This is where you can connect a channel to manage and keep all your conversations in one place.
You’re able to connect your email, forms, chat or Facebook Messenger through this feature.
Additionally, if you and your team use Slack for team communication, you’re able to connect Slack here to your HubSpot CRM!
You can read here about How to use Slack for team communication.
Next:
- Navigate back down to ‘Tools’.
This is where you’ll see other basic settings.
For example:
- Click ‘Marketing’.
- Select ‘Forms’ within ‘Marketing’.
This brings up basic settings you can choose when setting up your forms.
However, that brings us to the end of this CRM implementation guide on how to use HubSpot as a CRM for your small business.
Do you want to learn more about HubSpot’s CRM platform and how to use different features such as email marketing activities, deals, meetings, automation, and more?
Feel free to check out our complete beginners’ guide here which guides you through how to use HubSpot CRM and all its incredible features.
Video tutorial – How to setup HubSpot CRM for small business?
We have now covered everything we needed to show you on how to set up a HubSpot account and use their CRM with your business so manage your contacts, leads, teams and sales.
This CRM platform is exactly what every business owner needs!
When used in conjunction with HubSpots other powerful features such as their marketing and service based products, you can be sure your business will flourish online!
Feel free to check out our full video tutorial on how to configure HubSpot CRM below.
