If you run a WordPress website (or are looking to create one) and have next to zero design or technical skills and don’t know where to start, then this complete Divi theme tutorial for beginners on “How to Use Divi Theme” is for you.
By the end, you’ll be fully set up with Divi, and can start building incredible website pages!
We Believe Divi is The Best WordPress Theme Out There. Why?
- They make it easy to create a premium WordPress website without any of the challenging barriers like page building, coding or technical design!
- You can use Divi’s visual drag-and-drop page builder, and access thousands of pre-made website template that you can use to create your ultimate dream website.
Read more: Divi vs Elementor comparison guide.
How To Use Divi Theme?
This updated Divi theme tutorial for beginners will walk you through step-by-step how to use the Divi theme and all of its impressive features.
You will walk away after this Divi theme tutorial feeling confident in knowing that you can create and customize your own WordPress website completely by yourself.
1. Getting Started – How To Install Divi
To get started, you’ll first need to log into your WordPress website and learn how to install Divi.
*The link above is an affiliate link, which means we will get a commission if you sign up to Divi (at no extra cost to you). This helps support our education-based website and we thank you in advance!
It is important to note that the Divi theme is a premium theme that you need to install into WordPress.
If you’re completely new to WordPress and don’t have a domain name, WordPress web hosting and WordPress installed on your account, we recommend watching our premium website creation tutorial for beginners here before continuing with this tutorial.
That tutorial will guide you through the complete process of actually setting up your account and building your WordPress website with Divi.
Go ahead and check that tutorial out and we’ll meet you back here to continue with our Divi theme guide and review.
If you already have WordPress set up and you’re now ready to dive into How to use the Divi theme then this tutorial is for you!
Read more: Best website hosting for WordPress.
2. Sign In To WordPress

We’ve already logged into our WordPress account.
This is a completely fresh WordPress account that we’ve just set up for the purpose of this Divi theme tutorial.
Firstly, we want to find the theme that is currently installed and activated.
- Navigate over to ‘Appearances’ on the left-hand sidebar.
- Click on ‘Themes’.
We have the default Free theme ‘Twenty twenty-two’ activated (see screengrab).
To find out what this default theme will look like (before you make any customizations to your website):
- Navigate up to your website name in the upper left-hand corner.
Our website name for the purpose of this How to use Divi theme tutorial is ‘Stews consulting’.
- Click ‘Visit site’.
3. How To Download The Divi Theme
The Divi theme is one of the most popular and best WordPress themes on the marketplace for quickly and easily building a stunning, feature-packed, and responsive website with WordPress.
You can download the Divi theme by clicking here.
4. Divi Theme Pricing

Once you’re on the Elegant themes (Divi) website, you’ll have to choose your pricing plan.
You can find the pricing plans by:
- Clicking on ‘Pricing’ in the top right-hand corner.

You’ll then see two pricing plans to choose from (see screengrab).
1) Yearly access.
This means you’ll have to pay every year to access all the different features and update the Divi theme.
2) Lifetime access.
This is a one-time payment and allows you to access Divi forever!
It’s important to note that for both plans, Divi also offers an incredible 30-day money-back guarantee on all purchases.
This means that if you decide you don’t like Divi, or if it’s too hard for you to navigate (or for any reason you want to get a refund) you can go ahead and do that within Elegant themes, however, we know you’ll love Divi as much as we do!
Go ahead and sign up for the best option that suits you.
- Come down and click ‘Sign up today’.
- Simply sign up and create your account then log into your Elegant themes account
We’ll meet you inside your account as we already have an account with Elegant themes.

Once you’ve arrived inside your Elegant themes account:
- Simply navigate down to and click on ‘Themes and plugins’ underneath the ‘Members area’ header.
- You’ll then see two options (see screengrab).
- Download the Divi theme.
- Download the Divi builder plugin.
The second option is ideal if you already have a WordPress theme that you like, and you just want to use the Divi visual drag-and-drop builder to create your website pages.
However, as this is a complete guide on how to use the Divi theme, we’re going to download the entire Divi theme (that includes the Divi builder) and show you how to install Divi in this Divi builder tutorial.
- Click on ‘Download the Divi theme’.
5. How To Install And Activate The Divi Theme

Head back over to your WordPress website.
To install and activate the Divi theme:
- Navigate up to the top left-hand corner.
- Click on your website name next to the ‘W’ logo.
We’ll go ahead and click on ‘Stew’s Consulting’.
- Click on ‘Dashboard’.

- Navigate down to ‘Appearances’ again.
- Click on ‘Themes’.
- Select ‘Add new theme’.

- Navigate up to ‘Upload theme’.
- Click on ‘Choose file’
- Find the Divi zip file that you just downloaded.
- Click ‘Open’.
- Click on ‘Install now’.
And just like that, you’ve successfully downloaded, installed, and activated the Divi theme!
6. Receive Divi Theme Updates

Now that you’ve activated the Divi theme, we’ll show you how to make sure that your account is always up to date with the newest Divi updates.
Follow these steps to do so:
- Navigate down to ‘Divi’ on the left-hand sidebar.
- Click on ‘Theme Options’.
- Navigate up to ‘Updates’ next to ‘Integration’.
- Type in the username for your Divi account in the field next to ‘Username’.
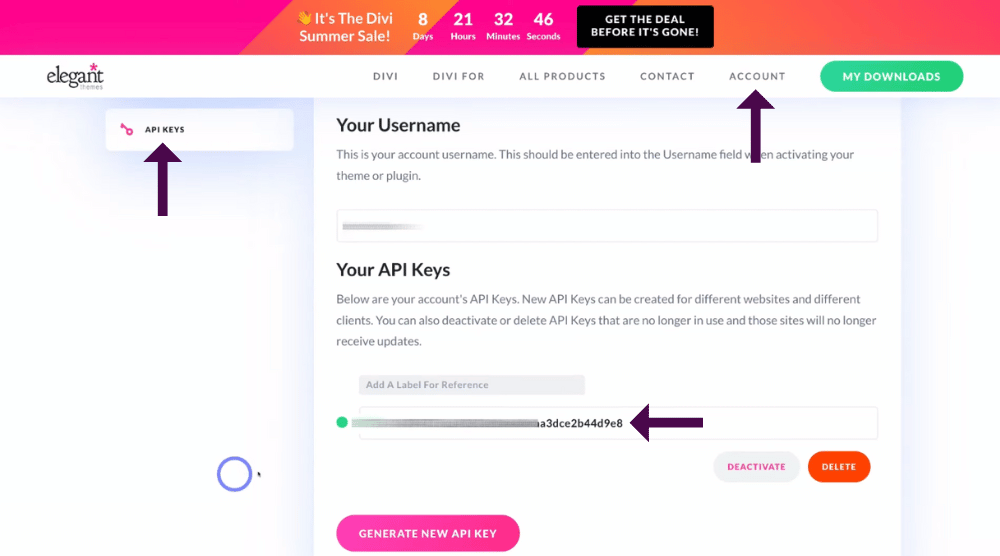
- Head back to your ‘Members area’ within your Divi account (on the Elegant themes website where you downloaded Divi).
- Navigate up to ‘Account’ (see screengrab).
- Click on ‘Account details’.
- Simply locate ‘API keys’ on the left-hand sidebar.
- Copy your API key by simply clicking on the code (see screengrab).

- Navigate back to your WordPress account.
- Paste in your API key that you just copied in the field next to ‘API Key’.
- Select ‘Save changes’.
To check out what your WordPress website looks like with the Divi theme installed:
- Navigate up to the top left-hand corner and click on your website name again.
- Click ‘Visit site’.
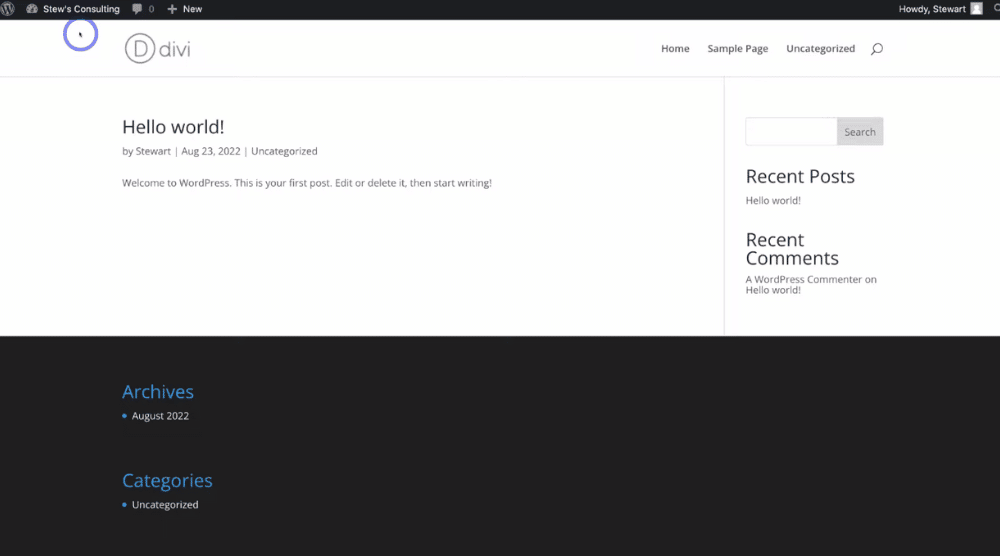
Here is our website! (see screengrab).
Your website might look slightly different from ours if you already have website pages and if you’ve already made customizations.
7. How To Add a Logo With Divi

To get started customizing your website, we’ll first show you how to add a logo to your WordPress website.
Follow the steps below:
- Click on your website name in the upper left corner again.
- Click ‘Dashboard’.
- Navigate down and click on ‘Divi’ on the left-hand side bar.
- Click ‘Theme options’.
- Under ‘General’, locate ‘Logo’.
- Click on ‘Upload’.
- Click on ‘Select files’ and find the logo you want to use.
- Select your logo.
- Click ‘Open’.
We will upload a logo that we created earlier.
Once you’ve uploaded your logo:
- Come down and click ‘Set as logo’ on the lower right-hand side.
- Simply click ‘Save changes’.
If you currently don’t have a logo for your business and for your website, check out our step-by-step beginner’s guide on how to create a logo using Canva, which is our favorite design tool that you can use to quickly and easily create your logo completely for free!
We also used Canva for the purpose of this How to use Divi theme tutorial to create the logo for this website.
You can also read our beginners tutorial on how to add a logo to a Wordpress website
Once you’ve uploaded your logo:
- Navigate down to and click on ‘Theme customizer’ under ‘Divi’ on the left-hand sidebar.

- Click on ‘Header and navigation’ on the left-hand sidebar.
- Select ‘Primary menu bar’.
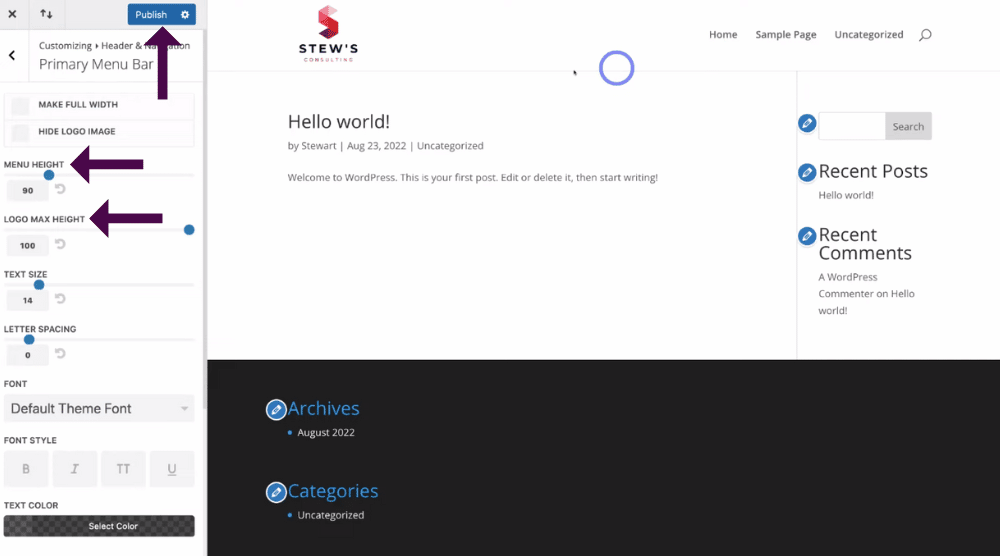
- Come down to ‘Logo max height’ and adjust your logo height to make it slightly bigger if you want.
- Click on ‘Menu height’ and adjust your menu height to make it slightly bigger if you want.
You can always come back here at any time to customize the way that your header up here (primary menu) appears on your website
We’re going to dive into further customizing your primary menu later on once we’ve finished creating website pages.
Once you’ve uploaded and resized your logo, you can preview what your website looks like with your new logo.
- Simply navigate over to ‘Publish’ on the left-hand sidebar.
- Click on the ‘X’ icon at the top of the left-hand sidebar.
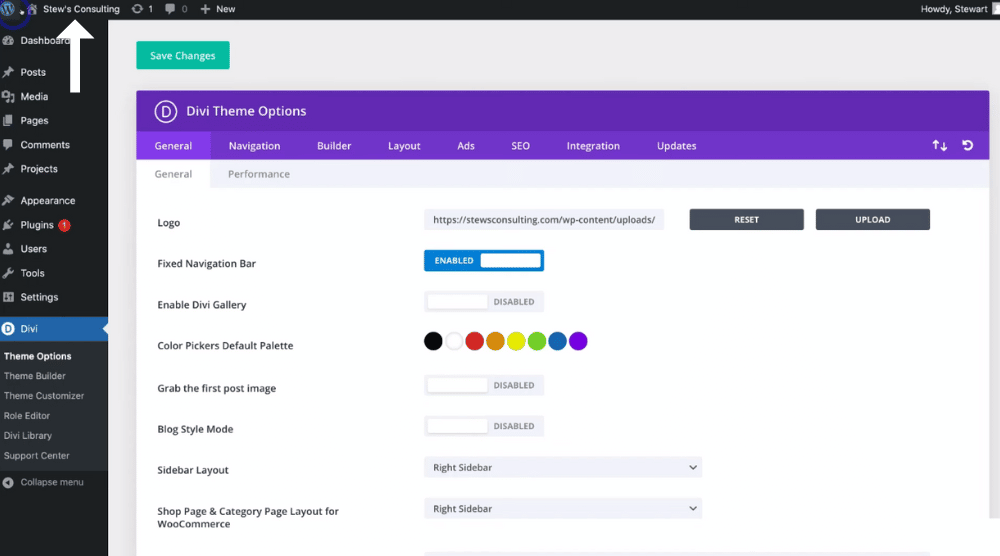
- Head back up to your website name in the upper left corner (next to the ‘W’ icon)
- Click ‘Visit site’.
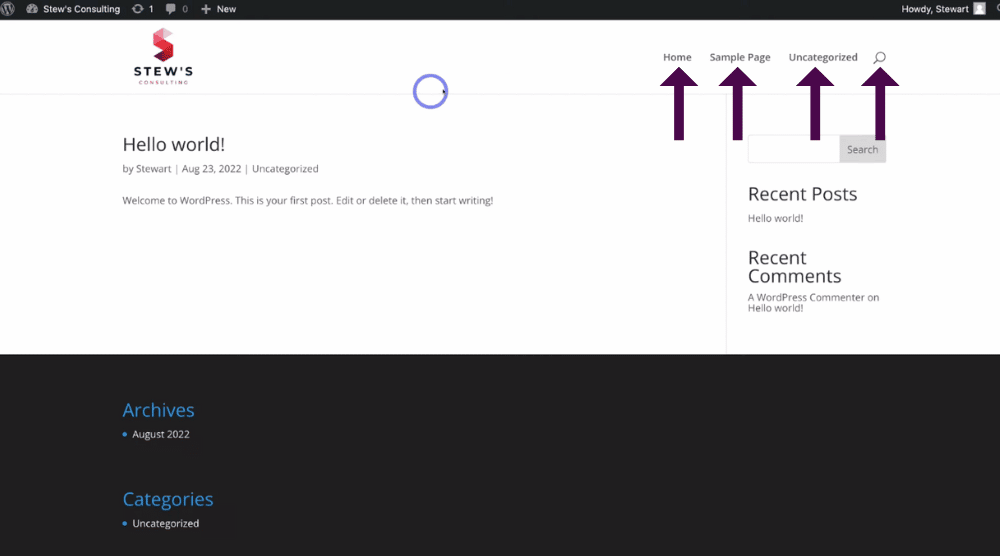
This will take you to a preview of your website.
You can then go back and follow the same process if you want to resize your logo again, however, we are super happy with how our logo looks
You can see we have a ‘Home’ page, a ‘Sample’ page ‘Uncategorized’, and a ‘Search bar’ over here.
8. Create Pages (Three Methods)

Now we’ll show you how you can add your own website pages in three different ways!
You can do this by following these steps:
- Navigate back over to the upper left-hand side and click on your website name again.
- Click on ‘Dashboard’.
- Select ‘Pages’ on the left-hand sidebar.
- Click on ‘Add new’ OR
- Simply navigate up to and click on ‘+ New’ at the top of the page.
- Click on ‘Page’.

That’s going to take you to the default block editor that WordPress offers.
First, you want to name your page:
- Simply type in the name of your page in the ‘Add title’ field.
We’re going to name our new page ‘Home’ to create a homepage for our website.
As we’re focusing on how to use the Divi theme and as this is a Divi builder tutorial, you’ll need to use the Divi page builder to create your website pages in WordPress
To do this:
- Click ‘Use Divi builder’.
- Select ‘Start building’.
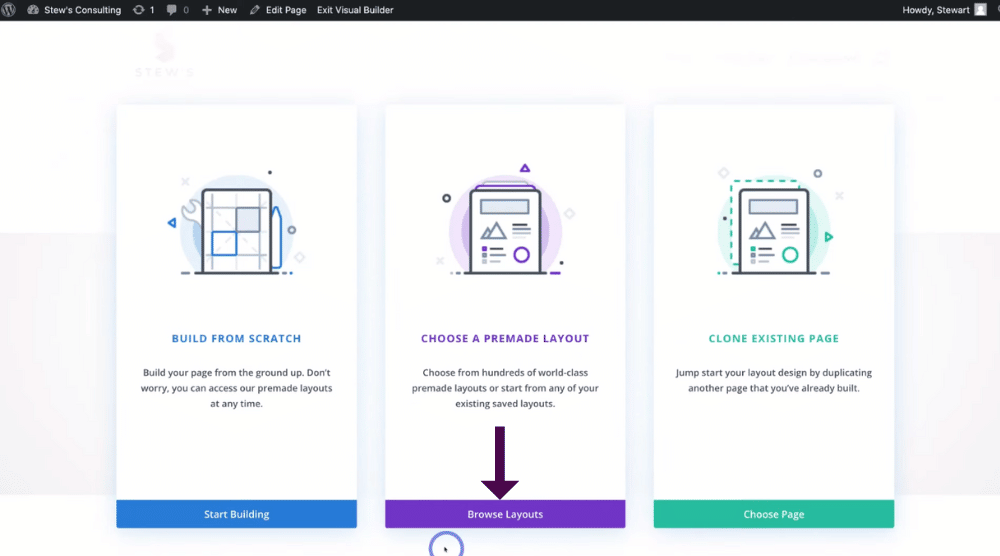
The Divi theme builder will give you three options for creating your website page
1) Build from scratch.
You can create a beautiful website without a template using Divi’s drag-and-drop visual builder.
2) Choose a premade layout.
Divi offers thousands of premade website templates and website pages that you can choose from and customize the way that you like.
These are professionally designed templates that you have access to within the Divi theme.
3) Clone existing page.
Duplicate the structure of a page you’ve already created, which should help all your website pages flow nicely with one another.
This means that once you’ve created your first website page, you could use that as a base for the rest of your pages and simply clone that existing page (and use that as a template base) to create other pages.
However, if you’re completely new to Divi, we highly recommend that you choose a premade layout.
Follow these steps to find out how you can customize each of the different elements within a premade template:
- Come down and click on ‘Browse layouts’.
Read more: How to add Anchor links to WordPress using Divi.
9. Amazing Divi Theme Templates (Layout Packs)

Divi will then generate hundreds of website layout packs as well as thousands of total layouts that you can choose from within the template library.
- Simply navigate up to the search bar and type in a specific keyword related to the type of website that you want to create OR
- Navigate down through all these different categories under ‘Category’ to filter through your different template options
For the purpose of this Divi theme tutorial, we’re going to find and select ‘Business’, and also ‘Services’ as we’re creating a consultancy website.
- Make your way through all the different layouts that Divi offers and find one that you like the look of.

We like the look of this consultant layout pack (see screengrab).
Once you’ve found one that you like the look of:
- Click on that pack to simply preview each of the pages within that layout pack.
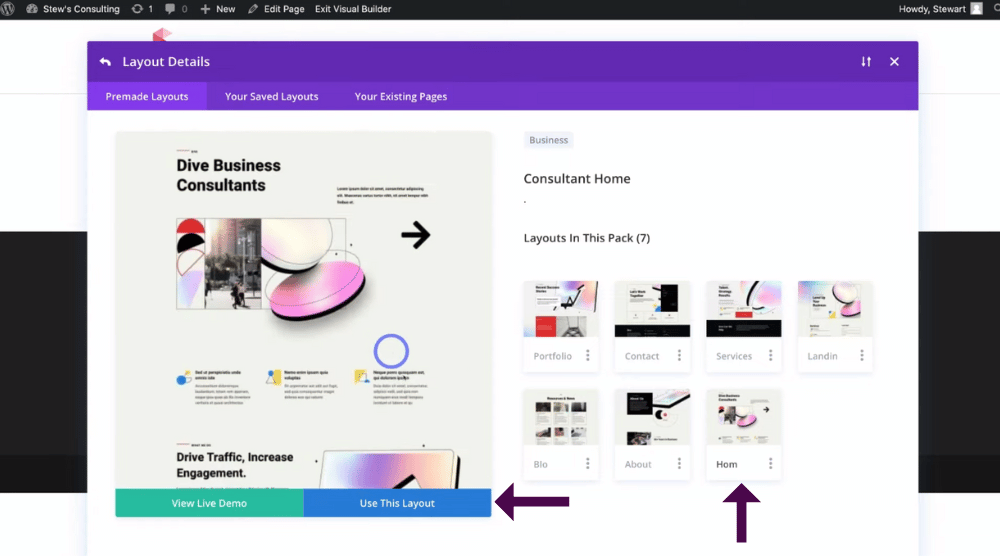
As we’re creating a homepage, we’re going to go ahead and click on the ‘Home’ page for this layout pack
- Scroll through the page and see if you like the layout.
- Click ‘Use this layout’ if you’re happy with the layout.
If you want to actually engage with that pack layout and see if that’s the type of layout that you want to use:
- Select ‘View live demo’.
We’re going to click ‘Use this layout’.
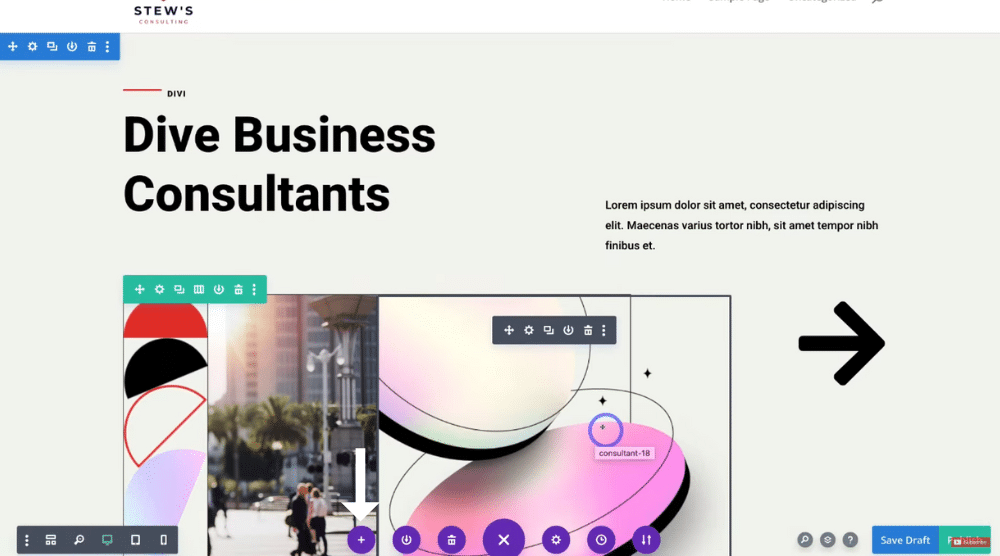
Give Divi a moment to import that template page into your new page.
And just like that, Divi is going to generate that entire template page that you selected.
From here, make sure you navigate through the entire page to check it out and make sure you like the look of it.
Once you’re happy with it, you’re ready to start customizing your chosen premade template!
However, If you’re not happy with your premade template:
- Navigate down and click on the purple ‘+’ icon.
This will bring up the template library again, where you can choose a different layout that can replace the current template.
This process is really straightforward and is a huge part of why we think Divi is the best WordPress theme!
It is super easy to use these professional templates within Divi.
We’re happy with our template, so we’ll exit this.
Also read: How to Add Instagram feed to your WordPress website.
10. Understand The Divi Page Structure

Before we go ahead and show you how you can start customizing your website page, it’s important to understand all the different elements that make up your page so you can better understand how to customize them.
1. This blue section up here is called a ‘Section’ (see screengrab).
The entire blue section makes up the whole top area.
We have another section down and another two sections below that.
This means that this template (and website page) is made up of four sections.
2. Within your sections, you’ll find ‘Rows’.
This green section here is a row (see screengrab).
3. Within your row, you have different elements also known as ‘Modules’.
Modules are what make up your website pages.
They could be text modules, photos, videos, images, forms, or anything else that you can think of that you want to add to your website!

If we scroll down the page, you can see that this is a row and within this row, we have multiple elements.
Again if we navigate down to this section, you can see we have the blue section here and within the blue section, we have the row and within this row, we have three modules (see screengrab).
If we click on the 1st row, you can see that the ‘three row layout’ has been selected (see screengrab).
Like we mentioned, within each of those three rows, you have modules.
11. Customizing Your Website Page With Divi

Now you’re ready to start customizing your website page by simply clicking on each module and changing the default text and images to your own.
Because Divi uses a visual drag-and-drop builder, you can simply customize everything from the front end, meaning you don’t need any technical knowledge to create stunning website pages.
We’re going to change this header to ‘Stews consulting’ by simply typing it in the module.
Alternatively, you can:
- Hover over the module you want to change
- Click on the little gear icon.

That’s going to bring up this customizing box so you can further customize your chosen element.
You can also drag out the customizing box to make it a bit easier and larger to view and make customizations.
Within your customizing box, you have more formatting options.
- Add a link.
- Add a background.
- Navigate over to ‘Design’.
- Come down to ‘Sizing’.
- Change the alignment and more.
When you’ve made any changes:
- Simply come down and click the green tick icon.
- Make sure when you make any changes, you click ‘Save draft’.
- When you’re ready to publish your website page, you can click on ‘Publish’ next to ‘Save draft’at the right bottom corner.
However, because we’re still working on the home page of our website, we’re going to save it as ‘Save draft’.
This means that any of those changes we just made are now saved as a draft, however, the website page is currently not visible online.
Go through all your text elements completing the same process as we just showed you to delete all the default text on the template.
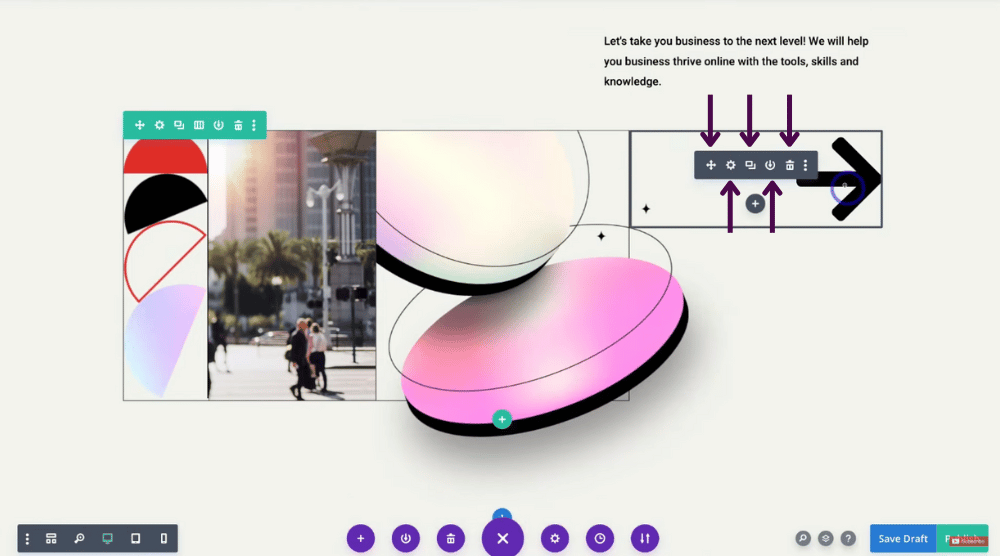
Simply click on each of your different elements to change the text.
This will also bring up a little bar that gives you more customization options such as:
- Delete
- Download
- Duplicate
- Move module
You can also find more settings by clicking on this gear icon (see screengrab).

Let’s navigate down to our next section.
You can see we have a row of three modules (see screengrab).
You can easily customize and change these text elements within each of these rows.
It is super straightforward and easy to do.
To do this:
- Click on each element that you want to change.
- Change the text by typing in your own text.
- Add the formatting that you like.
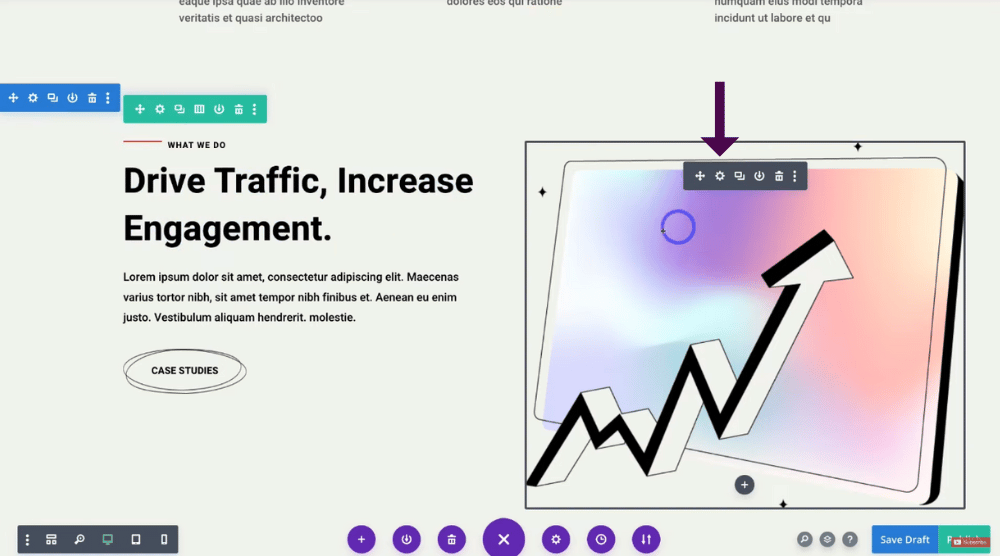
Within our row, we also have some image elements. To change image elements:
- Click on the image.
- Click on this gear icon.
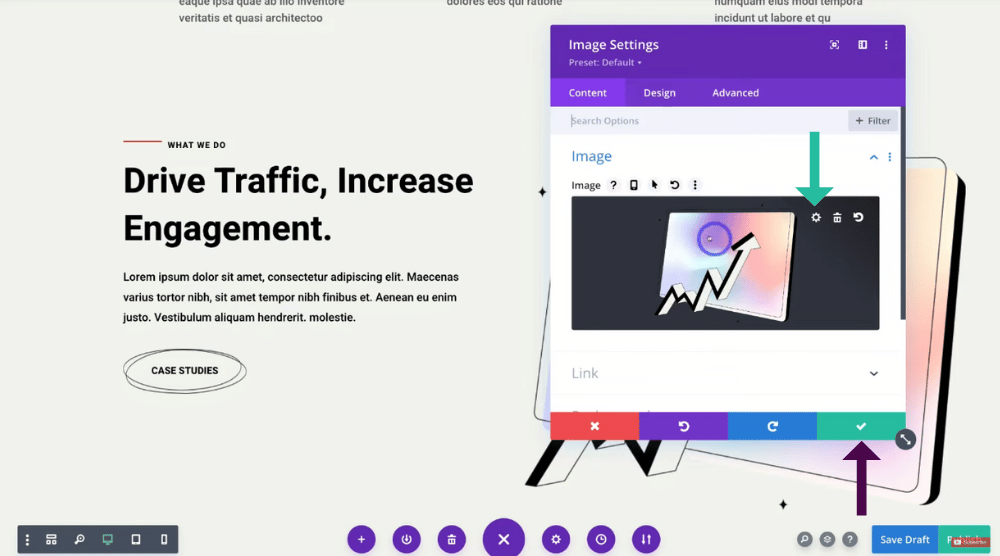
- Under ‘Image settings’, come down and change this image (see screengrab).
- Click the gear icon again to upload your own image.
- Choose from your media library (if you’ve already uploaded other photos in the past) OR
- Click on ‘Upload files’
- Click ‘Select files’ to upload your own photo that you want to replace the default photo with.
Once you’ve chosen your new image:
- Click ‘Exit’.
- Click on the green tick again.
Remember, once you’ve made any changes:
- Simply come down and click ‘Save draft’.
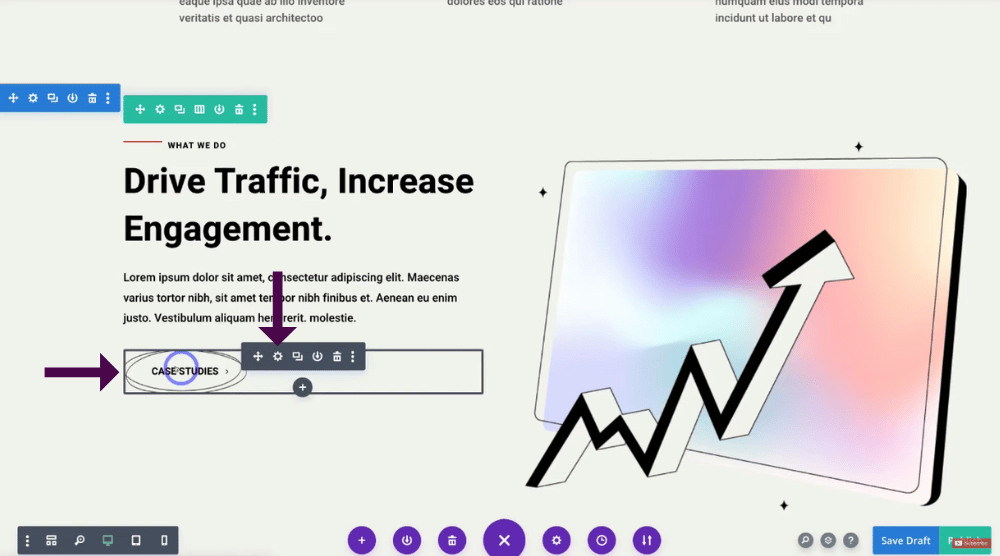
To change a button text:
- Click on the button you want to change (see screengrab).
- Click on the gear icon.
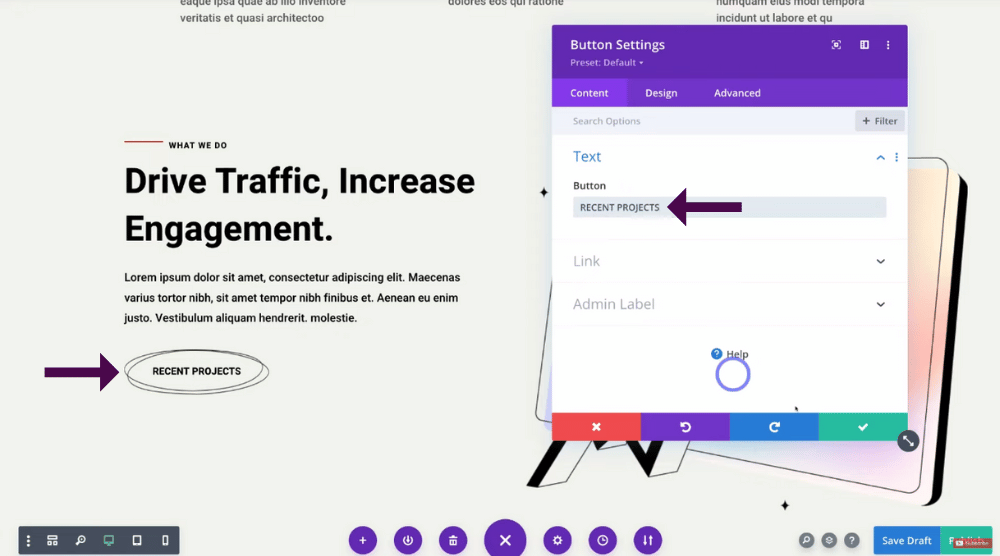
- Type in your new button text under ‘Text’.
- Click on the green tick to save your changes.
We’re going to change the text ‘Case studies’ to ‘Recent projects’.
That’s going to simply change the text down (see screengrab).
Additionally, you can simply change the button link URL by following these steps:
- Scroll down and click on ‘Link’.
- Type in the URL you want to add under ‘Button link URL’.
- Click on the green tick to save your URL link.
This URL should be the destination that you want to take people to when they click the button.
For example, if you created a website page with all the different case studies from previous clients, you could add that link here that will take people to that page.
However, we don’t have that page at the moment, so we’re going to leave that as it is.

If you like a particular module row or section that you’ve created and customized and you want to use that specific section on another website page, you can click on the element.
To do this:
- Click on the save icon within the section you want to use on another page (see screengrab) to add this section to your library.
- Name your section under ‘Section Name’.
We’re going to call this ‘Section template 1’.
- Come down and click on ‘Save to Library’.
You can now use this entire website section on other website pages!
You can also do the same with rows and modules.
- Simply click on the row or module you want to save to your library.
- Click on the same save icon.

Below each section, you can add your own section:
- Hover down below a section.
- Click this blue ‘+’ icon (see screengrab).
- Choose a section type.
We’re going to click on ‘Regular’ (see screengrab).
That’s going to allow you to structure your section with rows.
- Click on the structure you like.
We’re going to click on this ‘four section’ row
- Add in modules (elements) within each of these rows. (Will select the 1st section)
Divi allows you to add in a bunch of different modules, some of these include:
- Map
- Image
- Gallery
- Email opt-in
- Divider
- Contact form
- Call to action
- Blurb
- Audio
- Blog
- Buttons
- Comment
For example, let’s click on ‘Video’.
That’s going to add a video in here (see screengrab).
You can then replace this video with your own video (either from an external website like Youtube) or you can upload an MP4 file.
However, for the purpose of this tutorial, we’re going to exit that and go ahead and delete this video section we just created.
Once you’ve made any changes to your website pages, make sure that you preview what your changes will look like across all different devices.
To do this:
- Simply select ‘Desktop’, ‘Tablet’ or ‘Mobile’ in the lower left corner.
Take the time to make sure that your website pages and the changes that you’ve made are responsive across different devices.
Before you publish your website, make sure that you take the time to customize your premade template the way that you like.
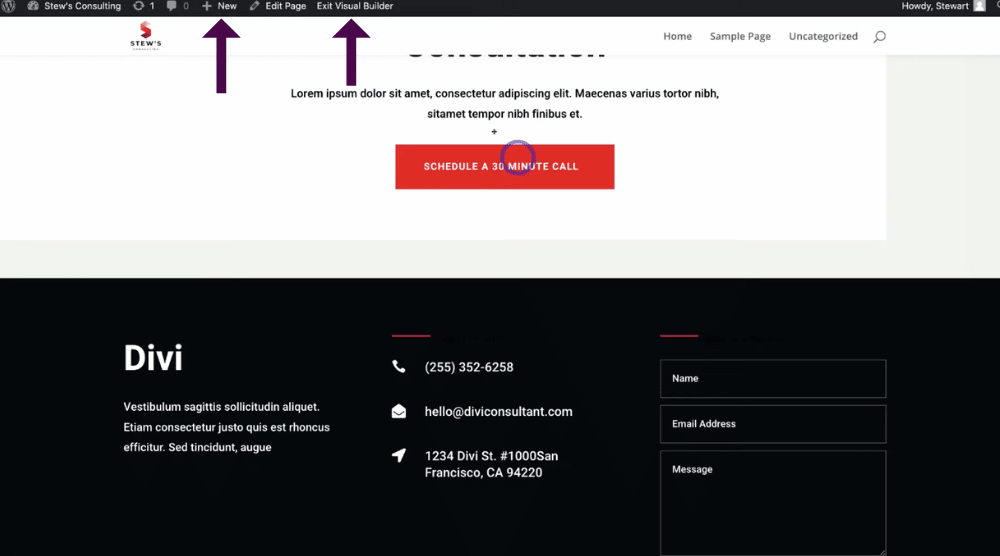
Remember, you can customize any of your website pages at any stage by clicking ‘Enable visual builder’ at the top of each selected page.
For the purpose of this tutorial, we’re going to quickly go ahead and create one more website page.
- Navigate up to ‘+ New’.
- Click on ‘Page’ again.
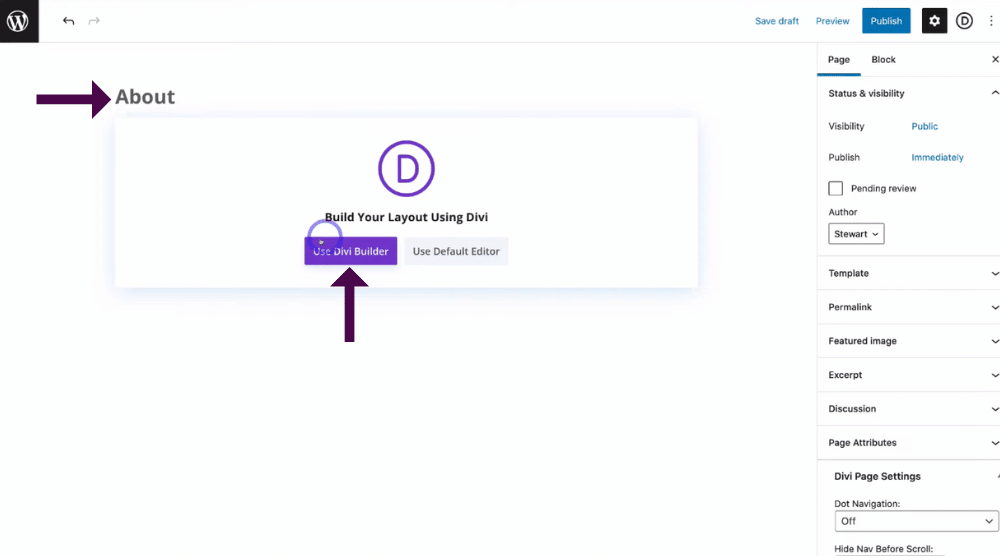
- Name your new page.
We’re going to create an ‘About’ page.
- Click on ‘Use Divi builder’.
Remember you have the option to choose another premade layout, clone the existing page you just created or you can create a website page from scratch.
12. Create Pages From Scratch With Divi.

This time, we’re going to show you how to build your website page from scratch.
Follow these easy steps to find out how:
- Click on ‘Start building’.
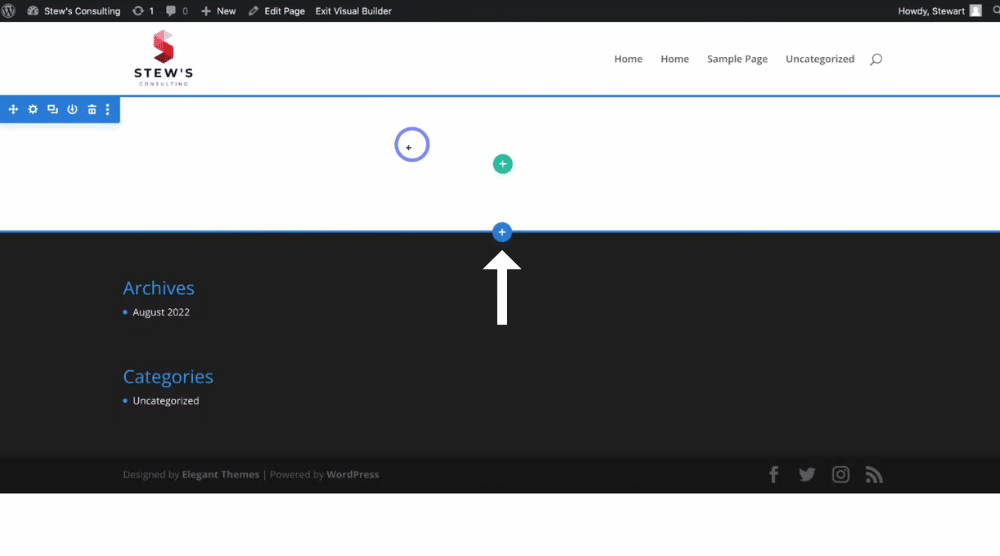
- Come down and click on this blue ‘+’.
- Select ‘Fullwidth’.
- Then select ‘Fullwidth header’.
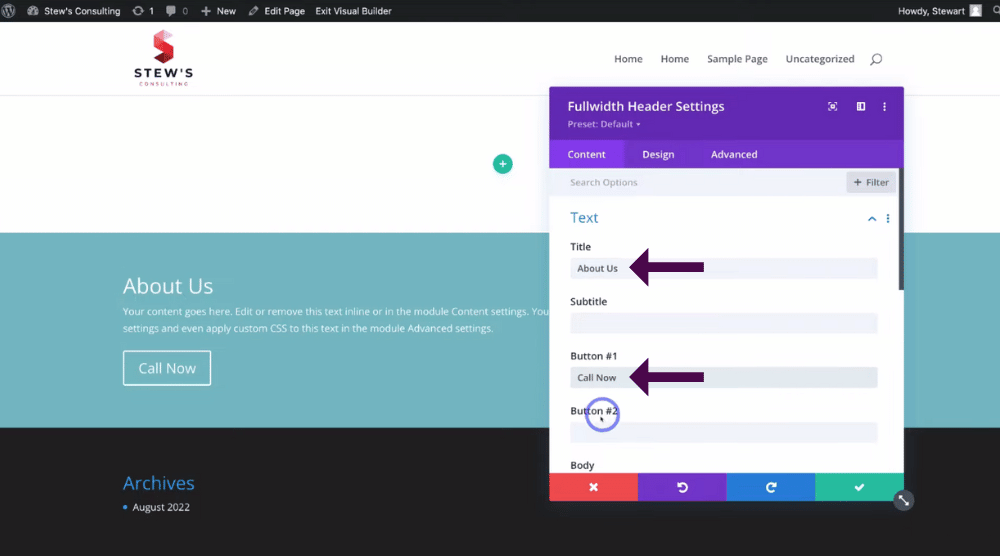
- Type in your title under the ‘Title’ field.(see screengrab).
We’re going to type in ‘About us’.
- Add your button name under ‘Button #1’
Ours will be called ‘Call now’.
If you want to add another button, you can add your second button name under ‘Button #2’
- Scroll down to ‘Body’.
This is the body text for your new page that you can customize.
Divi offers two easy options for you to customize your body text
- Customize visually from the front end by simply clicking on the element.
- Open up the editor and start customizing that way.
Make sure you take the time to customize your Title, buttons, and body text the way you like.
However, we’re going to leave that for now and click ‘Tick’.
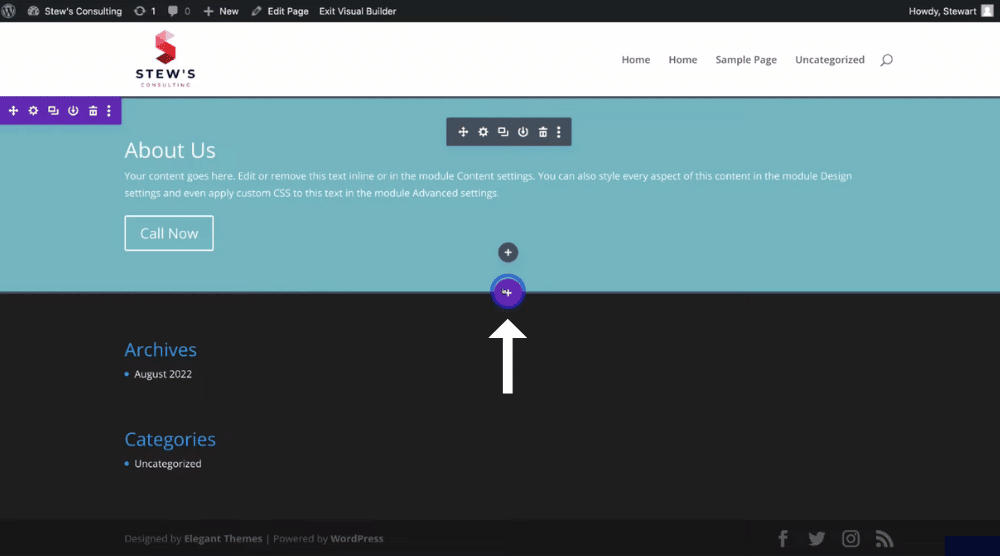
To add a new section to your website page:
- Come down and click on the purple ‘+’ icon (see screengrab).
- Select ‘Add a section from your library’.
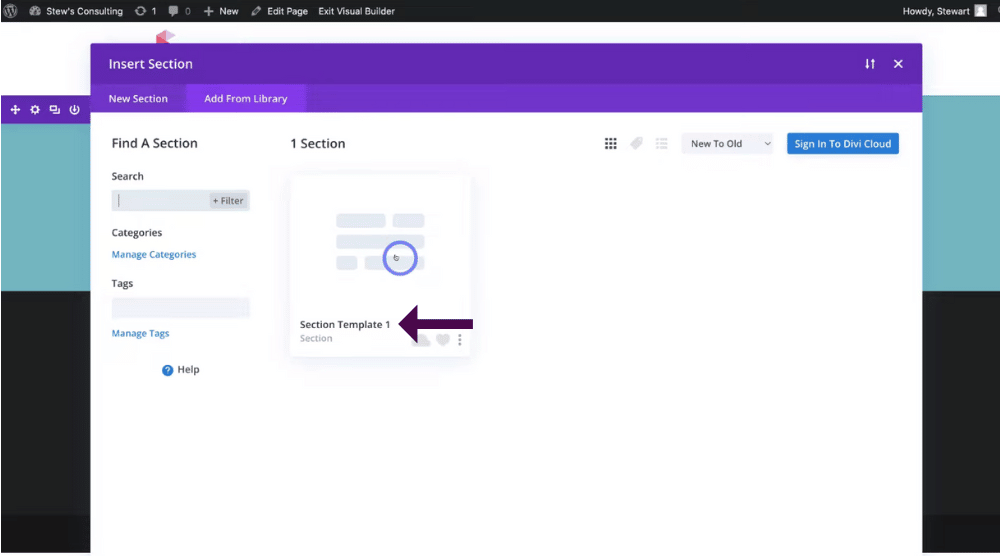
This brings up the section template we saved earlier.
- Select the template you want to use.
- Come down & Click ‘Use this section’.
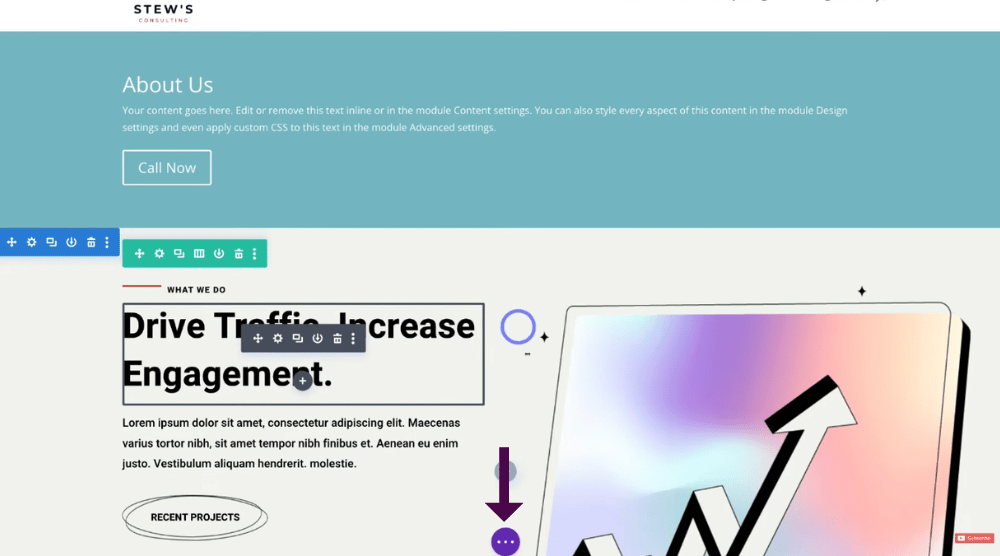
That’s going to add that section here (see screengrab). (This is the section that we saved earlier )
That’s just an example of how you can navigate through each of your pages with Divi to customize the different templates (or create your pages from scratch!).
However, the best way to create your website pages with Divi (especially for beginners) is to choose a premade website template and then customize them the way you like.
Once you’ve finished customizing your page, you’re ready to publish it!
- Navigate down and click on these Purple three dots (see screengrab).
- Click on ‘Publish’ on the right-hand side.
Note: Our second page ‘About us’ isn’t finished yet! We need to spend some more time customizing it and replacing all the default content.
Again, make sure you take the time to do this for your website pages before publishing!
Now we’re going to show you how to customize your website menu.
13. Homepage Settings

Firstly, we want to make our home page that we just created the correct home page by simply following these steps:
- Head over once again and click on your website name on the upper left-hand side.
- Select ‘Dashboard’.
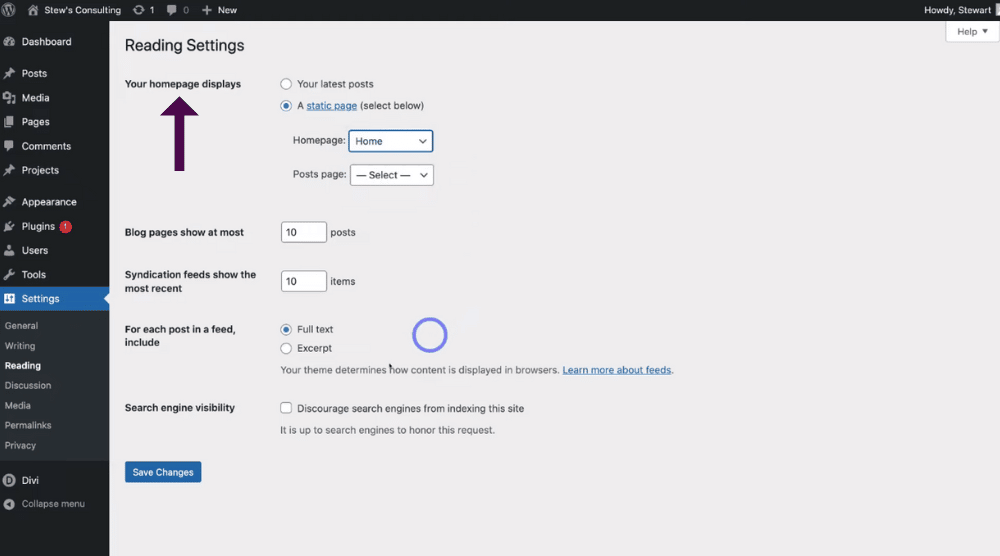
- Navigate down to ‘Settings’ on the left-hand sidebar.
- Click on ‘Reading’.
- Navigate up to ‘Your home page displays’ (see screengrab).
- Select ‘A static page’.
- Under this, you’ll see ‘Home page’.
- Make sure that you have ‘Home’ selected from the drop-down menu.
- Click on ‘Save changes’.
And it’s as easy as that!
We have now successfully changed our home page to the correct home page.
14. Add Primary Menu

To add your menu as a primary menu:
- Navigate over to ‘Divi’ on the left-hand sidebar.
- Click on ‘Theme customizer’.
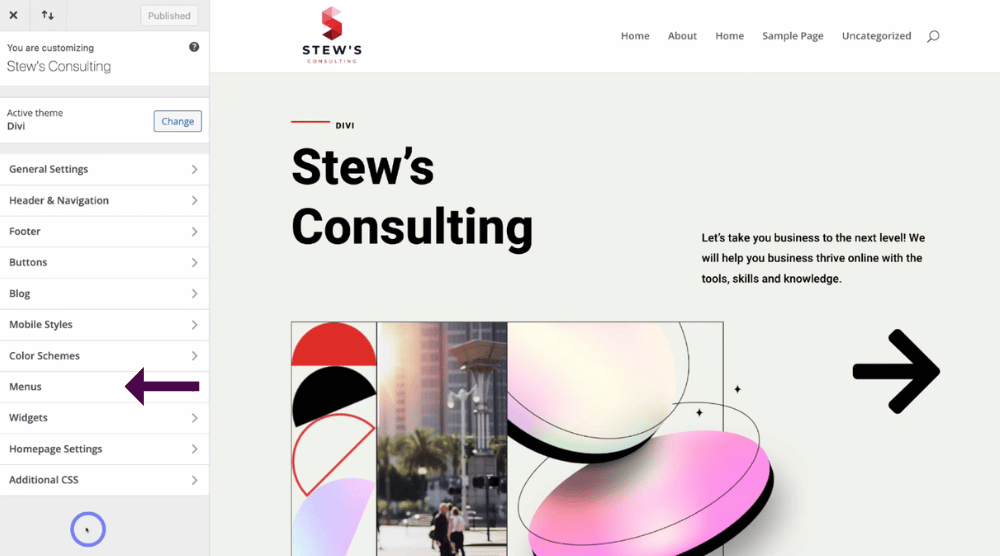
- Simply navigate up to and click on ‘Menus’ on the left-hand sidebar.
- Select ‘Create new menu’ on the left-hand sidebar.
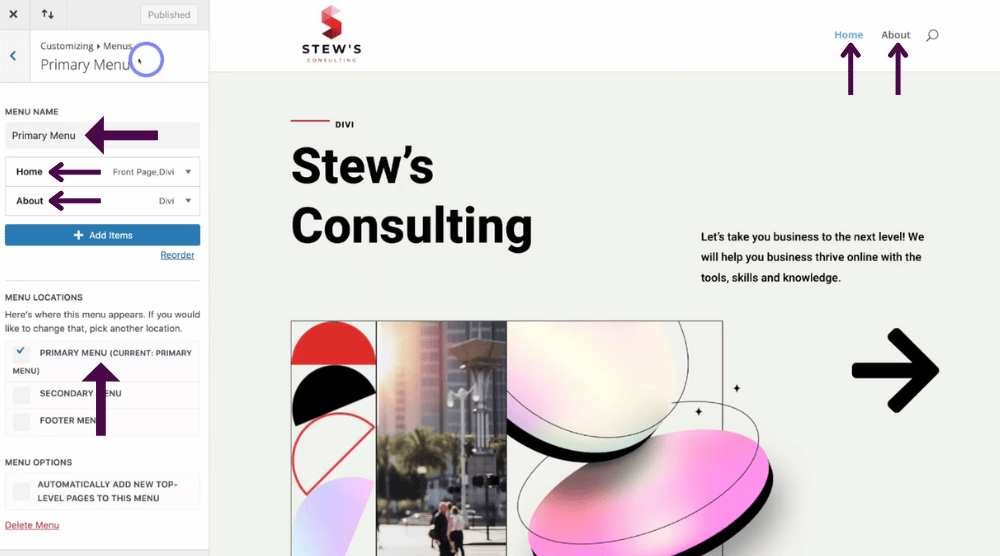
- Click ‘Primary menu’ on the left-hand sidebar.
- Name your menu under ‘Menu name’ on the left-hand sidebar.
We’re going to name our menu ‘Primary menu’ as this is the menu that we want to use up here.
Once you’ve named your menu:
- Come down and click on ‘Next’.
- Select ‘+ Add items’ on the left-hand sidebar.
Now you can simply go ahead and all the pages that you’ve created!
To do this:
- Simply tick the pages you’ve just created under ‘Pages’
For example, we’re going to add the two pages that we just created ‘Home’ and ‘About’
You can even add a new page here if you simply:
- Type in your new page name in the ‘Add new page’ field.
- Click ‘ + Add’.
You can then customize that page later.
Additionally, you can also add posts, projects, categories, tags, and more to your primary menu.
However, ideally, you just want to add your website pages to your primary menu!
Once you’re happy with your primary menu, you’re ready to publish!
- Click on ‘Publish’ in the upper left-hand corner.
As you can see, we now have two items in our primary menu!
We have the ‘Home’ page and the ‘About’ page (see screengrab).
If we click on each of these 2 items, it will now take us to the new pages we created.
To view your live site:
- Exit out of this customizer.
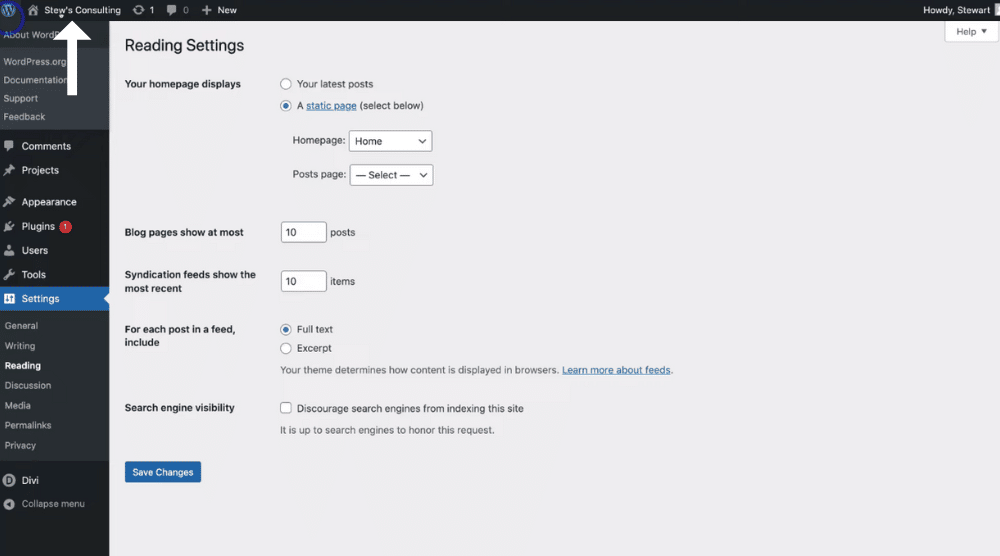
- Click on your website name in the upper left-hand corner to visit your site!
We’re going to click ‘Stews consulting’ to see all of our changes and visit the new website that we just created.
And just like that, we’ve shown you how to use the Divi theme to create your website and build your website pages with the Divi theme!
We have shown you a complete beginner’s overview of how to use the Divi theme.
We hope you are now confident in navigating around what we believe is the best WordPress theme offered and love it as much as we do.
How To Use Divi The Best WordPress Theme (Video Tutorial)
This tutorial on how to use the Divi theme should have given you the kick-start to get up and running with the Divi theme for your WordPress website.
Keep an eye out for a more complex tutorial in the future that will walk you through Divi’s more advanced features that you can leverage in order to build your WordPress website.
However, for now you can watch our complete Divi theme guide video below on how to install Divi , ultimately helping you reach your business goals and thrive online using the best WordPress theme out there!
