Table of Contents
In this Klaviyo tutorial for beginners, we are going to show you the simple process of how to set up and use Klaviyo abandoned cart emails to drive more sales to your Shopify online store.
All eCommerce business owners know how incredibly frustrating it can be when potential customers add items to their cart, then don’t actually purchase those items.
This is called an abandoned cart.
However, we have good news!
Did you know that you can set up and send specific emails to those potential customers with the aim to entice them back to your online store to purchase the products they abandoned in their cart?
This can easily be done all through your Shopify online store and a powerful email marketing and automation platform called Klaviyo.
The seamless integration between the two platforms means you’re able to simply set up Klaviyo abandoned cart emails and automatic email flows within a matter of minutes to assist with conversions on your Shopify store!
Read more: How to setup abandoned cart emails within Shopify
How to use Klaviyo abandoned cart for Shopify
This Klaviyo for Shopify tutorial will walk you through how to use Klaviyo abandoned cart emails with the aim to convert more of your Shopify abandoned cart potential customers into customers!
Email flows are different types of email sequences that you can select to send sequentially to your subscribers.
Each email flow has multiple emails within that flow that you can create, then send automatically based on a specific trigger and a specific goal.
In this Klaviyo tutorial, we are going to launch in and focus on creating a Klaviyo abandoned cart for Shopify email flow!
Read more: How to use Klaviyo email automations
1. Getting started – Klaviyo for Shopify

To set up powerful email flows with Klaviyo for Shopify, you’ll first need to log in to your Shopify online store.
Let’s meet you inside your Shopify store and learn how to set up an abandoned cart with Klaviyo!
Don’t have an online store but want to start selling your products online with Shopify? Learn how to get started with Shopify here.
2. How to Install Klaviyo on Shopify
Once you’ve logged into your Shopify store, you’ll need to install the Klaviyo app.
First time using Klaviyo?
Don’t worry!
We’re going to show you how to install Klaviyo onto Shopify.
If you’ve already installed Klaviyo on your Shopify store, skip to the next part of this tutorial.

To install Klaviyo:
- On your Shopify home dashboard click ‘Add apps’ under ‘Apps’ in the left-hand side bar.

- Click ‘Shopify App Store’ at the bottom of the page.

- Type in ‘Klaviyo’ into the search bar.
- Click ‘Enter’.
- Find and select the ‘Klaviyo email marketing and SMS’ app (see screengrab).

- Click ‘Add app’.

- Find and click ‘Install app’.
- Type in your b for your Shopify store.
- Click ‘Log in’.
- Add your ‘Center name’.
This is the name that your email subscribers will see when they receive an email from you.
- Type in your ‘Sender email address’.
- Click ‘Continue’.

- Select your goal from the four options (see screengrab).
Your goal will be individual to your business.
For the purpose of this Klaviyo abandoned cart for Shopify tutorial, we’re going to click ‘Earn more revenue’ and then ‘Email only’.
It’s worth mentioning that you can also select ‘SMS marketing’ as well as or instead of ‘Email marketing’ as Klaviyo is an SMS and email marketing platform.
However, for the purpose of this Klaviyo abandoned cart email tutorial, we’re just going to focus on the Klaviyo abandoned cart email sequence.
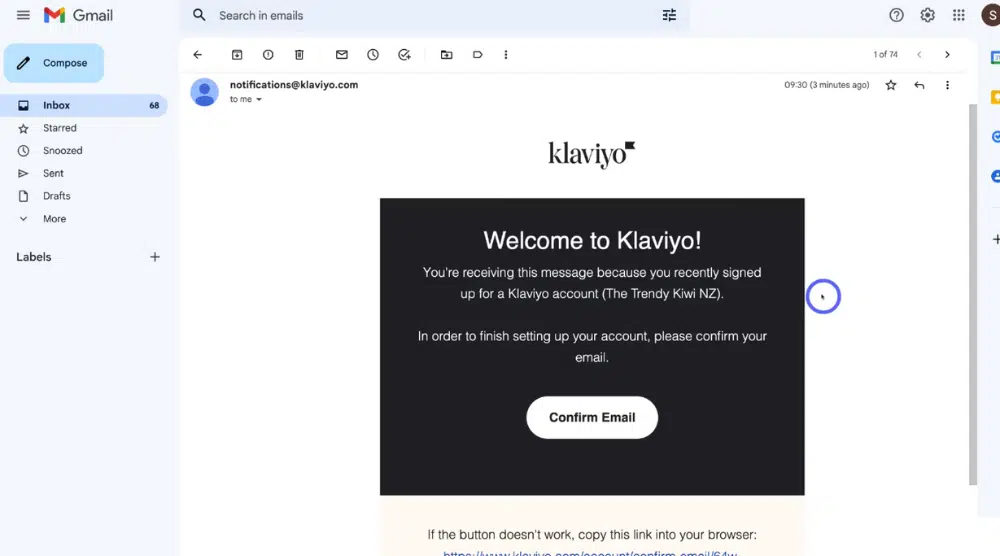
You’ll then see this page pop up telling you to activate your account (see screengrab).
- Head over to your email provider inbox.
- Simply click the link that has been sent to the email you used to sign up to Shopify.
The activation email that you’ll get from Klaviyo will look like this (see screengrab).
- Click ‘Confirm email’.

You’ll then be redirected to your new Klaviyo account!
Here you’ll be able to view the goal that you selected earlier.
Remember, our goal was ‘Earn more revenue’ (see screengrab).
Since we chose this as our goal, the next step that Klaviyo recommends is to start creating an abandoned cart email flow.
And that’s exactly what we’re going to show you how to do now!
If you’re interested in learning more about Klaviyo and all the different features that Klaviyo offers, check out our full beginners tutorial here.
However, in this tutorial, we’re just going to focus on how to set up an abandoned cart with Klaviyo’s email flow feature.
3. How to create an abandoned cart email flow

To get started with creating an abandoned cart email flow:
- Click ‘Flows’ over on the left-hand side bar.
Here you’ll find multiple different email flow template types that will help you with your specific goal (that you entered in earlier) (see screengrab).
We recommend using these email flow templates to create an email flow, especially if it’s your first time.
- Find the ‘Abandoned cart’ email flow.
- Click’ Get started’.

This is what your abandoned cart flow will look like before you make any customizations or changes to it (see screengrab).
At the top level, you can see the trigger ‘When someone checkout started’, then the time delay of ‘Wait 4 hours’.
This means that once this abandoned cart email flow has been triggered (when the checkout starts) but the visitor doesn’t make the purchase, the first email will be sent 4 hours later.
Then we have another time delay, which is if the potential customer still doesn’t convert by making the purchase 20 hours later.
This will then prompt the second email to be sent.
Over on the left-hand side, there are also additional actions you can add to your email flow such as another email, another time delay and more options below such as a conditional split.
A conditional split is if you want to split test your abandon cart email flow.

Now we’re going to show you how to edit your time delay within your email flow:
- Navigate up to ‘Wait 4 hours’ (the first time delay in the email flow template).
- Head over to the left-hand side bar.
- Simply type in the amount of hours you want to change your time delay to.
- Come down and click ‘Save’.
We’re going to change ours to 1 hour, meaning that after this abandoned cart flow has been triggered, one hour later our first email will be sent (see screengrab).
Read more: How to create a pop up form in Shopify using Klaviyo
4. How to customize email flow
Now that we’ve changed our first-time delay, we’ll show you how to customize the first email that potential customers will receive once they abandoned their cart (remember we changed our first email to be sent after 1 hour).

To do that:
- Hover over the email you want to customize (the first email).
- Select the three dots next to the email (see screengrab).
- Click ‘Edit’ from the drop down menu.

- Add in a subject line below ‘Subject line’.
You’ll notice there will be a default subject line that you can simply change or keep the same.
We’re going to keep ours the same (see screengrab).
- Select the smiley face icon next to your subject line to add an emoji to your subject line if you like.
This will help your subject line grab your potential customers attention.
- Below ‘Preview text’, add in a preview text.
- Add your sender name below ‘Sender name’.
- Type in your email address below ‘Sender email address’.
Your sender name is who is actually sending this email, so keep in mind that your recipients will see both your sender name and the sender’s email address when receiving your email.
Remember, you already added your sender name and email address earlier when you initially set up Klaviyo, so make sure you keep these the same throughout your email flow for consistency.
Once you’ve added in these details:
- Click ‘Edit email’ over on the right-hand side of the screen (see screengrab).

This is where you’re able to customize and change your first email that will automatically send to your potential customers when they don’t make a purchase on your online store and abandon their cart.
- Head over to the left hand side where you’ll see a bunch of different blocks that you can add into your email (see screengrab).
- Simply click on any block of your choice and drag it over onto your email.
- You’re able to add as many blocks as you like to your email.
For example, let’s add a logo to our email.
To add a logo:
- Click the ‘Image’ block.

- Drag the block and place it where you want your logo to appear.
- Select ‘Browse’ over on the left-hand side of the page.
- Click ‘Upload / Import’.
- Select ‘Browse for file’ and choose the logo you’ve saved onto your computer.
- Click ‘Upload’.
One of the images we’re going to upload.

From here, you’re able to edit your logo image.
We’re going to resize our image, however, there are many other image formatting options up above.
Make sure you take the time to play around with editing your logo.
Once you’re happy with how your logo looks:
- Click ‘Apply’.
- Select ‘Save’.
We want our logo to be in the center of our email, so we’re also going to click the ‘Center aligned’ option.
If you want to create a logo for your business (for free!) if you don’t already have one, check out our beginners tutorial here where we walk you through how to create a professional logo through a free design tool called Canva.
However, let’s continue with this Klaviyo abandoned cart email tutorial and continue editing your first email flow!

To change the default header text in your logo:
- Simply click on the header you want to change.
- Type in your new header text over on the left-hand side (see screengrab).
- You’ll also notice other text formatting options you can use to further customize your header text.
However, we’re happy with our email.
Once you’re happy with how your header text looks:
- Click ‘Save’.
Next, simply edit the other default elements on your email using the same process as we just showed you.
In addition to block elements, you also have the option to have dynamic block elements within your email (see screengrab).
A dynamic block element will actually generate the items your potential customer left in their cart!

For the purpose of this tutorial on how to use Klaviyo abandoned cart for Shopify, we’re going to add the ‘Social links’ element to the bottom of our email.
This means we can add our social media links to the email.
To do that:
- Head back over to and select ‘Blocks’ on the left-hand side bar.
- Click and drag the ‘Social links’ block to where you want it to go.

Again, we’re going to add ours to the bottom of our email.
- Click ‘Type’ on the left-hand side of the page (see screengrab).
- Choose your social link type from the drop down menu.
We’re going to select ‘Facebook’ to link our Facebook business page to our email.
- Type in the link to your social media page next to ‘Link URL’.
- Click ‘Add button’ to add an additional social link button.
- Select the relevant social media type and follow the same process as above.
For example, we’re also going to add both Instagram and Pinterest (see screengrab).
You can add as many social media links you like, however it’s important that you make sure you add the link for each of your business social profiles.
You can read our beginners guide on How to connect Shopify to your Facebook online shop
Once you’ve added all your social profiles and added the links to each of these:
- Click ‘Save’.
As you can see, it’s very easy to customize your email!

Once you’ve finished adding and editing your email block elements:
- Click ‘Styles’ on the left-hand side bar.
This is where you can change the overall style of your emails (see screengrab).
Here you can change the style and format of your texts, links and headings.
When you’re happy with how this looks:
- Click ‘Save’.

To preview your email:
- Select ‘Preview’ below ‘Styles’ on the left-hand side bar.
- On the right-hand side of the screen, you’re able to view your email on both desktop and mobile (see screengrab).
Once you’ve previewed your email and are happy with how it looks:
- Click ‘Save and return’.

That will redirect you back to your abandoned cart email flow.
Here you can see the first email that you customized for your email flow (see screengrab).
Now when 20 hours have passed from when we sent our first email, our second email will automatically send if the customer has not converted from our first email.
We’re going to change this time delay to a shorter amount of time.
You can do this by:
- Clicking on the time delay.
- Changing the amount of time on the left-hand side of the page (see screengrab).
For the purpose of this Klaviyo abandoned cart for the Shopify tutorial, we’re going to change this time delay to 6 hours instead of 20 hours.
- Click ‘Save’.

Now let’s have a look at our customized time delays and email flow (see screengrab).
Basically, as soon as the ‘Checkout’ trigger is activated, our first email will be sent one hour later (if the potential customer hasn’t already converted within this time’)
Next, if they still haven’t converted from our first abandoned cart email, the next abandoned cart email will be sent 6 hours later.
You’re then able to simply customize the second email following the same process as we showed you with the first email.
And that is the exact process of customizing your emails!
Read the blog to know How to use Shopify for email marketing
You’re also able to add additional time delays and emails if you like.
Simply:
- Click ‘Time Delay’ under ‘Timing’ on the left-hand side bar.

- Drag the ‘Time Delay’ button and place it below your second email on your email flow (see screengrab).
- Add in the time delay under ‘Set this delay for’.
- Choose from ‘Days’, ‘Hours’ or ‘Minutes’.
Basically, how long do you want your time delay to be for after your second email?
For the purpose of this tutorial, we’re going to add ‘One day’.
- Navigate over here and click on ‘Hours’ or ‘Minutes’.
- Click ‘Save’.

Now we’re going to add a third email to our email flow!
To do this:
- Click ‘Email’ under ‘Actions’ on the left-hand side bar.
- Drag and drop this email element below the time delay you just added (see screengrab).
- Simply edit this email in the same process as we showed you earlier.
If you want to delete the email:
- Hover over the email you want to delete.
- Click the three dots (see screengrab).
- Press ‘Delete’.
- Click ‘Delete Email’.
To duplicate an email:
- Navigate up to the email you want to duplicate.

We’re going to choose our first email.
- Click the three dots on that email.
- Select ‘Clone’ from the drop-down menu.
This is perfect for if you’ve created an email, love how it looks and want to reuse the design for another email within your email flow with small customizations.
- Click on the copied email (see screengrab).

- Drag this below the time delay of your choice.
We’re going to place ours under our ‘One day’ time delay.
- Click on the clone email.
- Navigate up to the name on the left-hand side (see screengrab).
- Change the name to represent what the email is about.
We’re going to change our email name to ‘Abandoned Cart Email 3’ as this is going to be our third abandoned cart email.
- Click ‘Done’.
Now it’s time to customize this email so it’s slightly different:
- Hover over your duplicated email.
- Click the three dots.
- Select ‘Edit’ from the drop-down menu.
- Customize the content of this email as shown above.
Additionally, you can add a discount onto an email flow, which is a great way to entice your potential customer to convert!
For the purpose of this tutorial, we’re going to add this on our third email.
This means that if the potential customer does not convert from the first or second email, they’ll receive a third email with an amazing deal that the customer can then use on their abandoned cart items!
If you want to learn more about how you can create a discount code and then add that to your email, make sure you check out our Shopify discount code tutorial that you can then use in your emails.
We’re just going to add 3 emails to our email flow, however you can add more if you like.
Once you’ve taken the time to customize your complete email flow:
- Click ‘Done’ in the upper right-hand corner.
5. How to activate your email flow

When you’ve finished fully customizing your email flow, you’re ready to activate it!
To do that:
- Click ‘Turn on and Review’ in the upper right-hand corner.
- Select ‘Turn on’.
- Navigate up to ‘Exit’.
- You’ll then see your abandoned cart email flow is activated (see screengrab).
And just like you’ve enabled your abandon cart email flow with Klaviyo!
This means that when any potential customers on your Shopify online store abandoned their cart, this email flow will automatically be triggered!
Read more: Best website builders for online stores
6. How to measure the performance of your email flow

To measure the performance and analytics of your email flow:
- Click ‘Edit flow’ on your now-activated email flow.

- Select ‘Show analytics’ at the top of the page.
Here you can see the ‘Open rate’, ‘Click rate’ and the ‘Placed orders’ on each email (see screengrab).
- At the top of the page, select ‘Manage flow’.
This is where you can view the flow history and edit the details.
Read more: Top 10 must have digital tools for small businesses
7. How to disable your email flow

If you’d like to disable your email flow, simply follow the steps below:
- Click ‘Update action statuses’.
- Select ‘Draft’ from the drop-down menu (see screengrab).
- Click ‘Update statuses’.
By doing this, your email flow and your different emails within that flow will turn into drafts.
You’re able to start customizing these emails again before you activate your email flow again.
To reactivate your email flow:
- Simply click ‘Review and Turn on’.
However, that is everything we wanted to cover in this Klaviyo tutorial on how to set up abandoned carts with Klaviyo and Shopify through the abandoned cart email flow!
How to use Klaviyo Abandoned cart for Shopify (Video Tutorial)
That completes our tutorial integrating one of our favorite email marketing software, Klaviyo with your Shopify eCommerce store in order for you to set up simple abandoned cart email flows to convert more customers.
We guarantee that by enabling this simple integration between the two platforms, your business will drive more sales for your online store!
If you’d like to watch this tutorial in a video format, check out our comprehensive video guide below on how to set up abandoned cart with Klaviyo.
