Table of Contents
Are you spending too much time jumping between, managing, and creating content for your individual social media accounts for your small business?
Well, buckle up, because we are going to show you how you can significantly reduce this with how to use Later, one of the best social media management software.
This beginner’s tutorial is going to guide you through how to use Later to help you save time, energy, and money by leveraging this amazing free social media management software!
Read more: How to use Zoho Social.
How to use Later?
We’re going to share how you can use Later to set up, manage and streamline your social media scheduling and posting activities from one convenient location.
The best news is, Later is both a paid and free social media management software, which is ideal for small businesses not wanting to fork out hundreds of dollars for this service.
1. Getting Started With Later

If you don’t already have a Later account, you’ll need to create one.
You can easily do this by following these steps:
- Simply head over to your browser and type in later.com or click here
That’s going to take you here (see screengrab).
- Simply navigate over to ‘Create free account’.
2. Later Pricing

It’s important to note that whilst Later can be used as a completely free social media management software with their ‘Free forever’ plan (which is suitable for small businesses), it does come with some limitations.
For example, you can only post 10 times per month per social platform.
They also only offer basic analytics and features.
We recommend getting started with the ‘Starter’ plan (see screengrab).
This is sufficient for small businesses and allows you to post up to 30 posts per month per social channel.
You also get access to essential social media management features, which we’re going to dive into now!
It’s also important to mention that both the free plan and the starter plan only allow you to manage one social set.
This means that you’re only able to manage one set of each of your social media channels.
For example, you can only manage one Instagram account, one Facebook account, or one Twitter account.
Additionally, both these plans are only for one user.
However, if you decide you need more users and need to manage more social sets or you want to access more advanced features that Later has to offer, you can always upgrade to a higher tier plan later on.
One of the great things we love about Later is that each paid plan offers a 14-day free trial, so you can easily try and see what plan works best for you and your business.
Read more: How to use Hootsuite for your social media management.
3. Sign up / Sign Into Later

Go ahead and sign up and we’ll meet you inside Later.
We’ve already created a fresh ‘Starter’ account for the purpose of this Later tutorial to help you navigate through all the essential features you need to know in order to better manage your social media!
Here we are inside our fresh Later account.
4. Download Later App

The first thing that you want to do once you’ve created a Later account is to go ahead and download the Later app onto your mobile device.
This is going to allow you to manage all your different social media marketing and management activities directly from your mobile device and will help you make the most of Later.
5. Social Media Profiles

Once you’ve gone ahead and downloaded the Later app on either iOS or Android, you’ll need to connect your social media profiles.
Remember, the whole purpose of social media management software is to save you time and energy when creating and posting content, and Later does an amazing job at doing just this.
You can ‘Bulk create’ content, then schedule all the content you created across your different social media platforms.
This is going to reduce the time friction of manually jumping between all your different social media platforms to post content.
To connect your social media profiles:
- Navigate over to the right-hand side and click on each social media platform you want Later to connect with and manage (see screengrab).
Go ahead and take the time to connect all relevant social media channels.
We’re going to quickly go ahead and do that now and then meet you back here.

And with just a few clicks, your social media channels are now connected to later!
To view the social media channels that you’ve just added:
- Navigate up to the right-hand side of ‘Schedule to’.
You can see the four social media channels that we connected (see screengrab)
We’ve connected our Instagram business account, Facebook business page, Twitter account, and LinkedIn account.
If you want to connect any of these other profiles that you didn’t select and are grayed out, all you need to do is:
- Click on the profile.
- Sign into your account.
Read more: How to use Facebook Business Suite App.
6. Later Calendar

To access your Calendar within Later:
- Navigate over and click on ‘Calendar’ over on the left-hand sidebar.
This is where you’re going to spend most of your time when it comes to creating, scheduling, and posting content.
As we’ve created a fresh account for this Later tutorial, you can see that we have no content (see screengrab).
7. How To Manage And Add Media

If you have a Dropbox or Google Drive account, you can add and use that content in your posts.
- Navigate up to the upper left-hand side to find the Dropbox and Google drive icons and click on what one you want to use (see screengrab).
Alternatively, you can upload content from your computer to use in your posts by:
- Clicking on ‘Upload media’.
For the purpose of this How to use Later tutorial, we’re going to select ‘Upload media’ to upload a bunch of different media that we can then use on our posts.
You can also read about How to use Google Drive for your small business.
As you can see, we’ve quickly gone ahead and manually uploaded content from our computer.
Once you’ve uploaded and are happy with your chosen media from your Dropbox, Google drive, or computer:
- Select ‘Show filters’ above your chosen media to filter the content that you want to see.
- Under ‘Media usage’, click on ‘All media’ from the drop-down menu to view all the media that you’ve uploaded.
- Click ‘Used media’ to see all media that you’ve previously used in your posts.
- Select ‘Unused media’ for media you haven’t used in your posts.
This option is incredibly useful if you’ve already uploaded a tonne of media and you want to create content only from media that you haven’t used yet.
- Simply click ‘Hide filters’ to hide these filter options.
Now you can select the social media channels that you want to create and schedule your posts to.
- Navigate up next to ‘Schedule to’ to find our social media channels.
- Simply select the social media channels.
At the moment, we have our Instagram page only selected, however, we’ll also go ahead and select our Facebook page and our LinkedIn profile (see screengrab).
Read more: How To Connect Twitter to Instagram
8. Schedule Social Media Posts (multiple)

Now let’s continue with this Later tutorial and show you how to create and schedule a post that will be distributed to these three profiles that we selected.
- Simply navigate down to the content you just uploaded.
- Select each piece of content that you want to turn into a post.
If you just want to select one image or video and turn that into a post then what you can do is:
- Click the image or video that you want.
- Drag it onto your calendar.
- Place it into the time that you want to schedule your content.
We’re going to schedule ours for 4 pm.
If you then want to change your schedule time:
- Simply click the drop-down menu next to ‘Publish on’ and change the time and date.
As you can see, we have our image here on the right-hand side (see screengrab).
9. Edit Content

To edit the content that you’ve just chosen:
- Come down and click ‘Edit image’.

- Select ‘Crop’ to crop your image to fit the different social media channels (see screengrab).
- Click ‘Filter’ to change the filter on your content.
- Select ‘Text’ to add text to your content.
Once you’re happy with your image:
- Click on ‘Update image’.
- Simply type in a caption to add to this post under ‘Post caption’.
- Navigate down to ‘Emojis’ to add any emojis to your caption.
- Next to ‘Emojis’, select ‘Saved captions’ to add in any captions you’ve saved.
10. How To Use Saved Captions

Saved captions will help you save time by saving and reusing captions that you use often.
This is another reason why we believe this is one of the best social media management software!
To create a saved caption:
- Click on ‘Save captions’.
- Navigate up to the ‘+’ icon next to ‘Create or select a saved caption’.

- Simply title your caption under ‘Title’. For us, ‘Contact us’
- Type in your caption under ‘Caption’. For us, ‘Get In touch with us today!’
- Select ‘Save caption’.
- Click on your new caption to insert and use your saved caption!
11. How To Use Hashtag Suggestions

This is a powerful feature that allows you to identify relevant hashtags.
- Navigate over to ‘Hashtag suggestions’ next to ‘Saved captions’.
- Simply type in a keyword related to your post under the ‘Find relevant hashtags to make this post more discoverable’ search bar.
Since our content is focused on small businesses, we’re going to type in ‘Small business’. (see screengrab).
Once you’ve typed in your keyword phrase:
- Click on ‘Suggest’.
Later will then generate all relevant hashtags that you can use
For the purpose of this tutorial, we’re going to go ahead and select:
‘#smallbiztips’, ‘#entrepreneur life’, ‘#startup’, ‘#business tips’ and ‘#business’.
Once you’ve chosen your hashtags:
- Click on ‘Insert hashtags’.
That’s going to add those hashtags below our caption in the middle.
12. Customize Each Channel’s Post

Again, we’re going to schedule this post across three channels (Instagram, Facebook, and LinkedIn).
You want to make sure you slightly customize your post to fit each channel you chose to post on.
Follow these steps to find out how:
- Come down and click on ‘Customize 3 posts’.

That’s going to then generate your post across the different profiles that you want to post this content to.
For example for Linkedin, you can:
- Slightly modify your post caption (see screengrab).
- Select ‘Edit image’.
- Click ‘Change media’.
For Facebook, you have the same options as Linkedin.
Instagram has a few more customization options (see screengrab).
- Add a ‘First comment’.
- Add a ‘Link in bio’
What is a Link in bio tool?
Later simply allows you to add all your important links onto a landing page that you can add to your social media posts, similar to Linktree.
- Add a ‘Location’.
- ‘Tag people’.
- ‘Tag products’.
Read more: How To Use Linktree To Add Links To Instagram & TikTok
13. Auto-Publish vs Send Notification

However, these are only available for auto publish only.
What does this mean?
With your Instagram account, you can’t automatically publish that content unless you’re using an Instagram business account.
Because this is a creator’s account, we can’t automatically publish.
You can read our beginner’s guide on How to create an Instagram business account.
When we save this post and schedule our posts, we will get a notification on the mobile app telling us to post our Instagram posts.
This is because we have ‘Send notification’ on as the ‘Publishing method’ (see screengrab).
As we mentioned, you cannot set up ‘Auto publish’ unless you have an Instagram business profile, however, don’t worry!
You’ll always be notified when you can publish this post.
Once you’ve edited your content for each channel:
- Come down and click on ‘Save three posts’.
And as you can see just like that you’ve scheduled a post! (see screengrab).
- Click ‘Done’.

Now under our calendar under ‘Friday the 16th’, we have three posts that will be published at 4 pm on Friday! (see screengrab).
Additionally, you can click on each post on your calendar to further customize your post if you like.
If you want to view all the content that you have scheduled by the month:
- Navigate over to ‘Month’ next to ‘Week’ in the upper right side of the screen.
14. Schedule Posts (Single)

Let’s say that you just wanted to create a post and schedule that post on your Facebook business page only. Simply:
- Head up to your social channels next to ‘Schedule to’.
- Unselect the other channels you selected, except for Facebook.
We’ll go ahead and unselect our Instagram and LinkedIn accounts.
As you can see, we now only have our Facebook business page highlighted (see screengrab).
- Select what media content you want to use.
- Simply drag and drop that post into your calendar to the date and time you want to schedule that post.

As you can see, ‘Auto publish’ is on to the date we selected (see screengrab).
If you want to change the date:
- Click the drop-down menu next to ‘Auto publish on’
- Simply select the new date.
For the purpose of this How to use Later tutorial, we’re going to put in the 30th.
- Simply change the time down here if you want to (see screengrab).
Again you have all the same options for customizing this post to be scheduled on Facebook as you did for scheduling multiple posts.
Take the time to customize this post and click ‘Save’ once you’re happy with it.
For the purpose of this tutorial, we’re going to delete this post and click ‘Discard post’.
15. Media Tab
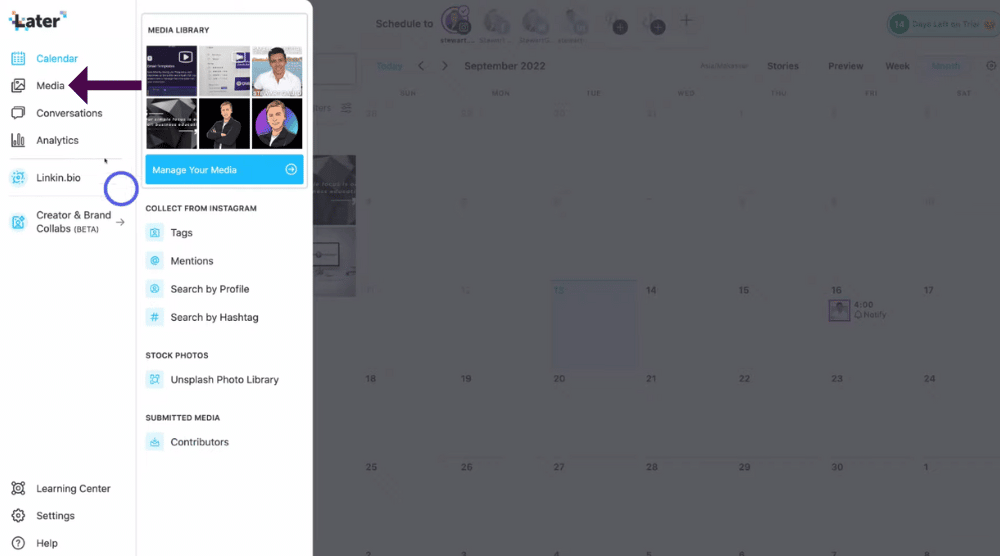

The media tab is where you can manage the media that you’ve uploaded to your library.
To access the media tab:
- Navigate over to and click on ‘Media’ below ‘Calendar’ on the left-hand sidebar.
- Click on ‘Manage my media’ to manage the media that you’ve already uploaded.
You can also search and collect additional media from Instagram (see screengrab) that you want to use in your own marketing activities.
You can search by:
- Tags
- Mention
- Profile
- Hashtag
However, you do need to be careful in terms of copyright.
If you choose this option, you have to make sure that you always mention the individual that is creating the content if you’re reusing someone else’s content.
- Below this, you can click on ‘Unsplash Photo Library’ to access stock photos.
- Under ‘Submitted media’, you can click on ‘Contributors’ if you like.
By selecting different contributors, allows the ability for external people to upload media to your Later profile for you to use in your social media marketing activities.
However, this feature is not available on Later’s free social media management software (you’ll have to upgrade to a paid plan to access this).
16. Conversations Tab

The conversations tab is where you can engage in comments across Instagram and Tik Tok.
To access this tab:
- Navigate up to and click on ‘Conversations’ on the left-hand sidebar below the ‘Media’ tab
Within this tab, you can reply, read or delete comments within Instagram and TikTok (see screengrab).
However, you’ll need to upgrade your plan to be able to access this feature.
17. Analytics Tab

Analytics allows you to identify how your different channels are performing, so for example To access the Analytics tab:
- Below conversations, click on ‘Analytics’.
- Under ‘Overview’ you can see a brief overview of your different channels (see screengrab).
- Next to ‘Overview’, click on ‘Audience’ to view when your audience is engaged with your content (see screengrab).
Scroll down to view:
- Audience demographics.
- Audience by gender.
- Audience location.
- Audience language.
You can also identify and compare the performance of your posts.
- Navigate over and click on ‘Post performance’, ‘Reel Performance’ or ‘Story performance’.
- Next to this, you can also click on ‘Linkin Bio Analytics’.
18. Link in Bio Tool

As previously mentioned, a Link in bio tool is where you can create a landing page on your social media to manage all your different links.
These are any important links that you want people to be able to find easily.
This is an important tool because platforms like Tiktok and Instagram only allow one Link in bio.
However, with this Link ln bio tool, your visitors can click on one link on TikTok or Instagram and view all your different links, as well as other content that you want to display!
For example, you can add buttons, videos, posts, your different social media channels, and a shoppable feed (see screengrab).
And that is everything we wanted to cover in this Later tutorial for beginners to help you get started with managing your social media marketing activities with the best social media management software!
How to use Later for Free social media management software (video guide)
That brings us to the end of this free social media management software tutorial using Later.
We hope you gained value and are now ready to save time and energy with this amazing tool.
Watch our full video below on How to use Later.
