
Table of Contents
Sending and receiving emails is a key part of running a business.
Every.
Single.
Day.
There are plenty of professional email services on the market, such as Zoho Mail, Outlook, Hotmail, and Google Workspace.
However, not every small business has the resources to pay a premium price for these services.
However, there’s another way to make your emails look professional across your website, social media, business cards, and other channels.
It’s setting up cPanel email forwarding.
In this brief tutorial we’ll share how to set up email forwarding in cPanel quickly and easily.
The good news is that you can initiate email forwarding within your cPanel completely for free.
It’s also known as server-based forwarding.
What is Email Forwarding?
There are two types of email addresses in general:
- The regular email address: This has its own inbox where people can send/receive emails using free email services like Gmail, Comcast, Hotmail, and Outlook.
- The forwarding email address: This automatically redirects messages to a destination email address (the free Outlook or Gmail address, which is usually a personal email account). The forwarding email lacks a unique mailbox and only serves as a mediator.
Even though you’re essentially operating through your free email account, the email forwarding is a great way to appear professional without spending any money.
You are basically creating a business email alias through your hosting provider (since they offer email services too).
How to Setup Email Forwarding in cPanel?
Now that we have a better understanding, let’s begin with our cPanel email forwarding tutorial!
Get Started with Email Forwarding
First, select an email that you’d like to set up as a forwarding email.
This email address is going to forward emails to a destination email (which will be a free Gmail account).
For this tutorial, we’ve selected sales@syndeomedia.co.nz as a forwarding email and stewstutorials@gmail.com as a destination email to simplify things for you.
Customers and prospects will use the former email address and their emails will be forwarded to the free Gmail account.
That’s how cPanel email forwarding works.
In the next section, we’ll walk you through the process of setting up email forwarding for free.
Also, we’re using HostPapa as our preferred hosting provider.
Since hosting providers like HostPapa use encryption to protect data, server-based email forwarding is completely safe and secure to use.
Step 1: Log in to Your cPanel

If you have never done so before or are unsure about how to do it, we advise you to contact your hosting provider.
They will guide you through the steps to find and access your cPanel.
Once you’re logged in, follow these steps:
- Locate ‘Email’ within your cPanel (the position of this section may vary).
- Select ‘Email Accounts’ under it.
- Click on ‘Create’
It’s time to move on to the next stage of our email forwarding tutorial.
Step 2: Create an Email
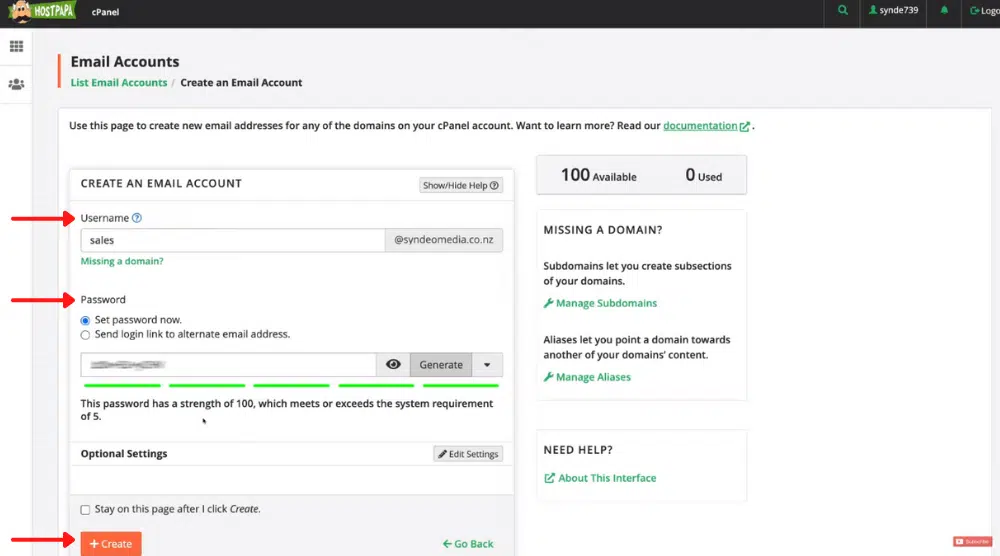
To do that:
- Point your cursor to ‘Create an Email Account’.
- Enter the username for your domain (refer to the screengrab). For us, it will be sales@syndeomedia.co.nz. However, it could be ‘help’, ‘team’, ‘support’, or anything you like (even your name). You can also create multiple forwarding emails if required.
- Add a password or click ‘Generate’ to generate a password. Remember to save this password on your file.
- Hit ‘Create’
You’ve successfully created a new email account within your cPanel.
Step 3: Activate Email Forwarding in cPanel
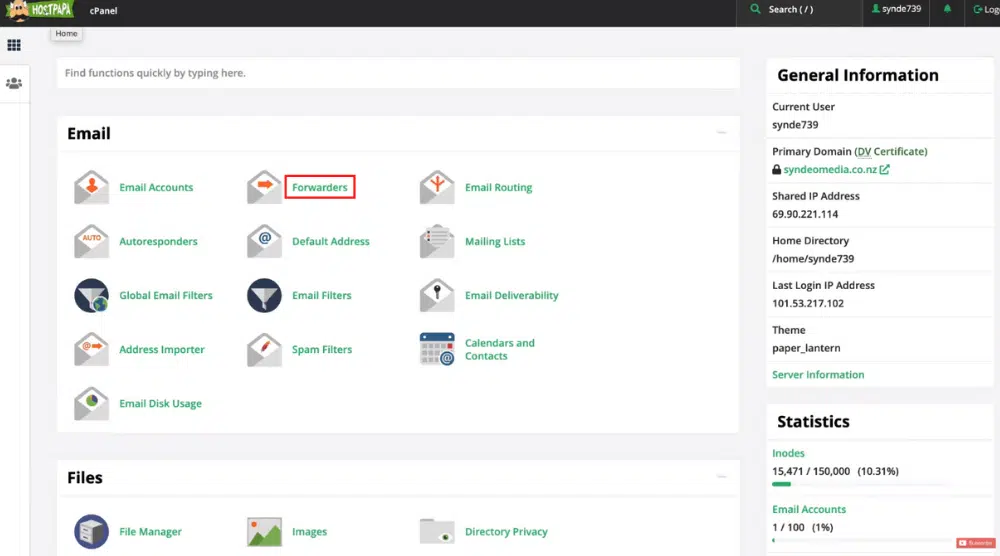
This time you need to select ‘Forwarders’.
Now, take the actions listed below:
- Hover your cursor to ‘Create an Email Account Forwarder’.
- Click on ‘Add Forwarder’.
- Enter the newly created username under ‘Address to Forward’ (which is ‘sales’ for this email forwarding tutorial). Make sure you’ve chosen the right domain.
- Under ‘Destination’ is where you want to put for free Gmail or Outlook email address. In this cPanel email forwarding tutorial, we’ll use stewstutorials@gmail.com as mentioned earlier.
- Click ‘Add Forwarder’
Now, when someone sends an email to sales@syndeomedia.co.nz, it will be forwarded to stewstutorials@gmail.com.
Well done!
You’ve just learned how to set up email forwarding in cPanel.
Also read: How To Track Emails in Gmail
Step 4: Send a Test Email
To test that the email forwarding is working well, you can send an email to your newly created alias.
Next, open your primary inbox to verify the receipt of that specific email.
If you’re using the same destination email to send the message, you’ll also see it in the ‘Sent’ folder.
Alternatively, you may use a different account to send the test email.
Also read: How To Create Group Emails in Google Workspace
cPanel Email Forwarding Tutorial (Video Guide)
Using the process explained above, you can create multiple forwarding emails as per your requirements.
For example, prospects who are interested in a quote can reach out to sales@syndeomedia.co.nz.
To allow your existing customers to address their grievances, you can create a separate forwarding email named support@syndeomedia.co.nz.
Remember to add these emails to your website, social media, and marketing materials.
You can either use a single Gmail (or Outlook) account for multiple forwarding emails or different free email accounts for different forwarding emails.
The choice is yours!
Disclosure: Some of these links on this page are affiliate links, meaning we will get a commission if you buy through them, this helps support our education-based platform and we thank you in advance.
We have a step-by-step video tutorial here to help you set up this process.
