Table of Contents
Creating videos for personal or business use can be time-consuming, stressful, and challenging especially for beginners. Fortunately, there are now dozens of powerful and easy-to-use video makers and the best video editing software/tools that allow individuals with literally no experience to craft stunning videos in minutes.
One of our favorite tools for beginners is InVideo.
In this InVideo tutorial, we will walk you through how you can make stunning and professional videos in minutes with this incredible tool. InVideo is not just an easy-to-use video editing software, you have access to thousands of customizable video templates, millions of stock images and videos. That makes it ridiculously easy to create your own video content.
InVideo: Best Video Editing Software
In the subsequent sections, we will guide you through how to use InVideo.
Step 1: Getting Started with InVideo
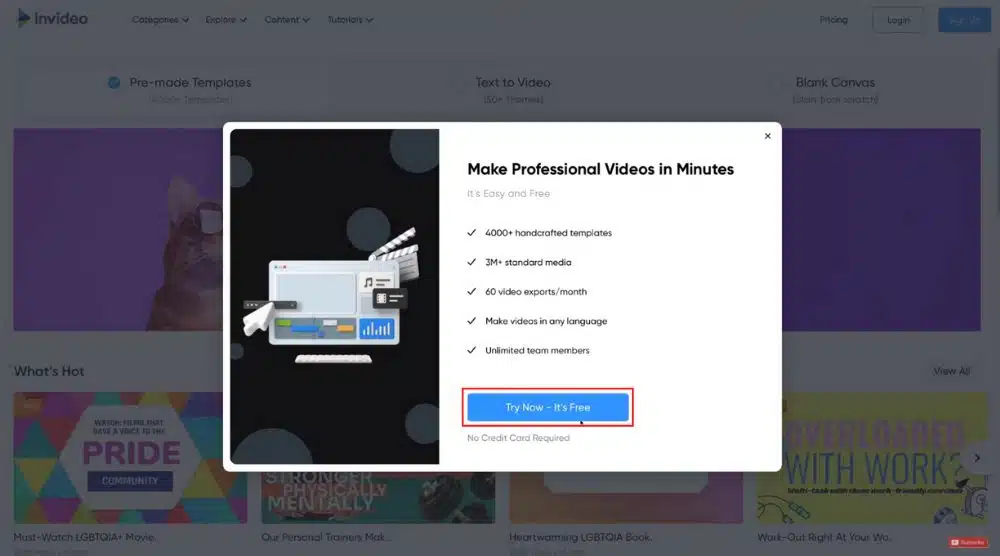
They offer 4000+ handcrafted templates, 3M+ standard media, 60 video exports/month, multilingual videos, unlimited members, and other premium features.
The free videos, however, still have a watermark. Although when you decide that you want to make the most out of InVideo and have access to premium images and videos, then you can upgrade to a premium plan of only $30 a month or $118 a year.
Also, the team at InVideo has generously given our audience a further 25% off with the code SG25. To get started, click ‘Try Now – It’s Free’. Fill out your information to create a free InVideo account and click ‘Continue’.
Select ‘Business’ to describe yourself and hit ‘Next’. We’re going to select ‘1-10’ to describe the number of employees. Click ‘Next’ again.
Just like that, you’ve signed up for the best video editing software!
Step 2: Exploring Pricing Options on InVideo Dashboard

You can now start designing, creating, and editing videos from scratch or from premade templates that you can see on the dashboard.
Before we navigate through InVideo’s dashboard and create our first video, we will select ‘Upgrade for free’ on the top right.
Here, you will see two pricing options:
- Business plan: $15/month
- Unlimited plan: $30/month
You can choose to pay monthly or yearly. Apart from that, you get a free 7-day trial for each of these plans to see if they work for you.
Upgrading your plan will remove the InVideo watermark from all your videos.
Not to mention the fact that you will gain access to 120 stock clips a month and 1M+ premium media from Shutterstock and iStock. Moreover, you get 24/7 live support if you experience any issues while using the software.
You can also add unlimited members to a single account.
For this InVideo tutorial, we will continue with the free plan for now.
Step 3: Using Pre-made Video Templates

By hovering over these templates (over 4000+ in InVideo), you can see the preview. By clicking on any of the pre-made templates, you will be able to see an extended preview of it.
You can also navigate down to sizing. At the moment, we have ‘Wide’ selected (ideal for YouTube).
If you select ‘Square’, your video will be converted into a square format (ideal for Facebook and Instagram posts).
For Facebook and Instagram stories, you can go with the Vertical format.
To use the template, simply come down and click ‘Use this template’. But we’re going to click exit and scroll back to the top.
Browsing through thousands of pre-made templates can be exhausting. Instead, we’re going to type our specific query or keyword in the search bar. For instance, if you want to create a video for a local gym, you can type in ‘gym’ and select any of the suggestions.
You can now preview all the professional pre-made templates related to the gym.
Heading back to the InVideo dashboard, you can see video sizing options below the search bar. Hence, you have the option to select the dimension before browsing the templates.
Step 4: Converting Text to Video

With this software, you can convert any text into engaging videos.
Select the dimension that works for you, and then scroll through all the pre-made video templates.
Select one that you like. You can change the default text to your text. Moreover, you can change the background images and videos using premium images and videos offered by InVideo.
Step 5: Creating Videos from Scratch

Step 6: Customizing Video Template

We will choose a ‘Gym’ based template for the purpose of this In Video tutorial. Leave the dimension wide and then click ‘Use this tutorial’.
Below the video, you can see the project timeline. At the moment, the first scene has been selected. Similarly, by clicking on different timeframes, you can see scenes 2, 3, 4, and so on. If you navigate back to scene 1, you can see some important elements above it.
Understanding the Layers

These are the layers that make up the scene. If you select any element here, it will be highlighted on the scene template. Up above you can see some editing details and formatting options to edit the particular element that you have selected.
Down below on your timeline, you can also see more details about the duration of that element.
For example, the selected element appears in scene 1 from the 1.63-second mark all the way through the 5-second mark.
You can go ahead and make that longer or shorter if you like by simply dragging the sides.
Now, InVideo lets you select the elements from the right-hand side under layers or you can just navigate over to your scene in the middle (the preview), to select the specific element.
For example, you can directly select and customize the text element in scene 1. You can change the text color, font size, font style, and other formatting options.
To change the text itself, simply click on ‘Text’. Replace the default text and you’re good to go.
Before moving on to the next scene, we’ll select ‘Play Scene from Start’ (below the preview). This will help you ensure that the scene flows the way you like. If you have multiple scenes already, what you can do is play all from the seeker.
For that, you have to drag the seeker to the beginning of the scene and click ‘Play’.
Now, to edit a new scene, just click the next scene you want to edit. We’re going to select scene 2 for this InVideo tutorial.
Understanding the Elements

As you can see, we have our template selected. Again, you can type the keyword ‘gym ad’ related to the template you want to find and then simply scroll through all the templates that InVideo provides.
Below that, we have ‘Uploads’. This is where you can upload your own media (audio, images, and video clips) to make videos. Use InVideo’s easy-to-use drag & drop feature to add media to your video.
Using Stock Videos

Below Uploads, we have ‘Video’. This is where you can search for stock videos.
For example, you can type in ‘gym’ to find stock videos related to that keyword and incorporate it into your video. You can preview any stock video by simply hovering over it.
Select the video to see a larger preview. Exit out of it, locate the stock video again, and then drag & drop that anywhere on your video. You can replace any element with that video by dragging & dropping there and then clicking ‘Replace’.
Besides this, you have the option to add it as a layer.
For this tutorial, we will choose replace.
Come down and click ‘Done’. In the preview, you can see that your old video has now been replaced by the new stock video.
Above the video, you will see some formatting options as well.
Using Stock Images

Follow the similar process (that you used for adding stock videos) to incorporate an ideal image in your video.
Using Stock Music

You can go ahead and search for specific music/genre that you would like to add to your video. Select the track you like, navigate over to the three dots, and select ‘Replace music’.
You can also click ‘Edit’ to edit the music that you currently have on your video and change the volume, trim the music, add loop, duplicate, and delete.
Using Text Elements

Here, you can browse through the text and different categories. If you find something that you like, you can simply click on it, drag & drop it like any other element.
Down below, you can change the duration of this text element or change the text itself by clicking on ‘Text’ up in the formatting options.
You can also select the text element, delete the default text, and start typing your own text.
You can delete the text in two ways:
- Select the text element and hit ‘Delete’ on your keyboard
- Select the text element and click the bin icon on the top right
Uploading Your Logo
![]()
You can upload your own logo here. This logo will appear on every scene of your video.
For this tutorial, we don’t want to add any logo so we’ll just click ‘Remove from all scenes’.
Read more: Canva Free Logo Maker
Rearranging the Scenes

For example, we have scene 2 selected right now.
What we can do is bring this white line up to the front by simply clicking the white line and drag that to the very front of our layers.
That’s going to bring this white line element in front of every other element on this scene. After that, you can play the scene from the start to make sure that it works well.
Transitioning between Scenes

Click on that icon and you can now play around with different transitions. Change the transition between every scene and then exit out of it.
Adding More Scenes

Click on the last scene, navigate to ‘Scene’, and choose between ‘Blank scene’ or ‘From template’.
To preview your video from start to finish, head back to the beginning of the video, and then select ‘Play All from Seeker’.
After you’re done editing, you can go ahead and click ‘Download & Share’ on the top right.
Before you download your new video, make sure you upgrade to a premium plan to remove the watermark. Click ‘Upgrade for free’.
You can also utilize our 25% discount code ‘SG25’ on InVideo’s premium plan.
Once you get a hang of it, you’ll be able to make your videos from scratch using the best video editing software for beginners – InVideo.
You will then become an expert in no time.
Step 7: Joining InVideo’s Facebook Group Community
You can join InVideo’s Facebook Group Community here. It’s a group of more than 20,000 marketing experts and video creators that can help you create stunning videos. You can ask questions, get advice, and learn from these experts.
We recommend joining this free InVideo Facebook community so that you can make the most out of this wonderful software.
Step 8: Finding Video Edits Stored in InVideo

When you arrive at your dashboard once you’ve logged in, you can select ‘Projects’ from the top right to see your previous projects.
You can either download them or edit the most recent version. Also, you can duplicate a past video to create a new one based on the former’s theme.
InVideo Tutorial for Beginners (Video Guide)
Take the time to explore all the different pre-made video templates and learn how different elements and tools work. If you gradually want to go from being a beginner to an expert, then we have a video tutorial just for you.
Watch our beginners InVideo tutorial here!
Disclosure: Some of these links on this page are affiliate links, meaning we will get a commission if you buy through them, this helps support our education-based platform and we thank you in advance.
Use code SG25 for 25% off premium plans.
