Table of Contents
In this tutorial, we’ll walk you through how to use Zoho Campaigns so you can get the most out of your email marketing activities for your small business.
Are you ready to grow your small business with email marketing activities?
Zoho offers free email marketing software called Zoho Campaigns as part of its giant suite of incredible in-house online business tools and apps.
If you already use Zoho’s other products and are looking for a way to expand your small business through email marketing, then this is the perfect tool for you.
If you haven’t heard of Zoho Campaigns before, they’re essentially an extensive email marketing software.
However, they also offer dynamic marketing capabilities such as SMS and social media marketing (which is ideal for bringing all your marketing activities into one place).
In terms of email marketing, you’re able to easily create powerful email campaigns, as well as being able to create autoresponders and automated email sequences (email automations) within one platform.
In a nutshell, Zoho Campaigns is ideal for small teams, especially those that already leverage popular Zoho products to grow their business online!
Read more: Top 5 free email marketing software for small business.
How to use Zoho Campaigns?
In this Zoho Campaigns tutorial for beginners, we will dive into how to use Zoho Campaigns’ free email marketing software to grow and engage with your audience online through email marketing for your small business.
Let’s go ahead and get started setting up email marketing with one of the best email marketing software, Zoho Campaigns!
1. Getting Started With Zoho Campaigns

*The link above is an affiliate link, which means we will get a commission if you sign up for Zoho (at no extra cost to you). This helps support our education-based website and we thank you in advance!
To get started with Zoho Campaigns, firstly you’ll have to log in to your Zoho account.
If you don’t already have a Zoho account, you’ll have to sign up.
- Simply click here
This will take you to the Zoho Campaigns landing page.
Read more: Zoho CRM Tutorial for Beginners
2. Zoho Campaigns Pricing

For the purpose of this email marketing for the small business tutorial, we’re going to walk you through Zoho Campaigns free plan only.
This free plan is more than sufficient enough for small businesses and small teams that have under 2000 contacts and under 5 users.
In addition to this, you can leverage their basic email templates and their sign-up and pop-up forms.
Also, all of Zoho Campaigns plans seamlessly integrate with all of the Zoho in-house tools that you can leverage to grow your business!
For example, if you already use Zoho’s CRM, you can seamlessly integrate your email marketing activities to funnel into your CRM.
You can read our beginners’ guide on How to use Zoho CRM.
Finally, Zoho offers many of its great features completely for free and you can also download the mobile app for Zoho Campaigns on iOS and Android.
Their extensive app actually allows you to measure your account’s performance and create and schedule emails within the app, so you can get the most out of this incredible free email marketing software!
Go ahead and sign up and sign in with Zoho Campaigns and we’ll meet you inside your account.
Read more: How To Create FREE Business Emails with Zoho Mail
3. Campaigns Dashboard – Trial Account
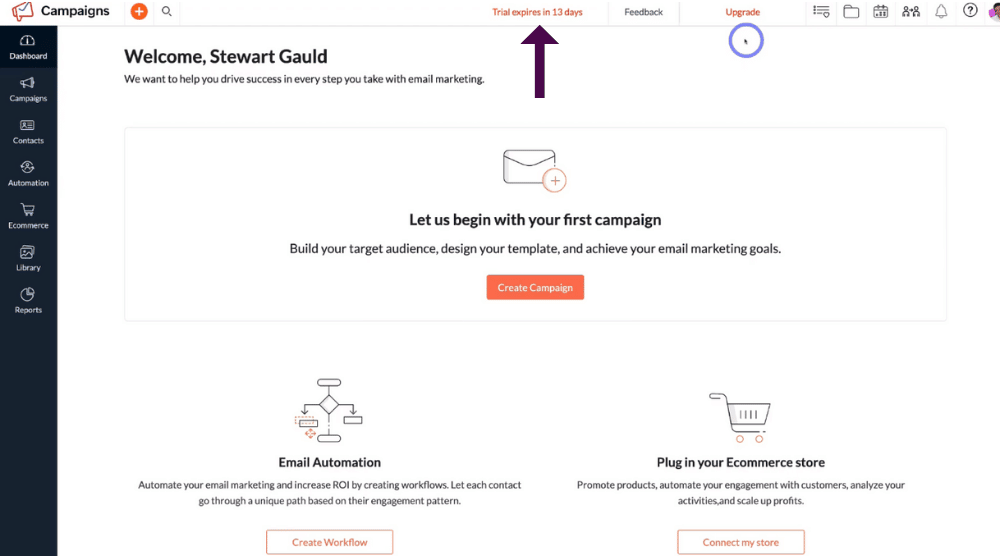

For the purpose of this tutorial, we’ve already created a fresh account to guide you through how to use Zoho Campaigns.
When you first sign up for Zoho Campaigns, you’ll automatically sign up for a 14-day trial for the paid plans. After the trial period has ended, you’ll be automatically downgraded to the free plan.
However, you can upgrade to a paid plan at any time if you like.
You can see our paid plan trial expires in 13 days as we only just signed up for Zoho Campaigns
Read more: How to use Zoho desk.
4. Get To Know Your Account

Let’s continue this Zoho Campaigns tutorial by showing you where all the different elements and features are for you to access on your account dashboard.
On the far right-hand side, you’ll see a bunch of different image icons that you can click on. These include:
- Account
- Help Center
- Notifications
- Calendar
- Folders
- Favorites
Let’s now navigate over to the far left-hand side where you’ll see two image icons next to ‘Campaigns’.
- Click on the magnifying glass icon to search for specific data within your account.
- Click the ‘+’ icon to quickly create anything within your account.
If you click on the ‘+’ icon, you’ll be able to quickly create a campaign, SMS campaign, autoresponder, and more. This is called a ‘Quick action’.
We’ll cover some of these elements later in this tutorial.
Next, you have your left-hand sidebar that we’ll walk through now.
1. Dashboard (which is currently where we are)
2. Campaigns
If you click ‘Campaigns’, you can choose to create email campaigns, social campaigns, and SMS campaigns.
For the purpose of this Zoho campaigns tutorial, we’re just going to focus on email campaigns, however, you can also connect your social media accounts to create and manage your Campaigns.
For example, say you created a post that you wanted to distribute on Twitter and Facebook, you can create and schedule this post through Zoho’s ‘Social Campaigns’.
Below that, you have ‘SMS campaigns’.
This is where you can essentially engage in SMS marketing.
One of the reasons why we love Zoho Campaigns is because it’s not only email marketing software! You can also leverage social media marketing, as well as SMS marketing.
You can read our blog on SMS marketing for beginners using Text Magic.
Again, we’re not going to dive too much into social campaigns and SMS campaigns in this email marketing tutorial.
Zoho also offers a separate social media management software called Zoho social.
If you’d like to read more about Zoho social, check out our beginner’s how-to guide here.
However, let’s continue with this step-by-step guide on how to use Zoho Campaigns’ free email marketing software!
3. Contacts
This is where you can create your email list and manage your segments and contacts.
You can also create a ‘Signup form’ and ‘Manage your contact tags’.
Read more: How to use Zoho mail.
4. Automation
This is where you can set up ‘Autoresponders’ and ‘Workflows’, which are both email sequences.
5. E-commerce
If you run an online store, you can actually connect your online store with Zoho Campaigns.
This is going to allow you to optimize your email campaigns for conversions, abandoned carts, and for bringing your customers back to your store through email marketing.
You can also set up automated email follow-ups.
This is useful when a potential customer initiates your shopping cart but doesn’t actually purchase your product.
You can then set up automated email campaigns to increase your conversion rates!
Read more: Top 3 free e-commerce platforms for beginners.
6. Library
This is where you can manage all your content, including your ‘Images’, ‘Email templates’, ‘Workflow templates’, ‘Form templates’, and ‘Attachments’.
Let’s say that you send out an email newsletter every week.
You can create an email template for that newsletter email campaign so that you can simply just change the content, instead of having to create a new template every week!
7. Reports
This is where you can easily view important analytics in regard to your email marketing activities.
5. How To Create an email list

Before you engage in email marketing, you need to create an email list.
Think about an email list as a group made up of your audience so that you can send email campaigns.
Over time, you can build that email list and create multiple email lists or create segments within each of your email lists.
For the purpose of this Zoho Campaigns tutorial, we’re just going to create one email list.
If you run a small business, you’ll most likely only need to create one email list.
You can then further group your contacts through segmentation.
Follow the steps below to create your email list and get started with email marketing:
- Navigate up to and click on ‘Contacts’.
- Select ‘Manage lists’ from the drop-down menu.
- Head up to the top right-hand corner and click on ‘Create list’.

- Type in the name of your first list next to ‘Name’.
We’re going to call this ‘Subscribers’, however, you could name your list leads, customers, newsletters, or subscribers (or anything else that you like).
- Click ‘Save’.

This is where you have a few options for adding contacts to your new email list
To do that, you have two choices:
- Select ‘Add contacts’ to manually add your contacts.
- Select ‘Import contacts’ to import your contacts if you already have a list (a database) of contacts.
Additionally, you can also select ‘Signup form’ to create a signup form from this page.
If you create a signup form, your contacts can actually join your email list from this form.
For the purpose of this tutorial, we’re first going to get started with adding contacts manually.
- Click ‘Add new’ under ‘Add contacts’.
- Select ‘Contact’ to add one contact or
- ‘Multiple contacts’ to manually add multiple contacts to your email list.
We’re going to go ahead and click ‘Multiple contacts’, then add a few contacts before continuing with this Zoho Campaigns tutorial.

Go ahead and take your time to add your contacts.
As you can see, we’ve gone ahead and quickly added three example contacts to our email list
Once you’ve added your contacts:
- Navigate over to the far right-hand side to the three icons above your email list contacts.
- Select ‘Multiple fields’ (which is what we have selected at the moment) or
- Select ‘Email address only’ (if you just want to collect the email address).
- Click on ‘Organize columns’ to customize and organize the columns.
Think about the fields (the data) that you want to collect that are important for you.
At the moment we have selected some fields
- Navigate down and select other important fields that you want to add and collect from your contacts.
We’re happy with the default information selected.
- Navigate down and click on ‘Add another contact’ below your contacts to add an additional contact.
- Come down and tick ‘These contacts have given consent to receive emails relevant to my product’.
- Come down and click ‘Add’.

You can see that we now have three contacts as part of our email list

Once you’ve added your email list, you can manage your list.
- Navigate over to ‘Contacts’ on the left-hand sidebar.
- Come down to ‘Manage lists’.
You can see that we now have two email lists. i.e ‘Subscribers’ & ‘My Sample List’.
We’re going to select the email list i.e ‘Subsribers’ we just created.

- Under ‘List summary’, you can see basic information about your email list.
- Navigate over to ‘Contacts’ next to ‘List summary’ to view the contacts that are part of your email list.
- Select ‘Forms’ to see which forms are part of this email list.

We’re going to go ahead and create a sign-up form shortly.
- Navigate back.
- Next to the email list that you just created, you can also navigate over here
- Select ‘Add contacts’ and add more contacts that way.
- Select ‘Create campaign’ to create a campaign from here.
- Next to ‘Create campaign’, click the three dots for more options to do with your list.
Read more: How to use Zoho projects.
6. How To Create Segments

Segments allow you to organize your contacts within your email list.
Follow these steps to create a segment for your email list:
- Navigate back over to ‘Contacts’ on the left-hand sidebar.
- Click ‘Segments’.
- Navigate over to ‘Create segment’.
- Select ‘Segment’ or ‘Bulk segment’.
We’re going to go ahead and create one segment by clicking ‘Segment’

- Navigate up to ‘Name’ and type in your segment name.
Think about how you want to group your contacts.
For the purpose of this tutorial, we’re going to create one segment and group our contacts with a country.
To do this:
- Type in ‘Country’.
- Under ‘Criteria’, click the first drop-down under ‘None’.
- Locate the correct field that you want to use to segment.
We’re going to click on ‘Country’.
- Navigate over to the next drop-down under ‘None’.
- Select ‘Contains’.
- Add a country in the next field.
We’re going to add the US.
This means that for us, if a contact has ‘US’ for the ‘Country’ field, then they will be added to this segment.
Once you’ve added your field:
- Click ‘Save’.

As you can see, the criteria for a contact to be added to our segment is ‘Country must contain US’
You can add multiple segments if you like, depending on the nature of your business and how you want to group your contacts within your email list.
7. How To Create Signup Forms
Once you’ve added your segments, you can create a signup form. Follow these steps to find out how:
- Navigate back over to ‘Contacts’.
- Come down to ‘Manage lists’.
- Click on your new email list.
We’re going to go ahead and click on our new email list ‘Subscribers’.

- Navigate over to and click on ‘Forms’.
- Select ‘Create sign up form’.
Alternatively, you can create a signup form another way.
- Navigate over to ‘Contacts’.
- Come down and click on ‘Signup forms’ to create a signup form.
We’re going to click on ‘Create signup form’ from our email list.

- Type in a name for your new form next to the pencil icon at the top of the page.
We’re going to call this ‘Newsletter’.
Once you’re happy with your form name:
- Click the ‘Tick’ icon.
As you can see, this form is associated with the email list ‘Subscribers’ which means that when a contact signs up to this sign-up form, they’re going to be added to our ‘Subscribers’ email list.
- You can also change that by clicking on the pencil icon next to your email list name
- Simply navigate down to ‘Choose template’.

You can now simply choose the type of signup form that you want to create!
You can choose to create:
- An embedded form that you can then embed onto your website.
- A pop-up form. This could be a pop-up form on your website.
- A library of saved templates. These are templates you’ve created in the past.
For the purpose of this Zoho Campaigns tutorial, we’re going to keep ‘Compact forms’ selected underneath ‘Embedded forms’.
- You have the option to select a pre-made sign up form
These are professionally designed templates that you can choose and then customize the way that you like.
Go ahead and choose a template that best represents the type of form that you want to create.
We’re going to go ahead and select this template on the right-hand side.
Once you’ve selected a template you want to use:
- Click ‘Use template’ on your chosen template.
8. Customize Sign-Up Forms

You can then start customizing this template sign-up form!
To do that:
- Navigate over your signup form.
- You can then click on each of the different elements on your form
Let’s say you wanted to change this text within this element (see screengrab).
All you would do:
- Click on the text you want to change. For us, ‘Sign up to be in the know’
That’s going to generate the content of the element over on the left-hand side, as well as some formatting options below the content
We’re going to quickly go ahead and change this text i.e ‘Sign up to be in the know to Let’s grow your business (see screengrab).
We’re also happy with the formatting options.

Once you’ve customized your text and formatting options:
- Navigate up to ‘Back’.
You have the option to click on any of these elements on the left-hand side (see screengrab)
Additionally, you can actually click on these elements on your signup form.
To continue customizing your form elements:
- Navigate over and click ‘Page body’.

Let’s say we want to change the background image of this signup form.
- Click ‘Change’ on the background image on the left-hand side.
- Go ahead and upload a new background image.

- Navigate back
- Come down and click on ‘Input field – first name’.

- Customize the ‘First name’ text on the left-hand side if you like or the ‘Input field email’.
However, we’re happy with this default information.

We want to change the background color of the ‘Sign up’ button on our form.
- Click on ‘Button-sign up’

- Select the ‘Paint’ icon.
- Pick a color that you want to change it to.
We’re going to go ahead and change the background color of this button to this blue color (see screengrab).
Additionally, let’s change the text of our button to ‘Join newsletter’ by:
- Navigate up to ‘Text’ and type in ‘Join newsletter’.
- Under this, you can also change the width and the height of the button.
We’re now happy with our buttons.

Once you’ve made any changes to your signup form:
- Navigate back.
- Click on ‘Setup’.

Make sure that the first name (the name field) is mapped correctly.
- Select ‘First name’.
Once you’ve customized your new signup form:
- Navigate up to ‘Preview’ to preview what your form will look like.
Next to ‘Preview’, you can:
- Change the template.
- Reset the form.
- Save the form.
- Save and proceed.
We’re going to click ‘Save and proceed’.

Once you’ve done this, you can:
- Click ‘Edit design’ to edit your design again.
- Click ‘Preview’ to preview your signup form.
Under ‘Preview’, you’ll see the associated email list (which is subscribers)
Below that, you can add an ‘Associate topic’.
Under ‘Associate topic’, you have the ‘Signup form URL’.
This is the URL that you can:
- Add to your different social media channels.
- Use to send in an email.
- Send the link to potential contacts via different channels (and then your potential contacts can simply click on this link). That’s then going to take them to this signup form, where they can sign up for your email list!
You can also embed your form onto your website by:
- Clicking ‘Get code’.
However, we recommend getting in touch with your web developer if you want to embed these forms onto your website.
Below this, you can also customize the pages and emails to be sent in response to the form submission (see screengrab).
You can customize each of these different elements
To do this:
- Navigate up to ‘Edit response’.
- Click ‘Preview’ on the right-hand side to see what they look like.
Once you’ve customized these responses to your liking, you can:
- Navigate up to and click on ‘More actions’.
- Click ‘Create a clone’ to duplicate this form.
- Select ‘Save template’ to save it into your saved templates.
- Click ‘Delete’ to delete your form.
And that is how you can simply create forms to capture your contacts and build your email list!
9. How To Create An Email Campaign

Now let’s show you how to use Zoho Campaigns to create and customize your first email campaign!
Follow these steps to create your Campaigns with Zoho:
- Navigate up to and click on ‘Campaigns’ over on the left-hand sidebar.
- Click on ‘Email campaigns’ or
- Select the ‘+’ quick action button above.
- Click on ‘Email campaign’.
This will bring up a few options.
However, because this is a beginner’s tutorial on how to use Zoho Campaigns, we’re going to keep it simple.
- Click on ‘Regular email’.
- Click ‘Create new’.

- Name your new campaign.
We’re going to call ours ‘Newsletter 1’.
- Come down and select a topic from the drop-down menu next to ‘Topic name’.
We only have one topic at the moment, which is ‘Marketing’.
Go ahead and select your topic then:
- Click ‘Save and proceed’.

This is going to be our first email campaign – our first newsletter that we’re going to send out to our email list.
- Click ‘Add Subject’.

This is the first line of text that your contacts will see before they open your email.
- Type in your preferred subject line next to ‘Subject’. For us, ‘How to drive more sales’
- Navigate over to the right-hand side and select the smiley face icon to add an emoji to your subject line if you like.
- Click on ‘Personalize’ to personalize your subject line.
For example, you can add the contact’s first name and the contact’s last name.
Therefore, each of your contacts will see their name in your subject line.
We’re happy with this basic subject line for now.
Once you’ve added your subject line:
- Come down and add a preheader next to ‘Preheader’. For us, ‘Learn how to use Zoho to grow your business’
This is a piece of text that follows your subject line. A preheader should explain your email.
When you’re happy with your subject line and your preheader:
- Come down and click on ‘Save’.

- Go ahead and ‘Add sender details’.
Basically, what name and email do you want your contacts to see when they receive an email from you?
- Under ‘Sender name’, you could put either your name, or a marketer’s name within your organization or it could be the organization’s name itself.
Let’s add ‘Syndeo media’, which is the name of our business.
We’re going to go ahead and add my name ‘Stewart’.
That way, the contact knows that this email is coming from Stewart (who often sends email Campaigns), as well as from the organization Syndeo media. (see screengrab).
Once you’ve chosen your sender name:
- Come down and add your email next to ‘Sender email address’. For us, ‘stewart@syndeo.co.nz.
It’s also recommended that you authenticate your email domain to improve email deliverability.
You can read the blog on How To Set Up Google Workspace SPF, DKIM & DMARC
This means that if you don’t authenticate your email domain, then your email might not even arrive in your recipient’s inbox, or it could be sent to their spam folder!
To improve the email deliverability so that your email arrives in your recipient’s primary inbox, you want to authenticate your email domain.
Once you’ve made sure you’ve authenticated your email domain:
- Come down and click ‘Save’.

- Click ‘Add Recipients’.

This is where your email is going to be sent.
- Click on ‘Lists’.

- Choose the email list that you created.
We’re going to select our ‘Subscriber’ email list.
- Click ‘Save’.

If your contacts are not associated with any topic follow these steps below:
- Come down and tick ‘Map contacts that are not associated to any topics to the Marketing topic’.
Basically, the emails that you added need to be associated with a particular topic.
When you’ve added your recipients, (remember you can either add single contacts, your email list as well as segments that you’ve created) follow these steps:
- Simply come down and click on ‘Create content’.
10. Customize The Email Campaign

Now you can start creating and customizing your email campaign!
This will help to enhance your email marketing for your small business. To do that, you have three options:
- Click ‘Saved template’.
- Click ‘Pre-designed templates’.
- Click ‘Basic template’.
If you run a small business or you’re a creator, an artist, or some form of the sole trader where you operate your business by yourself, then we suggest you then select ‘Plain text editor’
This is for those that want to create a more personal email, rather than a visually engaging email template with images, logos, and other elements.
These three types of email templates are ideal for larger businesses or organizations with a small team and that want a more corporate feel.
For the purpose of this tutorial, we’re going to click on ‘Pre-designed templates’.

- Navigate through all the different pre-made email campaign templates.
- Select one that best works for the type of email campaign that you want to create.
We want to create a newsletter, so we’re going to go ahead and select this email newsletter here on the left-hand side (see screengrab).
Once you’ve selected a template that suits you:
- Click on ‘Select template’.

That’s going to generate the email template, as well as the editor
- Navigate over your email campaign.
You’ll notice that when you hover over each different element, they’ll be highlighted.
This means that you can customize each of the different elements on your email template.
Let’s say you wanted to change this title text (see screengrab).
Follow these steps to this:
- Click on the title text. i.e ‘Branding Simplified’
That will generate some formatting options up above and text properties over on the left-hand side.
- Highlight the title text.
- Simply start typing to change the text.
We’re going to change this text i.e ‘Branding Simplified’ to our business name ‘Syndeo Media’.
- Navigate down and click on this text element. i.e ‘Elevate the voice of your brand’
We’re also going to change the text ‘Elevate the voice of your brand’ to ‘Ready? Let’s grow your business with zoho’ below our title text and play around with the formatting options for that text by changing it to bold and making the text slightly larger (see screengrab).
We’re now happy with that text.
Now we’ll show you how to change the image of our email campaign.
- Click on the image.
- Navigate over to the left-hand side.
- Click on ‘Change’.
- Select ‘Upload’ to upload your own image.
- Select ‘Upload from computer’ or ‘Import from Web URL’.
For the purpose of this tutorial, we’ve uploaded the thumbnail of this video to use in this email campaign.
- Click ‘Use this image’.
As you can see, that’s going to replace the default image with our own image (see screengrab).
Once you’ve selected your image:
- Navigate over to the left-hand side to your image properties.
- You can change the size of your image.
- Add a URL, so if a contact clicks on this image, that’s going to take them to a web destination.
Once you’re happy with those image properties:
- Come down and click on ‘Done’.
As you can see, we have a logo (see screengrab). To change your logo:
- Click on the logo.
- Click on the editing wand icon (over your logo).
- Select ‘Change’ and follow the same process as we did with the image.
You can read our beginner’s guide on How to make a logo with Canva for free.
You also have these formatting options down here.
Let’s say we wanted to delete this logo. Follow these steps to delete an element.
- Navigate over to this gear icon on the right side of the screen.
- Come down and click on ‘Delete’.
- Click ‘Delete’ again to remove the logo.

Now we’ll show you how to edit the button label on your email campaign:
- Navigate down the page.
- Click on this button. i.e ‘Show more about this webinar’(see screengrab).
- Navigate over to the left-hand sidebar to the field under ‘Button label’.
- Type in what you want to change your button label to.
We’re going to change ‘Show more about this webinar’ to ‘Get started with Zoho today’ (see screengrab).
- Under that, you can add a link to this button.
This means that if a contact clicks on this button, that’s going to take them to your chosen URL link.
As this tutorial is focusing on how to use Zoho Campaigns, we’re going to type in https://www.zoho.com/.
- Under ‘Open URL’, select either ‘New window’ or ‘Same window’.
We want to make sure that we have ‘A new window’ selected so that when a contact clicks on that button, Zoho will open in a new window
Take the time to navigate through your email campaign and customize all these different elements!
Once you’ve done that:
- Navigate down and click on ‘Done’.

You’ll see these other different block elements that you can simply drag and drop into your email campaign (see screengrab).
Let’s say you wanted to add another image.
- Click on ‘Image’. (see screengrab).

- Drag this image and place it to a specific location on your email campaign (see screengrab).
- Select ‘Upload’ to upload an image.
- Follow the same steps as we previously mentioned with images.
We’re going to quickly go ahead and delete that element.

- Navigate back up to the top left-hand corner and click on ‘Back’.
Under ‘Elements’, you can see all the different elements that you can simply drag and drop to add to your email campaign (see screengrab).
As you can see, it’s incredibly easy to create and customize your email campaign!
- Navigate over to ‘Layouts’.
This is where you can add specific layouts to your email campaign.
Let’s say you like the look of this element here you can:
- Drag and place that element on your email campaign to the right section.

As you can see, that’s going to generate these two columns (see screengrab) that you can further edit.
For example, you can:
- Click on ‘Upload’ to upload an image.
- Change the title.
- Add and change the paragraph.
- Customize the ‘Get now’ buttons.
Again, we’re going to delete that.

- Navigate up to ‘Design’.
Remember, you can add:
- Elements
- Layouts
- And play around with the design (see screengrab).
Under ‘Design’, you can edit the:
- Inner color.
- Outer theme.
- Outer color.
- Template width.
- Outer border size.
- Outer border color.
However, we’re happy with this pre-made template, so we’re going to leave the default template as it is.
Up above you can see that our changes have been saved automatically
Next to this, you can also:
- Click ‘Undo’ or ‘Redo’.
Finally, before you send your campaign, you should preview your email template and test the email template to make sure that it looks responsive across different devices within our contact’s email inbox.
- Navigate over to ‘Preview’ and test in the upper right corner.
Once you’ve done this, you can:
- Navigate over to the far right-hand side and click the three dots.
- Select ‘Save to library’.
This means that this email campaign template will now save to your library to use in the future.
Because this is a newsletter, we’re going to send this newsletter once every week.
We want to keep the structure of this email template the same, so by saving our template to our library, we can simply upload the email template from our library and then just change some of the content.
Go ahead and save your email template to the library (if you like)!
Once you’ve done that:
- Navigate over to ‘Proceed’.

- Under ‘Launch options’, you can either select ‘Send immediately’ or ‘Send later’.
- Additionally, you can also select ‘Send now’ or ‘Send in batches’ (see screengrab).
When you’re ready to send your email campaign:
- Simply come down and click ‘Send’.

- Scroll down further.
It’s important to note that if you see an error over here (see screengrab), that means there’s a change that you need to make on your email campaign.
For example, ‘Invalid URL’.
This means that they’ve found an invalid URL on this email content.
Therefore, before we send this email campaign, we need to make sure that we have zero warnings.
Additionally, you can:
- Navigate down and add a header or footer (see screengrab).
And it’s as simple as that to create and send an email campaign within Zoho Campaigns!
11. Settings

Before we wrap up this tutorial on how to use Zoho Campaigns, for beginners, it’s important to note that you can access and manage your settings within your Zoho account.
- Navigate down and click on ‘Settings’ in the bottom left-hand corner.

Here you’ll see a bunch of different headers that organize your account settings (see screengrab) we’ll quickly walk you through these below:
1. Users and control.
- Click on ‘Manage users’ to add additional users to your Zoho Campaigns account.
Remember, with the free plan you can add up to five users, however, that’s including the admin.
2. Integration
- Click ‘Apps’ to integrate Zoho Campaigns with other apps.
- Click ‘Marketplace’ to view the marketplace.
- Click ‘Integration platforms’ to integrate Zoho Campaigns with other platforms.
3. Customize
- Click ‘Header and footer’ to customize your email campaign header and footer.
- Click ‘Sign up pages and emails’ to customize these.
- Click ‘Custom Fields’ to make changes to your fields.
4. General information.
This is for all general customization settings, such as your profile and company details.
However, that is essentially everything we wanted to cover in this Zoho Campaigns tutorial for beginners!
Zoho Email Marketing Software for Small Business – Full Video
Check out our step-by-step video guide below on how to use Zoho Campaigns to get started with one of the best email marketing software on the web, so you can create a powerful email marketing for your small business!
