Did you know you can create a free website in a matter of minutes for your local business?
How to Create a Free Website?
Let’s dive into how to create a free website for your local business?
Google My Business is a free tool by Google that allows you to list your local business on Google Maps and Google Search which essentially makes it easier for customers to find your local business online.
In 2021, we know that more and more people are using the Google suggestions for businesses to use, so using the Google free options makes a lot of sense.
Not only this but Google My Business also provides a free website builder.
This allows you to launch a free website quickly and easily within minutes. In this tutorial, we’re going to walk you through how to create a free Google My Business website in 2021.
Sign Up to Google My Business
To arrive on Google My Business and learn how to make a free website, simply head over to google.com/business.
If you don’t already have a Google My Business listing, you’ll need to navigate through the sign-up process (a very simple process, or feel free to watch our step-by*step video tutorial here).
Through your Google My Business listing, you can create a free Google My Business website. Feel free to watch this beginner’s tutorial if you don’t own a Google My Business account yet.
Google My Business Dashboard
Once you have access to your Google My Business dashboard, you’ll find an option called ‘Website’ on the left-hand side. Before that, we want to ensure that all our information is correct.
Information Tab
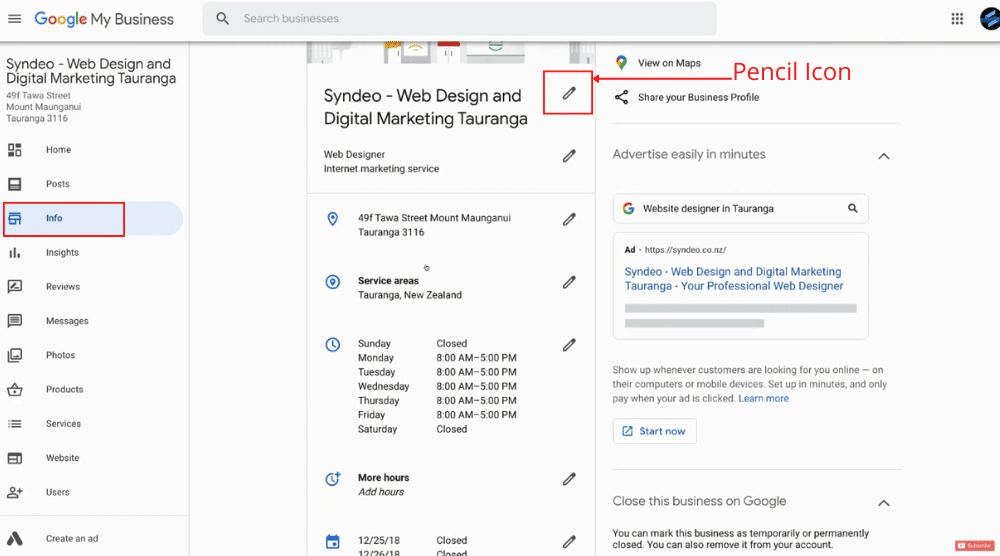
Navigate over to ‘Info’ and under your Information Tab, you can double-check your business details that you provided while signing up for Google My Business.
Click the pencil icon and edit each section that you see in the Information Tab.
You might notice that some of the information has not been added yet.
For example, you can add information about your opening hours or add more service areas. All this information will automatically be generated on your new Google My Business website.
Once you’re done filling in the information, navigate over to ‘Website’ under your menu.
Website Tab
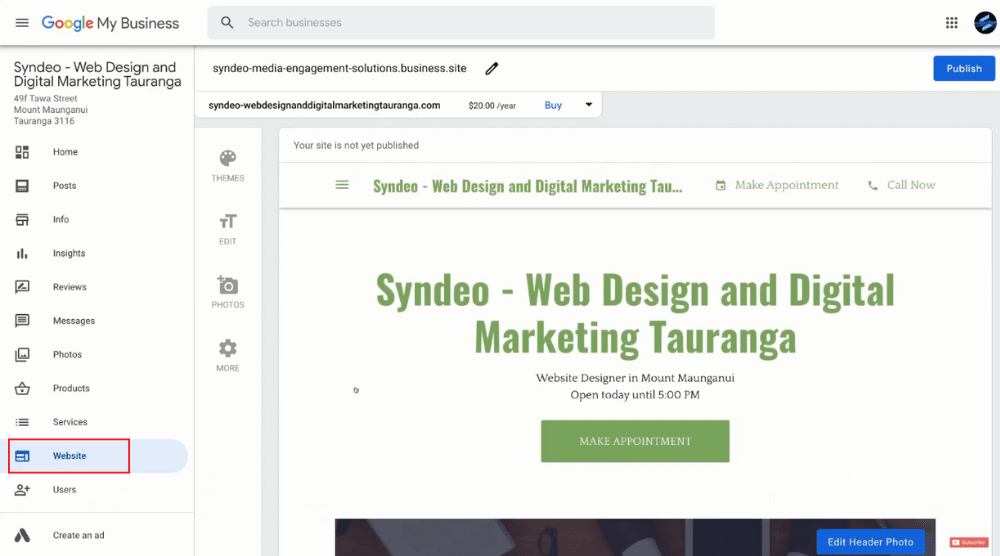
Under the Website Tab, you’ll notice the preview of your new Google My Business website.
This has been automatically generated based on the information that you added under ‘Info’.
You have the ability to customize your Google my Business website to change the overal look and feel of your website.
Website Overview
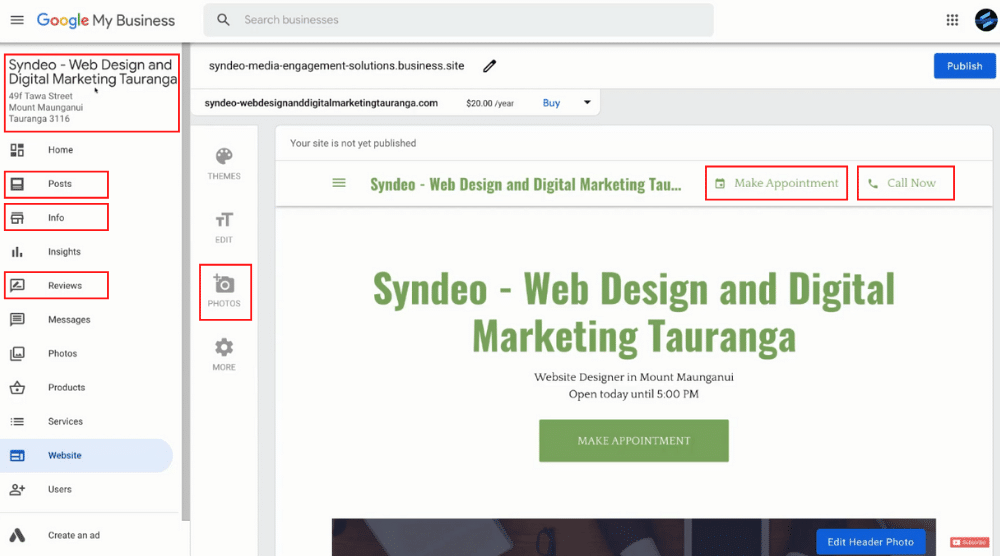
Firstly, you’ll notice that we have a menu on the left-hand side and your business name on top of that. Again, you can change that information under ‘Info’.
Then we have ‘Make Appointment’ to allow people to schedule an appointment with you.
You can also link this with another platform if you like or you can change this button to a different call-to-action (CTA) and we’ll show you how to do that later.
We also have the ‘Call Now’ option on the right so that people can call directly to your business if they click this button here from a mobile device.
Below that we have our business name in our header, followed by the information about the business (category and location that you operate in along with the business’s open times).
Next, we have an appointment button, followed by a header again and then ‘Updates’.
These updates are your posts on the Google My Business website.
You can click ‘Manage Posts’ to manage each of these posts.
Think about these updates as simple and basic blog posts that are updating your visitors about your business, products, services, industry, or anything that you want to share on your website.
To create a post, you can either navigate back up to ‘Manage Posts’ or ‘Create Post’ or head over to ‘Posts’ on the left-hand side menu.
If you want to dive deeper into posts, you can watch this video which will guide you through how to make the most of Google My Business posts.
Below the ‘Updates’, you’ll find ‘Testimonials” which are your reviews. By clicking on ‘Reviews’ on the left, you can see all your reviews. Here, you can manage or reply to each of your testimonials.
Below ‘Testimonials’ we have ‘Write A Review’ and ‘Read More’.
This is going to bring more information up about our business. After which we have the ‘About Us’ section and gallery. These are just pictures that you have added to your Google My Business listing. To add additional photos, you need to select ‘Photos’.
At the bottom of the website, we have ‘Contact Us’. This is the location that we added under ‘Info’.
Below that we have another call-to-action button ‘Call Now’ and our phone number.
You can also see a CTA for the direction (via Google Maps) to help visitors find where your business is located.
On the right, you can see the business hours that you added under ‘Info’.
Customize Website
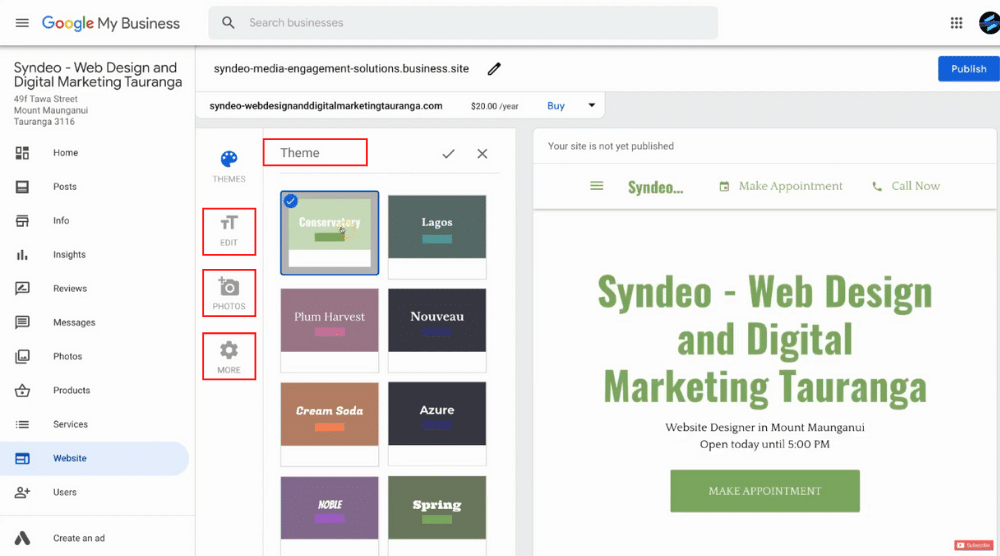
Navigate back to the top of your Google My Business website and click on ‘Theme’.
This is where you can customize the overall look, feel, and style of your website.
These are premade layout designs that you can select based on what best represents your business.
For this tutorial, we’ll go for the Conservatory theme.
Under ‘Edit’, you can edit the primary button (Make Appointment) by selecting another CTA from the drop-down. We’ll select ‘Get Directions’ for now.
You can see the edits made on your right.
Below that we have ‘Text’ which is our headline. You can go ahead and edit the header and description if you like.
Apart from that, you can also add a ‘Summary header’ and ‘Summary body’. This will help offer more information when visitors land on our website.
You’ll also notice more formatting options down below.
Once you have completed the edit, hit the tick button to confirm those changes. Now, if you want to add photos, all you need to do is click on ‘Photos’ and upload pictures to your website which would then show up under ‘Gallery’ as we explained earlier.
If you exit out of that one, you also have the option to select ‘Photos’ under the menu on your left-hand side.
Moreover, under ‘Settings’ you can publish your website and see all the changes you made live.
Below the publishing button, you’ll find ‘Tips for getting customers’.
If you click on it, this will give you vital information to help you make the most of your Google My Business website. Take the time to study each of these suggestions and then exit out of it.
Under ‘Site settings’, you can change the language of your website.
As mentioned, you can make these basic changes using the customization options to enhance the appeal of your new website.
Website Domain / URL
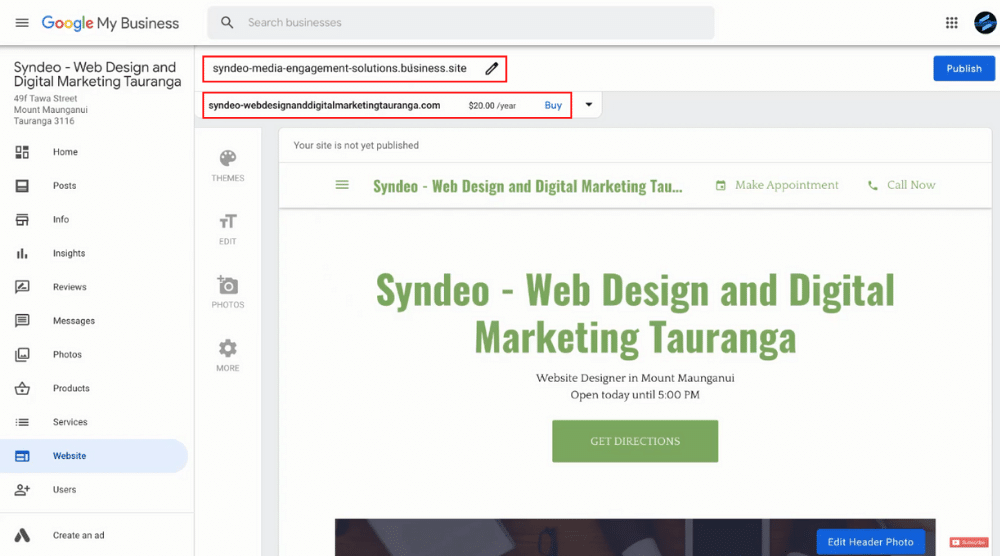
Before you publish the Google My Business website, let’s cover the website domain / URL.
You’ll find it at the top and when you do – click on it. You can send this URL to individuals to help them find your website.
If you like, you can change the section of the URL which represents your website by highlighting and typing in your preferred business name instead.
Tick the check box and then hit ‘Change’.
But for now, we’re happy with the current business name. At the end of our business URL, we have ‘.site’ which shows that we have a branded domain and not a custom domain that you can potentially buy.
If you want to buy a professional custom domain for your website, you can click on the down arrow where Google My Business suggests some domain names that you can purchase at $20 per year.
You can also click ‘View more domains’ to find and purchase the perfect domain for your new business website.
Here, you’ll also find the option to buy a custom email as well as a custom domain from G Suite (Google Workspace).
After recent branding, G Suite is now known as Google Workspace. But since this tutorial is about how to make a free website, we’re not going into details about this paid platform.
You may exit out of that for now.
Launch Website
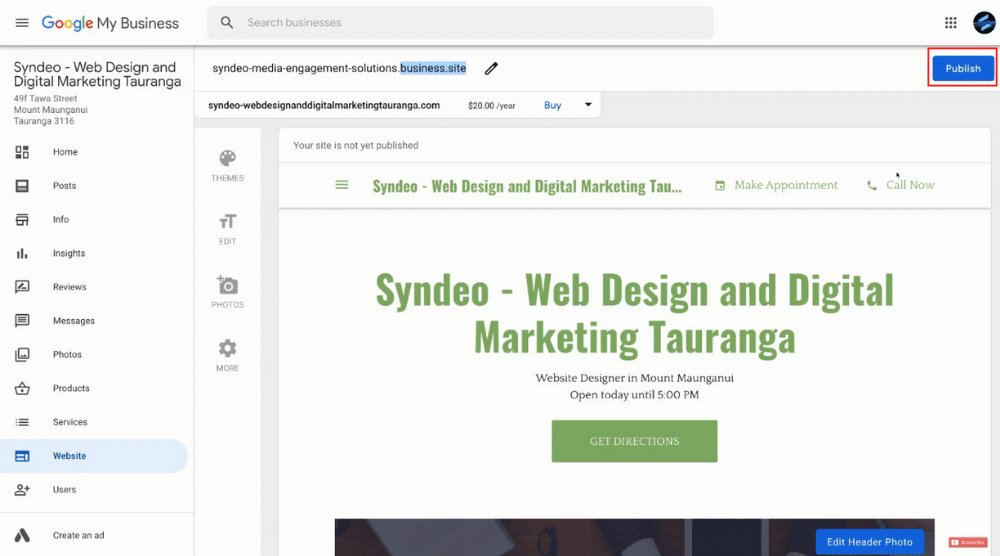
Now that you’re satisfied with your business domain name, URL, site address, CTAs, and content, then it’s time to launch your Google My Business website.
For that, you just need to click ‘Publish’ and your website will go live. People will now be able to find your business on Google Maps and Google Search.
To share your new website on different social media channels, copy your URL, link that to your social media pages, and send it to individuals.
Again, before sharing the URL you can modify it if you like.
By selecting ‘Buy domain’, you can purchase a professional domain for your business website.
View Live Website
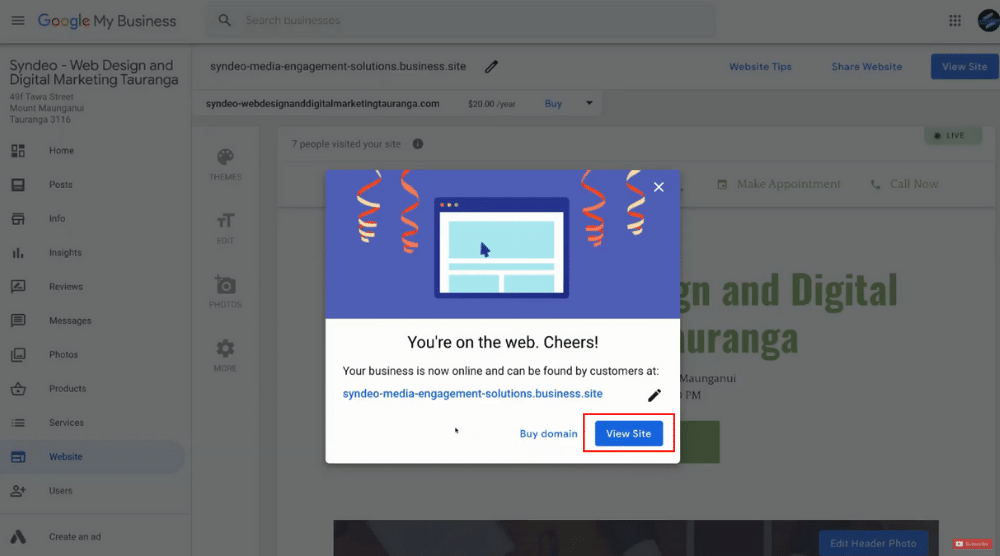
To see your website live, all you need to do is click ‘View Site’.
This is what your visitors will see when they arrive on your Google My Business website.
On the top left, you will find the menu bar and see the different areas of your website such as ‘Contact’ and ‘Testimonials’.
For instance, if you select ‘Contact’, that’s going to take you to the very bottom of your website. And if you choose ‘Directions’, you’ll be taken to Google Maps.
You want to ensure that your ‘Make Appointment’ button links to the right destination.
At the moment, it links back to the ‘Contact Us’ page of your WordPress website which we created a while ago.
If you exit out of it again, you’ll find tips or suggestions to help you leverage the full scope of Google My Business.
Study each section carefully to implement those that help.
Above your header and business name, you can see basic metrics like the number of visitors to your website or whether your website is currently live.
You can also share your website via Twitter, WhatsApp, Facebook, and Email by just clicking ‘Share Website’ on the top right and editing the URL if necessary.
You can also just copy the link and send it to anyone you like or post it to other online assets. We also have ‘Website Tips’ which is again going to take you to those tips or suggestions that we talked about earlier.
Unpublish Website
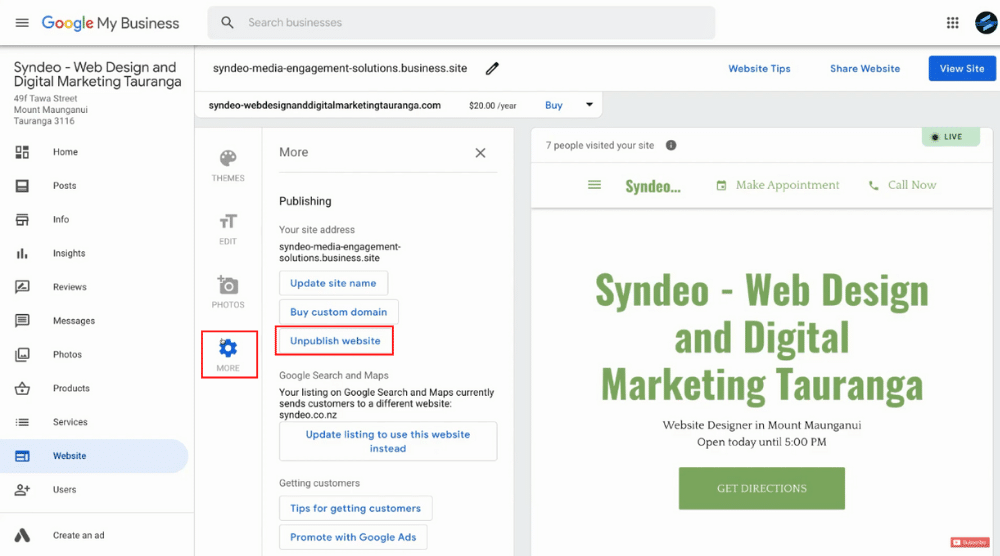
You have the option to unpublish or disable your website so that it no longer shows online.
One reason for doing this is that you have upgraded to a more comprehensive website builder, or you’ve built a new website.
If that’s the case, you may no longer need the Google My Business website.
To disable or unpublish your website, simply navigate over to ‘More’ and then ‘Unpublish website’. It will no longer show up online.
You can publish and unpublish your Google My Business website at any time.
Also Read: Create a ONE PAGE Website for FREE
Google My Business Tutorial for Beginners
This wraps up our Google My Business tutorial for beginners.
You can now get started with your free website!
If you need a visual tour, below we have a video tutorial to Google My Business, which will guide you through the process for creating your free website.
Enjoy watching the video and feel free to leave a comment below with your questions or feedback.
Go for GOLD!
