What Are Google Sites?
Google Sites is a part of Google’s free web-based office suite.
This website builder offers simple customization options to get your small business website up and running in no time.
Moreover, it integrates easily with other Google tools and apps, including Google Maps, Google Drive, Google forms, Google My Business and more.
Apart from that, you can create multiple websites with multiple pages using Google Sites with a free Google account. There’s no limitation! So why not build your website for free with Google Sites!
How to Create a FREE WEBSITE in Minutes?
In this Google Sites tutorial for beginners, you’re going to learn how to create a free website in under 10 minutes without needing any website design experience.
Step 1: Google Sites Login

Under Google Apps on the top-right corner, you’ll find Drive. Select it and then click ‘New’. Pop down to ‘More’ and then click ‘Google Sites’.
Let’s learn how to use Google Sites!
Related: Create Google My Business Website
Step 2: Understanding the Basics

By clicking ‘Share with others’, you can start adding more people to whom you want to give access to your website. You can select whether you want them to edit the website with you or just view it after it’s published. For this Google Sites tutorial, we’re not going to add more members.
Under ‘Insert’, you’ll find various elements such as images and a text box that you can incorporate to customize your website (more on that later). Here, you can also access your Drive when needed. Below that, we have layouts and other elements required to make our website.
Next to ‘Insert’ we have ‘Pages’ where you can add more web pages. And finally, we have ‘Themes’.
Step 3: Changing your Googles Sites Theme

To change the cover image, all you need to do is click ‘Change image’ and select ‘Upload’ to upload an appropriate image from your computer. Googles Sites is going to adjust the readability. To create your own media, you can head over to Canva which offers free professional templates to customize.
Check out our Canva tutorial here to learn how to use Canva to create free graphics and designs.
Also, you can upload your company logo by clicking ‘Add logo’.
Under ‘Settings’ and ‘Brand images’, you need to enter the alt text and click ‘Upload’. You’ll now be able to see your Favicon.
We also have a tutorial on creating a free logo for your business if you don’t already have a logo. Check that tutorial here.
Read, more: Canva Free Logo Maker
Step 4: Adding New Web Pages

Under ‘Pages’ click the ‘+’ icon to build a new page and name it ‘Our services’. Similarly, add another page called ‘Contact’.
You’ll notice a menu on the home page. Google Sites is one of the best free website builders that allows you to add a direct link on the menu that takes people to a different page or website.
For this Google Sites tutorial for beginners, we’re going to add a link to our YouTube channel.
Copy your URL and paste it under ‘New link’. We are going to name it ‘YouTube Tutorials’. You’ll now notice the direct link on the menu.
Adding the Subpages
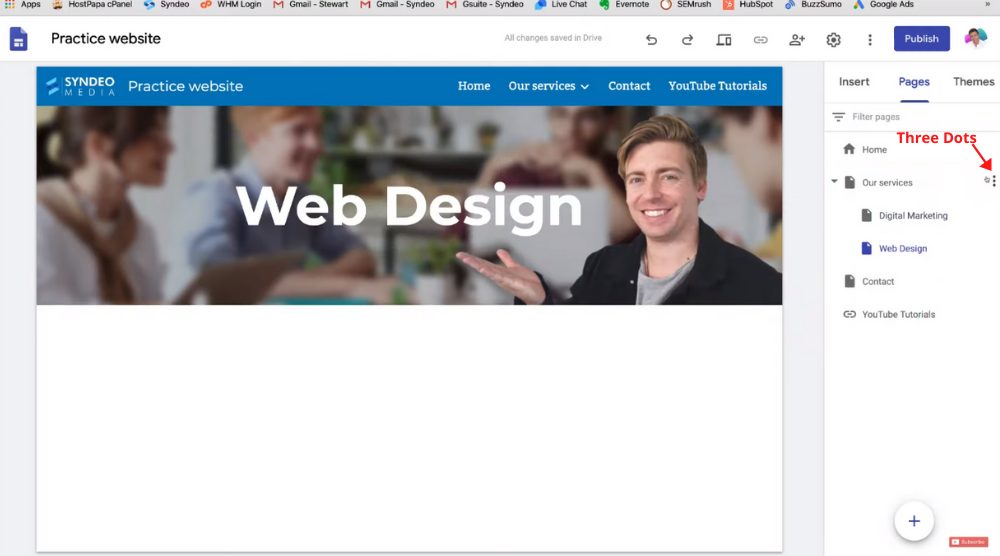
To do that, click the three dots next to ‘Our Services’ and select ‘Add subpage’. Name it ‘Digital Marketing’. Similarly, we will create two more subpages for ‘Web Design’ and ‘Online Workshop’ for this Google Sites example website.
On the menu bar, you’ll notice the subpages as well.
Step 5: Changing Website Menu Navigation

Step 6: Designing the Web Pages
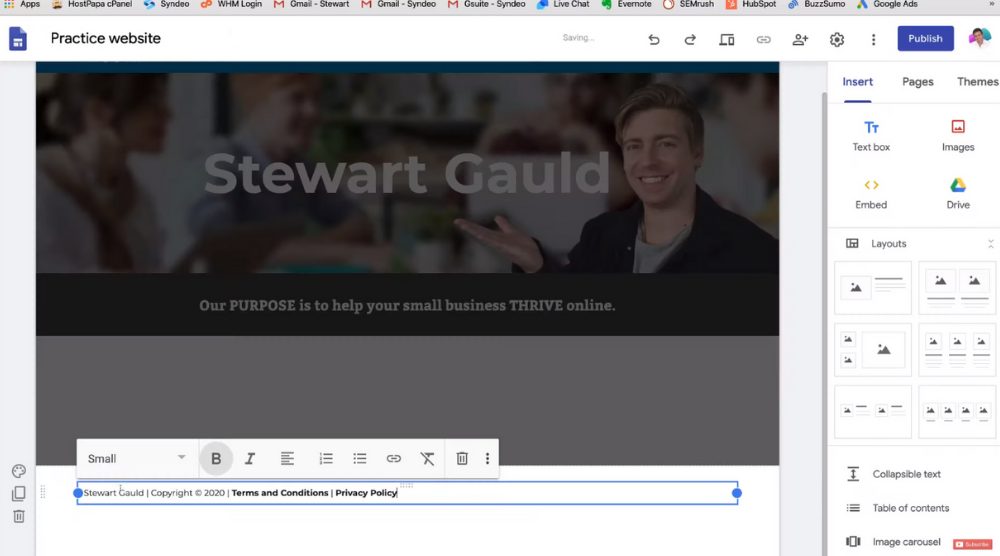
Google Sites is an easy-to-use free website builder that offers a drag-and-drop editor.
Double-click on the white space and choose the text element.
That’s going to pop up with a new section.
You can now enter the text (a headline, for instance) and use the formatting options for customization (alignment, numbered list, bold, italics, insert links, etc.).
Also, you may delete or duplicate any section if you like.
For each section, you’ll also notice a ‘Section background’ option towards the left, that you can use to change the background color (or add an image) according to what suits your Google Sites theme.
Follow the same process to add other sections such as the footer (that links to terms and conditions and privacy policy pages).
This footer will appear on every page of your website. Again, double-click on the white space to insert images and embed videos.
To insert layouts, head over to ‘Insert’ and then choose a layout of your choice. And, if you are not happy with a layout, you can always delete it.
Step 7: How to Increase Conversions
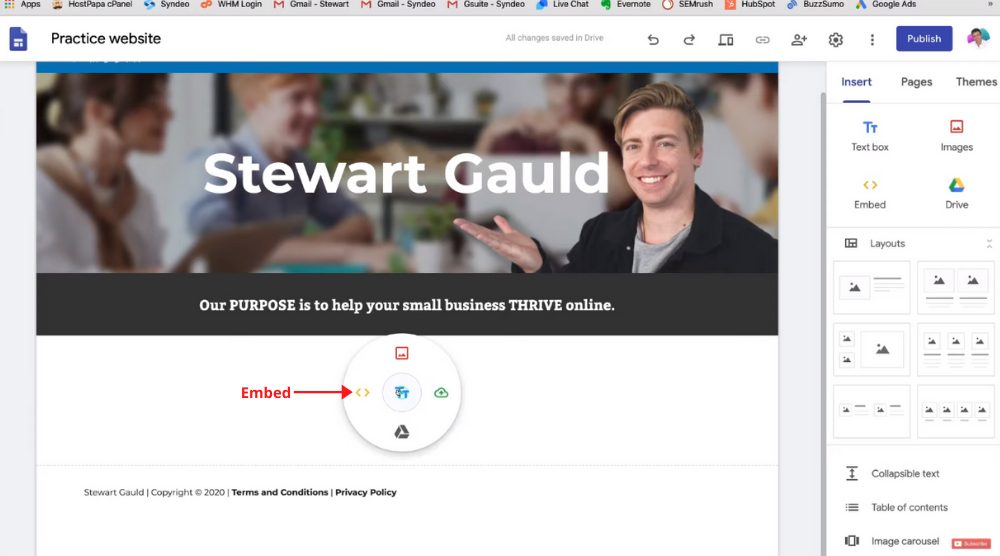
Therefore we are going to add a video to this Google Sites tutorial for beginners. For that, you need to double-click and select ‘Embed’.
In the next step, add the link to your video (a YouTube video, for example).
You’ll be able to see a preview below. Click ‘Insert’. By dragging and dropping the video, you can align it anywhere on the web page.
In the next section, you can add and customize more content that you want people to read on your home page. In this Google Sites tutorial, we’re creating everything from scratch without using layouts. Make sure that the background and readability are streamlined with the website theme.
Step 8: How to Add Buttons
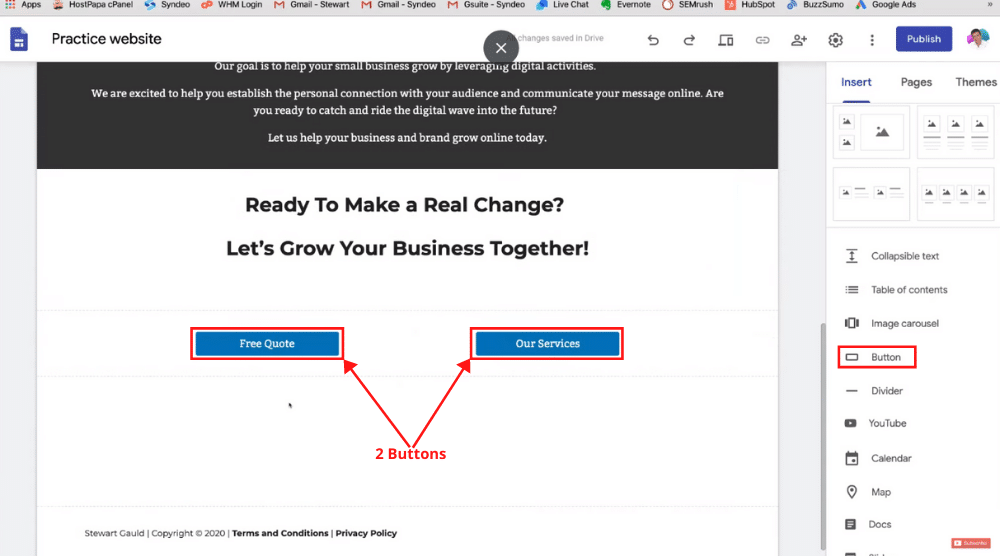
Click on it and then enter the button name (Free Quote) and link (to the contact page, for example).
Hit ‘Insert’. You should ideally have at least two buttons or call-to-action on your home page.
The great thing about the Google Sites website builder is that you can just drag and drop each element to its preferred location. By dragging the sides, you can also change the size of the buttons.
To make sure our website flows really well, we’ll add another section with a dark background and no text.
We have now finished customizing the home page using this website builder. It’s a sleek, sharp, and professional-looking web page.
Step 9: Using Layouts for our Contact Page

Click on ‘Contact’ to arrive on your contact page. You can change the header image by selecting one from the gallery or uploading one from the system.
Choose a layout that you like and click on the ‘+’ icon to upload an image. You can resize the image and add some information on the right. Again, you can format the text according to your needs.
Using the simple drag-and-drop feature of Google Sites, you can change the position of your layouts and sections if needed.
On your contact page, you can add information using the text element, that includes:
- Hours of operation
- Office address
- Email and phone number
- CTAs
Next to your contact information, you can add a map. You’ll find it under ‘Insert’ on your right.
In the following step, enter your Google My Business name, which is going to automatically bring up your location. Once you verify that it’s indeed your business’s location, click ‘Select’.
If you want to learn more about adding your business to Google maps with Google my business, check out this Google My Business tutorial here.
The map is now added to your contact page. Now, you can resize the map and drag and drop it to the preferred area on your page.
Using this free website builder by Google, you can also add a divider. All you need to do is click ‘Divider’ under ‘Insert’.
Moreover, you should have internal linking between different pages of your website. Hence, you can add a button for your services page on the contact page and vice versa. You will, of course, need to build the services page first.
Let’s learn how:
Step 10: Creating the Services Page

You’ll also notice the footer that we created earlier at the bottom of the page.
Next, add a layout that allows you to add three images, one each for your three types of services – digital marketing, web design, and online workshop.
For each service, add a button that takes visitors to the corresponding sub-pages.
Instead of adding three buttons one-by-one, you can just add one button and then duplicate it twice.
You would, however, need to change the link so that visitors are redirected to the right sub-pages. To do that, double-click the button and then choose the right sub-page from the drop-down menu.
Again, double-click and choose the text element to add more content to your services page. Make sure that your web page flows nicely.
Step 11: Previewing & Publishing Website

To preview your website on a tablet, desktop, and mobile device, click the Preview button in the top-right area. And when your website is ready to go live, hit ‘Publish’. You can see your website URL (which is a branded one) before you publish.
Alternatively, you get a custom URL by purchasing the domain. However, we won’t go into that since this is a free website builder tutorial.
Under Publish drop-down, you’ll find the ‘View published site’ option. Click on it to see your website live.
You can now share the website link with your contacts. Remember, Googles Sites is a great option if you’re a beginner.
Nevertheless, it does not replace a comprehensive website since Google Sites is limited in its features and functionality compared to other website builders like WordPress or if you have your website built by a designer.
That said, it’s great to get your small business online!
Also, read: Create ONE PAGE Website for FREE | Google Sites Tutorial
Google Sites Tutorial for Beginners (Video Guide)
To use Google Sites, you don’t need any website development and web design experience. However, it’s best to look at other websites in your industry or market to analyze the way they have set up their web pages.
Feel free to play around with the design of your newly-created website. Take your time to understand each element and its corresponding customization options. Remember to ask for feedback from your friends, family, or colleagues.
And, you can always add people to view or edit your website as we explained in this Google Sites tutorial for beginners.
That is everything you need to know on “how to make a free website” using Google Sites.
Check out our complete video tutorial below! Enjoy!
