In this step-by-step guide, you’ll learn how to redirect HTML to another page on your Shopify store.
Do you have a Shopify store and want to redirect your website visitors from one URL to another?
For many small business owners with no coding experience, the prospect of redirecting HTML within your Shopify store seems pretty daunting.
Whether updating product URLs for better SEO, merging product pages, or doing maintenance on a specific page, you’ll need to redirect your website traffic to another page.
However, I have good news! Setting up a redirect page in Shopify is easier than you think!
This can be done in two ways: inserting an HTML meta refresh tag or using Shopify’s built-in URL redirect feature.
So, are you ready to learn how to redirect HTML on your Shopify storefront?
Read more: Ultimate Shopify Review 2024.
How To Redirect HTML To Another Page On Shopify?

Redirecting HTML to another page on Shopify can be achieved using two different methods.
Here’s a straightforward way to implement a redirect on your Shopify store using an HTML meta refresh tag:
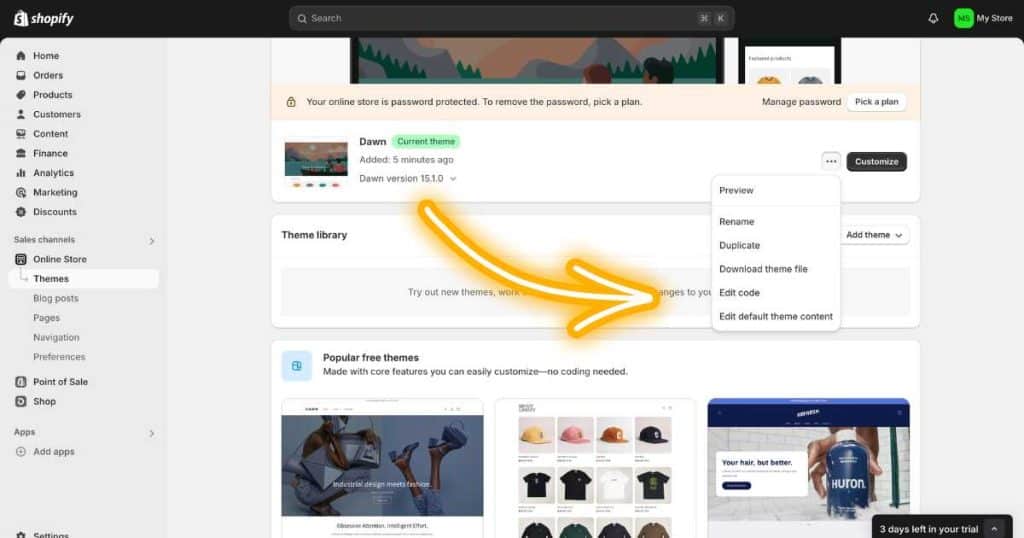
- Go to your Shopify Admin Panel.
- Click ‘Online Store > Themes’.
- Find the theme you want to edit, then click the three dots > Edit code.’
- Select the HTML file or template you want to redirect from within the theme editor.
- Insert the meta refresh tag with your chosen URL into the <head> section of the HTML document.
- Select ‘Save’.
Another way to redirect HTML to another page within Shopify is by using Javascript within your HTML code.
To do this:
- Place the following script within the <head> or just before the closing </body> tag of the HTML page that you want to redirect from:
<script type=”text/javascript”>
window.location.href = ‘https://www.example.com/new-page’;
</script>
- Follow the same steps mentioned in the first method to edit the code through the Shopify Admin Panel.
Read more: Do You Need An LLC For Shopify?
How To Redirect URL To Another Page On Shopify?

Did you know that Shopify offers a built-in URL redirects feature?
Follow these simple steps to learn how to redirect a URL in Shopify:
- Head to your Shopify dashboard.
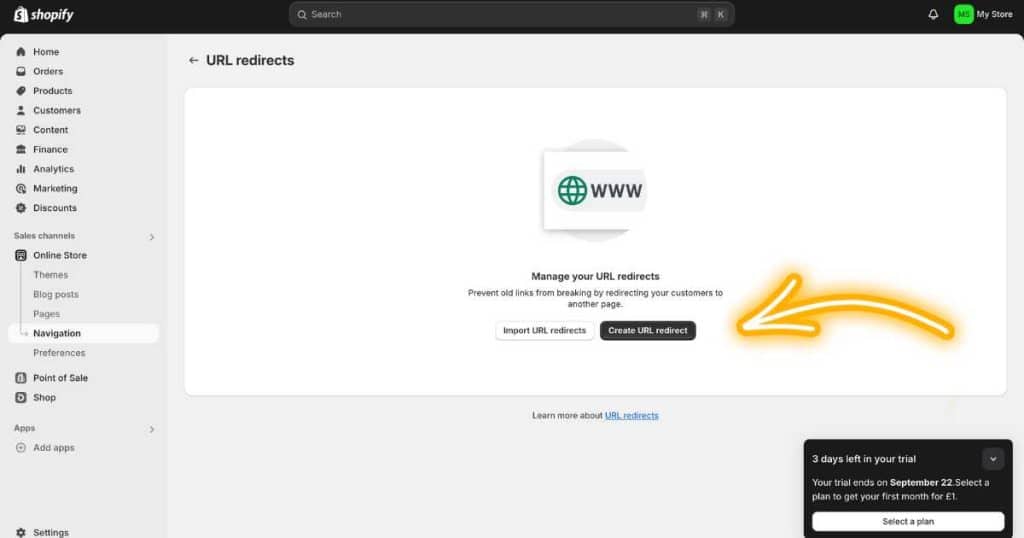
- Select ‘Online Store > Navigation’ on the left sidebar.
- Click ‘View URL Redirects’ on the top right.
- Press ‘Create URL redirect’ to initiate a new redirect.
- Type the old URL within the ‘Redirect from’ field.
- Type the new destination URL (where you want the traffic to go) within the ‘Redirect to’ field.
- Select ‘Save redirect.’
By following these steps, you’ll successfully set up a new URL redirection on your Shopify store!
Remember to consider the impact on SEO when implementing redirects, as improper use can affect your search rankings.
Read more: How To Remove Powered By Shopify On Your Website?
Redirect HTML vs Redirect URL
An HTML redirect and a URL redirect have the same goal: To take visitors from one web page to another automatically.
So, what’s the difference between the two? And how do they both work?
- An HTML redirect embeds HTML code (often a meta tag or Javascript) in the web page’s header to redirect your visitors to another page after a number of seconds.
- A URL redirect is essentially handled server-side and uses a 301 (permanent) or 302 (temporary) redirect to take the user to the new URL before the browser loads any HTML from the original page.
To keep things simple, the HTML redirect is processed by the client’s browser, and the URL redirect is processed by the server.
As a general rule, URL redirects are generally preferred for SEO purposes.
So, while both HTML redirects and URL redirects redirect users from one page to another—they operate at different levels (client-side vs. server-side).
And both are used in different scenarios (based on the level of control required and the impact on SEO).
Read more: How To Close Shopify Store?
Can You Use HTML Redirects For SEO?

Compared to 301 redirects, HTML redirects aren’t advised for SEO purposes as they can result in delayed search engine recognition.
This is because search engines must process the HTML document to detect the redirect instructions, which can slow down the indexing of the change.
Plus, there’s an element of uncertainty with HTML redirects in terms of how search engines interpret them.
Unlike 301 redirects, HTML redirects aren’t necessarily picked up correctly, affecting the transfer of a page’s already established authority.
Also, HTML redirects can be slower than 301 redirects, affecting the overall browsing experience for users.
Read more: Is Shopify Good For Beginners?
Are Shopify Redirects 301?
When you create a URL redirect in Shopify, it’s generally to move an old URL to a new one permanently.
Therefore, redirecting a URL in Shopify is a 301 redirect (permanent redirect).
This is particularly useful for updating product links, changing your website structure, or merging pages.
A 301 redirect is also useful for SEO purposes.
Basically, by redirecting a URL, you’re telling search engines that the page has moved permanently, and they should transfer the link equity to the new URL.
This is crucial for keeping your site’s hard-earned search engine rankings while ensuring your users easily find their way to the correct page.
Stews Final Thoughts
There you have it! We have shown you how to redirect HTML to another page on Shopify.
And thanks to Shopify’s built-in redirect URL feature, you can easily redirect your website visitors to another webpage without hassle.
Depending on the context and your goals, you should choose to redirect your users through the HTML or URL method.
Remember, always test your redirects to ensure they work as expected before fully rolling them out!
Additionally, you always want to ensure your redirects don’t impact the SEO or user experience.

