In this Facebook Ads step-by-step guide, I will guide you through how you can install Facebook Pixel on your Wix website.
Want to optimize Facebook ads and evaluate their performance? Well, did you know you can do this by adding Facebook Pixel to your Wix site?
The Facebook Pixel is a piece of code that helps you monitor the effectiveness of your Facebook ad campaigns.
This piece of code is added to your website in order to track events like scroll depth, purchase, add to cart, page views, time on page, etc.
Why Add Facebook Pixel to Your Website?
Thanks to the analytics offered by Facebook Pixel, you can improve Facebook ads retargeting to ensure that they are being displayed to the right set of audiences.
Based on the events tracked by Facebook Pixel, you can then remarket to website visitors and encourage them to purchase a product.
Facebook Pixels works with most website builders, however, the focus of this tutorial today is Wix websites.
By learning how to install the Facebook Pixel on Wix, you can further optimize your Facebook ads and obtain the desired return on investment (ROI).
So, can you add a Facebook Pixel to your Wix website? Let’s find out.
How Does Facebook Pixel Work?
Now that you’re familiar with Facebook Pixel, let’s talk about how it works. There are four steps to the Facebook Pixel:
- Adding the pixel: This process begins by installing a tracking code on the website.
- Collecting the data: Facebook Pixel will gather data related to site visitors, such as their demographic information, traffic sources, devices used, and more. You can leverage these insights to make changes to your Facebook ads.
- Building audiences: Using the insights obtained in the second step, you can start creating lookalike audiences, Facebook Custom Audiences, as well as tailored ads.
- Revaluating the strategy: By evaluating the conversion events, you can further refine your Facebook ads strategy.
How to Add Facebook Pixel on Wix?
In this updated Wix pixel tutorial, we walk you through the step-by-step process of adding the Facebook Pixel to Wix. Facebook Custom Audiences.
1. Get Started

*The link above is an affiliate link, which means we will get a commission if you upgrade to a paid plan (with no extra cost to you). This helps support our education-based website and we thank you in advance!
First things first – in order to connect Wix and Facebook Pixel, you’ll require a premium Wix plan and a custom domain.
2. Visit Ads Manager

- Visit facebook.com/adsmanager
- Ensure that the correct account is selected
If you don’t have a Business Manager, we suggest watching this detailed tutorial.
It will help you set up the Business Manager inside Facebook.
Once you’ve done that, head straight back into this Wix Pixel Facebook guide.
The Business Manager will allow you to add and manage your ad accounts.
Within your ad account is where you can create a new Facebook pixel.
3. Head Over to Events Manager (Create Pixel)

Inside the ad manager, follow these steps:
- Click on ‘All tools’
- Locate ‘Events Manager’ and select it
- Tap on the ‘Connect Data’ button

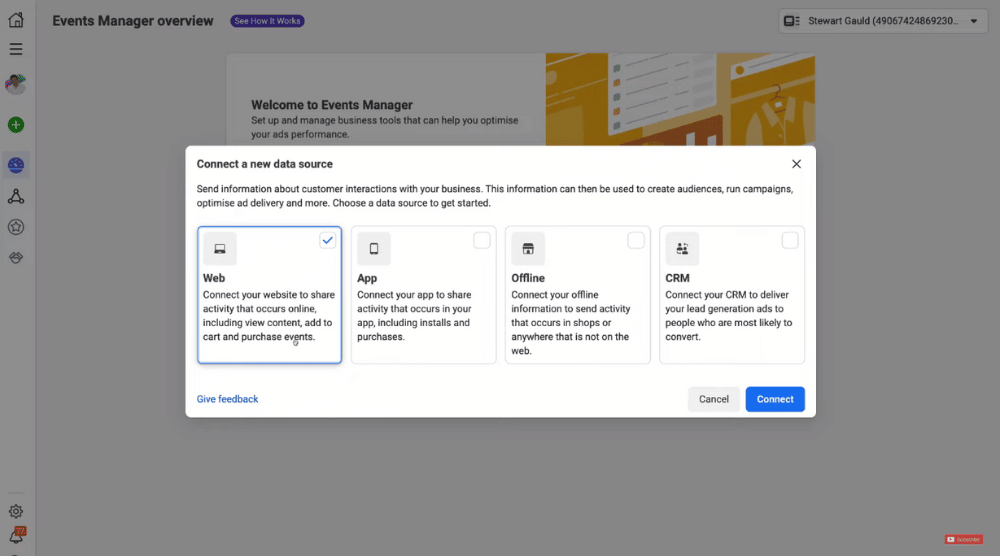
- Choose ‘Web’ as your data source in the next step. This will allow you to install the Wix Facebook Pixel. It will track activities, such as purchase events, add-to-cart actions, and content impressions when you run Facebook campaigns.
- Hit ‘Connect’

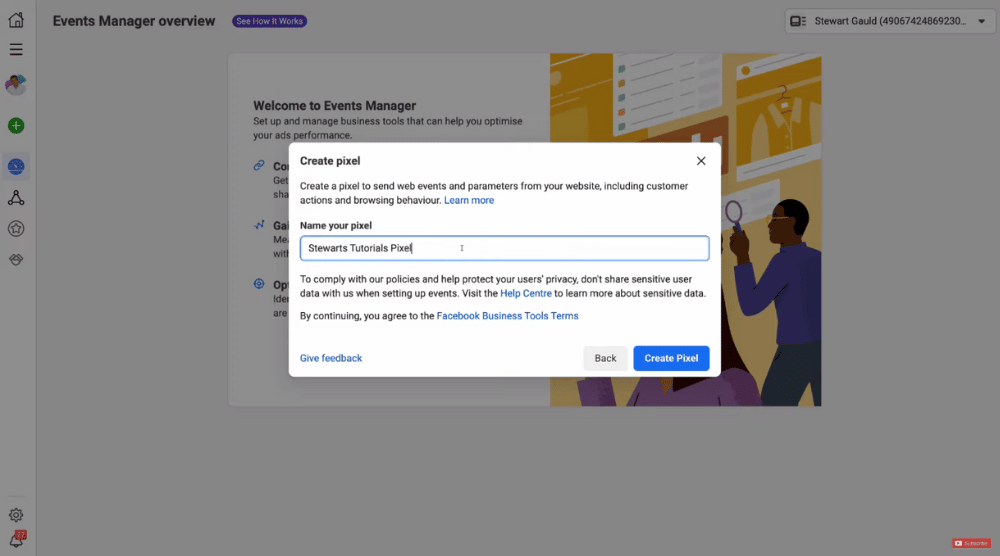
- Name your Pixel. Ideally, the name should be your website name followed by the word ‘Pixel’. (Refer to the screengrab)
- For this tutorial, we’ve named ours Stewarts Tutorial Pixel.
- Hit ‘Create Pixel’

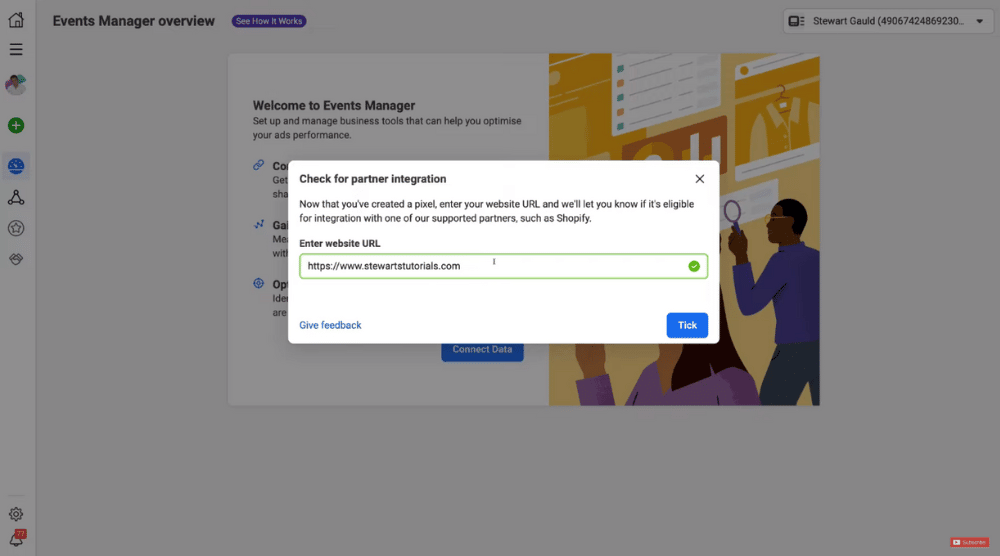
- Enter your Wix URL and select ‘Tick’. (Refer to the screengrab)
- Click on ‘Next’

- Keep the first option selected, which is – Conversions API and Meta pixel
In order to install Facebook Pixel on Wix, you’ll need to log in to your Wix website and establish the connection.
Read more: Create a Free website with Wix
4. Log In to Wix Dashboard

After you log in, you’ll need to take certain actions on the Wix dashboard.
- Select ‘Marketing & SEO’ on the left-hand side
- Tap on ‘Marketing Integrations’ from the options
Read more: Best Website Builders for Small Business
5. Move Forward with Wix Pixel Integration

Okay, let’s continue this guide on how to add Facebook Pixel to a Wix site.
To do this:
- Under ‘Marketing Integrations’, find ‘Facebook Pixel & CAPI’
- Click on ‘Connect’
- Select ‘Connect to Facebook
- Continue with your profile
- Grant permission to Wix Marketing Tools and hit ‘Continue’

- Ensure that you have the correct Business Manager selected
- Choose the newly created Pixel. While doing so, make sure that the ID is correct.
- Click ‘Continue’

- Reconfirm that you have the right Facebook Pixel and Business Manager selected
- Check that ‘Automatic advanced matching’ is turned on (refer to the screengrab)
- Hit ‘Continue’ and ‘Next’
- When you see the success message, click on ‘Done’

So far, it sounds pretty easy to install Facebook Pixel on Wix, right?
Well, there are just a few more steps to complete before you’ll know how to set up Facebook Pixel on Wix.
It’s time to revisit the Events Manager inside Facebook. Click on ‘Next’ and then ‘Next’ again.
Finally, tap on ‘Close’.
Read more: How to install Facebook Pixel on WordPress
6. Navigate Data Sources

- On the far-left panel, you’ll find ‘Data Sources’

- Click on the relevant pixel.
- Navigate over to ‘Test events’
- Under ‘Test browser events’, enter your website URL.
- Tap on ‘Open Website’. That last action will open up your Wix website.
Now, head back to the Events Manager.

Under ‘Events received’, you’ll be able to see that the page has been viewed.
You want to test all the pages on your website to make sure that they are being tracked properly.
7. Create Custom Conversions

- Keeping the ‘Data Sources’ interface open, click on ‘Create’ (top-right area).
- Select ‘Create Custom Conversion’

For example, if you’re selling products on your Wix website, you’ll need:
- Identify the name of this custom conversion
- Add a description
- Ensure that you have the Pixel selected
- Under ‘Event’, make sure that ‘All URL traffic’ is selected
- Under ‘Rules’, verify that ‘URL’ and ‘contains’ are selected as well (refer to the screengrab).
- Enter the URL of the success page that people land on once they’ve purchased a product from your website. That will help track conversions.
If you’re tracking form submissions like lead generation, you’ll need to click on ‘Contains’ and, from the drop-down, select the ‘equals’ option.
After that, you’ll be required to add the URL to the thank you page and click ‘Create’ in the bottom-right corner.
Wix Integration with the Facebook Pixel (Video Guide)
And that brings me to the end of this in-depth walkthrough of how to set up Facebook Pixel on Wix.
By learning how to connect Facebook Pixel to Wix, you can start tracking events on your website when driving traffic from Facebook using Facebook ads.
The process of installing the Wix Facebook Pixel is relatively straightforward and you should be able to start tracking events using this beginner’s tutorial in minutes!
Using the Facebook Pixel is one of the best ways to get the most out of those Facebook advertising dollars.
Check out our complete video guide below!

