This step-by-step Pipedrive tutorial is thus created for beginners to help them navigate all its amazing features.
Pipedrive is a well-known sales pipeline management software.
Pipedrive is designed to drive revenue and growth for businesses.
We recommend Pipedrive as a possible alternative to HubSpot (if you are not a fan of HubSpot), one which is primarily focused on sales.
If you’re looking to enhance your sales processes, teams, and pipeline management, then Pipedrive is the perfect CRM software for you.
How to Use Pipedrive as an Alternative to HubSpot?
To get started, visit Pipedrive.
1. Understand Pricing Options

- On the Pipedrive homepage, move your cursor to ‘Pricing’ at the topmost menu.
- Click on it and scroll down to pricing options.
Unfortunately, Pipedrive doesn’t have a free plan.
You can, however, get started with any of its paid plans.
The cheapest plan (Essential) offered by this CRM software costs $12 per user per month.
With this plan, you can manage leads and deals, track communications, automate, leverage reports, integrate third-party apps, and more.
Alternatively, you can opt for a 14-day free trial if you’re still figuring out Pipedrive.
The most expensive plan is the Enterprise plan which costs $59.90 per user per month. You get additional communication, automation, tracking, and security features with this plan.
We recommend getting started with the Essential plan which is ideal for small teams.
When you grow out of the features offered under Essential, you can always upgrade the plan.
Now, for this Pipedrive CRM tutorial, we’ll create a fresh account.
Go ahead, pick a plan, and sign up for the free trial.
Also read: How To Use Zoho CRM
2. Arrive at Pipedrive Account

Once you complete the signup, you’ll be inside the Pipedrive account.
Your sales team will have no issues figuring out the CRM software, thanks to its easy interface.
Keep reading this tutorial to understand how to use Pipedrive.
Notice that from the far right-hand side, you can add team members to Pipedrive.
Also read: Best CRM Software for Mobile
3. Configure Account Settings

- Tap on your profile (top-right corner)
- Select ‘Company settings’
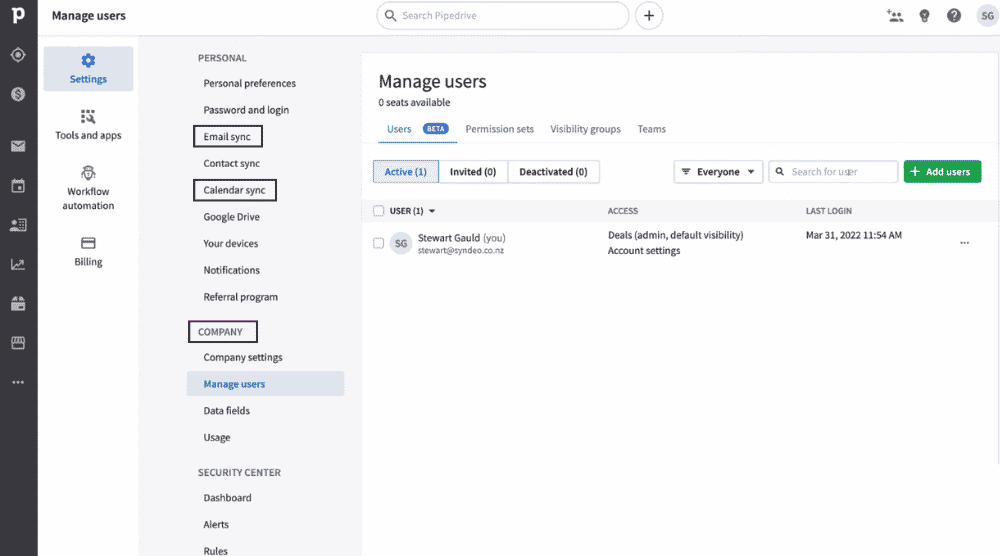
Now, you want to sync your email and calendar to get the most out of this CRM software.
- Under ‘Company’, choose the ‘Manage users’ option. This is where you can invite and manage your sales team.
We’ll now introduce you to the amazing features offered by Pipedrive. For this, you can head back to your home dashboard.
Also read: How To Use Zoho Social
4. Add & Manage Leads

- Select ‘Deals’ (see left-side panel). This is where you can manage your deals within Pipedrive.
- Tap on ‘Leads’ above ‘Deals’. As the name suggests, this is where you can manage your qualified and unqualified leads.
- Navigate over to ‘LEADBOOSTER’ below ‘Leads inbox’. Here, you can add web forms, chatbot, live chat, etc. for lead generation.
For this Pipedrive tutorial, we’ll add one lead to Pipedrive.
- Tap on the ‘Lead’ button (refer to the screengrab)
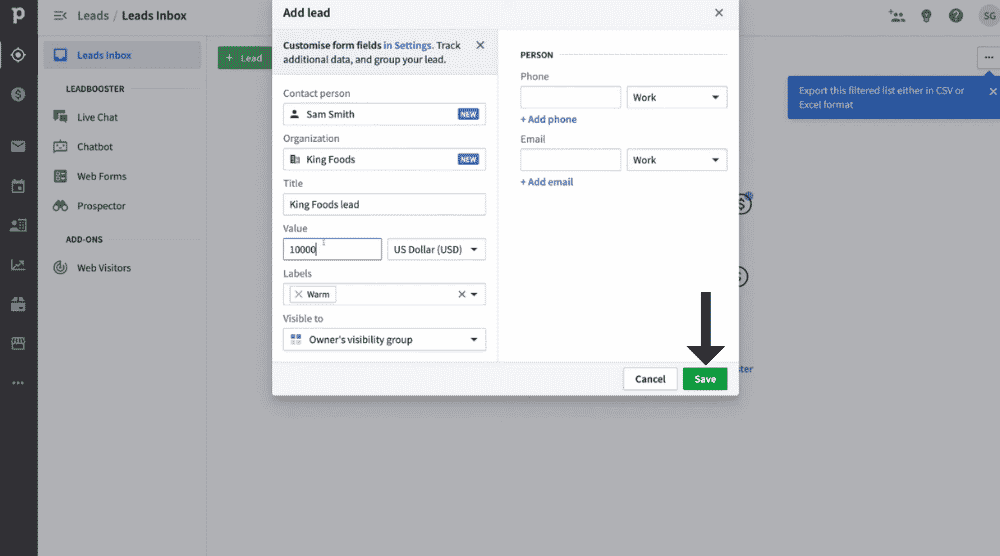
- Add the contact person, organization, title, value, labels, etc. for each lead.
- Hit ‘Save’
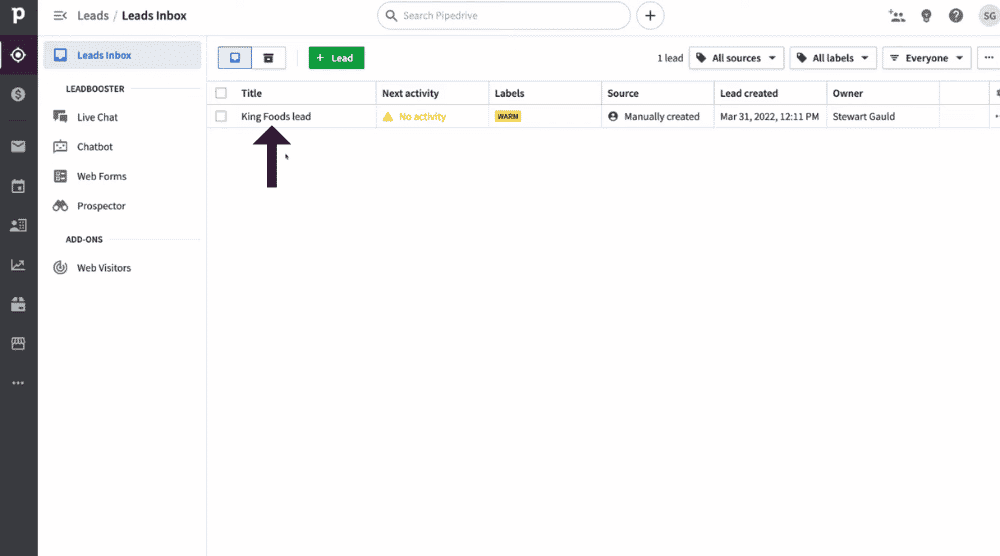
Follow the steps above to add as many leads as you like.
If you click on the newly created lead, you can view all details related to the lead.

You can add notes under the ‘Notes’ tab and see recent activities (meetings, emails, and calls) under the ‘Activity’ tab.
After connecting your email with Pipedrive, you can directly communicate with your leads via email under the ‘Email’ tab.
Refer to the screengrab.
This way, you won’t need to visit a completely new tab called ‘Mail’ (on the left-hand panel) every time you want to communicate with your leads and clients.
Keep the Email tab selected for the new lead. As you can observe from the screengrab, we don’t have any activity for the lead currently.
To add an activity:
- Select the call button
- Choose an activity from the options: task, meeting, email, lunch, deadline, and call
- For this Pipedrive tutorial, we’ll select ‘Meeting’.
- Go ahead and add a title for this meeting
- Schedule the meeting and hit ‘Save’.
- Tap on the ‘Convert to deal’ button at the bottom when the unqualified lead becomes a qualified lead.
- Add more information about the deal that you didn’t already include for that lead before. Hit ‘Save’.
Also read: How To Use Freshworks CRM
5. Navigate Through Sales Pipeline

Now that you’ve learned how to add and manage leads using the best CRM software, we’ll go ahead and cover the sales pipeline.
- Head back to ‘Deals’ (from the panel again)
- Notice the current stage of the lead. It’s under ‘Qualified’. As the deal progresses, you can move it through the next stages in the pipeline, i.e., contact made, demo scheduled, proposal made, and negotiations started
- Click on ‘Pipeline’ (top-right area), and select ‘Edit pipeline’. This is where you can customize the sales pipeline within Pipedrive.
The ability to customize the existing sales pipeline or create a new one is extremely important as every organization has a different sales process.

To edit the sales pipeline:
- Enter the name of your pipeline, which is currently ‘Pipeline’ by default. For this Pipedrive CRM tutorial, we’ll change the default name to ‘Sales Pipeline’.
- Rename each sales stage as per your sales process.
- Add the probability for each sales stage. It’s the probability that each deal will flow through the specific stages in the pipeline.
Here’s the probability we’ve selected for each stage:
- Qualified: 100%
- Contact Made: 80%
- Demo Scheduled: 70%
- Proposal Made: 50%
- Negotiations Started: 40%

Navigate over to the far right-hand side, and click on ‘New stage’ to add a new stage to your sales pipeline.

In this Pipedrive tutorial, we’ll create an additional stage called ‘Contract Sent’ and set the probability at 35%.
Similarly, we’ll create another stage called ‘Deal Closed’ and set the probability at 20%.
This is the probability that a deal will reach the end of the sales pipeline. Hit ‘Save’.
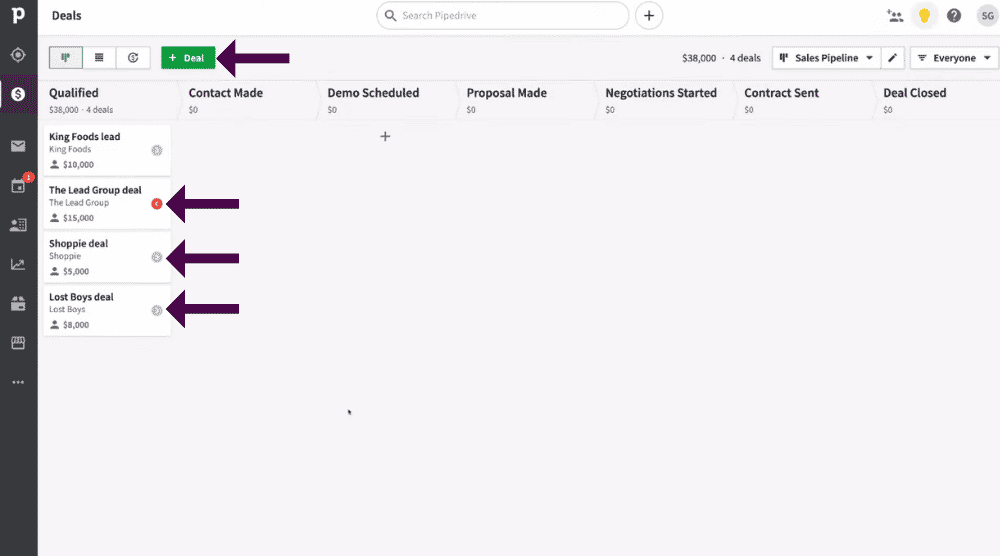
Using Pipedrive for project management, we’ll add three more deals quickly by clicking “Deal” (left-hand side)
- Next to each lead, you can see a symbol that represents the type of prioritization. If you click on the symbol next to ‘King Foods lead’, you can see the type of activity that is due in 7 days. For this lead, the activity is ‘Introduction Meeting’ (which we created before)
- By selecting ‘Schedule an activity’, you can add more activities for each lead. If you click on the Red symbol next to ‘The Lead Group deal’, you’ll notice an overdue activity ‘Call’ which was supposed to be made yesterday.
- For another lead called ‘Lost Boys deal’, there are no activities scheduled. Refer to the screengrab. For this lead, you can add a follow-up email activity a week from now, for instance, and hit ‘Save’.

When these activities are completed, mark them as ‘Done’ and add notes (see the screengrab).
As soon as you do that, the symbol will turn green. Remember to save changes each time.
Using the drag-and-drop cursor movement, you can move the deal onto the next stage.
Go ahead and schedule another activity that will help the deal progress to the subsequent stages in the sales pipeline.
Clicking on the lead would bring up more details.
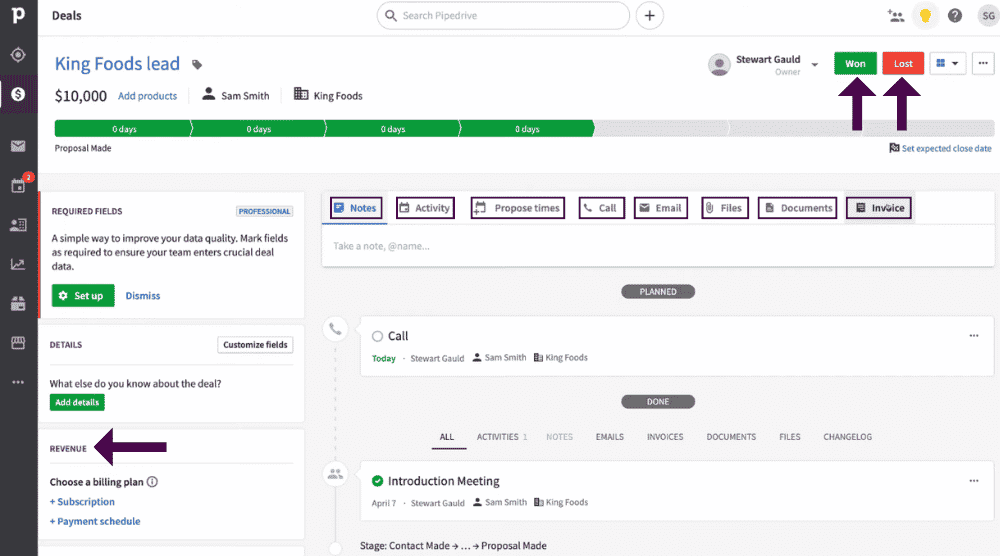
Notice the ‘Won’ and ‘Lost’ buttons in the top-right corner as well.
When a lead becomes a customer, use the ‘Won’ button, or the ‘Lost’ button depending on the outcome.
Moreover, you can choose a billing plan (such as payment schedule or subscription) under ‘Revenue’. This will allow you to track revenue.
There are a bunch of other options on the right, including notes, activity, propose times, call, email, files, documents, and invoice.
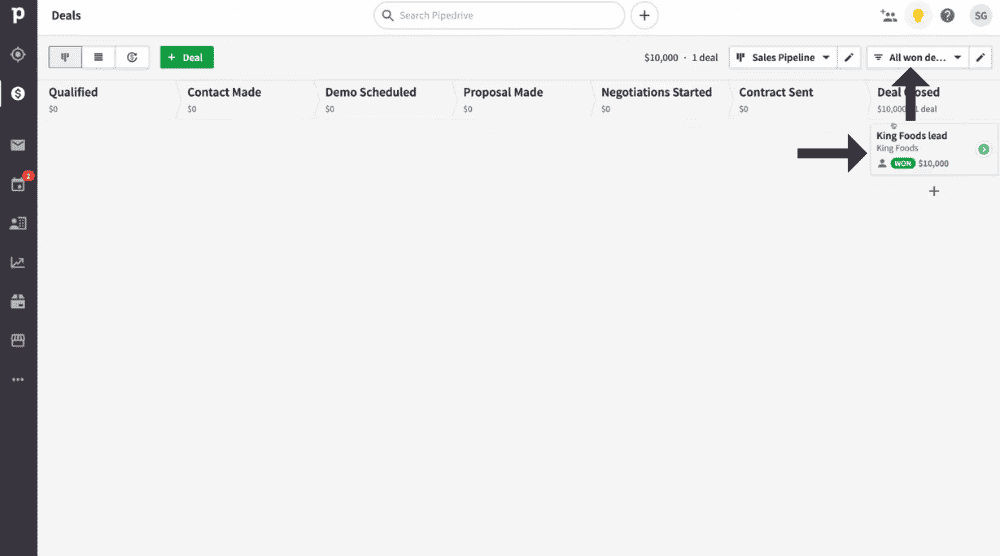
Let’s understand how to filter deals using CRM software.
- Head back to ‘Deals’.
- Tap on the filter (far right-hand-side)
- Select ‘All won deals’
Move the deal won to the ‘Deal Closed’ stage.
Also read: How To Create a Sales Hubspot Pipeline
6. Connect Your Mail

As mentioned at the beginning of this Pipedrive tutorial, you can connect your email with the popular CRM software.
To do that:
- Visit ‘Mail’ from the panel
- Click on ‘Connect your email’ and follow the easy steps as directed by Pipedrive.
By doing so, you’ll be able to communicate with your leads and customers directly via email yet within Pipedrive.
Also read: How to use Monday.com
7. Manage Activities on Pipedrive

- Navigate over to ‘Activities’ below ‘Mail’. This is where you can view all the activities that you’re assigned.
- Switch between the list view and calendar view as per your convenience. The options are available right next to the panel.
- Sync your calendar with Pipedrive to access the calendar view.
Also read: HubSpot Tutorial for Beginners
8. Add & Manage Contacts

- Below ‘Activities’, we have ‘Contacts’. This is where you can add and manage all your contacts inside the best CRM software.
- To view all the organizations, simply click on ‘Organizations’ below ‘People’.
- To add additional organizations, just tap on the ‘Organization’ button next to the panel.
- Click on ‘Contacts timeline’ to view their activity timeline.
9. Access Insights & Reporting

- Below ‘Contacts’, we have ‘Insights’. This is where you can customize your sales dashboard.
- Share a public link with external parties that want to view some of this information.
- Add the types of reports that you want to display on your dashboard.
- Hover over to ‘My reports’ to access the different types of reports on deal progress, the average value of won deals, products sold, deal duration, activities completed, emails sent, etc.
Here, you have access to both basic and advanced reports.
10. Add & Manage Products

- Below ‘Insights’, we have ‘Products’. This is where you can add and manage all your products.
- Tap on the ‘Product’ button to add a new product. Add details like name, product code, category, unit, unit prices, tax, etc.
- Associate these products with your deals, contacts, and leads.
- Hit ‘Save’
11. Visit Marketplace
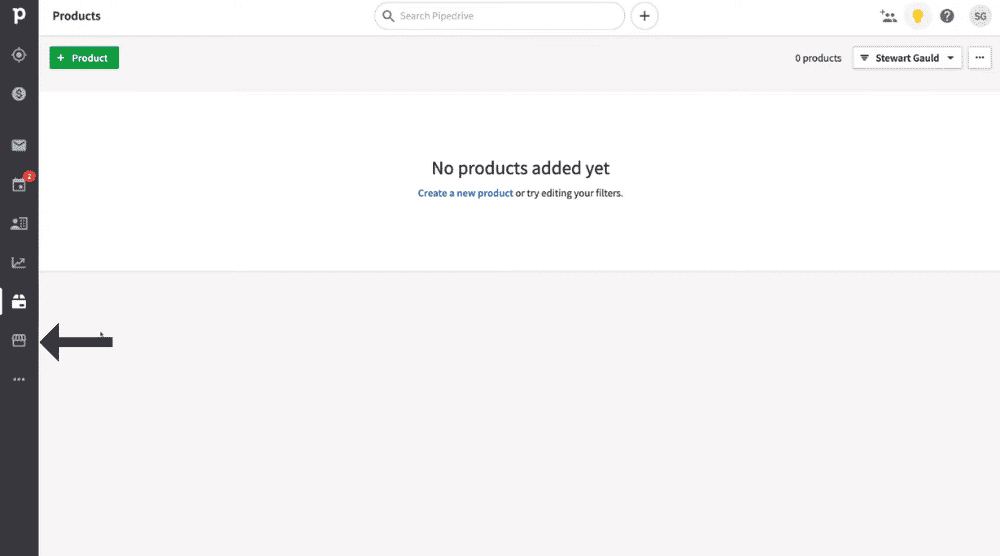
- Select ‘Marketplace’ below ‘Products’.
- This is where you can explore the apps that you can integrate with Pipedrive.
12. Explore Other Features

- Head back to your Pipedrive account
- Click on ‘More’
Here, you can set up automations using Pipedrive for project management.
Workflow automations help you save both money and time. We’ll cover this feature in detail in another tutorial.
Also read: How To Use HubSpot CRM
Pipedrive Tutorial (Video Tutorial)
You can also import and export data as well as access academy videos to help you get more out of Pipedrive.
If you encounter issues or need help navigating Pipedrive, you also have access to the knowledge base which is located below the academy videos.
The additional features also include community and mobile apps.
Pipedrive offers a mobile app that runs on both iOS and Android.
Basically, you can manage your CRM activities across devices.
That covers our overview of one of the best CRM softwares available.
That’s everything you need to get up and running with this incredible sales-focused CRM software.
Stay tuned for an advanced Pipedrive tutorial that will cover more features in the future!
Check out our full video below.

