
Table of Contents
In this ProofHub Tutorial 2022, we’ll introduce you to key ProofHub features to get you up and running with this business management system.
ProofHub is an all-in-one business management system that combines project management and team collaboration features into one convenient tool.
With ProofHub, you don’t need an assortment of standalone tools to manage your teams and business.
You can easily manage projects, files, clients, communication, and more using this software.
How to Use ProofHub?
1. Get Started with ProofHub

- Head over to your browser
- Visit ProofHub to land on their homepage
2. Check Out Pricing
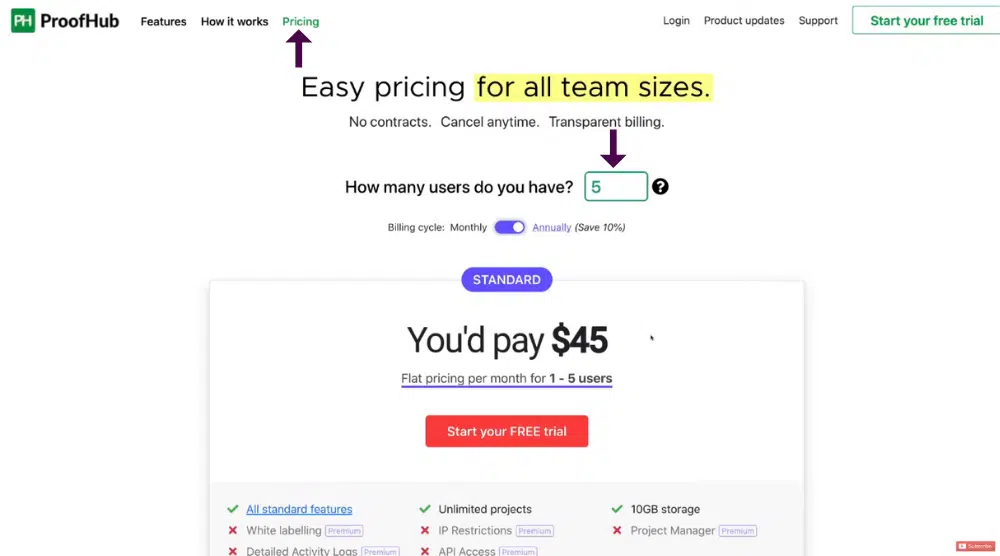
One of the reasons why we love ProofHub is its simple pricing packages.
To check out their prices:
- Hit ‘Pricing’ in the top-left region
- Enter the number of users (refer to the screengrab)
For this ProofHub tutorial, we’ll add five users.
The flat rate for that number of users (1-5) is $45 per month.
You also have access to 10GB of storage.
Most project management software tools require you to pay per user per month.
ProofHub, however, allows you to pay a flat rate instead.
Similarly, if you enter 10 users, the price becomes $90.
For that many users (6-10), you get 20GB of storage.
For every pricing plan, you have access to unlimited projects.
Alternatively, you can opt for a free trial too if you haven’t made up your mind yet.
ProofHub project management also offers premium features like detailed activity logs, API access, white labeling, and more. However, you need at least 11 users to access those.
And for 11-50 users, you’d need to pay a flat rate of $135 per month.
When you unlock the premium package, you also get 100 GB of storage.
To sum up, there are three standard pricing plans offered by ProofHub as mentioned above.
Even larger organizations can add more users and the pricing will increase accordingly.
For this tutorial, we’ll go with the free trial since our purpose is to help you determine if ProofHub is the ideal business management system for you.
Also read: Monday.com Project Automation Tutorial
3. Create ProofHub Account

- Sign up for your ProofHub account
- Enter your details like email, password, name, company name, contact information, etc.
After completing the ProofHub signup, you’ll be taken to your first project.
This is a default project that you’ll be asked to create when you first sign up to ProofHub.
Let’s call this project ‘Website Redesign – Client A’.
The name will be reflected in the top-left corner.
Refer to the screengrab.
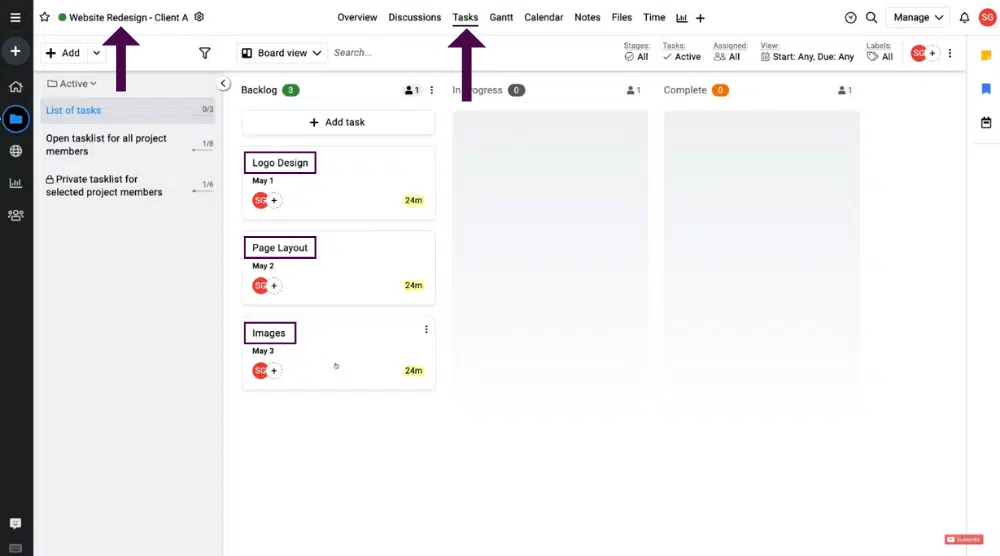
Next to the project name, we have different tabs like overview, discussion, tasks, Gantt, calendar, notes, etc.
By default, the ‘Task’ tab has been selected under which we’ve created three tasks, namely:
- Logo Design
- Page Layout
- Images
Before we talk about ProofHub project management features, let’s dive deeper into understanding more about your account.
Also read: How to use Asana & Manage your Business
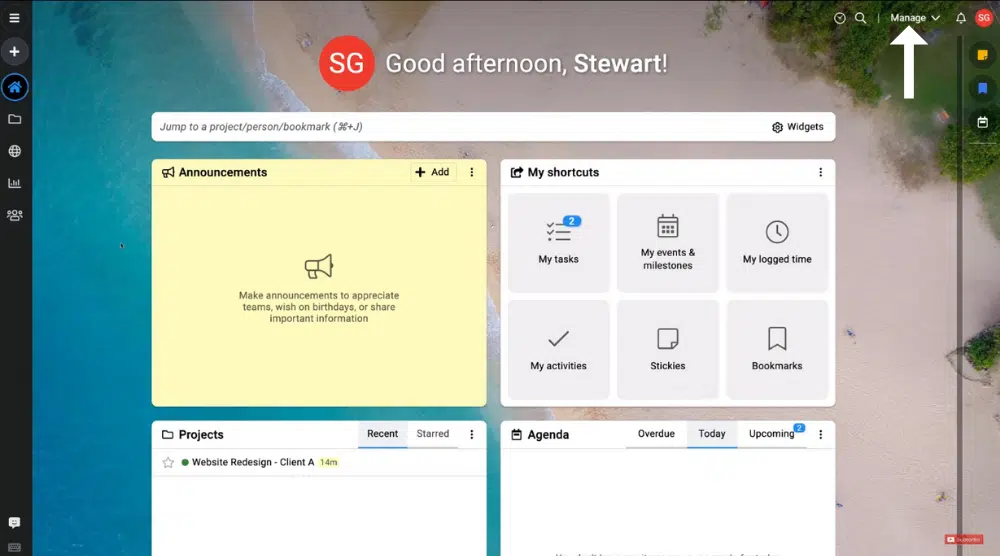
4. Understand Home Dashboard & Navigation

- Hover over to the panel on your left
- Select ‘Me’ which will take you to your home dashboard

- Notice the search bar on the dashboard. Using this search bar, you can jump to specific areas within your ProofHub account. Those could be specific projects and people.
- Back on the dashboard, we have ‘Announcements’. This is where you can share important information, appreciate team members, and wish birthdays.
- To add an announcement, simply enter the title, description, and click ‘Add’.
- Head back to your ProofHub dashboard to locate ‘My shortcuts’. As the name suggests, this is the quickest way to find tasks, events, milestones, activities, bookmarks, and more.
- Below announcements, you can view projects.
- Under ‘Agenda’, you can view overdue, current, and upcoming tasks.
- In the bottom-right corner, you’ll find the option to chat with teams and individuals. You can conduct both one-on-one and group chats here. Not many project management software tools offer this feature. Often, businesses have to use different platforms for team communication, such as Slack.

- In the top-right corner, you’ll notice ‘Manage’. This is where you can manage task labels, workflows, project statuses, project categories, etc. Most of these options in the dropdown are self-explanatory. We’re not going to cover them in this ProofHub tutorial for beginners.
- Make sure the billing and account details are accurate.
- There’s another way to jump to specific areas in your account. And it’s by clicking the three horizontal lines in the top-left corner.
- You can quickly add a task, project, event, note, and announcement by clicking the ‘+’ icon on the left no matter where you are in your ProofHub account.
Convenient, isn’t it?
Let’s learn more about how to use ProofHub:
Also read: Slack Tutorial for Beginners
5. View Projects
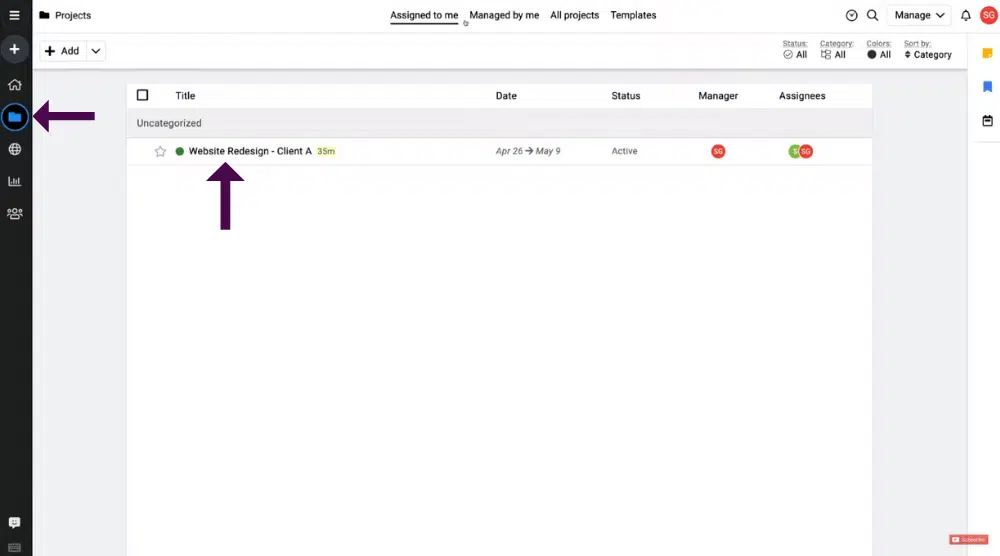
- If you select ‘Projects’ (on the menu), you’ll be taken to the project interface.
- Clicking on the existing project (Website Redesign) will generate a few options like Gantt, calendar, tasks, notes, files, time, report, overview, etc.
Also read: HOW TO USE BASECAMP
6. See Project Overview

If you click on ‘overview’, ProofHub will generate an overview of your project.
It will show you the tasks, time on tasks, milestones, timesheet summary, and the overall progress of the project.
Also read: How to use Monday.com
7. Hold Discussions

See the various tabs at the top?
One of them is named ‘Discussions’.
Click on it to conduct discussions with your clients or teams.
Tap on the ‘Add’ button (on the left) to create a topic for discussion as well as include individuals that are relevant to this discussion.
Moreover, you can attach files, add a description (with formatting options), and pin it at the top.
The discussion can also be made private within ProofHub project management.
Also read: How to use Trello for Project Management
8. Add Tasks & Task Lists

Next to ‘Discussions’, we have the ‘Tasks’ tab. This is where you can view all the tasks related to your project.
- To quickly add a new task, simply hit ‘Add task’. For this ProofHub tutorial, we’ll add another task called Homepage Design.
- Enter the description, choose a date, include tags, and assign individuals for the new task.
- Click on the task to generate more information.
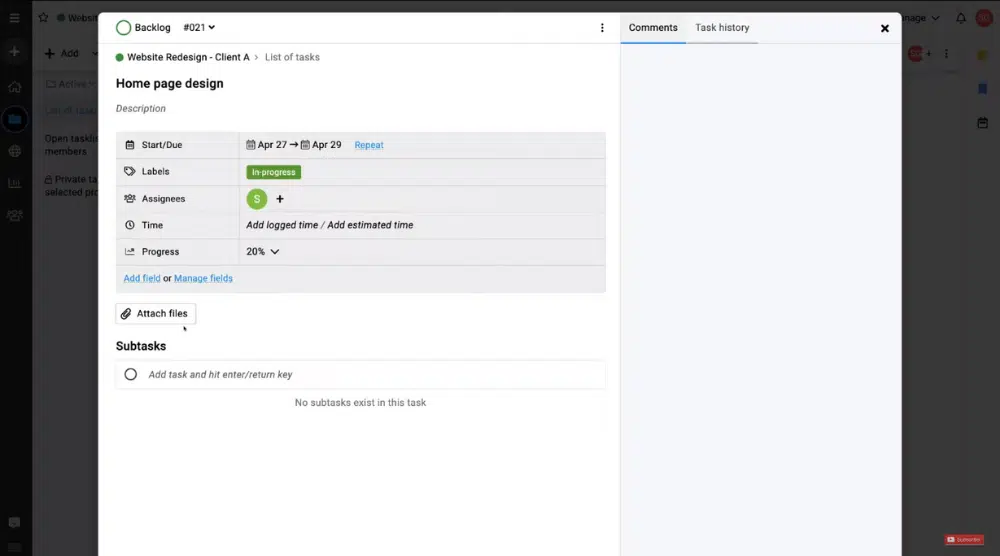
- Go ahead and add a start date/due date, labels, assignees, log time, and progress.
- You can include a new field if needed by selecting’ Add field’.
- You can also attach files and create subtasks (refer to the screengrab).
- See the bottom-right corner. Here you’ll find the option to leave a comment when required.
Note: You never have to worry about saving changes in ProofHub since it’s a cloud-based platform.

By dragging and dropping each task i.e “Home page design”, you can move them through the next stages.
The three stages that you’ll see on the dashboard are backlog, in progress, and complete.
Each project can have several tasks under it. For better organization, you can create task lists within ProofHub by:
- Clicking the dropdown adjacent to ‘Add’
- Selecting ‘List’ from the options

- Adding information like the title, subscribers, subscriber stages, etc.
- Hit the ‘Add’ button.

If you click on the three dots next to the task list name, you’ll find the ‘Edit’ option in case you wish to change something.
You can also manage people associated with the task list.
Also read: How To Use ClickUp
9. Explore Gantt & Calendar

Next to ‘Tasks’, we have the Gantt and Calendar view.
Simply click on the tab to check the respective view types.
Also read: Jira tutorial for Beginners
10. Create Notes

Adjacent to ‘Calendar’, we have ‘Notes’. This is where you can create notes for your clients and teams.
11. Understand Files & Approval Process

To the right of ‘Notes’ is the ‘Files’ tab.
This is where you, your team, and your clients can upload and manage files relevant to the project.
As a manager, you can proofread these files.

If you open a document, you can:
- Leave comments (see bottom-right corner)
- Approve the file (see top-right corner)
- Download the file (next to ‘Approve’)
- Zoom in/zoom out of the document
12. Leverage Time Tracking

Another exciting feature offered by this business management system is time tracking.
It allows you to manage timesheets, and track billable and non-billable hours.
- To the right of ‘Files’ is the ‘Time‘ tab
- Hit the dropdown next to ‘Add’ (see the screengrab)
- Select ‘Timesheet’ or start a timer
13. Access Reports

Next to ‘Time’, we have ‘Reports’.
Here you can view and manage specific reports related to your project.
The layouts are visually pleasing and easy to understand.
14. Add & Manage People

On the left-hand-side panel, select ‘People’ below ‘Reports’.
This is where you can add and manage your teams and clients.
All you have to do is:
- Hit ‘Add’

- Enter the information concerned with the team member or client (name, email, role, etc.)
If you select the admin role, that person can view and manage all the projects.
On the other hand, if you select the ‘Normal User’ role, then that person can view and manage a specific project.

You can also create groups by clicking ‘Add’ and selecting ‘Group’ from the dropdown.
These groups can be internal teams, departments, or external teams.
You just have to name the group and assign team members.
Refer to the screengrab for better understanding.
15. ProofHub Integrations
The last ProofHub feature we’re going to talk about is integrations.
- Click the dropdown next to ‘Manage’ (far-right)
- Choose ‘Apps/integrations’ from the options

- Go ahead and install the necessary ProofHub integrations, such as Google Drive, Box, QuickBooks, OneDrive, FreshBooks, etc.
Unfortunately, ProofHub lacks extensive integrations, unlike Trello, Monday.com, Asana, and other project management software.
However, that is compensated by the numerous features built into the ProofHub platform!
ProofHub Tutorial for Beginners (Video Guide)
With this, we conclude the ProofHub tutorial 2022.
If you are a beginner and want to have a more detailed visual understanding of ProofHub, we have a video tutorial just for you.
Let us know if you have any feedback or questions in the comments below.
