
Table of Contents
Monday.com provides one of the best project management automation tools on the market.
You can either choose from pre-made automation templates or create your own automation with Monday.com to fit your specific workflow automation requirements.
In this Monday.com Project Automation tutorial for beginners, we’ll share how to automate project management activities.
Also, have you heard of Monday.com CRM? Check out my honest Monday.com CRM review here.
How to Automate Project Management Activities With Monday.com?
Step 1: Getting Started with Monday.com
To begin with Monday.com automation:
Get started with Monday.com for FREE here
*The link above is an affiliate link, which means we will get a commission if you upgrade to a paid plan (at no extra cost to you). This helps support our education-based website and we thank you in advance!
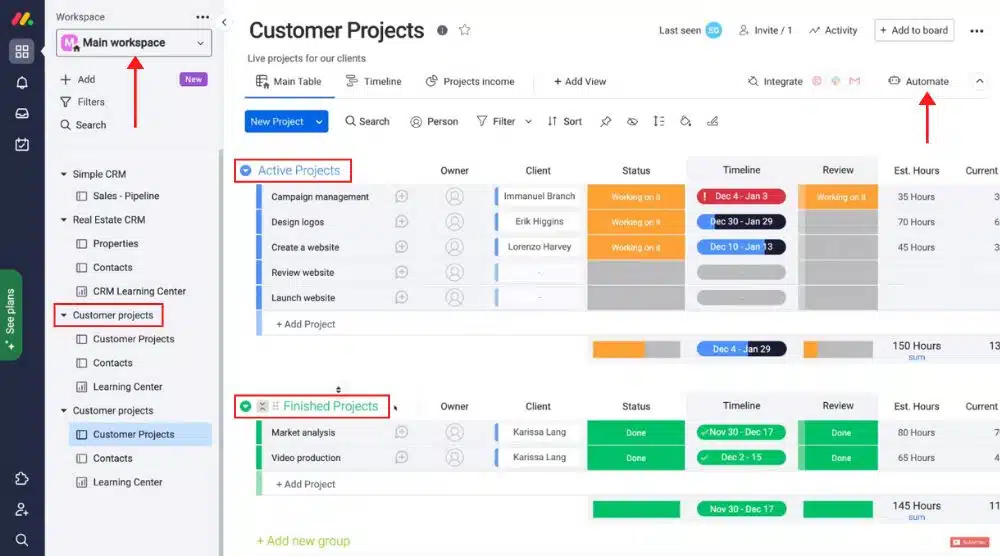
- Login to your Monday.com account. Choose the workspace and your project board that you want to automate.
- Notice that we have active projects and finished projects as seen on the dashboard (refer to the screengrab). Within each group, we have tasks.
- Navigate over to the top-right corner and click ‘Automate’.
Note: If you wish to make the most out of Monday.com automation, you need to upgrade to at least their Standard plan (at $10 per user every month).
Before we go ahead and create our first Monday.com automation, it’s important to understand a few terminologies first.
Your automation is comprised of a trigger, a condition (there can be multiple conditions), and an action (you can have multiple actions as well).
This is how project automation works:
- The trigger initiates the com automation.
- The condition helps you determine what you’re changing.
- The action is the outcome of your project automation.
These are the three main terminologies of Monday.com automation.
Refer to the screengrab to understand the structure or how it works.
Let’s understand where and how you can leverage pre-made automation!
Read more: How to use Monday.com
Step 2: Selecting a Pre-made Automation Template
- Hover your cursor on the left-hand side menu.
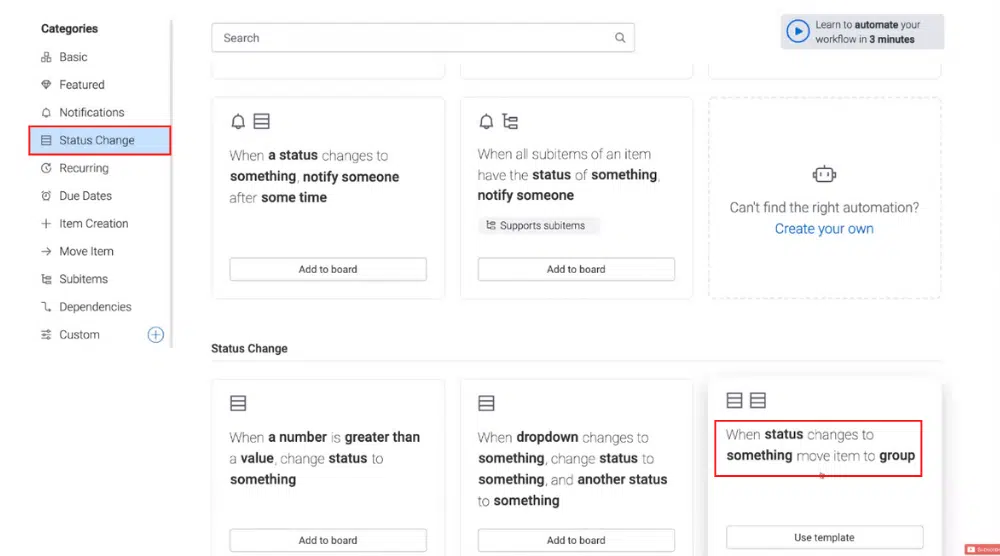
- Notice the many categories, such as status change, recurring, notifications, features, due dates, item creation, move item, subitems, dependencies.
- Select any of the given categories like ‘Status Change’ for this com tutorial for beginners.
- Under each category, there are many pre-made automation templates that we can use in our board.
- Let’s pick an automation template named “When status changes to something move item to group” by clicking ‘Use template’.It’s time to create a Monday.com automation!
Step 3: Creating a Monday.com Automation

- Navigate over to ‘status’, which is the trigger that will initiate the automation
- Click on it and tap ‘Status’
- Click on ‘something’ (which is the condition) and select ‘Done’ from the drop-down
- Click on ‘group’ (which is the action) and pick ‘Finished Projects’ from the drop-down. Remember we have two groups within our project board.
Refer to the screengrab to view what the final Monday.com automation will look like.
When you are ready to create it, tap the ‘Create Automation’ button.
However, in this Monday.com tutorial for beginners, we’ll go a step further by creating multiple actions.
To do that:
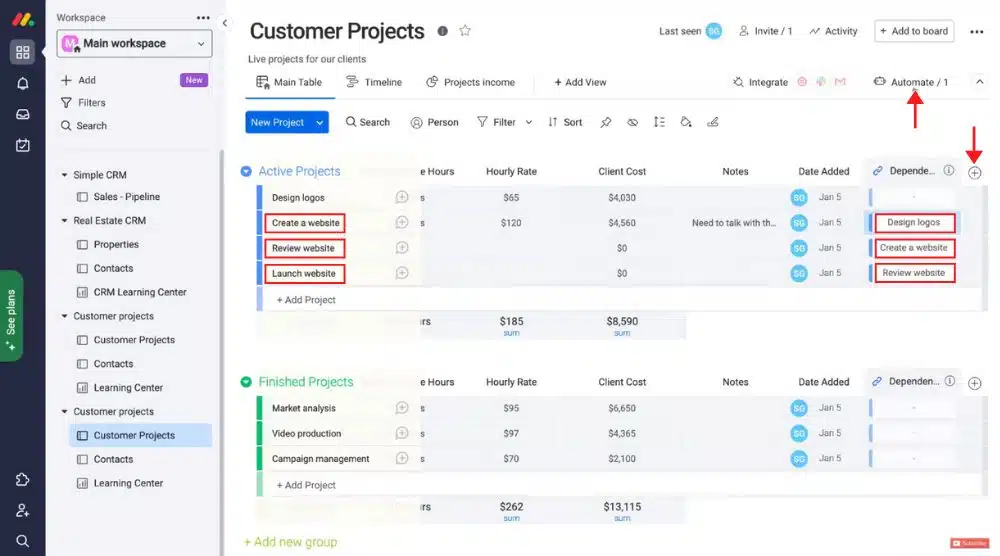
- Hit the ‘+’ icon next to the existing action, i.e., ‘Finished Projects’.
- Pick another action from the drop-down, like create an update, send an email, assign person, notify, change status, or move the item to the group. You may also click on the ‘More options’ area.
- For this tutorial, we’ll select ‘notify’ because we want to notify someone as soon as the ‘status’ changes to ‘done’ and the item is moved to ‘Finished Projects’.
- Click on ‘notify’ and customize a message to notify an individual. You may also auto-populate fields from the board items. That’s how you create a custom notification.
- Next, select ‘someone’ and add the individual who needs to be notified. In this Monday.com tutorial for beginners, we’ll select ‘Team Member’ and then pick the appropriate teammate.
We now have one trigger, one condition, and two actions.
By clicking the bin icon, you can delete these at any time. It’s time to click ‘Create Automation’ and understand how it works in real-time.
On your project board, you’ll observe that you have one active automation.
You may now exit out of it.
Step 4: Testing the Newly Created Automation

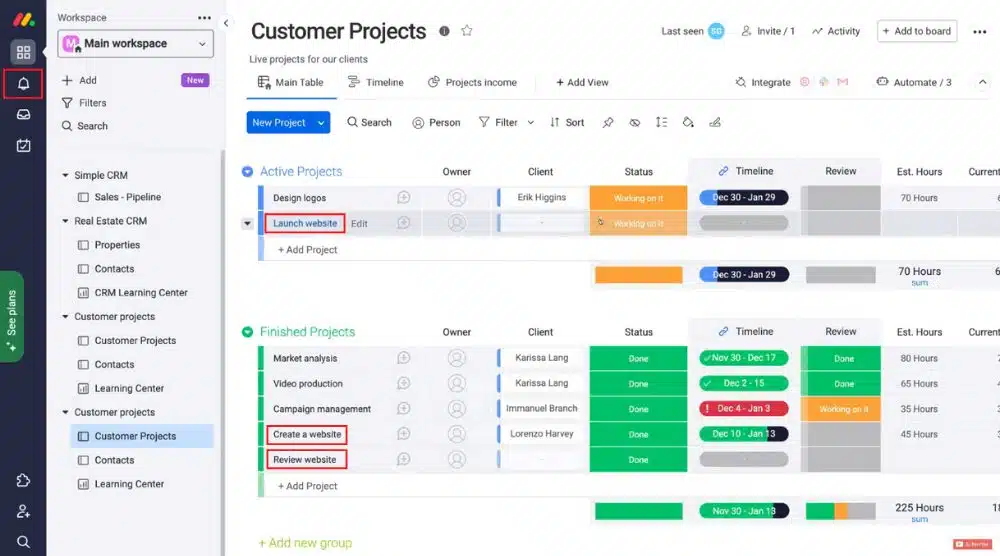
- Change the status of one of your tasks to ‘Done’. For this Monday.com automation tutorial, we’ll change the status of the ‘Campaign management’ task by just clicking the current status (which is ‘Working on it’) and selecting ‘Done’ from the menu that appears as a result.
- As soon as you change the status, the item ‘Campaign management’ will be moved to the ‘Finished Projects’ group automatically.
- Click on the bell icon on your left (refer to the screengrab) to view your notifications. You’ll find a notification regarding the latest status change of your task. This notification is automated as well since earlier in this tutorial, we had created a second action for this condition.
- Navigate over to ‘Automate’ in the upper-right portion of your dashboard and click on it.
- Tap on the ‘Automation Center’ tab. Go through all the different categories for premade automation templates.
- Alternatively, you may select ‘Create Custom Automation’ to create project automation from scratch. This is where you can choose your own trigger, condition, and actions that you want to create.
- Click ‘Back to automations’ in the upper-left corner and exit out of automation altogether.
It’s time to cover automation dependencies in this project management automation tutorial.
Step 5: Setting Up Automation Dependencies
In the current example, the task ‘Create a website’ is dependent on the preceding task called ‘Design logo’, which means that the preceding task has to be completed first for the next task to begin.
Similarly, ‘Review website’ is dependent on ‘Create a website’, and ‘Launch website’ is dependent on ‘Review website’.
Now, to create automation dependencies:
- Scroll across your project board and click on the ‘+’ button to add a new column (refer to the screengrab)
- Select ‘More columns’
- Type in ‘dependency’ in the search bar
- Under ‘Board Power-Up’, you’ll find ‘Dependency’. Click on ‘Add to board’.
- Tap on the ‘Connect Columns’ button
- Locate the task ‘Launch website’ and click on the dependency on the far right-hand side
- Select ‘Review website’ from the options
- Locate the ‘Review website’ task, and click on the dependency on the far right-hand side
- Select ‘Create a website’ from the options
- Locate the ‘Create a website’ task, and click on the dependency on the far right-hand side
- Select ‘Design logos’ from the options
- Click on ‘Automate’ in the upper-right portion and select ‘Automation Center’
- Locate ‘Dependencies’ on the left-hand side menu and click on it
- Select an automation template named “When a status changes to something, change the status of its dependency to something” by clicking ‘Add to board’.
- Click on ‘Status’ and select ‘Status’ from the drop-down (the trigger)
- Click on ‘something’ and select ‘Done’ (the condition)
- Click on ‘dependency’ and select ‘Dependent On’ (the dependency)
- Click on ‘something’ and select ‘Working on it’
- Select ‘Add to board’ in the bottom-right corner
This automation will change the ‘dependent on’ task to ‘working on it’ once the first task has been completed and changed to ‘Done’.
Next, we will test the dependencies in this Monday.com tutorial for beginners.
Step 6: Testing the Dependency Automation
Head back to your project board and follow these steps:
- Locate the task ‘Create a website’ and change its status to ‘Done’
- This task will be moved to ‘Finished Projects’ automatically as per our first Monday.com automation. Also, the status of the next task, which is ‘Review website’ will be changed to ‘Working on it’ (again automatically). This is according to the dependency automation we created in the preceding section.
- Click the bell icon to view the notification for the first status change. This is based on our first automation for which we created two actions.
- Similarly, you can check the dependency for the next task ‘Review website’ as well. As soon as you change its status to ‘Done’, it will be moved to the finished projects, and the status of subsequent task ‘Launch website’ will be changed to ‘Working on it’.
Monday.com Tutorial for Beginners (Video Guide)
You now know how to automate your project management activities!
We hope, by reading this Monday.com tutorial for beginners, you’ve learned how to automate project management tasks successfully.
If you require a more detailed explanation step-by-step guide, then we have a video tutorial that will take you through this process.
Enjoy the video and if you have any questions, let me know!
