
Table of Contents
Importance Of Social Media Management Software
Social media is an integral part of building a brand online today.
Businesses today can simply create content to distribute across multiple social media platforms for driving brand awareness, business, product or service information, and sales.
However, managing so many social media platforms simultaneously is not easy – even for social media managers who are usually entrusted with this job.
The process of creating and distributing content can be costly and time-consuming which can negatively impact the business’s productivity.
If you are in the position where you are handling these social media channels yourself or have hired a social media manager, there’s no doubt that a social media management tool like Zoho Social will make your life a whole lot easier!
A platform like Zoho Social will help you streamline your social media marketing activities.
Zoho Social: Managing Your Social Media Accounts In One Place
In this tutorial, you’ll learn how to use Zoho Social to better manage your social media activities.
You’ll save both time and money using this free social media management software.
1. Get Started with Zoho Social

Zoho Social is one of the many dynamic products offered by Zoho.
You can check out more Zoho tutorials below:
- Zoho Desk Tutorial for Beginners
- How to Use Zoho Projects
- How to Use Zoho Mail
- Zoho CRM Tutorial for Beginners
First, we need to sign up for free in order to get started with this Zoho Social tutorial:
Get started with Zoho Social for FREE here
*The link above is an affiliate link, which means we will get a commission if you upgrade to a paid plan (with no extra cost to you). This helps support our education-based website and we thank you in advance!
- Let’s go ahead and sign up
- Keep ‘For Businesses’ selected (refer to the screengrab)
Read more: Zoho CRM Tutorial for Beginners
2. Complete The Sign Up Process
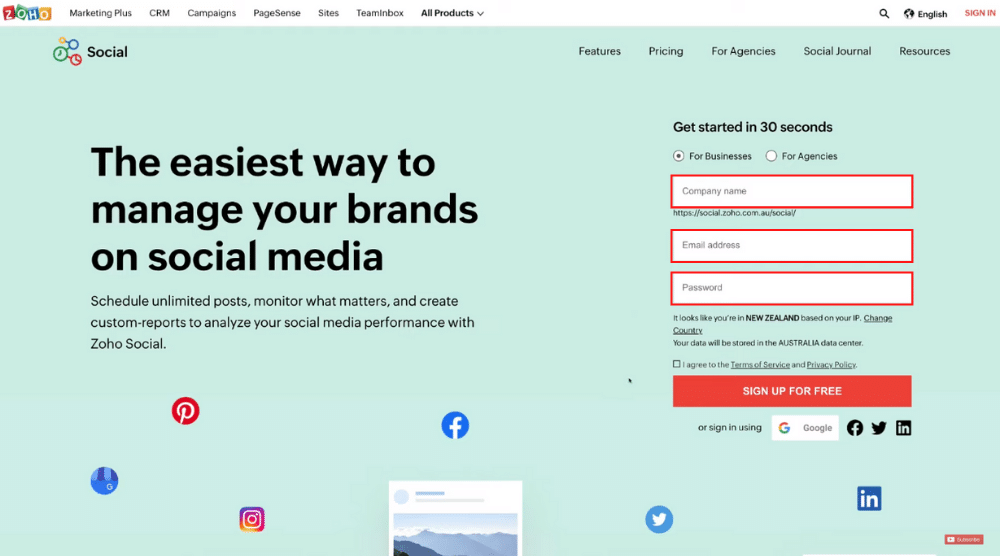

- Enter your company name
- Type in your password and email
- Check the ‘Terms of Service’ box
- Click on ‘Sign Up for Free’
You can also sign up/sign in using your Google, Facebook, LinkedIn, or Twitter account.
For this Zoho Social tutorial, we’ll sign up with Google.
- Pick a Google account of your choice
- Select ‘Try Zoho Social Now’
Under its free plan you have access to the following:
- one team member can access your account
- one business can publish across up to seven social media channels
- access the zShare browser extension (The extension allows you to share content directly to your connected channels within Zoho Social)
In our opinion, the free Zoho Social plan is perfect for small businesses.
Now, follow these steps listed:
- Choose your core social media objectives (refer to the screengrab). For this Zoho Social tutorial, we’ll select ‘Publishing/Scheduling’
- Enter a company size
- Enter a contact number
- Hit ‘Take me in’
Read more: Zoho Projects | Online Project Management Software
3. Connect Social Media Channels
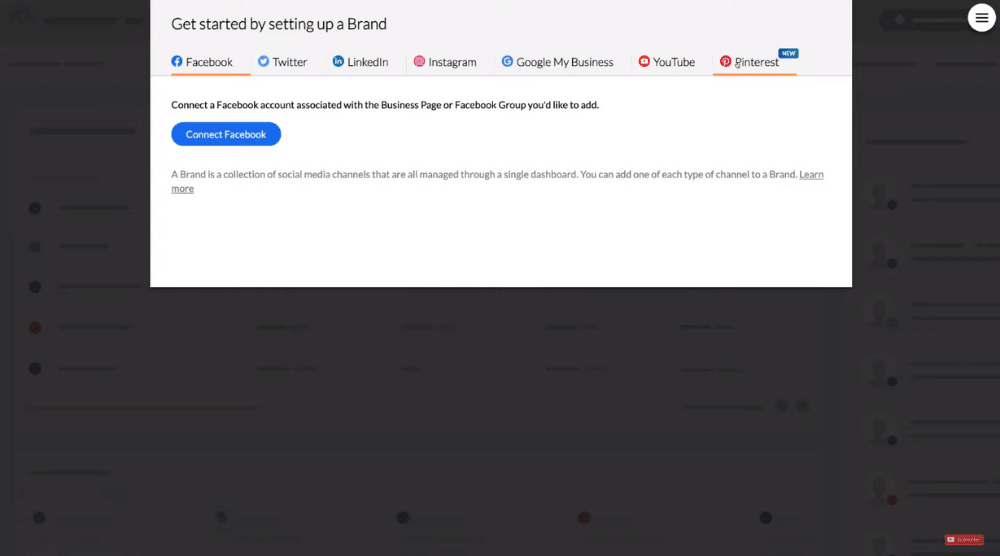

Since this is a fresh Zoho Social account, we now need to link relevant social media channels with it.
It’s a pretty straightforward process and all you have to do is click ‘Connect Facebook’ or ‘Connect Twitter’, etc. to connect your social media accounts with Zoho Social.
Zoho Social will guide you through the next, easy steps.
Alternatively, you can select ‘Connect Later’ and do this later on. This brings us to the next part of our Zoho Social tutorial.
Read more: How To Use Zoho Mail
4. Invite Team Members
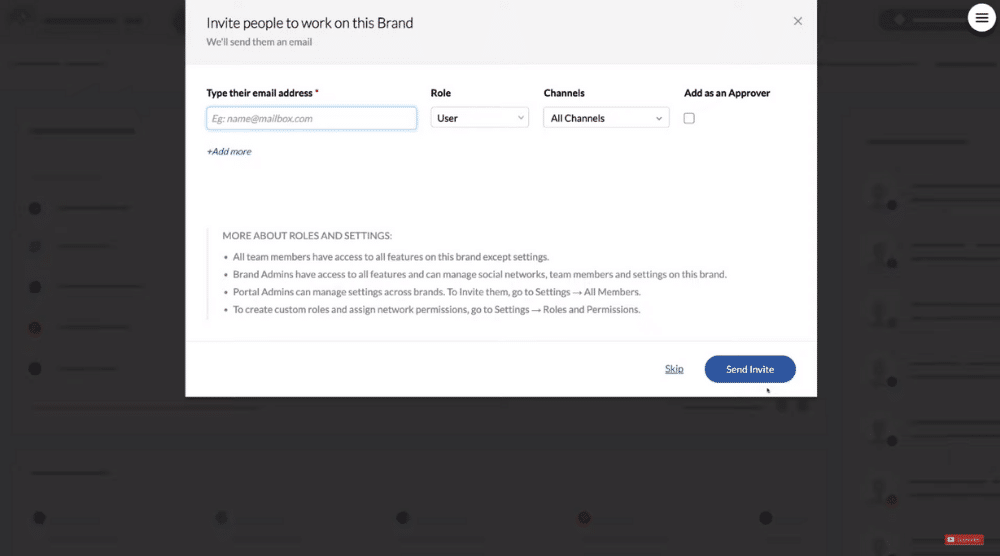

After connecting your socials, you can now invite team members to Zoho Social.
However, only one person (i.e., you) can access the account using the free plan. Therefore, we’ll click on ‘Skip’ for now.
You will find yourself inside the Zoho Social account.
Read more: How To Create FREE Business Emails with Zoho Mail
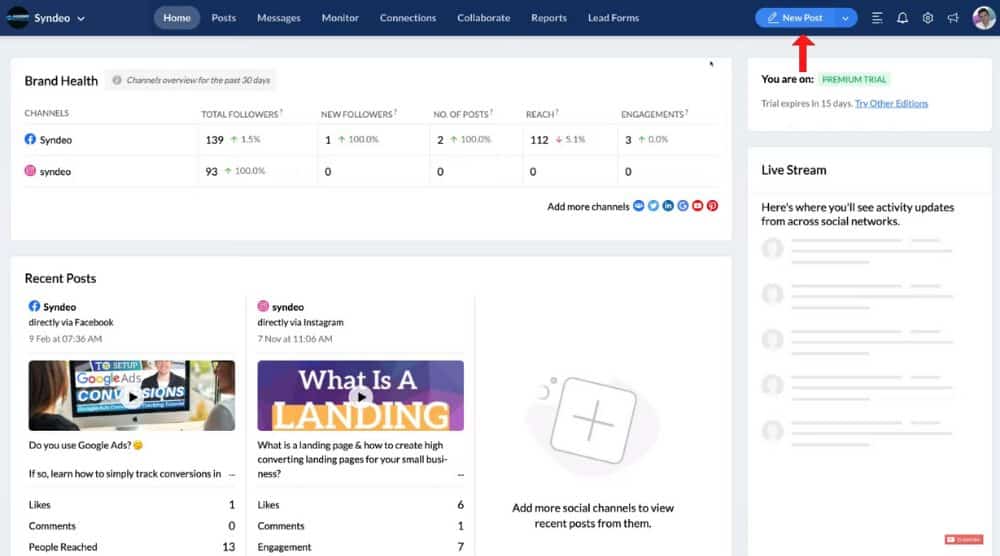
5. Navigate the Home Dashboard
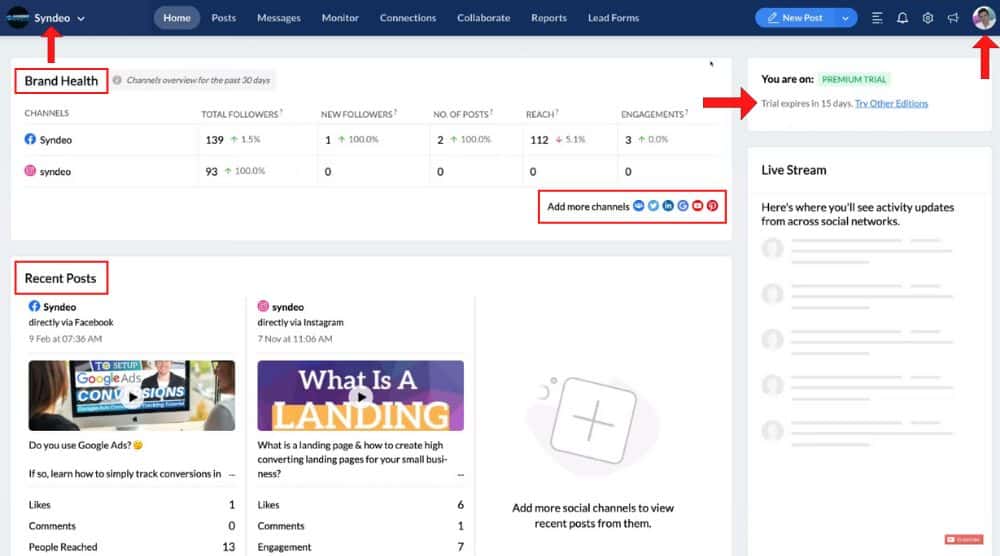

Inside your home dashboard, you can view:
- Brand health: This is where you will see your connected social media accounts within the free social media scheduling tool.
- For each channel, you can see basic analytics. This includes total followers, new followers, no. of posts, reach, and engagements.
- Below the analytics is where you can connect more social media channels with Zoho Social. Remember, you can link up to seven channels with the free plan.
Again, the process is quite simple and it only takes a few clicks to connect social media channels.
In the upper-left corner, you’ll find your brand name.
Here you have the option to add a new brand if you like.
However, you won’t be able to add another brand under the free plan.
(Therefore, if you are an agency then you will need to upgrade to a paid plan depending on how many accounts you manage).
On your home dashboard, you will also find:
- Recent posts on your linked social media accounts
- Basic information below each post, including the number of likes, comments, link clicks, engagement, etc.
- The trial period is in the upper-right corner. When that ends, you’ll be automatically downgraded to the free plan.
However, you can also try premium features during the trial period by:
- Clicking on your profile (see top-right corner)
- Selecting ‘Try Other Editions’
From there, you can try other paid plans offered by this free social media management software.
You are now ready to create posts within Zoho Social.
6. Create Posts

- Navigate up to ‘New Post’ and click on it (see top-right corner) or tap on the drop-down next to ‘New Post’ and select ‘Bulk Schedule’
- Draft your post and add images/videos
You can either upload images/videos from your desktop, media library, cloud picker, or you can design your posts on Canva.
If you’re unfamiliar with Canva, watch this tutorial to learn how to create graphics with this incredible free and easy-to-use design tool.
Simply use Canva’s drag-and-drop design experience and access the thousands of premade templates to create your posts in minutes.
Now, by clicking the image icon, you can attach graphics to your post too.
![]()
- Next to the image icon, we have ‘Instagram First Comment’. This will allow you to add the first comment to your Instagram post. This is important if you wish to kick-start the engagement on your Instagram post.
- You can also insert emojis into the post.
- Next to emojis, you have the option to insert alt text as well.
- At the top, you’ll notice the social media profiles that you have selected to publish your posts simultaneously on. By clicking on any of them, you can deselect the profiles if you do not want to share on a specific social media platform.
Depending on the social media profiles you choose, there might be some limitations.
For example, if you choose the Instagram Business account, you’re permitted to select only one image.
You now have the following options:
- Publish the post
- Schedule the post for a specific date and time (you can also choose ‘Repeat this Post’ if you like)
- Add it to the queue – this helps you avoid overlapping the content
- Choose a SmartQ Slot – this allows Zoho Social to post your content based on the time your audience is most active
- Save as draft
7. Manage Posts
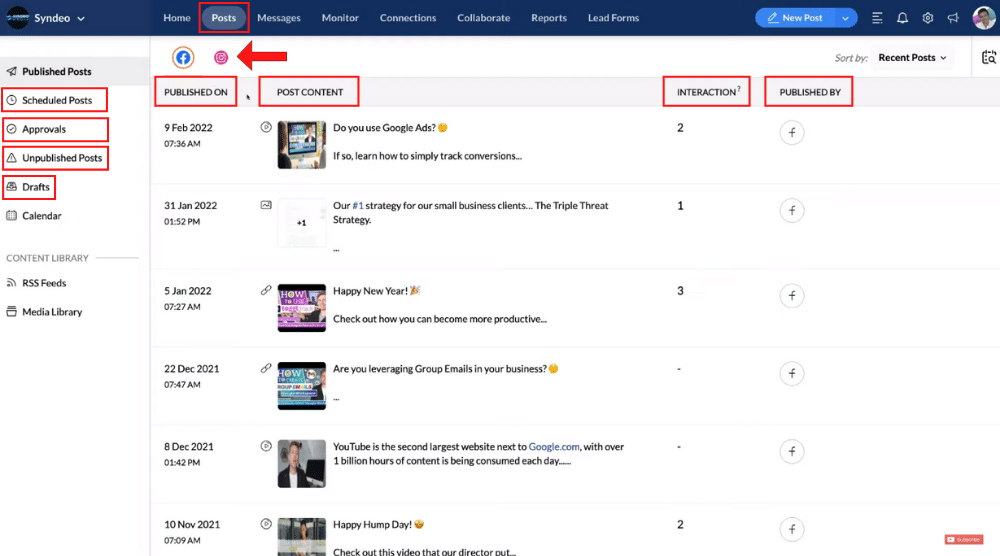

- Click on ‘Posts’ next to ‘Home’. This is where you can view and manage all your posts.
- Notice the post content, published date, interaction, and published by (the social profile) for each post
- At the top is where you select the social media account to view and manage respective posts (refer to the screengrab).
- Below ‘Published Posts’, we have ‘Scheduled Posts’ on the left. As the name suggests, this is where you can see the scheduled posts using the social media management tool.
- Below ‘Scheduled Posts‘, you can view ‘Approvals’, ‘Unpublished Posts’, and drafts
8. View Content Calendar
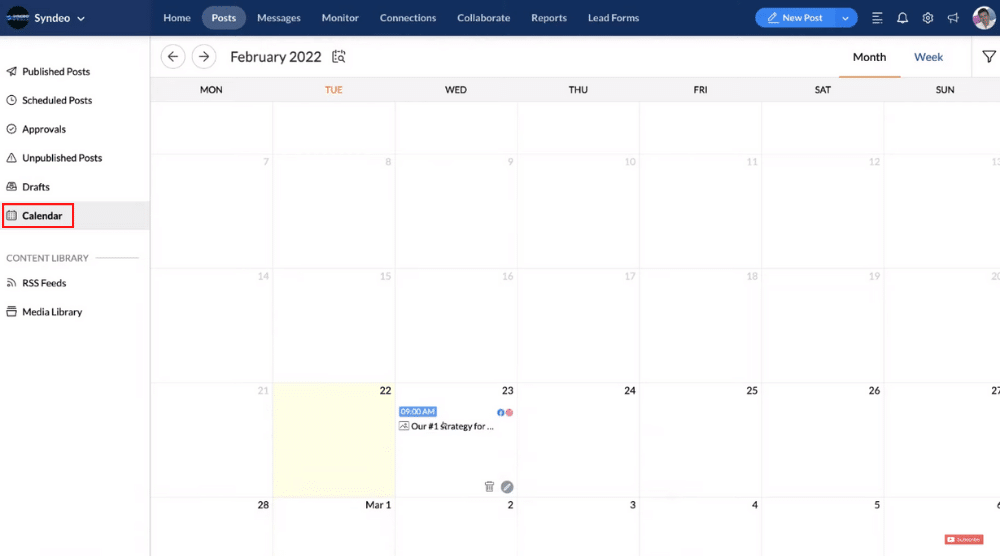

- Under the ‘Posts’ tab, you’ll find ‘Calendar’ (refer to the screengrab). Click on it.
- The above step will take you to a social media marketing calendar. Here you can see the calendar view of your schedule
9. Manage Messages
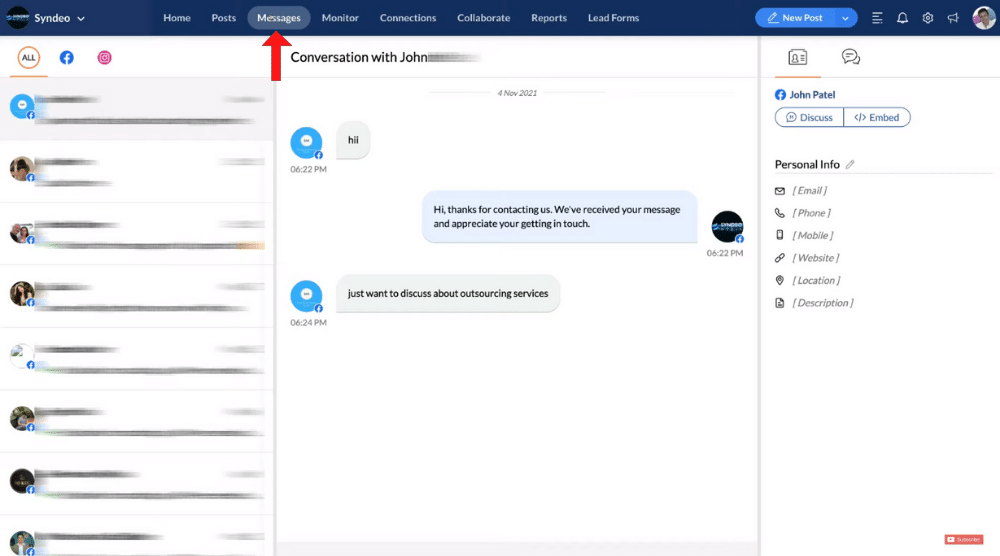

Next to the ‘Post’ tab, we have ‘Messages’.
This is where you can manage all the messages across the linked social media accounts.
Read more: Zoho Desk | Best Customer Service Software
Beginner’s Tutorial to Zoho Social (Video Tutorial)
Without a doubt, Zoho Social is a powerful, free social media management software.
Using this all-in-one social media management tool allows you to simplify your life, improve productivity, and use the remaining time on other key aspects that are important to you when running your business.
This wraps up our beginner’s tutorial on Zoho Social.
Check out our full video guide down below if you need more guidance to getting started with Zoho Social.
