In this updated Asana tutorial for beginners, we’re going to share how to use Asana to better manage your teams, tasks, and projects all on one dynamic platform.
Asana is an all-in-one free project management software designed to be your team’s online workspace.
You can communicate, collaborate, delegate and manage projects or tasks using Asana project management software.
Small businesses or individuals can leverage its free plan, which allows access for up to 15 users to all the essential features needed to manage day-to-day activities.
How to Use Asana to Manage Projects for FREE?
Okay, let’s get you up and running with Asana in this Asana tutorial for beginners.
Step 1: How to Sign-up to Asana with Basic Plan
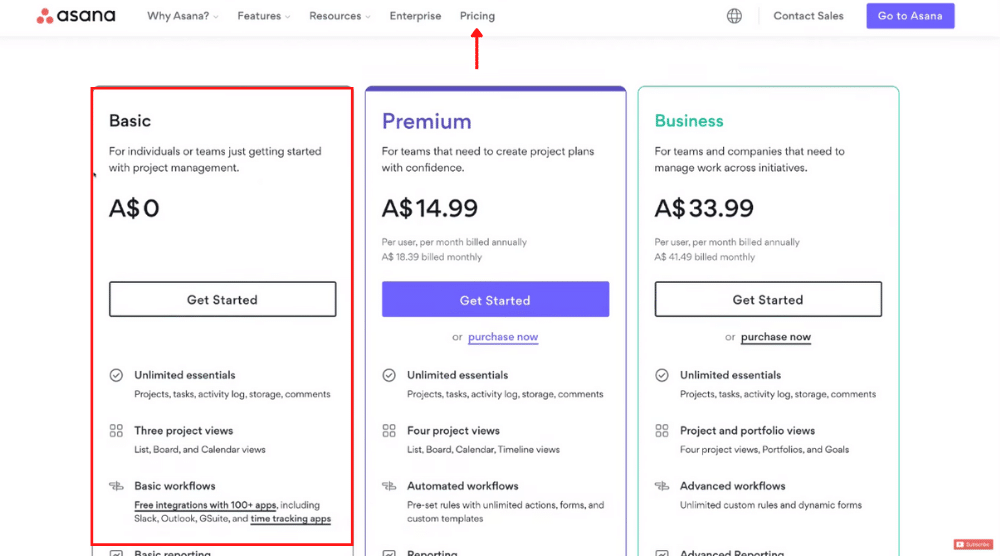
To begin, head over to www.asana.com.
For this Asana tutorial, we’re going to use the web version (however, you can also download the app on IOS and Android).
To complete the initial setup:
- Click ‘Pricing’ at the top if the page.
- Head over to the Basic plan.
Under this plan, you’ll get unlimited essential features (tasks, projects, activity log, comments), 15 users, and more.
- Select ‘Get Started’.
- Answer a few basic questions.
- Simply add your teammates.
- Select your project type.
Once you’ve completed these steps, you’ll have finished the inital set up of your Asana account!
However, we’re going to cover features such as adding teammates and selecting the project type later in this Asana tutorial for beginners.
After you’ve completed the initial sign-up of your free Asana account, you’ll arrive at the Asana dashboard.
Read More: How To Use Asana
Step 2: Explore the Asana Dashboard!
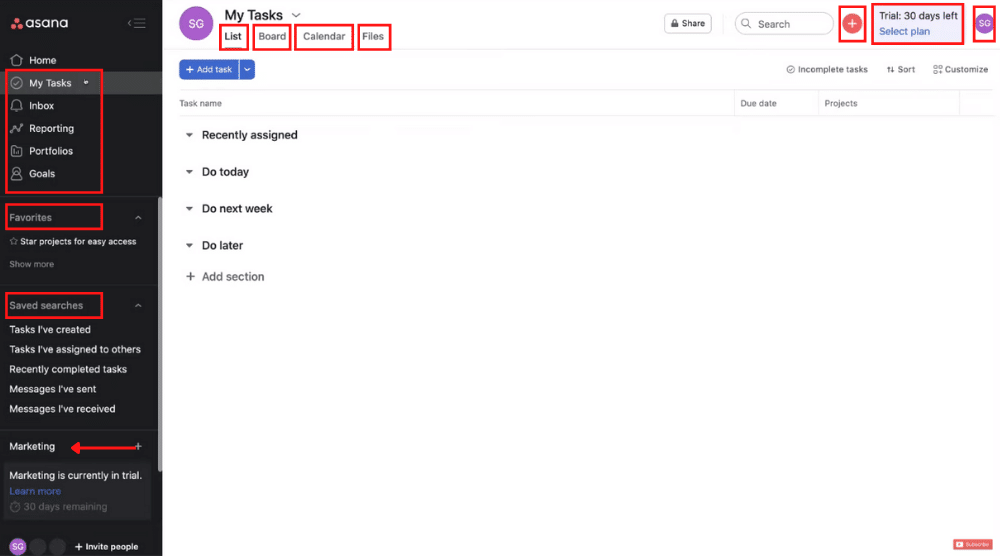
Let’s go ahead and show you around the Asana dashboard:
- In the upper-right corner, you’ll find the Asana account settings.
- Next to that, you have the trial period.
If you don’t upgrade to a paid plan of your Asana project management account after the trial period ends (30 days), your free plan will be activated.
- Now, if you click the plus (+) icon next to this, you can create tasks & projects, send messages, and invite team members to join Asana.
- Click ‘My tasks’ on the left-hand menu to view your current, completed, and upcoming tasks or activities.
- Add a section or milestone if you like (refer to the screengrab).
- Apart from that, you can choose the view type.
The options for the view types are: List, board, or calendar view.
- Under ‘Files’ you can view all the attachments associated with your tasks.
To view and reply to your messages:
- Click ‘Inbox’ on the menu.
- Below ‘Inbox’, you’ll see ‘Reporting’.
This is where you can access real-time data related to your projects, teams, and tasks.
Now, to monitor the status of your projects/tasks and team-member workload:
- Click ‘Portfolios’ on the left.
When you need to set strategic goals for your organization:
- Navigate over to ‘Goals’ on your left.
These goals can also be set for selected team members.
- Back on the navigation menu, you can ‘star’ projects to add them under ‘Favorites’.
- Under ‘Saved searches’ you can view your recent activities.
- Below that, you can see your workspace and your teams and projects within it.
For the purpose of this Asana project management tutorial, our workspace is called ‘Marketing’ (refer to the screengrab).
Additionally, our project for this Asana tutorial for beginners is named ‘Brand redesign campaign’ (which we selected during the initial setup).
Step 3: How to Invite Teammates to Asana
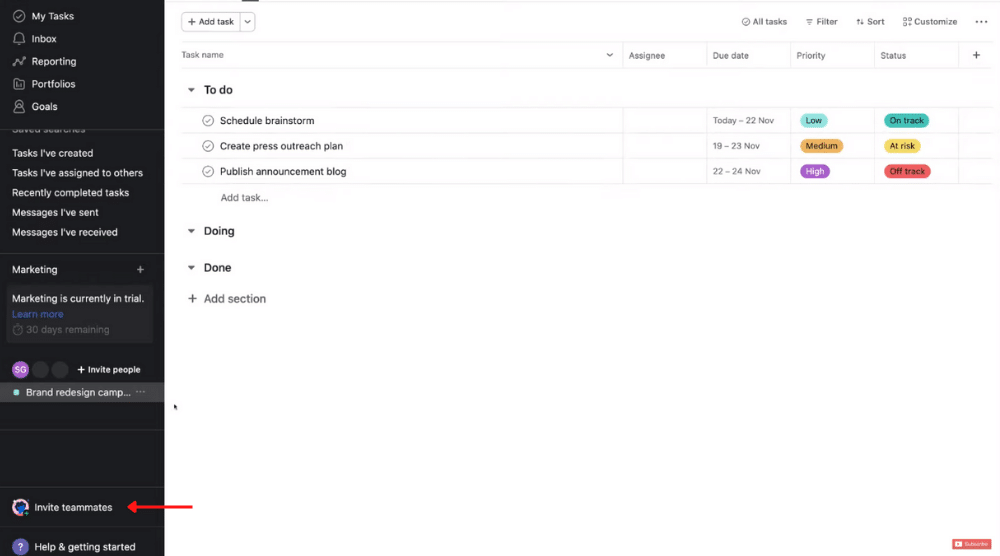
To collaborate with your teammates using Asana for project management:
- Click ‘Invite teammates’ at the bottom of the navigation menu.
- Add the email addresses of your team members .
Remember, you can invite up to 15 teammates under the free plan.
- Choose a starting project that your teammates will see as soon as they log in to Asana.
- Even if you don’t currently have a project, click ‘Send’ to invite your team.
Before we go ahead and create our first project in this Asana tutorial for beginners, you’ll need to understand the structure of how Asana works.
This is the project structure that is important to remember:
Workspace (or team) > Projects > Sections > Tasks > Subtasks
Step 4: How to Create Your First Project within Asana
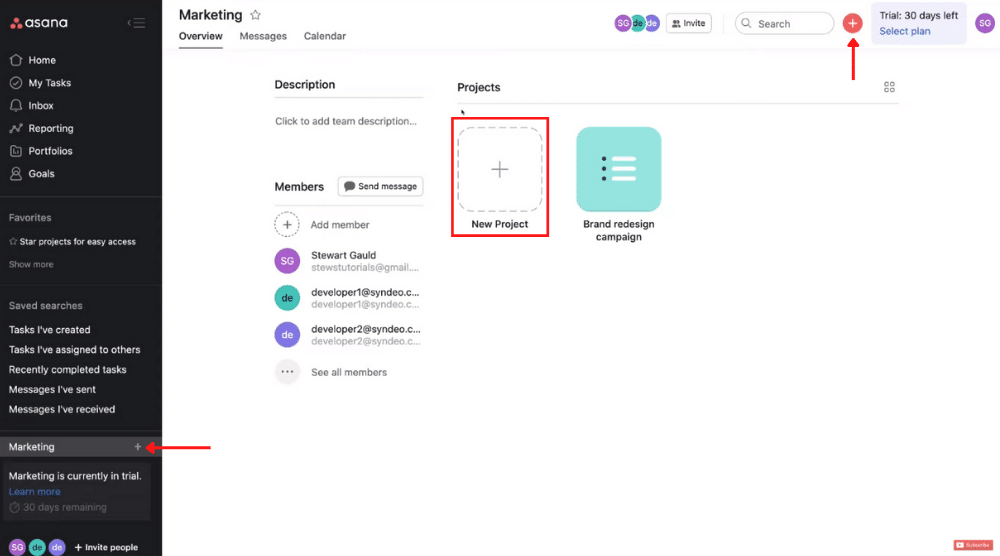
There are multiple ways to create projects using Asana project management software.
To create a project using the first method:
- Click on the ‘+’ icon (see upper-right corner).
- Select ‘Project’ to begin your first project.
In the second method, you need to:
- Click on the ‘+’ icon (see the navigation menu on your left).
- Select ‘Use a template’ from the drop-down.
Here you can choose from Asana’s pre-made project workflows and simply start customizing the one you like.
- Click ‘Blank project’ if you’d like to start from scratch.
In the third method:
- Click on your workspace (‘Marketing’ in this case).
- Select ‘New Project’ on your right, or customize an existing project.
- You can also see the team members that are part of this workspace.
- Add a description for this workspace if you like.
- Next to ‘Overview’, you can check out your messages and view your calendar.
If you click on ‘New Project’, you’ll again need to choose any of the three options:
- Blank project.
- Use a template.
- Import spreadsheet.
In this Asana tutorial, we’re going to create a project from scratch, so we’ll choose ‘Blank project’.
Next:
- Name your project.
For this Asana project management tutorial, we’re going to create a project for a web design client.
Hence, our project will be called: Client A – Website Project.
Once you’ve chosen your project:
- Under ‘Privacy’, either choose ‘Public to Marketing (our team in this case)’ or
- ‘Private to project members’.
We’re going to keep the former selected.
You can then choose a layout view from any of the four options:
- List.
- Board.
- Timeline.
- Calendar.
However, it’s important to note that the ‘timeline’ default view is a paid feature.
Since this is a free trial, you can utilize this feature for 30 days.
We’re going to keep the ‘list’ view selected and hit ‘Continue’ for the purpose of this Asana tutorial for beginners.
You can now:
- Start adding tasks.
- Set project context.
- Share with teammates.
We’ll go with the first option and select ‘Go to Project’.
Step 5: How to Create Sections and Tasks
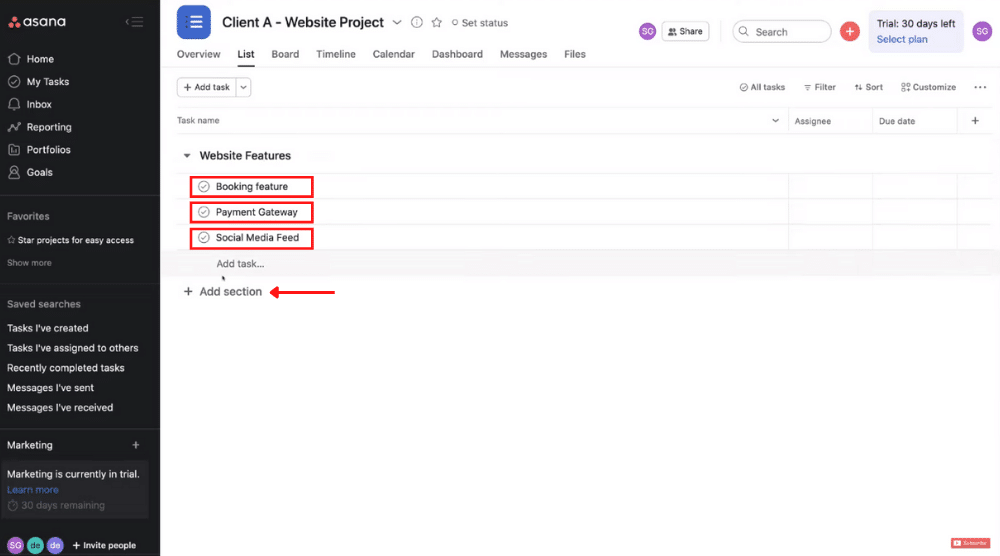
Within your project, you can create sections.
These could be different stages within your pipeline, your workflow, or it could be different sections of a project.
The first feature we’re going to add using Asana for project management is ‘Website Features’.
For this section, we’ll create three tasks:
- Booking feature.
- Payment gateway.
- Social media feed.
Using the same process, you can create multiple sections and tasks under them (refer to the screengrab).
Also Read: Slack Tutorial for Beginners
Step 6: How to change your Project Views
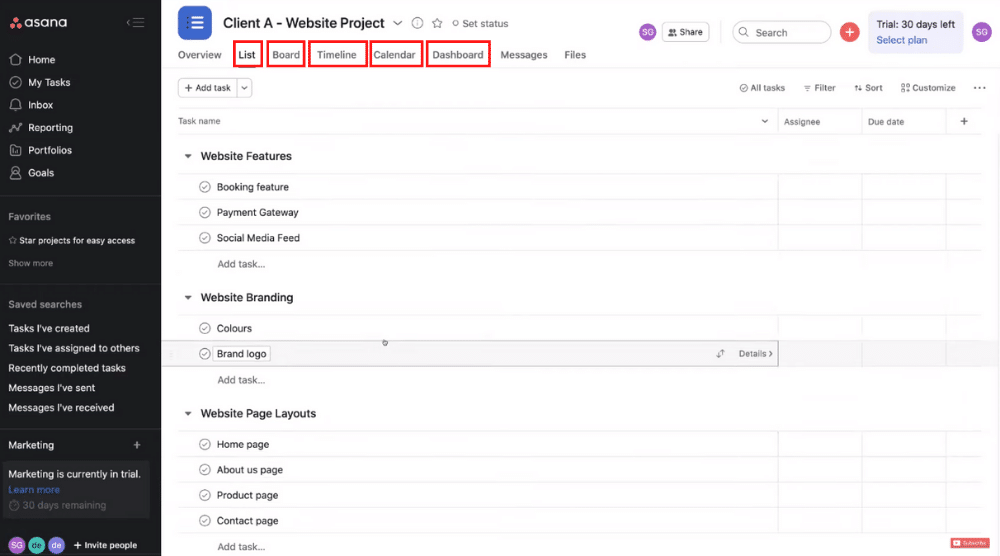
What you see right now is the list view of your project.
You can again choose a different view, such as board, timeline, calendar, or dashboard.
You’re able to choose any of these different views depending on what you’re using Asana for.
For example, if you’ve created a workflow journey, you’ll want to drag and drop tasks in the subsequent sections as you complete each stage of the journey.
Therefore, the board view is the most suitable.
However, if you have specific dates associated with your tasks, then the calendar view makes better sense.
Our personal preference when using Asana is a list-based layout.
However, if you prefer a more visual layout (a board view, for example), then we recommend using other free project management software like Trello.
We believe Trello is more visually appealing and engaging for creative teams.
Want to learn more about Trello? Watch this tutorial here.
Also Read: How to use Trello
Step 7: How to Customize Tasks within Asana
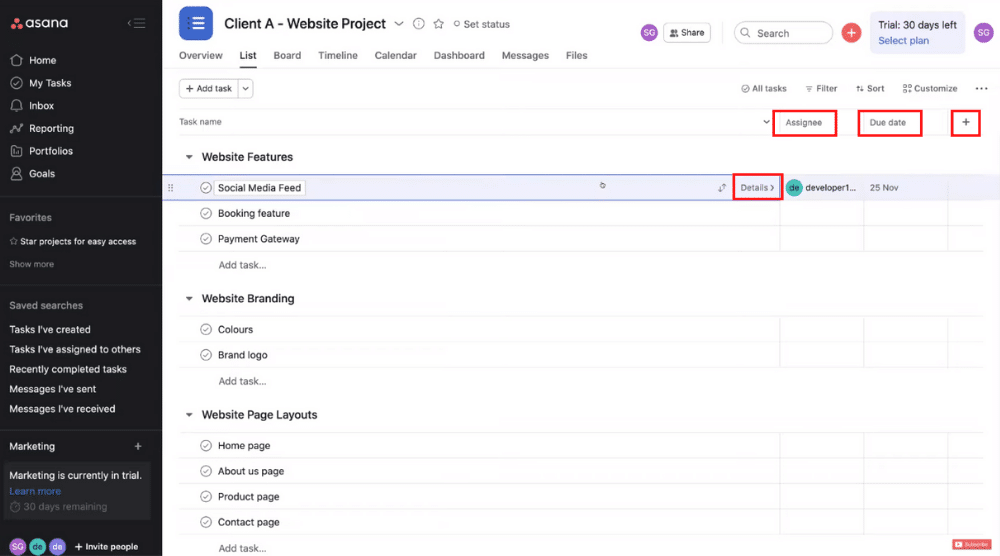
Now that you’ve created your tasks, you’re able to customize each of your task details.
To do this:
- Simply click ‘Details’.
Additionally:
- Click under ‘Assignee’.
- Select the individual you want to assign tasks to.
This is the team member who is responsible for completing the task.
To set a deadline for your task:
- Select the due date next to it.
If needed:
- You can also add an additional field.
- Drag-and-drop each task to a different order or a section within the list view.
To access information associated with a task:
- Simply click ‘Details’.
- Here you can rename the task, add an assignee, set a due date, include a description, and add subtasks.
- You can also see the project this task is a part of.
- Also, if your task depends on another task being completed first, you can include that under ‘Dependencies’.
For example, if the task ‘Social Media Feed’ needs to be completed after creating the brand logo, you can add the task ‘Brand logo’ under ‘Dependencies’.
Let’s learn how to use the Asana project management tool to create subtasks in the next section.
How to create Subtasks within Asana
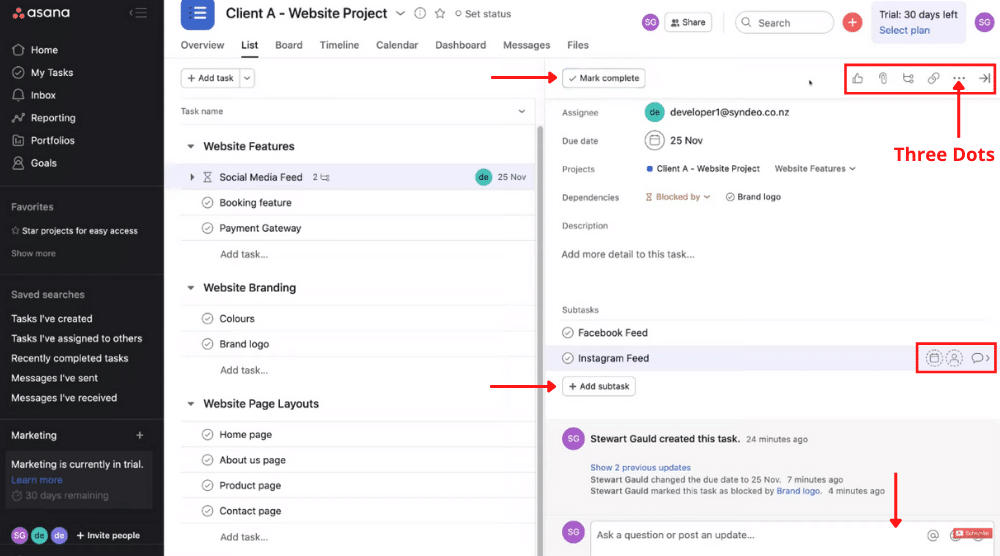
Next, we’ll show you how to create a subtask within a task.
Simply:
- Click ‘Add subtask’ within your chosen task.
- Name your subtask.
We’re going to name ours ‘Facebook Feed’ (since the task is ‘Social Media Feed).
However, you can name your subtask whatever you like and can add as many subtasks as you like.
For each subtask, you can:
- Add a due date, assign it to a teammate, add notes and comments.
- Below it, you can see the activity log for this task.
- In the field provided (refer to the screengrab), post an update, ask a question, or post a comment to notify the assignee.
- At the top of this task, you can mark it complete.
- You can also like the task, add attachments, view subtasks, or copy the task link (to share individually with your teammates if needed).
If you click the three dots, you’ll find more actions, such as:
- Mark as milestone.
- Add to another project.
- Mark as approval.
- Convert task to template.
- Create follow-up task.
- Print.
- Delete task.
- Delete selected subtask.
Take the time to go through all your sections, tasks, and subtasks, and make sure you’ve both assigned them to relevant teammates and added a due date for each.
Additionally, when setting a due date you can also set a task to repeat the date.
This is very useful if you had a task that needed to be repeated say multiple times within a project workflow!
The repetition of the due date can be weekly, monthly, yearly, periodically, or you can set a custom repetition period.
Apart from the weekday, you can also set specific times (start time and deadline) for your repeat tasks.
Also Read: How to use Basecamp
Step 8: How to Create a New Workspace
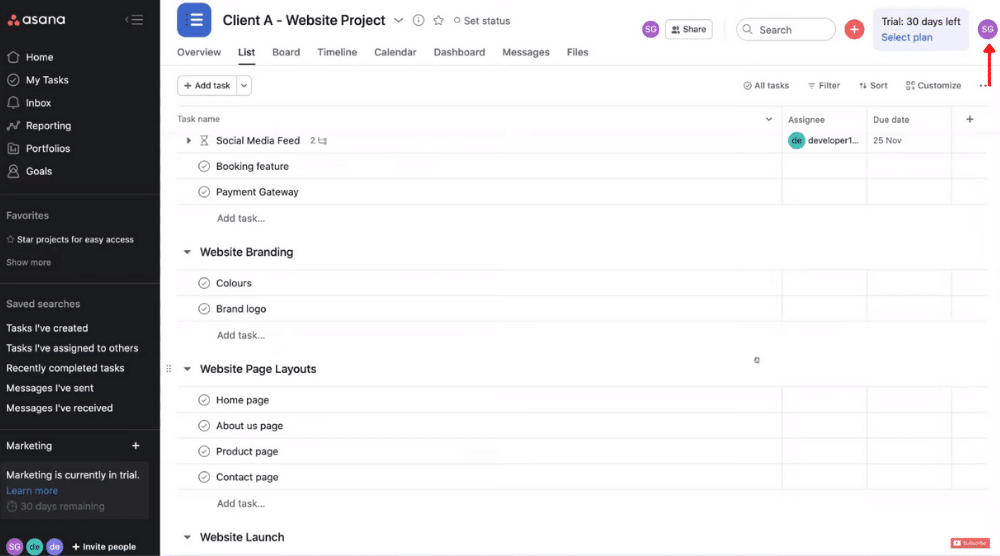
Using Asana project management software, you can create a new workspace as well.
To do that:
- Click on your profile (see upper-right corner).
- Click ‘More’.
- Select ‘Create New Workspace’.
- Name your workspace and add your team members.
- Hit ‘Create Workspace’.
…and that’s it!
Your new workspace has been created.
However, for small businesses you most likely will only need one workspace).
Asana Tutorial for Beginners
We hope by now you’ve learned how to use Asana for project management and are equipped with the knowledge to manage your day-to-day business activities efficiently.
If you are a beginner and want to have a more detailed walk-through, then we have a video tutorial just for you.
So, enjoy the video and let us know if you have any questions.

