Trello is one of the best project management software options out there designed for individuals and teams looking for a visually pleasing and intuitive interface.
Trello helps you manage tasks and projects with your small team for free.
Through this Trello tutorial for 2021, we’re going to help you understand how to use Trello, a leading free project management software.
We will focus on their generous free plan, which allows you to manage up to 10 live projects and collaborate with unlimited users.
How to use Trello for Effective Project Management?
In this Trello tutorial for beginners, we’ll also cover many generous features and help you get started with this leading project management software.
1. Getting Started with Trello
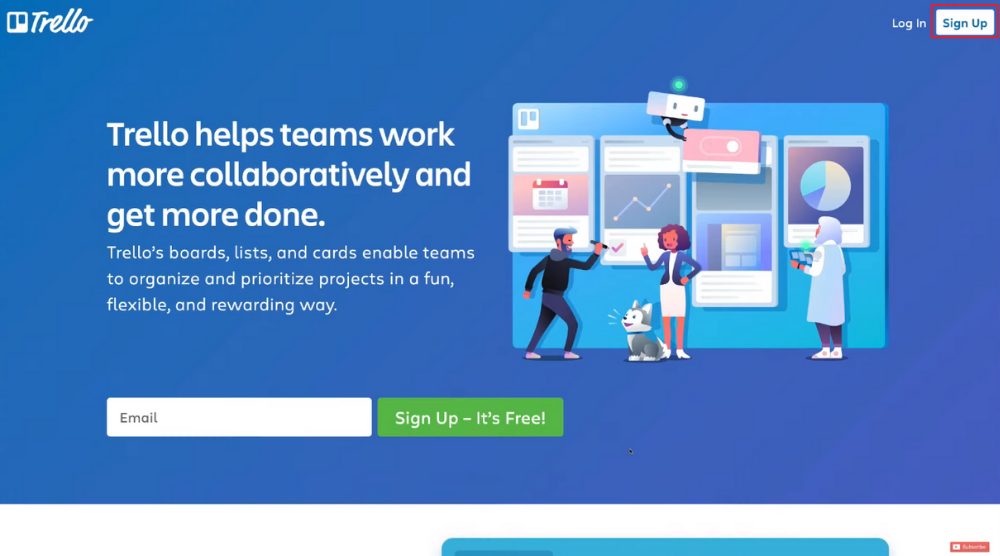
First head over to trello.com and you’ll arrive at their home page.
As we navigate through this Trello project management tutorial, we’ll walk you through the free plan which is ideal for both personal and business use.
One of the main reasons we love Trello is its amazing user-friendly visual interface.
Unlike other project management tools that are quite plain or dull, Trello offers a fun and engaging layout. When collaborating with other team members, you’ll find it flexible and easy to use.
If you have already signed up for Trello project management, feel free to skip this step.
To start with the free plan, you can either simply enter your details here or sign up with Google.
However, since we like keeping all our business information integrated and accessible from one account, we typically recommend signing up for Trello using your Google account.
Once you create your account, you can go ahead and name your first team (for us we are going to add Design Team) and then choose your team type (Operations).
We’re going to skip adding our team members here because we will cover that within the Trello dashboard.
Once you’re done, click ‘continue’.
Trello will now prompt you to begin with their paid plan.
However, today we are going to cover the overly generous free plan which is great for small teams and individuals.
With Trello’s free plan, you get unlimited personal boards, lists, and cards.
If you start their 30-day trial, you get access to all the features offered under the business class plan.
For now, we’ll select ‘Start without Business Class’, and then click ‘Let’s go’.
You have now completed the initial signup to Trello.
2. Understanding the Home Dashboard
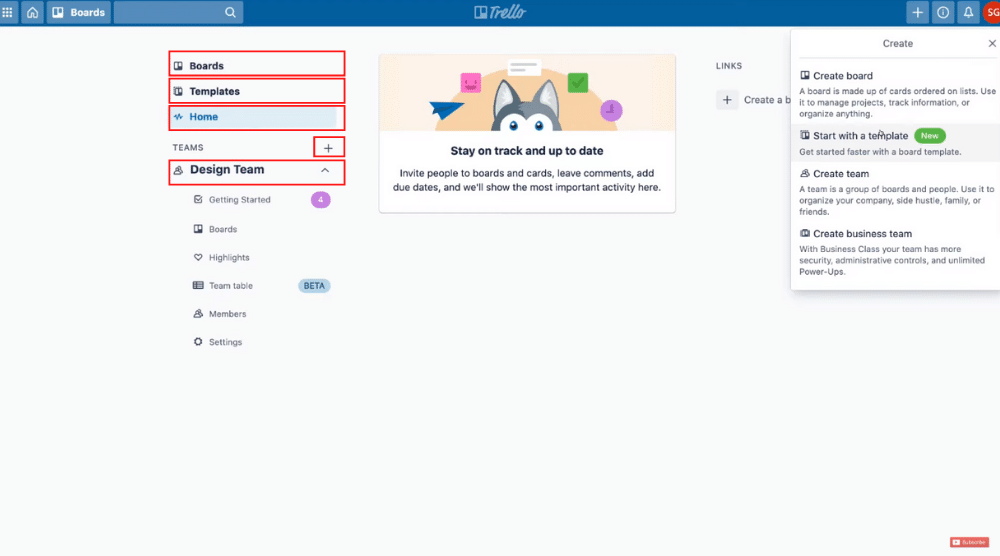
Here, we’re going to go through all the important elements and features on your dashboard.
To clean up our Trello project management dashboard, we’ll first click ‘Dismiss this’.
Move your cursor to ‘Upgrade this team’ and dismiss it. We love the simple layout of this dashboard.
On the left-hand side, we have ‘Boards’.
You can also find this option on the top left and on the top right in the form of the ‘+’ sign. Here, you can create a board, start with a template, create a team (paid), or create a business team.
For example, you can start with a premade template to create a board. This can speed up the process and gives you an idea of how you can be creative with project boards.
You can also create a new board from the quick link offered by Trello.
However, to view all your boards, you have to select ‘Boards’ from the left-hand side.
Below that, we have ‘Templates’ (more on that later) and ‘Home’ which is where we see up-to-date activities that are relevant to you and your teams.
As you can see, we have already created a ‘Design Team’ for this Trello tutorial.
At present, we don’t have any boards associated with this team. But you can create multiple teams, departments, and then allocate those teams to specific projects.
Below each of your teams, we have information to get you started, we have boards along with highlights, team table (included in paid plan), members, and settings.
Next to the ‘+’ sign, we have information.
This is aimed at helping you understand how to use Trello to manage projects and make the most out of this project management software. Next to that, we have notifications. You can allow both desktop and email notifications on Trello’s dashboard.
Next to notifications is where you can see your profile that you can customize in your spare time. Now that you’ve become familiar with Trello’s dashboard, we’ll go ahead and create a new team.
3. Creating Teams on Trello
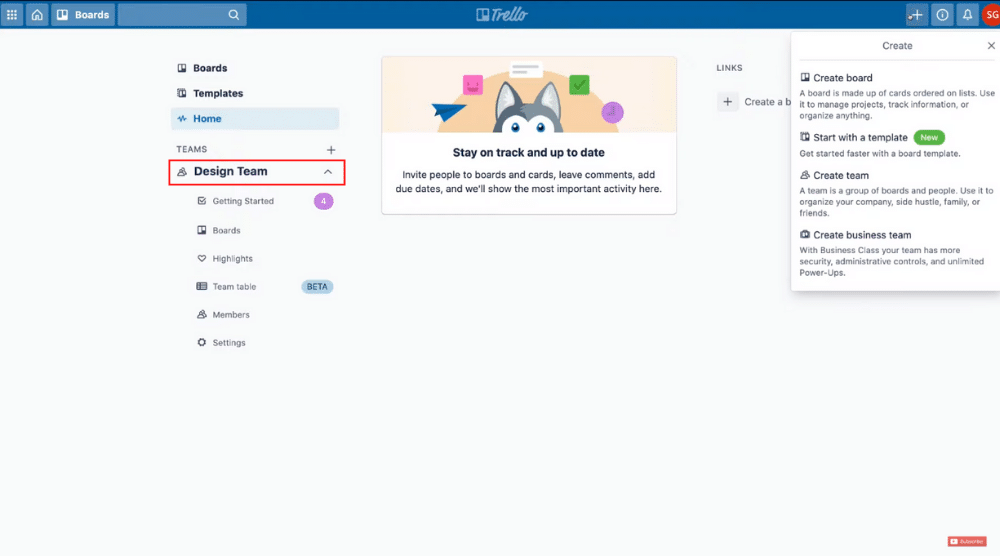
Navigate up to ‘Teams’ and click on the ‘+’ icon or simply click the ‘+’ icon on the top right and then click ‘Create team’. You can now name your team (Marketing Team), choose the team type (Marketing), and add a description.
Click ‘continue’ once you’re done.
Now, add the email addresses of team members in the next step. You can add as many team members as you want and then click ‘Invite to Team’.
You also have the option to include more team members later on.
For this Trello tutorial for beginners, we’ll only add one team member.
You have now successfully created a new team member on this popular project management software. Here, you can edit team details and create a new board from scratch or choose a pre-made template.
Under ‘Members’, you can come down and select ‘Invite Team Members’ to include more people in this team.
Also, you can change your team’s visibility to ‘Public’ under ‘Settings’.
This means that everyone on the internet can find your team.
And that goes for your projects too. But we will keep the ‘Team Visibility’ to ‘Private’. At the bottom of the page, you will find the option to delete this team when you want.
Now, head back to your home dashboard, you will notice that it shows two teams now – the design team and the marketing team.
4. Adding Team Members
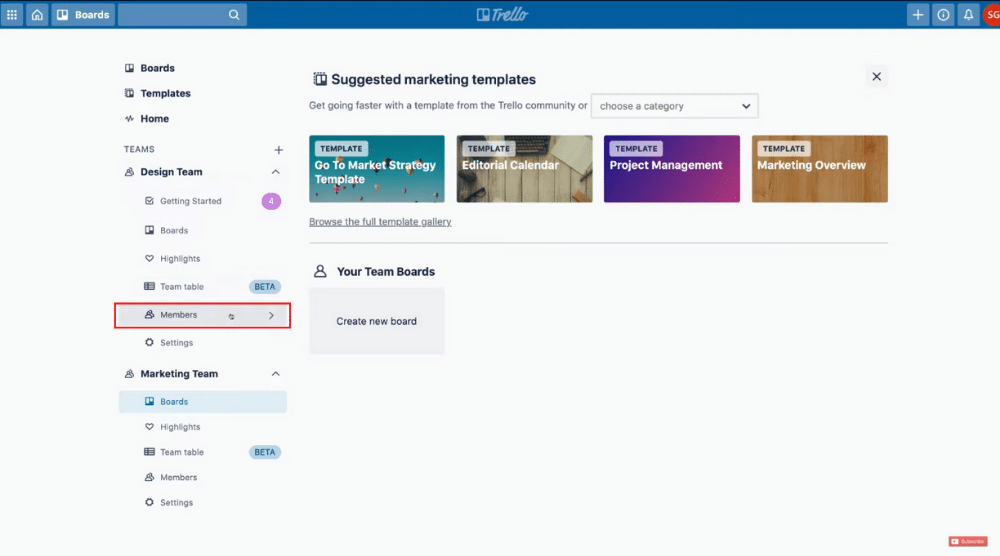
For example, click on ‘Members’ under the design team and then simply enter the email addresses of the people you want to include.
Once you do that, click ‘Invite to Team’. You can see that now your design team has two members.
Next in this Trello tutorial for beginners, we’ll talk about creating boards (projects).
4. Creating Boards (Projects)
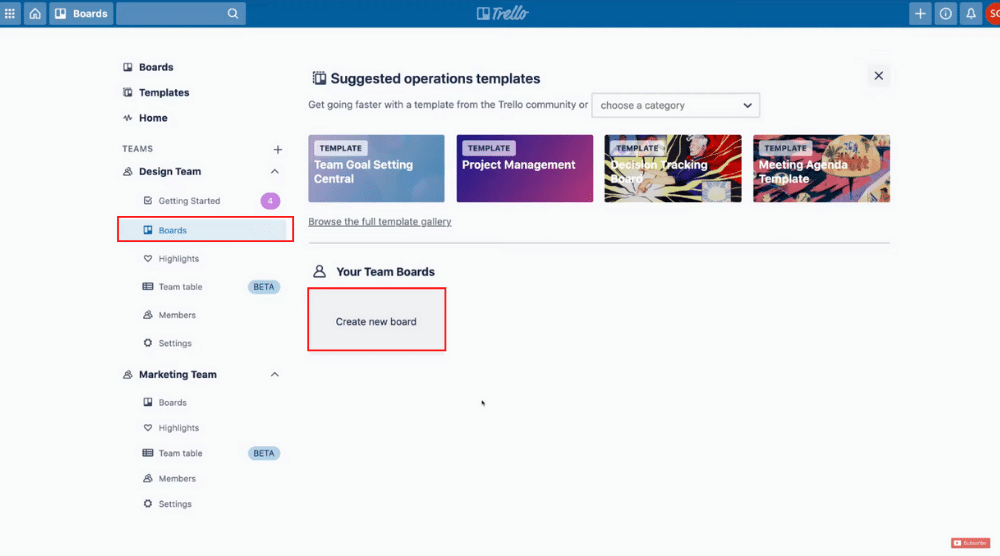
Under the design team, click on ‘Boards’ to create projects from scratch or by using a premade template.
For this Trello tutorial, we’re going to create a board from scratch.
First things first, we need to name our new board (project).
We’ll name this ‘Website Project (Client A)’. Make sure you have the right team selected and alter the team visibility if you like.
Here, you can also select a background color or start with a premade template instead.
We recommend choosing bold colors so that everything is easier to read.
Once you have completed this step, click ‘Create Board’.
Understanding how to use Trello effectively using these project boards is relatively straightforward.
Under each board, we have the board itself, and then we have lists (or categories) and cards (or tasks).
5. Making And Editing Lists (Categories)

We’re going to name our first list ‘Project Jobs’. We’re going to name the other two lists ‘In Progress’ and ‘Pending Approval’.
You can always add new lists and for that, all you need to do is click ‘Add List’.
For this Trello tutorial for beginners, we’re going to stay with the four lists. As you may have observed, we have created our lists in such a way that they represent a workflow.
6. Creating And Editing Cards (Tasks)
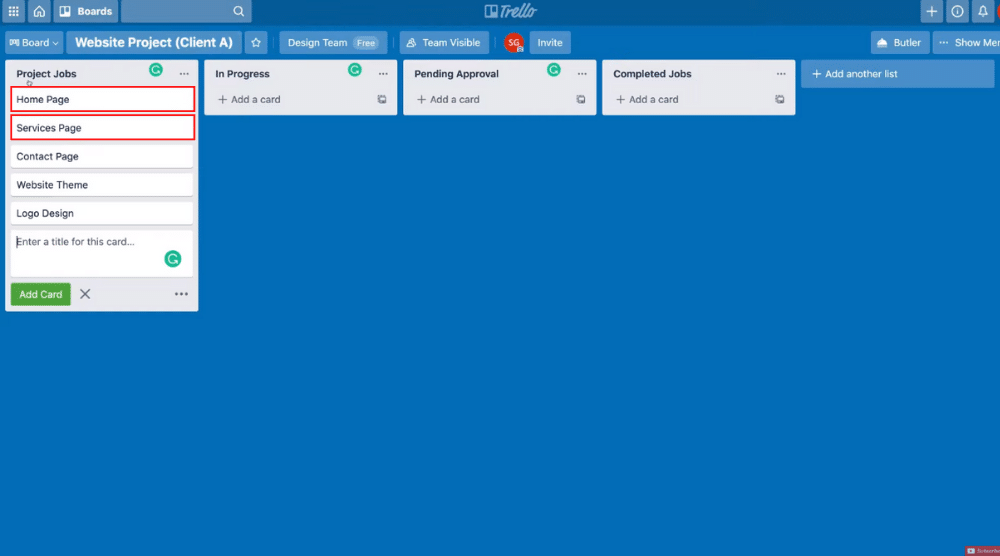
Using the process explained above, we will add five more cards. These cards or tasks make up this website project.
For the completion of your website project, you need to complete these project jobs. Also, each of these lists or cards can be moved around. But we’re happy with the existing workflow.
When the developing team starts working on a task (home page or service page, for example), you can move that task to ‘In Progress’.
Once it is complete, you can move that over to ‘Pending Approval’.
Once the client approves the page, it can be dragged and dropped over to ‘Completed Jobs’. This is our project management work flow or pipeline.
Eventually, all our tasks would be moved over to ‘Completed Jobs’.
This is how you can effectively use Trello for project management. However, if you’ve never created a Trello project before, then we recommend choosing a template instead.
You can also edit each of these cards, which we’re going to cover in the subsequent section.
7. Adding Card Details
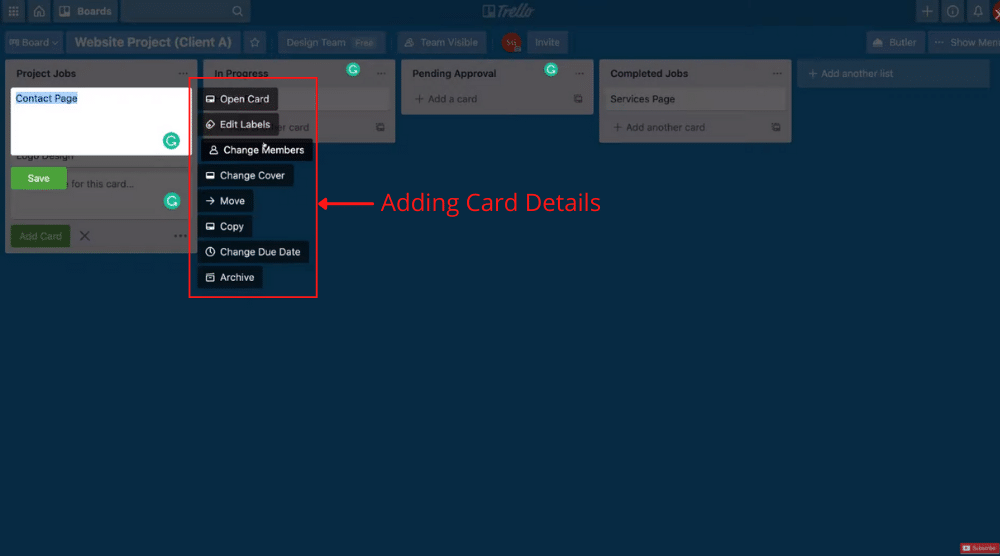
You can:
- Open card to see more details
- Edit labels
- Change members that are associated with this task
- Change cover such as adding an image that’s relevant to the task
- Move the card down the pipeline
- Copy
- Change Due Date
- Archive
We’ll choose the first option – opening the card. Here you can see that, under the card, we can add additional details.
By clicking on ‘Members’ on the right, you can search and allocate a member who would be responsible for finishing this task.
You can also add ‘Labels’ like ‘Important’ if you like.
Apart from that, adding a checklist could be very handy under Trello. You can also add a start date and due date for each task.
Under ‘Cover’, you can either upload a cover image or use one from stock photos.
Down below you have more advanced features such as ‘Add Power-Ups’ which allows you to add features to your tasks. It also allows you to integrate other apps which we’re going to talk about briefly later on.
Below these elements, we have ‘Actions’ that you can take for each task – move, copy, make a template, watch (this will enable notifications for this task).
In addition to that, you can add comments if you want to communicate something important to a team member. Using ‘@’ to address the individual will help them get notified.
Hence, for each card in Trello project management software, you can add relevant, additional information to manage the project effectively. If you exit out of the card, you can see that we have the edited card under ‘Project Jobs’ as well as the label.
This would be more visual if you add a cover here. And that is how you can create your own project boards under Trello. If you want to change the team, you can do so by clicking on ‘Design Team’.
Next to that, we have ‘Team Visibility’ where you can go ahead and change the visibility to ‘Private’, ‘Teams’, or ‘Public’. Adjacent to that, we have ‘Invite’ where you can invite more people to join this board (project).
We mostly used Trello for larger projects and project workflows like the website project we explained in this tutorial. In such projects, we tend to engage and collaborate with our clients.
The internal team coordinates with clients through this project management software.
This is why Trello is great for including your clients as well as internal teams. On the other hand, you can also use Asana for day-to-day management, personal projects and workflows, and to-do lists.
If you want to learn about Asana as a day-to-day project management tool, you can watch this tutorial to get started.
Now, back to Trello, we also have a ‘Butler’ on the top right. Here, you can create small automation to get the most out of this incredible project management tool.
When you start increasing the activity on each of your Trello boards, you start getting notifications from the Butler helping you with more insights and information.
If you now navigate over to ‘Show Menu’, you can edit the details such as the board description, change the background color, and search for specific cards.
Based on this particular board, you can see the activities here.
8. Using the Trello Templates
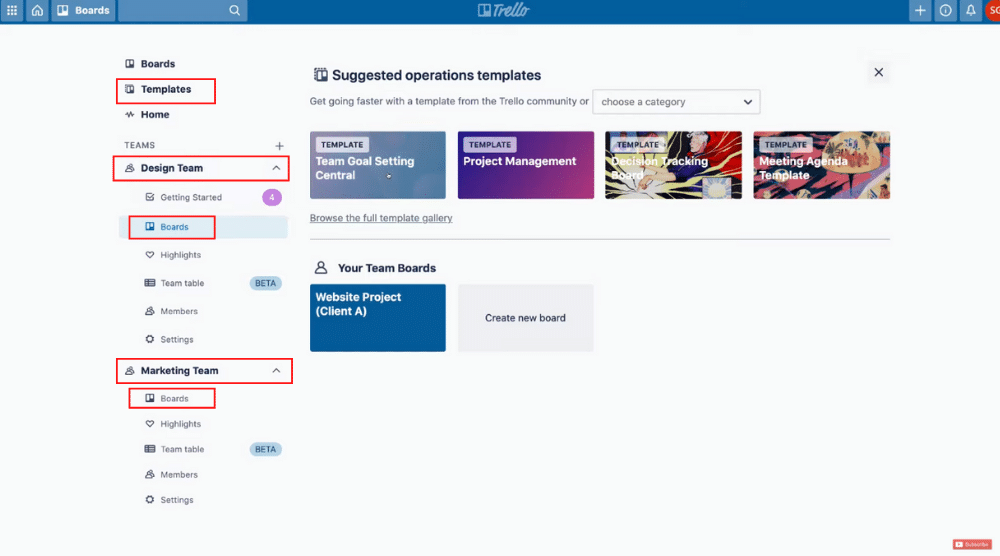
Navigate back to your home dashboard and select ‘Boards’ under ‘Design Team’. As you can see, we have the option to use a template for creating the board or project.
Under ‘Marketing Team’ and ‘Boards’, you’ll find the same option to select the given templates.
But what we want to do is click on ‘Templates’ on the top left which is below ‘Boards’. This will take you to all the free premade templates to get started with a project.
If you pick a category, let’s say ‘Project Management, you can see there are a whole bunch of templates here. Similarly, you can find many templates for each category in Trello.
Click on a template that you like, scroll down to view them, and then click ‘Use Template’ if you’re happy with using it.
You can then give this board a title and add a team. Check the boxes below and hit ‘Create’. And now you have a template that you can build from and get ideas from.
Take the time to go through the templates to find the best fit for your Trello project workflow.
Related: Top 5 Free CRM Software for Small Business
Trello Tutorial for Beginners (Video Guide)
If you are a beginner and want to explore all the steps in the video, then we have a great video tutorial to help you get started with Trello.
Enjoy the video and start managing your project with absolute ease!
