If you have a Wix website and want to learn how to set up Google ads conversion tracking for Wix, keep reading below to find out how!
Google Ads is a powerful advertising platform that allows anyone to set up and run different ad campaigns to drive business growth.
However, if you do not have conversion tracking set up on your website, it’s impossible to identify and measure if your Google Ads are actually generating conversions on your website.
In this tutorial, we will walk you through the step-by-step process of setting up Google Ads conversion tracking on your Wix website in 2022!
If you don’t have a Wix website, you can easily create a stunning, professional, and FREE Wix website.
Alternatively, you can also set up Google Ads conversion tracking on your WordPress website.
How To Setup Google Ads Conversion Tracking for Wix
Let’s begin…
1. Getting Started

Before you can create and set up Google Ads conversion tracking on your Wix website, we first need to head over to Google Ads.
To do this:
- Simply head over to your browser.
- Type in ads.google.com
- Click “Get started”
- That’s going to take you to your Google Ads account.
If you’re completely new to Google Ads, check out our beginner’s guide on how to use Google ads here.
The tutorial above will guide you through the process of setting up your Google Ads account and launching your first campaign.
2. Inside Your Account

Once you’ve arrived inside your Google Ads account:
- Simply navigate up and click on ‘Tools and settings’.(see screengrab).
- Select ‘Conversions’ (under measurement).
- Next, navigate over and click ‘+ New conversion action’.
This is where you’ll need to select the type of conversion that you want to track.
You’ll see four options:
- Website.
- App.
- Phone calls.
- Import.
3. Website Conversions

For the purpose of this Google ads conversion tracking tutorial, we’re going to go ahead and select ‘Website conversions’.

Follow the steps below to set up your website conversions:
- Go ahead and enter your website’s domain name in the search bar. This is your Wix website’s domain name.
- Go ahead and click ‘Scan’.
- Then scroll down to the bottom of the page and click on ‘+ Add conversion action manually’.
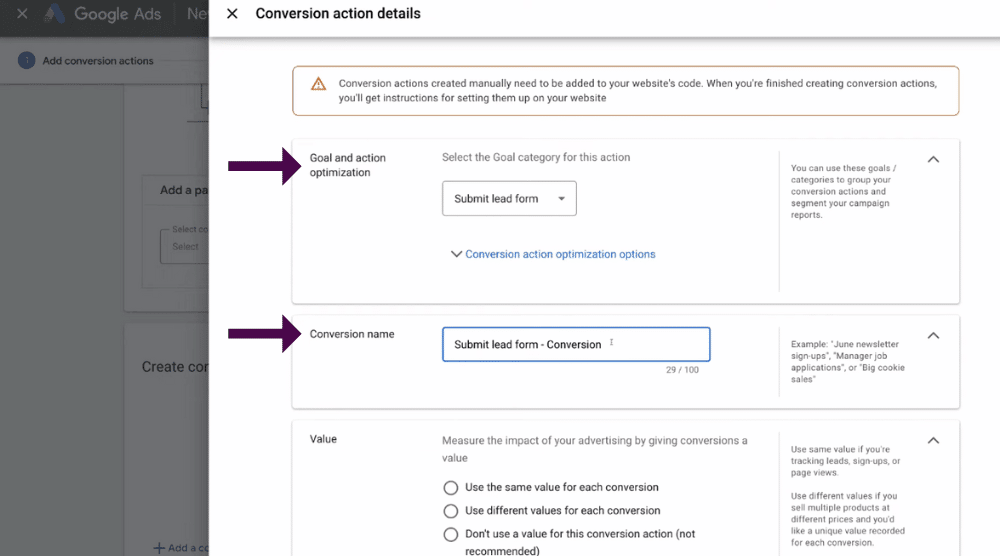
- This will bring up a new popup menu ‘Conversion action details’ (see screengrab).
- Next, select ‘Goal and action optimization’.
- Navigate down the drop-down menu and select a goal category that you want to record.
For the purpose of this Google ads conversion tracking Wix tutorial, we’re going to record a ‘Submit lead form’.
So we’ll click on this from the drop-down menu.
This is the conversion that we want to measure on our Wix website.
What does this mean?
Basically, when someone submits a form, they’ll be taken to our thank you page. This will be tracked as a conversion.
Once you’ve added your goal category:
- Simply navigate down to ‘Conversion name’ and type in your conversion name.
- Then scroll down to ‘Value’ (underneath ‘Conversion name’).
4. Values For Your Conversions

From here, there are three options to select from. (see screengrab).
- ‘Use the same value for each conversion’.
You can enter the average value of each lead, or if you sell one type of product (for example, if your products are all $20) then you can go ahead and add 20 in the value box.
Google ads will then record a value of 20 for each conversion.
- ‘Use different values for each conversion’.
This is if you run an e-commerce website.
Maybe you sell multiple products on your Wix website and you want to record each conversion with its own unique value.
- ‘Don’t use a value for this conversion action’. (This is not recommended)
We’ll navigate up to the first option and use the same value for each conversion to continue setting up Google ads conversion tracking for Wix.
If the value of each of your leads were, for example, $10, then you could add 10 into the value box.
However, for us, we’re just going to leave it as 1 for now.
Read more: Create a free website and sell products on your Wix online store.
5. Conversion Count Settings

Once you’re happy with your values:
- Navigate down the page to ‘Count’.
This is where you can select how many conversions to count per click or interaction.
- We’re going to navigate down and click ‘One’.
That’s because we want to generate leads.
- If you navigate over the right-hand side you can see that
If someone clicks on your ad and enters their information twice on your website, only one conversion is reported per click.
However, if you’re running an eCommerce website and you’re selling products, then you would want to measure every purchase because every purchase is valuable.
If you want to do this:
- Simply click on ‘Every’ instead of ‘One’.
Once you’ve selected these count settings, you can come down and change other conversion details:
6. Other Conversion Details

Click-Through Conversion Window:
This is currently set at 30 days for us.
This means if a visitor interacted with our ad and they converted within 30 days, then that would be counted as a Google Ads conversion.
Video Engagement:
We won’t go into detail on this for this tutorial.
View Through Conversion Window:
This is similar to the ‘Click through conversion window’, however, this is just for when a visitor views your Ad.
Attribution Model:
We’re going to keep ‘Data driven’ selected.
You can change any of these settings by simply clicking the drop-down menu beside each setting header.
When you’re happy with all those settings:
- Navigate down and click ‘Done’.
- Then click ‘Save and continue’.
7. Embedding Your Codes To Your Wix Website

Under ‘Edit your website code’, we want to take:
- The global site tag and event tag
And embed both tags on our Wix website to record that specific conversion.
We want to add both of these codes to our thank you page because when a visitor submits their information:
- They convert and become a lead and arrive on our thank you page.
- So, when the thank you page triggers after the form has been completed
- This will be considered a conversion.
Global Site Tag
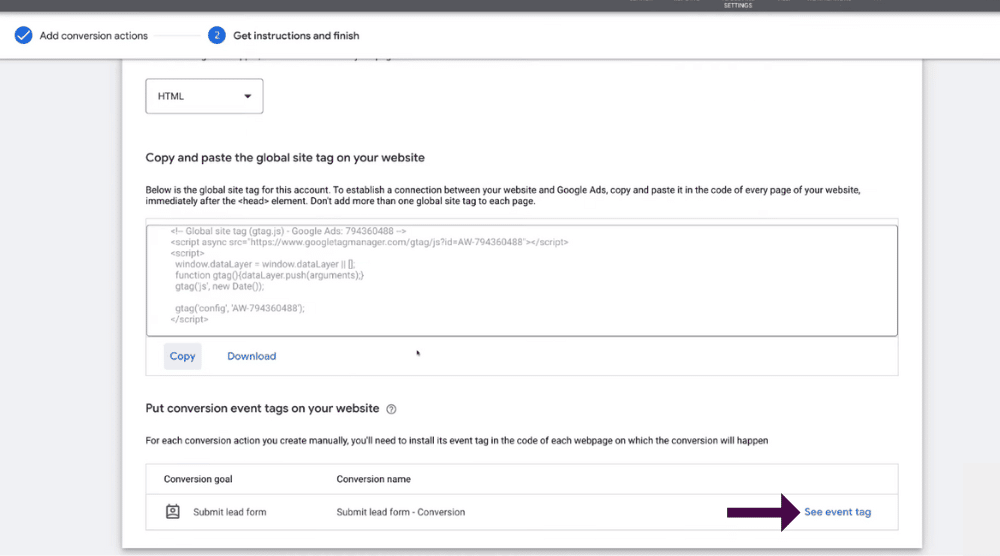
The first thing you want to do is go ahead and copy the global site tag.
- Come down and click ‘Copy’ (see screengrab)
That’s going to copy the entire global site tag snippet
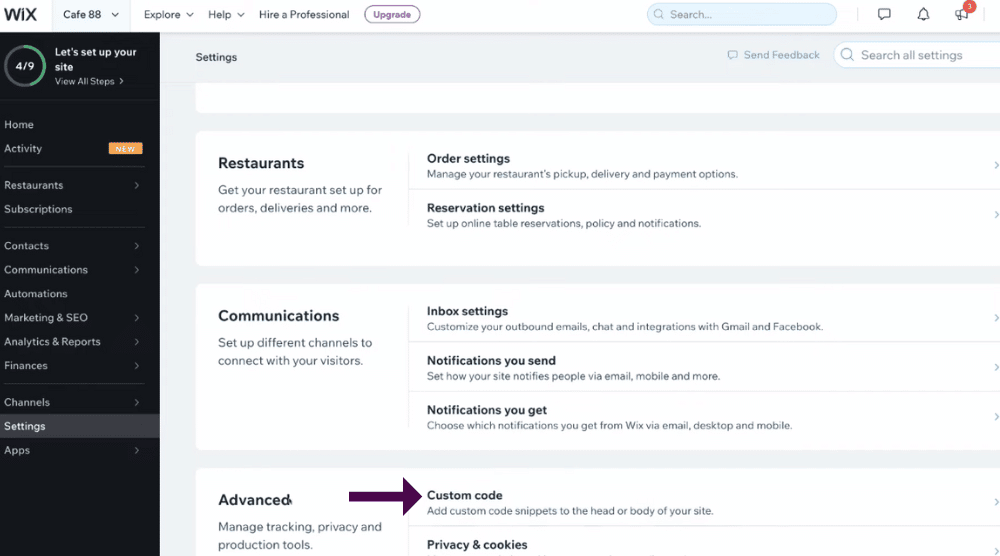
Then what you want to do is:
- Head over to the back end of your Wix website.
- Within your Wix website back end, simply navigate to ‘Settings’ over on the left-hand side and select.
- Then, navigate down the page and locate and click on ‘Custom code’ next to ‘Advanced’
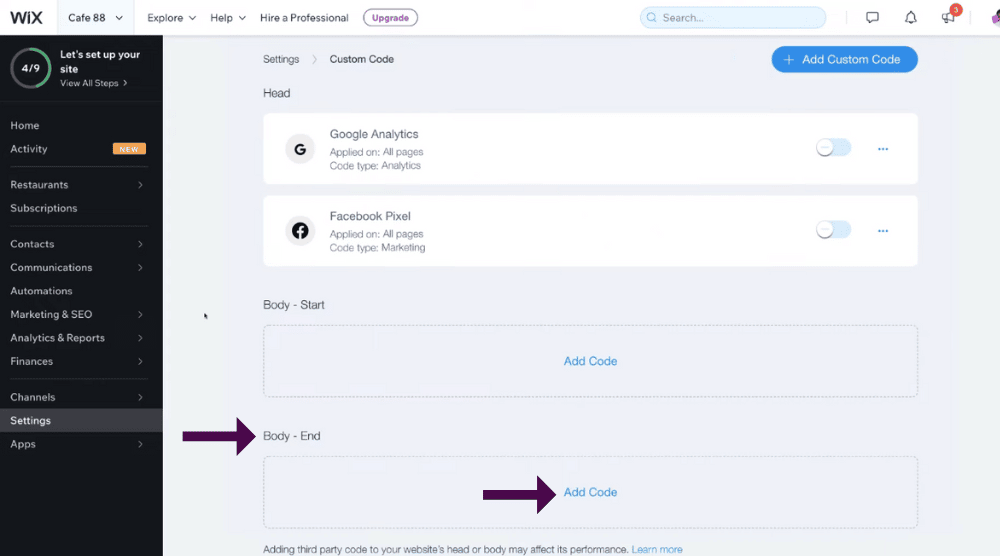
- Under ‘Custom code’, you’ll see ‘Head’ ‘Body-start’ & ‘Body-end.
- Come down and click ‘Add code’ under ‘Body-end’.
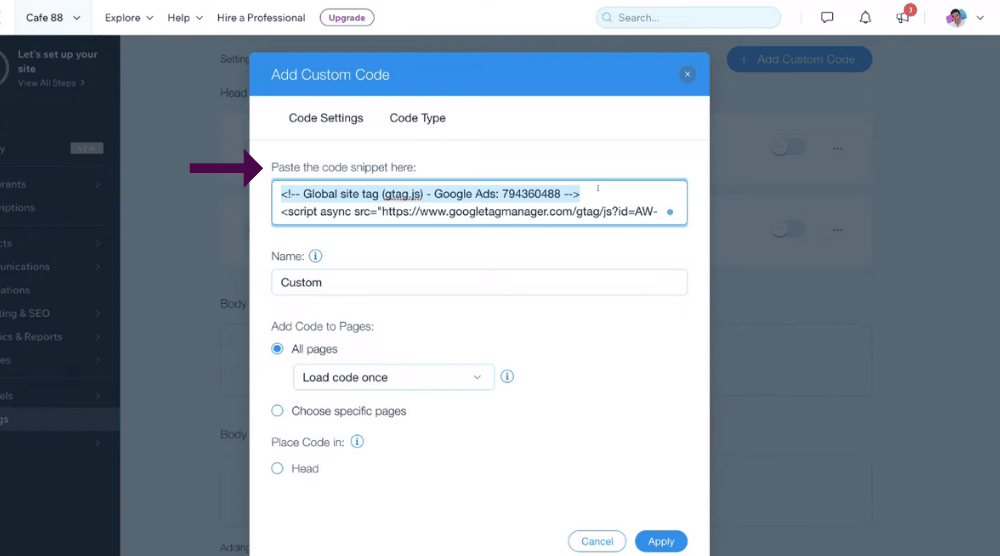
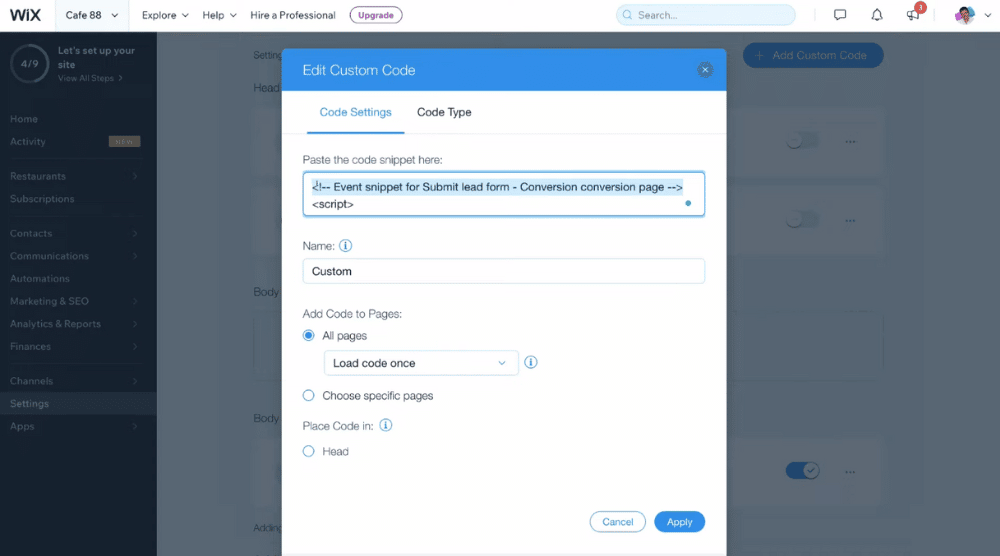
- Next, simply navigate up to ‘paste the code snippet’ here and paste in your global site tag that you copied earlier (see screengrab).
- Navigate up to the top of your tag.
- Highlight the top part of your tag(See screengrab). This is the part that we want to remove (in order for our conversion tracking to function properly).
- Go ahead and remove the top section of your global site tag by pressing delete on your keyboard.
Event Tag
When you’ve removed the top section of your global site tag:
- Head back to Google Ads.
- Once in Google Ads, navigate down the page and click ‘See event tag’.
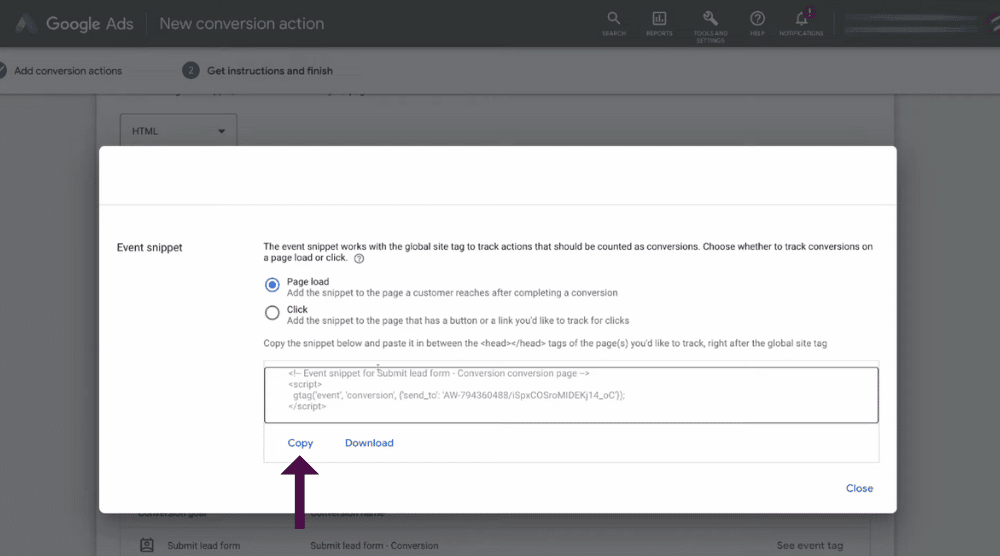
- Next, make sure that ‘Page load’ is selected (see screengrab).
This will add a snippet to the page a customer reaches after completing a conversion.
For example for us, when a visitor submits their information on our booking form or our lead generation form, they’ll be taken to the thank you page.
This code (the event tag) is the code that we want to add to our thank you page.
We’ll show you step-by-step how to do that next:
- Come down and click ‘Copy’.
- Navigate back to your Wix website.
Remember earlier when we added the global site snippet?
Head back to that pop-up window (on your Wix site) and follow the below steps:
- Navigate all the way down to the bottom of your global site snippet.
- Click Enter (on your keyboard).
- Paste in your event tag code that you just copied below the global site snippet.
- Then again, as you did with the global site snippet, remove the top section – the top snippet highlighted (see screengrab) just above ‘Script’ by clicking delete
Now you have both the global site tag and the event tag pasted correctly
- Simply come down and name your conversion. For this Google ads conversion tracking for the Wix tutorial, we will call it ‘Lead form conversion’.
- Then, navigate down and tick ‘Choose specific pages’.
- Here, we’ll scroll down from the drop-down menu and select our thank you page.
- You can tick multiple pages if you want, however, we only want to track conversions from our thank you page.
This is the thank you page that our successful leads will be redirected to.
Once you’re happy with all that:
- Come down and click ‘Apply’.
As you can see, we’ve added this Google Ads conversion tracking event to our Wix website!
This is so we can identify if our Google Ad campaigns are generating conversions.
8. Final Checks

Now you’ll need to check that everything is working properly before we wrap up this tutorial on how to setup Google ads conversion tracking for Wix.
- Head over to your website.
- Select the page you selected previously that you want to track conversions from (for example, we’ll head over to our thank you page).
Once you’re there on the thank you page
- Navigate up to your browser search bar and click on ‘Google tag assistant legacy’. This is a browser extension that you can add onto your chrome browser.
Our global site tag and the Google Ads conversion tracking were successfully added.
You can check this by:
- Looking at the smiley face next to the two tags.
If they are green, then they have been successfully added. (see screengrab).
You can also set this up with Google Analytics and Google Tag manager, there are a few different ways that you can set up and track conversions.
- Head back to your Google Ads tab.
- Come down and click ‘Close’.
- Simply come down and click ‘Done’.
As you can see, we have our conversion action setup here(see screengrab).
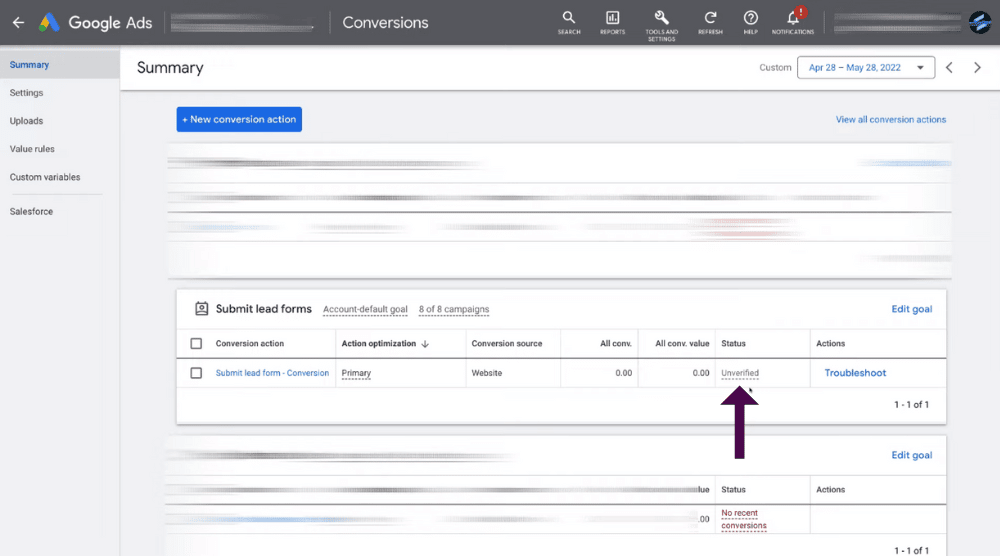
- Now if we navigate over the right-hand side, you can see under ‘Status’ that we’re currently unverified.
Don’t worry about this as it can take up to three hours after someone visits your page containing the tag to become verified.
However, what you can also do is:
- Visit the page to trigger the tag. This will speed up this process.
Congratulations, just like that you’ve enabled Google Ads conversion tracking on your Wix website!
Google Ads Conversion Tracking Tutorial (Video Guide)
That is it for this Google Ads conversion tracking tutorial for your Wix website.
We hope you enjoyed this tutorial!
Make sure you check out our video tutorial below for an in-depth guide on how to setup Google Ads conversion tracking.
