In this out-of-office auto reply guide, we’re going to show you how to set up automatic reply in Outlook in just a few simple steps.
An out of office automatic reply is an email reply you can set up from your email address that recipients will receive in response to the email they’ve sent to you.
Out of office auto reply responses are crucial to let your personal or business contacts know that they should expect a delay in a response from you as you’re not in the office!
In addition to this, you can also add in any details for someone they can contact in your absence if the email is urgent.
This is useful for when you’re away on annual leave, unwell, or simply in a long training session or business meeting.
If you use Outlook for your business emails, this tutorial on how to set up auto reply in Outlook is for you!
Say goodbye to the days when you’re constantly checking and keeping an eye on work emails on your phone when you’re on holiday, or the alternative…coming back to a bunch of angry teammates or customers.
Let your out of office auto reply take care of all your incoming emails for you!
Read more: How to create a professional free email signature
How to setup auto reply in Outlook
We’re going to walk you through the step-by-step process of how to setup auto reply on Outlook so you can feel at ease while you’re out of the office.
It’s important to note that the process of setting up, using, and customizing an Outlook out-of-office automatic reply is the same regardless if you have a paid or free version of Outlook.
However, there are a few small differences between both versions that we’ll mention shortly.
Let’s get stuck in and find out just how easy it is to set up an out-of-office auto reply in Outlook!
Read more: How to set up out of office reply in Gmail
1. How to setup auto reply in Outlook – web version
To access and turn on auto-replies in the web version of Outlook:
- Head over to Outlook on your web browser.
- Click ‘Sign in’.

- Click on the ‘Settings’ icon in the upper right-hand corner.

- Select ‘View all Outlook settings’ at the bottom of the right-hand sidebar.

- Click ‘Automatic replies at the bottom of the menu’
- Turn on ‘Automatic replies’ (see screengrab).
It’s as easy as that!
You can now customize your auto-reply to your liking.
2. How to setup auto reply in Outlook – app version
If you run your emails from the Outlook application and want to learn how to set up an auto-reply on the Outlook app:
- Open the Outlook app.
- Click the ‘Settings’ icon on the left-hand sidebar.
- Select ‘Automatic replies’.
- Turn on ‘Automatic replies’.
As previously mentioned, setting up automatic email replies is key, as it lets your recipients know you’re out of the office or on holiday and can’t reply at the moment!
Read more: How to create a free business email with Gmail
3. How to customize your out of office Outlook auto replies

Once you’ve enabled automatic replies, you’re now ready to customize these replies.
To get started:
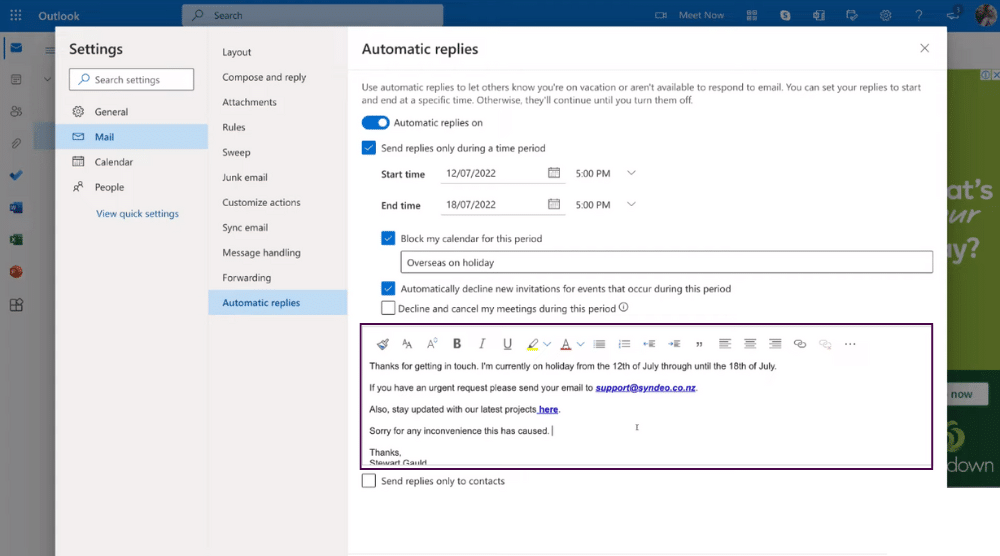
- Tick or untick ‘Send replies only during a time period’ to send your replies during a specific time period (see screengrab).
This is ideal if you have planned to leave for a holiday, conference, or similar.
You can even add in your exact leave and end times if you know the exact moment you’ll be leaving and returning to the office.
- Simply add your planned leave start date and time next to ‘Start time’.
- Type your leave end date and time next to ‘End time’.
Once you’ve chosen those specific dates and times, that’ll enable your automatic reply for that particular date.
Another awesome feature Outlook offers is the ability to block your calendar for when you’re out of the office, meaning no one is able to book in meetings or events with you.
To do this:
- Tick ‘Block my calendar for this period’.
- Below this, simply type in a name for the event that will then show up on your calendar so your colleagues or customers know why your calendar is blocked.
Your event name can be anything related to your leave.
We’re going to type in ‘Overseas on holiday’.
Next:
- Tick or untick ‘Automatically decline new invitations for any events that occur during this period’.
- Select or deselect ‘Decline and cancel my meetings during this period’.
These two options mean you can ensure you won’t have any accidental meetings, invitations or events during your time away.
Read more: How to create a professional business email with Titan
4. How to create your out of office auto-reply message
Once you’ve customized your out-of-office dates, times, and calendar, it’s time to create your automatic email reply message!

To do this:
- Simply compose your personal automatic email response in the email message field.
- Edit your text size, font, color, and more using the formatting options above the email message field.
Remember when creating your email, you should inform all the different types of people trying to reach you that you won’t be in the office.
As you can see, in our example message, we’ve added why we’re out of the office and how long we’ll be away (see screengrab).
Also, we added information about who to contact if you have an urgent request.
This is important because some people might need an urgent response that can’t wait.
We’ve also included a link in our email auto-reply message that people can click on to receive updates about things going on within the organization.
Read more: How to set up Google Workspace business email
5. Outlook for business

If you use Outlook for business instead of the free Outlook version, there is just a small difference when creating auto-replies.
You’ll notice you have the option to send replies outside your organization or send replies to your contacts only.
We’re going to send our automatic response to everyone who sends us an email, so we’re going to make sure ‘Send replies only to contacts’ is unticked.
Once you’ve taken the time to create your automatic reply:
- Click ‘Save’.
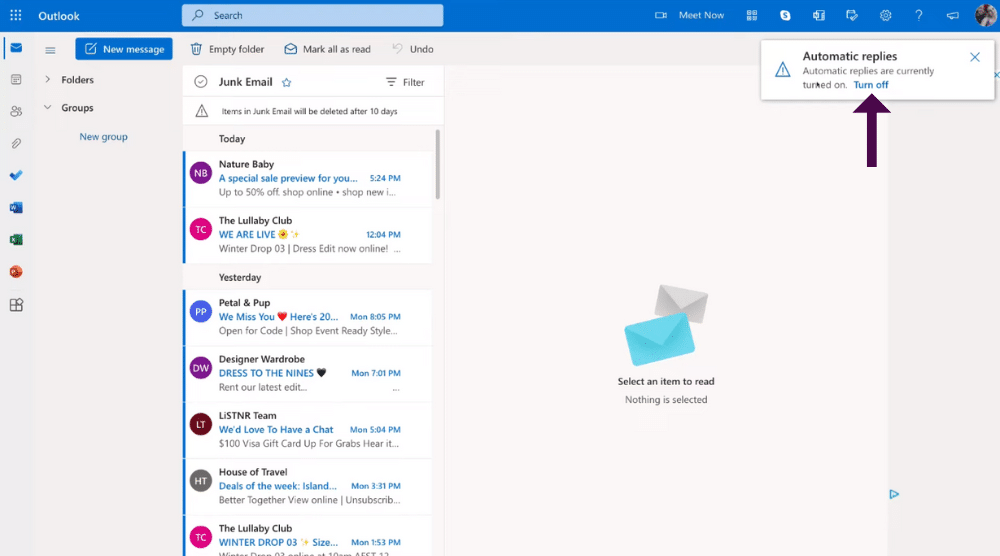
- You’ll then notice a notification pop-up saying that your automatic replies are currently turned on

- This notification will appear every time you log into your Outlook account, meaning your replies are still on.(see screengrab).
To turn off your automatic replies:
- Click ‘Turn off’ on the pop-up notification.

That’ll take you to the ‘Automatic replies’ section of your settings.
- Simply deselect ‘Automatic replies on’.
- Click ‘Save’.
That is everything you need to know on how to set up automatic replies within Outlook.
As you can see, this process is easy and only takes a few clicks to set up, customize, enable and disable!
How to set up auto reply in Outlook – Video guide
That concludes the tutorial on how to set up an out of office automatic reply in Outlook on the web version, app version and Outlook for business.
This is such a seamless and easy process that is so valuable and important!
By creating out of office auto replies, you can be sure your emails are being taken care of, ultimately helping maintain, manage and foster relationships with your email contacts whilst you’re out of the office.
Check out our video tutorial below for a visual step-by-step of setting up an out-of-office automatic-reply message for your emails within Outlook.

