
Table of Contents
In this Google Workspace tutorial, our aim is to show you how to set up a Google Workspace business email for your small business.
Say goodbye to unprofessional Gmail email addresses for your small business forever and get ready to be taken seriously!
We are going to show you the step-by-step simple way to set up a professional business email with Google Workspace, as well as how you can connect your business domain to the platform.
Read more: Top 5 productivity apps for small businesses.
What is Google Workspace?
If you haven’t heard of Google Workspace, it is of course another incredible, innovative, and easy-to-use business productivity and collaboration platform within Google.
Google Workspace is the home of popular applications such as Google Drive, Gmail, Google Meet, Google Docs, and Google Calendar (just to name a few)!
Essentially, you’re able to create, share and collaborate with both your team and clients through emails, documents, video calls, spreadsheets, events, and more through one simple, all-in-one business suite.
We love and use Google’s products on a daily basis, and Google Workspace is certainly no different!
Read more: How to use Google Drive for beginners.
How To Set Up Google Workspace Business Email?
Google Workspace is also a leading email service for setting up business emails for all business types and sizes.
What does this mean?
You can set up dynamic, individual business emails for your whole team within Google Workspace.
This means that every team member will have their own professional and custom email address ending in your business domain name instead of ‘@gmail.com’ or ‘@outlook.com’.
Having a professional business email is so important for any business, as it helps you establish and retain both authority and credibility within your clients, potential clients and contacts.
This is truly a game changer for any business, and is so easy to set up!
In this tutorial for beginners, we are going to walk you through how to use Google Workspace for business to simply create and set up professional business emails for your teams with your unique business domain name.
Let’s launch into setting up Google Workspace for business emails for you and your team!
Read more: How to create a free business email with Gmail.
1. Getting Started With Google Workspace
Let’s start by exploring Google Workspace:
- Open up your browser of choice.
- Simply type in workspace.google.com
That’ll take you to the Google Workspace homepage.
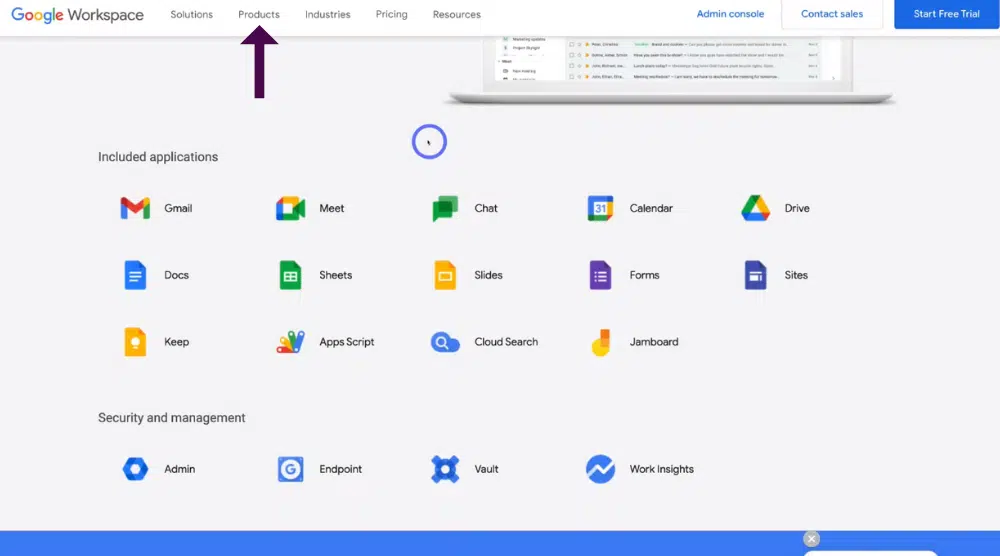
- Click the ‘Products’ header at the top of the screen.
- Select ‘See all apps’.
This is where you’re able to see all the different incredible applications mentioned above and more, all available within your own Google Workspace account (see screengrab).
Additionally, your entire team will have their own set of applications within their own Google Workspace account that they can independently and collaboratively use.
You can find out more about Google Workspace and all the incredible features and tools they offer in our ultimate Google Workspace guide here.
We recommend checking out that video after you’ve completed this tutorial.
However, this tutorial is going to focus on taking a deep dive into initially setting up your account, then how to set up Google Workspace business email through that account.
Let’s launch into setting up Google Workspace!
2. How To Set Up Google Workspace

To set up and get started with Google Workspace:
- Click ‘Start free trial’ in the upper right-hand corner of the Google Workspaces homepage.
They offer a generous 14-day free trial, which gives you enough time to identify if it’s a good fit for your business and fall in love with all the tools and features within the platform!

- Simply add your first name and your surname in the fields required.
- Click the arrow next to your surname (see screengrab).
- Add your current email that you use for business.
- Click the arrow next to the email address that you’ve just added.
- Select the correct size of your team.
For the purpose of this Google Workspace for business tutorial, we’re going to click ‘A small team’, meaning we have two to nine people in our organization.
Once you’ve selected your team size, you’ll next need to choose what domain name you’re going to set up your Google Workspace account with.
Read more: How to create group emails in Google Workspace.
3. How To Buy or Choose an Existing Domain

Next, you’ll be able to choose the domain settings for your account.
Google Workspace gives you two domain options you can select from (see screengrab).
1) ‘An existing domain’.
This is if you already have a domain for your business (this can be through another provider or Google Domains).
2) ‘A new domain’.
Here you’ll be able to purchase a new domain through Google Domains.
Google Workspace will then show you how to simply connect your domain name with your account.
We already have an existing domain that we purchased earlier from Google Domains, so we’re going to select ‘An existing domain’ & Click on ‘Select’.
Don’t have a domain name for your small business?
Make sure to watch our video on how to choose a domain name for your business.
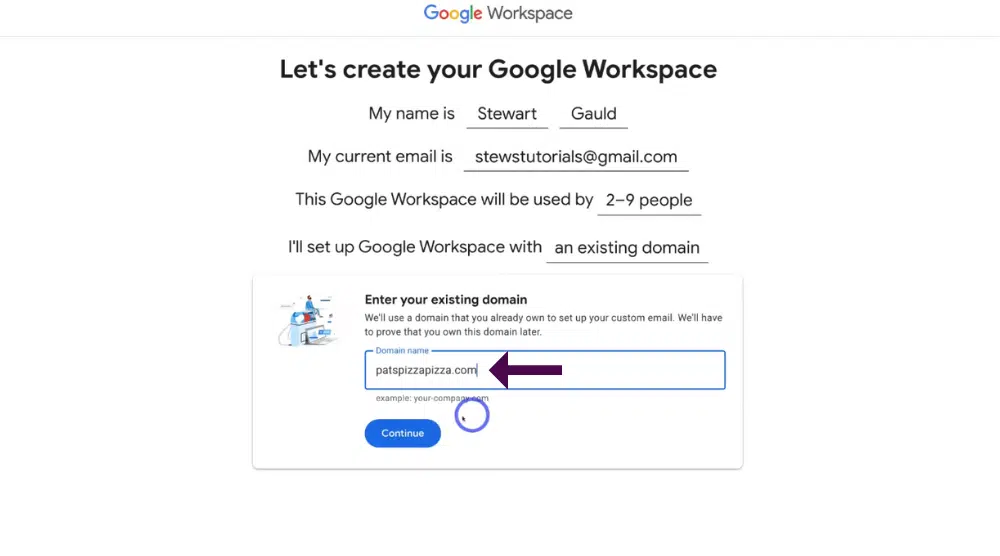
Once you have an existing domain:
- Type your domain name below ‘Domain name’
- Click ‘Continue’.

This is the domain we’re going to use for the rest of this tutorial (see screengrab).
- Click ‘Continue’.
Google Workspace makes it super simple for you to set up your account with your domain (if you purchased your domain from Google Domains).
Read more: How to create FREE business emails with Zoho Mail.
4. How To Add Your First Business Email
Next, we’re going to walk you through how to set up your first professional business email through Google Workspace!
To do that:
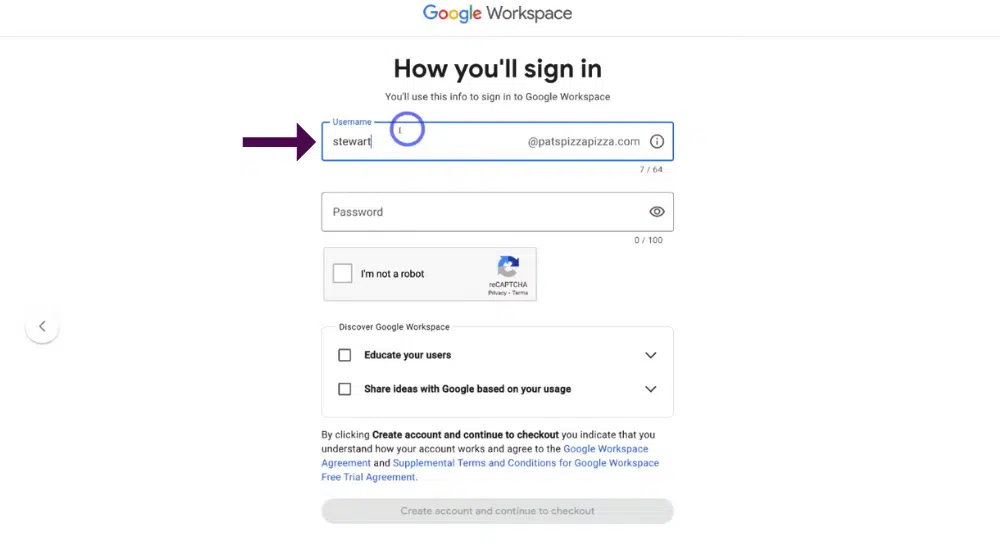
- Type in the name that you want this email to be associated with below ‘Username’.
For example, we’re going to add my name ‘stewart’ to create the email address stewart@patspizzapizza.com (see screengrab).
Read more: How to create a business email with Titan.
5. Business Email vs Email Alias

What about creating another username that’s different from your name?
For example sales@yourdomain.com at or help@yourdomain.com (see screengrab).
We are here to tell you that this is possible!
With each of your emails like this, you can actually create these email aliases to use in conjunction with your main account.
First, create your main business email then simply create an alias email for that same account.
For example, say we’re the sales manager for ‘Patspizzapizza’.
We could create the alias account email ‘sales@patspizzapizza.com’.
This means any sales-related emails will be sent to that email within the same Google Workspace account we use for our main email.
If you’re not sure how to add email aliases to your account, don’t worry!
We cover this exact process in our Google Workspace tutorial, so make sure you check that out.
However, let’s continue with this tutorial on how to set up Google Workspace business email.

Once you’ve added your main account username:
- Type in a password below ‘Password’ (see screengrab).
- Tick ‘I’m not a robot’.
- Click ‘Educate your users’.
By clicking this, it allows Google Workspace to automatically send information to any new users you add to your Google Workspace account in order to help them get up and running with their account.
- Click ‘Share ideas with Google based on your usage’ if you like.
However, we’re not going to tick that.
- Click ‘Create account and continue to check out’.
Now, this is when Google Workspace may then ask you to add your payment details.
Remember, you’re on a 14-day free trial.
If you decide you don’t want to use Google Workspace after the trial period ends, you’re able to cancel your account before the end of those 14 days (and you won’t be charged).
- Click ‘Next’.
You’ll then be asked to go through a few steps to set up your account simply:
- Select ‘Next’ again.
- Click ‘Next’ to allow Google Workspace to verify the ownership of your domain.
- Select ‘Next’ again to enable the option to add additional accounts for other users (see screengrab).
- And finally, click ‘Next’ to activate your Gmail account.
Once you’ve done this, you’re ready to move on to the next step.
- Select ‘Finish’.
Read more: How to set up an automatic out-of-office auto reply in Gmail.
6. How To Verify Your Domain With Google Workspace

Next, you’ll need to verify your domain and protect your account.
Follow these steps to find out how:
- Simply click ‘Protect’.

Next, you’ll need to add a verification code to the DNS records of your domain (see screengrab).
- Click ‘I’m ready to protect my domain’ (see screengrab).
- Select ‘Sign in to verify’.
It’s important to note that because we purchased our domain through Google Domains, we don’t need to worry about setting up the DNS.
If you didn’t purchase your domain through Google Domains, click here for information on connecting your domain with Google Workspace.
You can read our beginner’s guide on How to setup Google Workspace SPF, DKIM and DMARC.

Next:
- Make sure that you have the correct Google account selected up in the upper far right-hand corner (see screengrab).
Remember, this is the Google account that you used to buy your domain with (through Google Domains).
Once you’ve made sure you have the correct account:
- Come down and click ‘Add’.

And as you can see, our domain is successfully verified. We are now the owner of our domain! (see screengrab).
Once you’ve done that:
- Click ‘Go to Workspace’.
You’ll then see that your domain has been verified.
It truly is as easy as that to set up!
Now that you’ve set up your domain, you’re ready to set up the rest of your account.
7. How to Add Other Users (your team)

At the moment we have stewart@patspizzapizza.com as our main email address.
- Click ‘Create’ next to ‘Create new users’ to create users and unique email addresses for those users.
Again, check out our ultimate Google Workspace guide where we explain in detail how to create additional users from inside your admin panel.
8. How To Activate Gmail (Business Email)

The final step to setting up your Google Workspace account is to activate Gmail for your business email.
For the purpose of this how-to set-up Google Workspace Business email tutorial, we’ll activate Gmail for our example domain ‘patspizzapizza.com’.
- Below ‘Create new users’, click ‘Activate’ to activate Gmail for your domain.
- Click ‘I’m ready to activate Gmail’ (see screengrab).
Now it’s important to note that it can take up to 60 minutes to activate your email.
And there you have it, it really is as simple as that to set up your Google Workspace account and professional business emails!
Read more: How to fix Gmail spam issues.
9. Admin Home

Now you’ve set up your Google Workspace account, we will show you how and where you can manage everything to do with your Google Workspace account through your ‘Admin home’ (see screengrab).
To take you to your admin home:
- Head up to the top left-hand corner.
- Click these three lines (see screengrab).
- Select ‘Home’.
Alternatively, if you’re opening a new browser window:
- Head over to your browser.
- Type in admin.google.com.
- Sign in with your email and password (the one that you just created).

To find all your different apps for your Google account from your admin home:
- Navigate over to the far right-hand corner and click ‘Google Apps’ (see screengrab).
- Scroll down to the bottom of your Google app to find the ‘Admin’ panel.
That will also take you inside your admin account.
Read more: Top 3 email tracking tools and software.
10. How To Manage Your Billing Account

Your admin account is where you can set up and manage your billing account following the below instructions:
- Click ‘Setup billing’ (see screengrab).
- Scroll down and select ‘Get started’.

As you can see, we’re currently on the ‘Google Workspace Business Standard’ (see screengrab).
Don’t worry, we’ll show you in just a moment how you can downgrade to the starter plan.
- Click ‘Checkout’(see screengrab).
- Add in your details.
- Scroll down to the bottom of the page and simply click ‘Place order’.
Remember, you’re on a 14-day free trial, so if you decide you don’t like Google Workspace (although we doubt you won’t like it!) you can always cancel before the 14 days are up and you won’t be charged.
Since this is just a Google Workspace business tutorial, we’re going to head back to our admin panel.
Read more: How to use email snippets with Gmail.
11. How To Change Subscription Plans

To change your subscription plan to the ‘Google Workspace Business Starter’ plan:
- Click ‘Billing’ on the left-hand side bar within your admin account.
- Select ‘Subscriptions’.
- Click ‘Add or upgrade a subscription’ (see screengrab).

- Simply select ‘Google Workspace Business Starter’
12. Google Workspace Pricing Plans

The main difference between the different paid plans Google Workspace offers is the amount of storage that you have, as well as the number of users you can add to your account.
So, you’ve finished the 14-day trial and now you need to pick a plan.
Which one do you pick?
We recommend most small businesses go with the ‘Google Workspace Business Starter’ plan which is more than sufficient enough.
To switch from the ‘Google Workspace Business Standard’ plan to the ‘Google Workspace Business Starter’ plan: (see screengrab).
- Simply select ‘Start free trial’ on ‘Google Workspace Starter’
- Scroll down and click ‘Get started’.

- Select the 14-day free trial.
- Come down and click ‘Checkout’
- Then ‘Place order’.
And as you can see, we’ve now bought the 14-day free trial for the ‘Google Workspace Business Starter’ plan.

Next:
- Navigate up to ‘Set up billing’ if you want to add your payment details and use Google Workspace following the end of the trial.

To add additional users:
- Click ‘Directory’ over on the left-hand side bar.
- Select ‘Users’.
- Click ‘Add new user’ (see screengrab).
Again, we cover all that information and more in our Google Workspace tutorial!
However, that is everything you need to know and everything we wanted to cover to help you initially set up your Google Workspace account and business emails for your entire organization!
Video Guide – How To Set Up Google Workspace Business Email?
That concludes our guide on how to set up Google Workspace business email.
We hope you are now confidently able to set up your Google Workspace account, connect your domain with your account and start using professional business emails with that domain for your organization all within this incredible business, collaboration and productivity suite.
This process is so simple to do, yet so effective in establishing both credibility and authority for your small business.
If you’d like more clarification on this process, feel free to check out our video below!
