
Table of Contents
Google Workspace is an incredible, easy-to-use all-in-one email and productivity platform under the Google umbrella to help you and your team collaborate effectively and efficiently.
In fact, we recommend Google Workspace so much that we’ve included them in our ‘must have’ digital tools to help small businesses succeed online!
You can read all of our Top 10 MUST-HAVE digital tools for small business SUCCESS here.
Have you ever found that your Google Workspace emails are simply not working?
In order for your Google Workspace business emails to function correctly, and improve email authentication and email deliverability, It’s important to ensure that your domain is configured properly.
You can easily do this by setting up three email authentication methods for your domain to enhance your Google Workspace email setup and email deliverability.
These include:
- SPF
- DKIM
- DMARC
With this setup, you’ll stop emails from arriving inside your recipient’s spam folders and ultimately enhance the deliverability of your emails!
In this brief Google Workspace tutorial, we will share the step-by-step process of how you can properly set up Google Workspace with SPF, DKIM, and DMARC to ensure that your emails are working properly.
If you’re new to Google Workspace, check out our in-depth beginners’ guide on how to use Google Workspace here.
How To Set Up Google Workspace?
Let’s go ahead and learn how to set up your domain with Google Workspace.
1. Log In To Your Hosting Provider

In order for you to set up and properly configure your Google Workspace SPF, DKIM, and DMARC records for your domain, firstly you’ll need to log into your hosting provider and locate ‘DNS’ (Domain name system) records.
For the purpose of this tutorial, we’ll be using Cloudflare for our DNS record, and this is where we will go ahead and change all our DNS records.
It’s important to note that every domain provider and their user experience will look slightly different.
Once you’ve logged in to your domain provider, you’ll need to locate the DNS on the left-hand side.
Read more: How To Create Group Emails in Google Workspace
2. How To Set Up Google Workspace SPF Record

The first step to enhance email deliverability for Google Workspace is to add the SPF (sender policy framework) record.
This record basically prevents your messages from being labeled as spam when they arrive in your recipient’s inbox.
Follow these steps to set up your Google Workspace SPF record:
- Locate ‘Add record’ within your DNS.
- Navigate over and click on ‘Type’.
- Locate ‘TXT’ record under the ‘Type’ heading drop-down menu.
- Under ‘Name’, simply add the ‘@’ symbol.
- Come down to ‘Content’ (or you might see ‘Value’)
- Add this content information under ‘Content’ (see screengrab).
You can simply copy and paste this content information in this section within your DNS content
v=spf1 include:_spf.google.com ~all
Once you’ve done that:
- Simply navigate down and click ‘Save’.
Now you have successfully added the SPF record!
3. How To Set Up Google Workspace DKIM Record
Now that you’ve successfully added the SPF record, you’ll need to add the DKIM (Domain keys identified mail) record.
This basically helps prevent you from being identified as a spammer.
The first thing that you need to do is log into your Google Workspace Admin account and follow these steps:
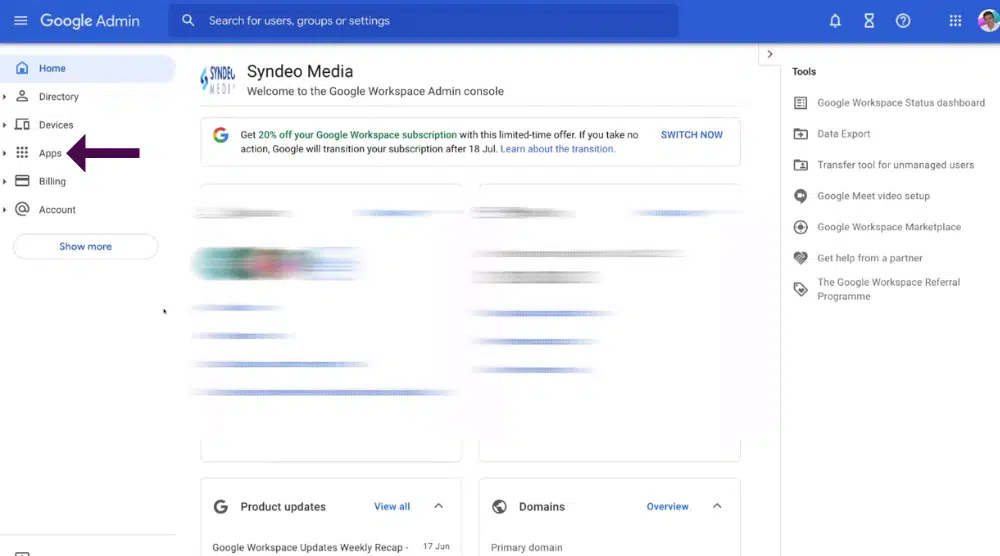
- Navigate up to and click on ‘Apps’.
- Locate ‘Gmail’.

- Then navigate over to the right-hand side and click on ‘Authenticate email’.
- Make sure under ‘DKIM authentication’ that you have your domain selected (see screengrab).
- Then come down and click on ‘Generate new record’.
- Navigate up to ‘New record’.
- First, you have the option to select the length of your DKIM key.
We have 2048 selected.
We can also select 1024, however, it’s recommended that you keep 2048 selected (which is more secure).
Once you’ve done that:
- Keep ‘Google’ selected under the ‘Prefix selector’.
- Click ‘Generate’.
- Navigate up to ‘DNS host name, TXT record name’.
- You should see google._domainkey under this section (see screengrab).
- Select and copy: ‘google. _domainkey’.

- Head back to your domain provider (your DNS records).
- Select ‘Add a new record’ again.
Again, you’ll need to:
- Navigate over to ‘Type’ and make sure that you have ‘TXT’ records selected.
- Then under ‘Name’ all you need to do is paste in that bit of text that we copied earlier: google._domainkey. (see screengrab)
- Then simply navigate down to ‘Content’ (or value) and then head back to your Google Workspace admin.

- This time, simply copy the entire ‘TXT record value’ (see screengrab).
- Once you’ve copied this TXT record value.

- Simply head back to your DNS records.
- Under ‘Content’, paste in that value.
- Navigate over and select ‘Save’ to save that new TXT record.

- Head back to your Google Workspace admin.
- Simply navigate down and click on ‘Start authentication’.
Note: It can take up to 48 hours for the DNS changes to fully propagate.
4. How To Set Up Google Workspace DMARC Record

The last thing that you need to do to enhance your Google Workspace email deliverability is to add your DMARC (Domain-based message authentication, reporting, and conformance) record.
To do that:
- Simply head back to your domain DNS records.
- Click on ‘Add record’ again.
- Navigate over to ‘Type’ and locate ‘TXT’ records’ again from the drop-down menu.
- This time under ‘Name’, add _dmarc.
- Navigate down to ‘Content’ and paste in this information:
v=DMARC1; p=none; rua=mailto:name@yourbusiness.com
Once you’ve pasted that into the ‘content’ section, you’ll need to change some of the content.
Replace ‘name@yourbusiness.com’ with your email.
We’ll go ahead and add our email (see screengrab).
Make sure that you’ve added your correct email in this section of the content.
Then again all you need to do is:
- Navigate over and select ‘Save’ to save this third record.
And congratulations, just like that you’ve updated your DNS records with the correct SPF, DKIM and DMARC records!
5. Checking Your Domain Is Set Up Correctly

Now you’ll need to confirm that your domain is set up correctly.
To do that:
- Simply head over to Google Admin Toolbox check MX.
- Simply add your domain name under ‘Domain name’.(see screengrab).
- Click ‘Run checks’.
Just like that, you’ll be able to see if your domain was configured properly!
That concludes how to correctly set up Google Workspace email set up with SPF, DKIM, and DMARC records.
And there we have it, that is all we wanted to cover in this brief Google Workspace tutorial.
We hope you gained value and are now confident in how to enhance your email deliverability and authentication!
Google Workspace SPF, DKIM, and DMARC (Video Tutorial)
You can also check out our full step-by-step video tutorial down below if you require more assistance with setting up your Google Workspace SPF, DKIM, and DMARC records to improve email deliverability.
