If you want to learn how to use Loom, an easy to use screen recorder and screen-sharing software for teams or individuals, then you’re in the right place!
What is Loom?
Loom is a free screen-sharing and video recording software that allows you to effortlessly create shareable recordings for training or educational purposes for your small business.
This tool is easy to use and can save you a lot of time and energy.
How Does Loom Work?
In just a few clicks, you can record your camera, microphone and desktop at the same time (on one platform!)
Once you’ve created your Loom recording, you can then instantly and simply share your Loom to your team or clients.
It is really as easy as that.
How Can Loom Make a Difference For Your Small Business?
Video recording and screen sharing with Looms free screen recorder software is imperative for any business, as it ultimately allows you to enhance training activities, education, and productivity within your business.
Loom’s focus is to significantly reduce the amount of time spent on training new staff members, unnecessary meetings and messy emails back and forth with clients or team members.
Let’s go ahead and dive into this tutorial.
1. Getting Started With Loom

To start creating free video and screen recordings that you can then simply share with your team, customers and other contacts, you’ll first have to sign up to Loom.
To do this:
- Head over to your browser and type in the Loom.com or click here.
That’s going to take you to this landing page (see screengrab).
- Navigate down and click on ‘Get Loom for free’.
- Select to sign up through whatever platform suits you.
You can sign up with your favorite platforms such as Google, Slack, Apple, SSO or your email address to get started with the best free screen recorder online out there!
You can read our beginner’s guide on how to use slack.
It only takes a few clicks to sign up with Loom, so go ahead and sign up and we’ll meet you inside your free Loom account.
Also read: How to use Google Workspace.
2. Loom Accounts

Here we are inside our free Loom account (see screengrab).
Before we go ahead and dive into the process of creating free video and screen recordings, it’s important to mention some of the benefits and limitations of the free plan.
With the free plan, you can collaborate with up to team members and your video recordings will be limited to five minutes.
However, if you opt for a paid plan, you’ll be able to remove the Loom branding from your videos and record in high definition.
We recommend choosing the free plan to get the most out of this free video recorder tool.
The great thing about Loom is that if you get started and find you need access to more advanced features, you can upgrade at any time to a paid plan.

Now we’ll show you how to navigate through your account, starting with the left-hand sidebar:
- Navigate over to the left-hand sidebar (see screengrab).
- Click ‘Invite teammates’ at the top to invite people to join you on Loom.
This will allow your teammates to create their own Looms, and collaborate with you on your Looms.
- Below ‘Invite team members’ you have ‘Home’.
- Below ‘Home’, you have your ‘Library’.
3. Loom Library

Within your library, you can view, create and manage all your different Looms.
- Click on ‘Library’.
For example, on this account, you can see a few different Looms that we’ve already created (see screengrab).
To send Looms from your library to your contacts:
- Navigate over to the ‘Share’ icon on the Loom you want to send.
- Select ‘Copy link’.
- Click the three dots (more actions) on your chosen Loom (see same screengrab).
- Click on ‘Share’ to share the Loom.
Here you can also click on:
- ‘Rename’ to change the name of your Loom.
- ‘Move’ to move this Loom to a folder to better manage your Looms.
- ‘Duplicate’ to duplicate this Loom.
- ‘Archive’ to archive the Loom.
- ‘Post’ to post the Loom
- ‘Download’ the Loom.
- ‘Delete’ this particular Loom.
With each of your Looms, you can see the different types of engagement that your Looms have had (see screengrab).
Let’s head back over to the left-hand side bar.
- Below ‘Library’, you have ‘Notifications’.
This allows you to identify if particular people have watched your Loom.
For example, if you created a Loom as a training video and you sent that to a team member or a potential team member, then you want to ensure that they have watched your Loom.
- Below ‘Notifications’, you have ‘History’.
To quickly find people, tags, folders and Looms:
- Navigate up to the search bar and type in what you’re looking for (see screengrab).
To manage your Looms:
- Navigate back over to ‘Library’.
How do you create a Loom?

Well, there are actually a few ways that you can create a Loom.
You can create a Loom either within Loom or through a Google Chrome extension.
Remember, creating Looms is a great way to streamline your productivity.
We’re going to look at both of these options to complete this tutorial.
Read more: How to use Scribe to create how-to guides
4. Create a New Loom Video (Inside Loom)

Firstly, we’ll show you how to create a new video inside Loom:
- Head back over to the left-hand sidebar.
- Select ‘Library’.
- Simply navigate over and click on ‘New video’.
- Click on ‘Record a video’ or ‘Upload a video’.
For the purpose of this Loom free screen recorder tutorial, we’re going to select ‘New video’.
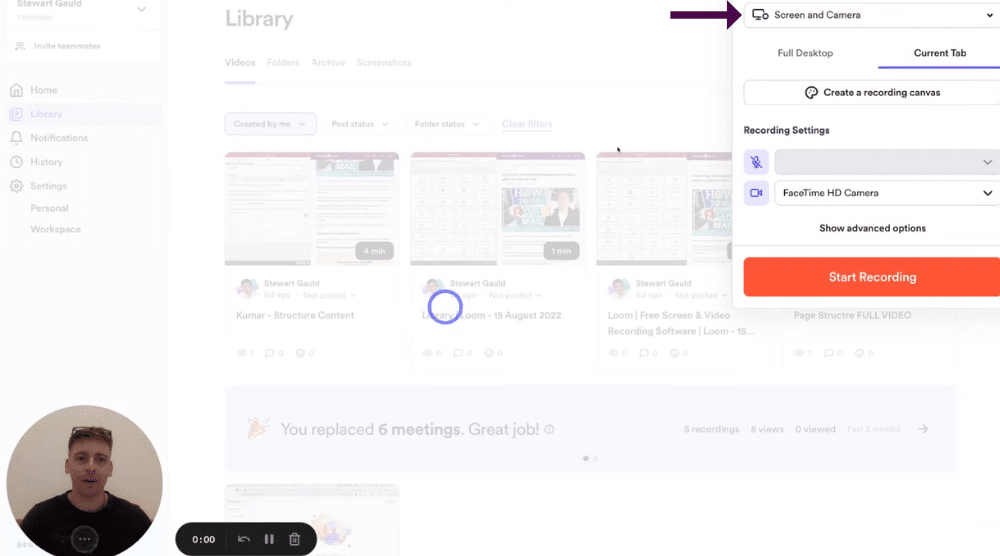
As you can see what’s going to generate this information in the top right-hand corner
We’ve got ‘Screen and camera’ selected (see screengrab).
This means that the Loom will record both our screen and our camera.
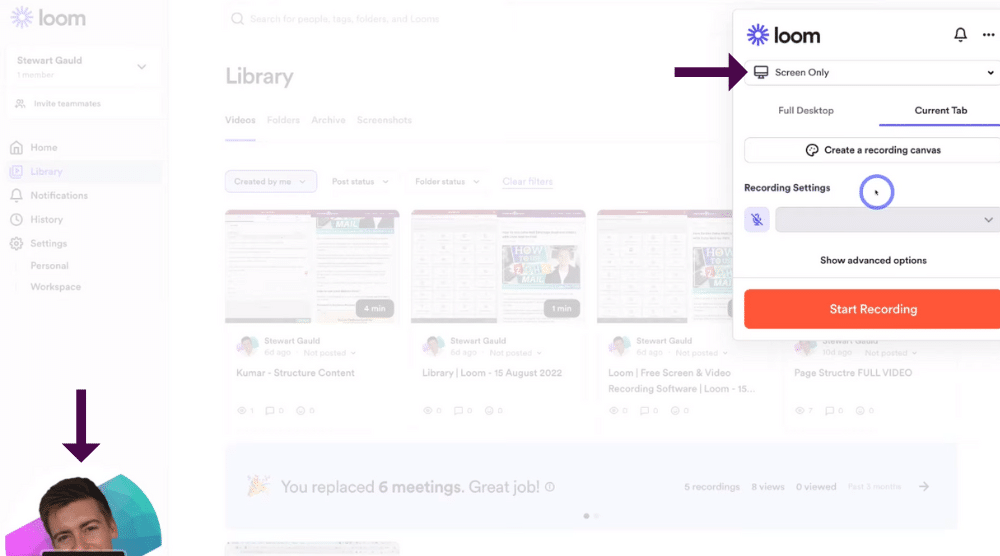
For the purpose of this tutorial, we’re going to create a Loom with our Screen only.
- Navigate up and click on ‘Screen and camera’.
- Select ‘Screen only’ from the drop-down menu.
You could also choose ‘Camera only’ if you only wanted to record your Loom with your camera.
However, we’re happy with ‘Screen only’ because we’re going to create a Loom about a responsive issue we’re having on our website that we need to send to our web developer in order to fix.
As you can see, our screen has now been replaced in the bottom left-hand corner with our profile avatar (see screengrab).
To edit your profile avatar:
- Navigate down and click on ‘Change Photo’ to change it.
- Below that, you can choose to resize this image to make it bigger or smaller.
We’re going to keep ours smaller so it doesn’t disrupt the user experience when they’re watching our Looms.
You also have the option to reposition this image.
- Simply click on the image and drag it to where you want it to go.
You can read our beginner’s guide on How to create a FREE logo with Canva.
Once you’ve chosen your profile avatar or image and are happy with how it looks:
- Head back over to the right-hand side of the screen.
- Click ‘Full desktop’ or ‘Current tab’ to record your Loom on either your full desktop or current tab only.
- Below this, click on ‘Create a recording canvas’.
This is where you can add a background and add text to your screen.
However, we simply want to create a recording of our screen so we’re not going to select this option.
Before you’re ready to start recording:
- Make sure your mic is set up correctly in order to record your voiceover under ‘Recording settings’.
However, we’re going to keep this off for the purpose of this free screen recorder tutorial.
Now you’re ready to start recording!
- Simply click ‘Start recording’.
5. Create a Loom Video From Loom Chrome Extension

The other way that Loom allows you to quickly create Looms is by downloading the Chrome extension called ‘Loom extension’.
To download the Loom extension on Google Chrome:
- You can click here
That will take you to this landing page where you can install the Chrome extension.
For the purpose of this tutorial, let’s pretend we have a responsive issue with our website.
We’ve identified the responsive issue and we want to quickly create a Loom about this issue on our website, then share this with our developer. (This is just an example of how you can use Loom).
Follow these steps to create a Loom with the Loom extension using this responsive issue example:
- Head over to the ‘Home’ page of your website
- Simply navigate up to the Chrome extension (the Loom extension) (see screengrab).
That’s going to generate this information that we went through earlier that you can change (see screengrab).
We’re happy with ‘Screen only’ and ‘Current Tab’ selected, however, remember you can change these if you like and make sure that you have a mic selected under ‘Recording settings’.
Because we’re recording a recording just for the purpose of this tutorial, we’re now ready to start recording!
- Click ‘Start recording’.
Read more: Top 10 Best website builders for small businesses.
6. Record Loom

That’s going to start a countdown, then your Loom will start!
Once your Loom has started:
- Navigate down to the bottom to view the options down here (see screengrab).
These are:
- Finish recording.
- Restart recording.
- Pause recording.
- Delete recording.
You can simply click on any of those options at any time during your recording.
Our Loom would consist of us navigating through our website and explaining the responsive issue we have.
For example, our voiceover would sound similar to the below:
‘Hey developer, thanks for joining me on this Loom, you can see that this is not very responsive, can you please make sure that this landing page is responsive on desktop, tablet, and mobile devices’.
Again, that’s just an example of how you can use Loom!
Once you’re ready to complete your Loom:
- Simply click the ‘Finish recording’ icon down the bottom of the screen.
7. How To Edit The Loom Recording

As you can see, we’ve quickly gone ahead and created our new screen recording (see screengrab).
To edit your Loom screen recording:
- Simply navigate up here and click ‘Play’ to preview your Loom.
- Click on ‘Review transcript’ over to the right-hand side to review your Loom transcript (see screengrab).
- Click on ‘Video preferences’.
- Select ‘Trim and add clips’ to edit your video.
For example, if there was a bit of fluff at the beginning of this video, we could trim this out (get rid of) at the start of the video before sending it to the developer.
- Below this, click on ‘Call to action’ to add a call-to-action to your Loom.
- Select ‘Change thumbnail’ if you want to add a thumbnail for your video.
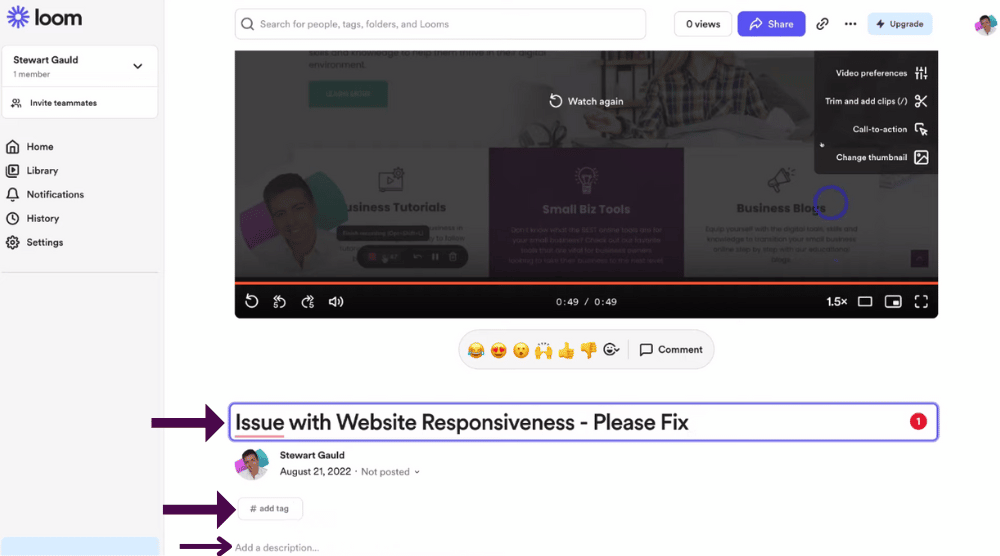
Once you’ve made your way through these editing options:
- Come down and add a title to your Loom (see screengrab).
- Navigate down and add a description
- Below this, you can also add tags to your Loom.
Tags are important if you’re creating multiple Looms.
Tags will help better manage all your different Looms in case you ever want to use this Loom again in the future.
8. How To Share Loom
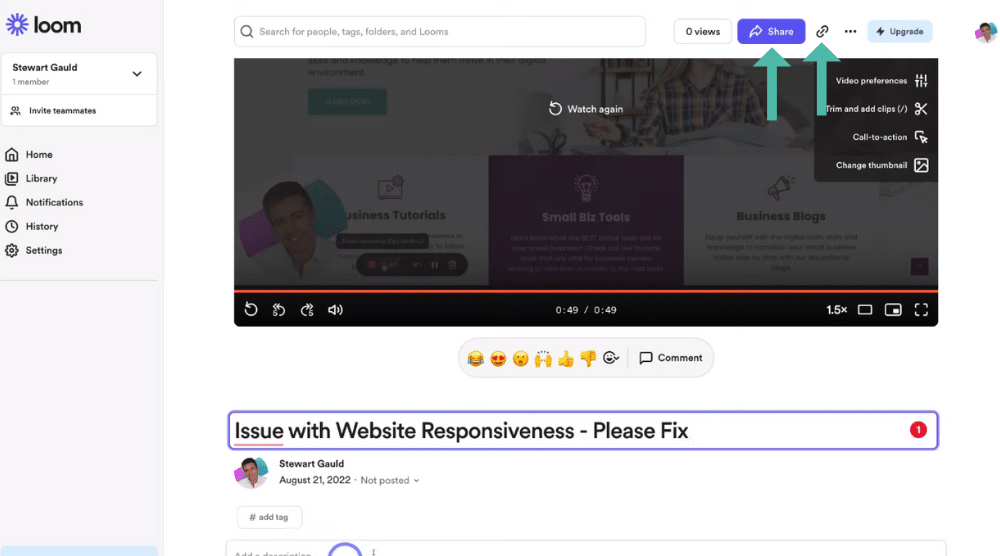
When you’re happy with your new Loom, you’re ready to share it!
- Simply navigate up to the top.
- Click on the ‘Copy link’ icon (see screengrab).
That’s going to copy the link to this Loom that you can then share with the contact, customer, or team member that you want to share your Loom with.
- Next to the ‘Copy link’ icon, click on ‘Share’ to share your Loom.
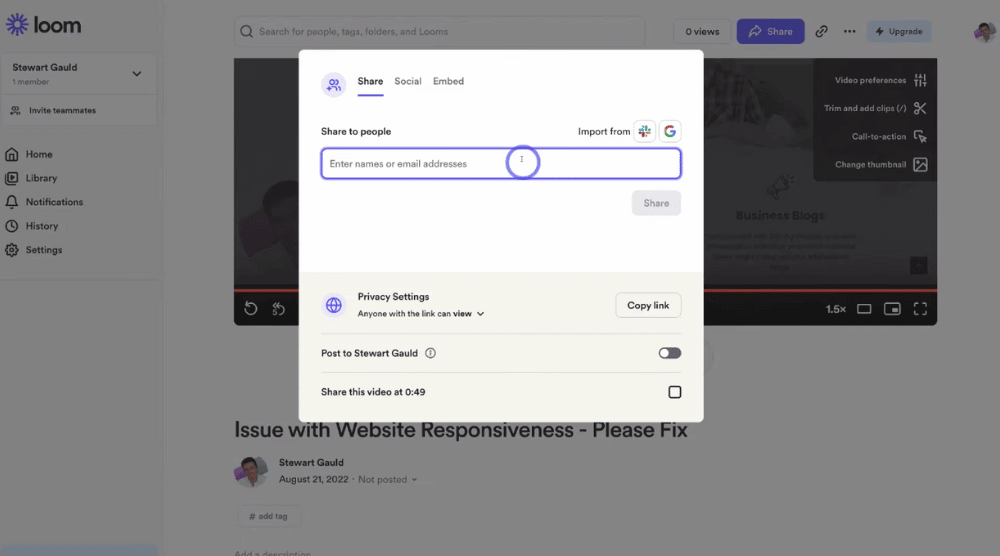
- Enter the email address of the individual you want to share this Loom with (see screengrab).
Additionally, you can also:
- Click on ‘Privacy settings’ to change the Privacy settings.
- Click ‘Post to (your Loom name) which means everyone that’s part of your Loom will be able to see this Loom.
You can also share your Loom on your social media platforms and channels.
- Navigate up to ‘Social’ next to ‘Share’ (see screengrab).
Finally, you can Embed your Loom.
- Simply select ‘Embed’ next to ‘Social’.
- Click ‘Copy embed code’ to embed your Loom onto a website (see screengrab).
Once you’ve finished sharing your Loom:
- Exit out of this.
- Navigate up to the three dots next to ‘Copy link’ and ‘Share’.
- Again you have these basic options up here.
We have almost completed this tutorial and their free screen recorder tool!
Before we wrap up, we’ll show you what the Loom we just created will look like when a potential customer, team member, or contact opens up the link and views this Loom recording.
9. What Your Loom Recipients See

As you can see, this is exactly what a recipient will see when they click on the link that will take them to this Loom recording (see screengrab)
- Simply go ahead and watch this Loom video.
- Leave a comment and a reaction down here
- Navigate up to the left-hand side (or the top right-hand corner) and click on ‘Get Loom for free’ so that they can get started with creating their own Looms.
For example, we were sending this Loom recording to our developer to fix an issue on our website.
All the developer would do is go ahead and watch this and see exactly what they need to do!
Genius, right?
This process of creating a Loom replaces physical meetings or even online meetings via Skype, Zoom (or any other platform) through leveraging Loom.
Again, you can see how you can use Loom for training purposes, for example:
- You can create one Loom video and then share that video multiple times or
- Add particular Looms in different locations online for people to access.
Looms are used for educating people, training purposes, communicating and recording issues to send to your customers or quickly enhancing communication with any type of activity.
How To Use Loom For Free Screen Recorder Online (Video Guide)
And that wraps up our guide on how to use Loom to quickly and easily create video recordings and screen recordings that you can then share with anyone that you like!
This is the end of this brief Loom tutorial, however, you can watch our full step-by-step video guide on how to use and leverage this incredible free screen recorder tool to enhance your small business.

