
Table of Contents
Are you looking for an easy-to-use free website builder with extensive features and customization options to create your own E-commerce store from the Ecwid tutorial?
You’ve arrived at the right place.
Ecwid is a free website builder for creating an online store.
Ecwid not only allows you to create a free standalone store to sell your products online – it integrates seamlessly with other website builders like Wix, Squarespace, Weebly, and content management systems like WordPress, Drupal, Joomla, and others.
This means that small business owners can simply add an E-commerce store to an existing business website or blog.
What’s more, is Ecwid offers a completely free plan (not a trial, like other popular E-commerce website builders).
How to Use Ecwid to Sell Online Products for free?
In this Ecwid tutorial for beginners, you’ll learn step by step how to use Ecwid to create an online store.
Step 1: Getting Started – Ecwid Login
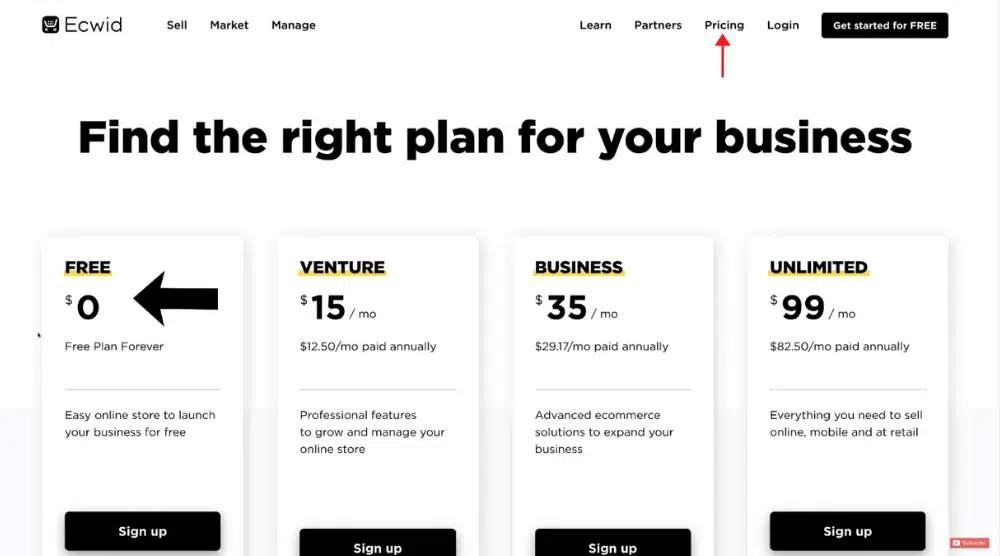
Here, you’ll notice the free plan offered by Ecwid. It’s important to note that you can list up to 10 products under its free plan.
To list more than 10 products, you will need to upgrade to the Venture, Business, or the Unlimited plan.
With the free plan, you won’t be able to integrate other sales channels, including an Instagram store, Facebook store, and eBay.
However, the free plan will suffice for small businesses looking to quickly and easily start selling their products online.
Hence, under the free plan, click ‘Sign up’.
Next, add your details on the right-hand side or sign up with Google. For this Ecwid tutorial for beginners, we’ll choose the latter.
Make sure your details are correct and click ‘Next’.
Now, add your business address (or home address if you don’t have one) and click ‘Next’.
In step 3 of 4, you’ll be asked a few questions, to which you need to select the appropriate answers. Click ‘Next’ again.
In step 4 of 4, you’ll be asked if you already have a website. Select ‘No’ from the drop-down.
Below that you need to add your business name (for this tutorial we will add purenz).
Later down the track, you can choose a proper domain for your store. Click ‘Finish & Proceed to Dashboard’.
Read more : Create A Free Website and Sell Products on Wix Online Store
Step 2: Ecwid Dashboard

This is where you’ll learn how to sell products online for free through Ecwid.
Below ‘Greetings!’ you’ll notice your site URL. This will take you to your website.
Step 3: Add Products

But first, you’ll need to delete the existing default products.
Navigate under the filter and select all the products. Click Bulk Update > Delete Selected.
To add your first product to Ecwid, click ‘Add New Product’.
First, we need to upload images of the product (from different angles).
Simply hit ‘Upload Images’ and select relevant image files from your system. You can sort the images in the preferred order by dragging and dropping them.
Following this, enter the following information:
- Name of the product – Vertical Bar Necklace
- Stock Keeping Unit (SKU) – this is for your own reference
- Weight in kilos (kg)
- Product description – using the formatting options above the description, you can add an image, insert a video, etc.
- Price
Remember to hit ‘Save’ on the top-right corner.
By clicking Options > Add New Option, you can add color options for your product.
Under ‘Option name’ type ‘Colour’ and select ‘Drop-down list’ under the ‘Input type’.
By checking the box that says ‘Do not preselect default value’, you make sure that the customer selects a color before making the purchase.
Click ‘Add New Value’ and enter ‘Rose Gold’. Add two more values – Silver and Gold.
For each option, you can select a price modifier.
For example, if you were to offer an additional accessory, you can put a price on that.
However, since we’re adding only the color options in this Ecwid tutorial for beginners, we won’t select a price modifier.
By following this process, you can add more products.
Ecwid is a free website builder for online stores that allows you to duplicate a product to quickly add more products similar to the existing one.
Remember though, you can only add up to 10 products under the free plan.
Step 4: Choose Your Shipping Method

In step 1 of 3, you’ll find the shipping method selected based on the country you’re in.
We have New Zealand Post selected by default. Now, click ‘Set Up New Zealand Post’.
Next, you can choose any of the following options:
- Set Up Free Shipping
- Set Up Conditions
- Set Up Flat Rate
- Set Up Custom Rates
For this Ecwid tutorial for beginners, we’ll choose the free shipping option.
In Step 3 of 3, click ‘Save & Finish’. You can edit these shipping details anytime from ‘Shipping & Pickup’.
Step 5: Select Payment Options

Using this best free E-commerce platform for small businesses, you have the option to get paid by PayPal, Afterpay, or/and Stripe.
For this Ecwid tutorial, we’ll connect PayPal.
Click on ‘Enable PayPal’. If you have a different email associated with your PayPal account, navigate over to ‘Actions’ and select ‘Edit’ to change your email.
We recommend connecting Stripe and Afterpay as well to enable more payment options.
Step 6: Customize Your Online Store

For that, you need to select ‘Website’ under ‘Sales channels’ on your left.
If you scroll down, you can add your online store to other websites by clicking ‘Pick Platform’.
Here, you can integrate your Ecwid store with Facebook Shop, Facebook Messenger, Instagram Shopping, and other website builders such as Wix, WordPress, Weebly, and Joomla.
For integrations, however, you would require a paid plan.
This allows you to reach more people and sell across different platforms. However, in this tutorial, we’re going to focus on launching an online store directly with Ecwid.
Navigate to Website > Site appearance > Edit.
Click on ‘Header’ and add a site logo under ‘Content’.
Select the type of logo (text or image) in the next step.
You can also change the navigation menu here or add an additional menu item.
Under ‘Content’, you may proceed to add the contact information (phone and email).
Under ‘Action Link’, you can add a call-to-action (CTA) on your menu header.
For example, if you type in ‘GET DEAL’, a button will be generated on the menu header (far-right).
Now, you need to choose the ‘Action on click’ (open page, for example) below the CTA.
To edit your cover, simply click on ‘Cover’ and add a tagline, title, and description. Below that, you can also change the cover image.
Under ‘Primary action’ is where you can change the button using the best free E-commerce platform for small businesses.
Under ‘Featured Products’ is where you can add your featured products and next Customer Testimonials where you can add a title, description, and delete or change the image.
Similarly, you may modify the About Us, Contact Us, and footer sections.
Now, our entire website made using the free website builder for online stores is a single-page website.
If you click on ‘Contact Us’ on the menu header, you’ll be taken to the corresponding region of the web page.
Also, by clicking ‘Add Block’, you can add additional blocks such as Special Offers, Location, and Company info to your single-page website.
After you have edited each section, click ‘Save & Publish’.
To view your website live, navigate back to the Ecwid dashboard, and click the website URL.
Also Read: How To Use, Setup & Start Selling on Etsy
Ecwid Tutorial for Beginners (Video Tutorial)
And that is how you can create a free online store with Ecwid.
If you are a complete beginner to Ecwid, we have a video tutorial below to take you from beginner to expert in using Ecwid. If you have any questions feel free to add those below. Enjoy the website building process with Ecwid!
Disclosure: Some of these links on this page are affiliate links, meaning we will get a commission if you buy through them, this helps support our education-based platform and we thank you in advance.
