Want to learn how to set up recurring payments in Stripe? Stay tuned!
But first, what is Stripe?
Born in 2010, Stripe is an online payment provider that provides a platform for businesses to receive and make automatic payments over the Internet.
Stripe offers a variety of payment processing solutions, including credit card and ACH transactions.
It’s the go-to solution for accepting payments online!
Not to mention, Stripe integrates easily with many popular business software and applications.
But did you know that you can also leverage Stripe for recurring payments?
What do we mean by Stripe recurring payments?
A recurring payment is a payment that is made on a regular schedule and is often paid automatically.
Basically, this is a convenient way for customers to purchase a product or service without having to remember to actually make a payment.
And by using Stripe’s automatic payments, you’ll reduce the manual activity of creating the invoice over and over again.
Are you ready to learn how to set up recurring payments with Stripe automatic payments?
Read more: How To Use Stripe To Collect Online Payments
Also read: Best Website Builder for Online Store
How to Use Stripe for Recurring Payments?
Get yourself comfy and bucket up – we’re about to show you just how easy it is to streamline your payment processes!
Let’s jump right in and learn all about Stripe recurring payments.
1. Get Started with Stripe

But before we show you how to set up recurring payments in Stripe, you’ll need a Stripe account.
If you’re entirely new to Stripe and need help creating an account, we suggest watching this tutorial first.
Plus, it also covers the many impressive features that Stripe has to offer!
Also read: How To Use PayPal to easily send and receive online money
2. Set Up Recurring Payments

Once you’ve set up your account, you’re ready to start setting up recurring payments in Stripe.
To get started:
- Click on ‘Products’ on your Stripe dashboard
- Stripe subscriptions are created within a product. To add a new product, hit ‘Add product’

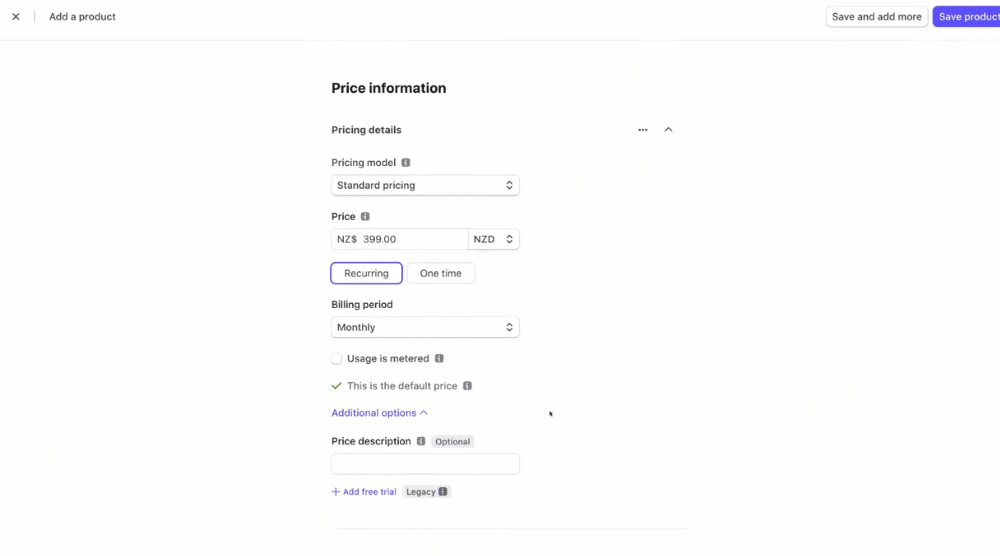
- Enter the name of your recurring product or subscription plan. For this Stripe tutorial for beginners, we’ll use the name ‘Yearly Platinum Consulting/$399 p/m’ (refer to the screengrab)
- Upload a product/service image
- Add a product description if needed

- Under ‘Pricing model’, keep ‘Standard pricing’ selected.
For the purpose of this Stripe recurring payments guide, we’re going to keep this selected
However, feel free to check out other pricing models like volume pricing, graduated pricing, and package pricing.
- Under ‘Price’, keep ‘Recurring’ selected
- Enter a price in the field given and choose your currency
- Select a billing period: weekly, monthly, every 6 months, yearly, custom billing cycle, etc.
Because we’re focusing on how to set up recurring payments, we’re going to opt for a monthly billing period.
- Keep the ‘usage is metered’ box unchecked to charge a flat monthly fee
- Enter a price description for internal reference if necessary
- To add more pricing plans for this product, click on ‘Add another price’ (refer to the screengrab). We’ll skip it for now.
- Hit the ‘Save product’ button (top-right corner).
Also read: How To Set Up Recurring Payments in PayPal
3. Create Stripe Payment Link


This is where you can:
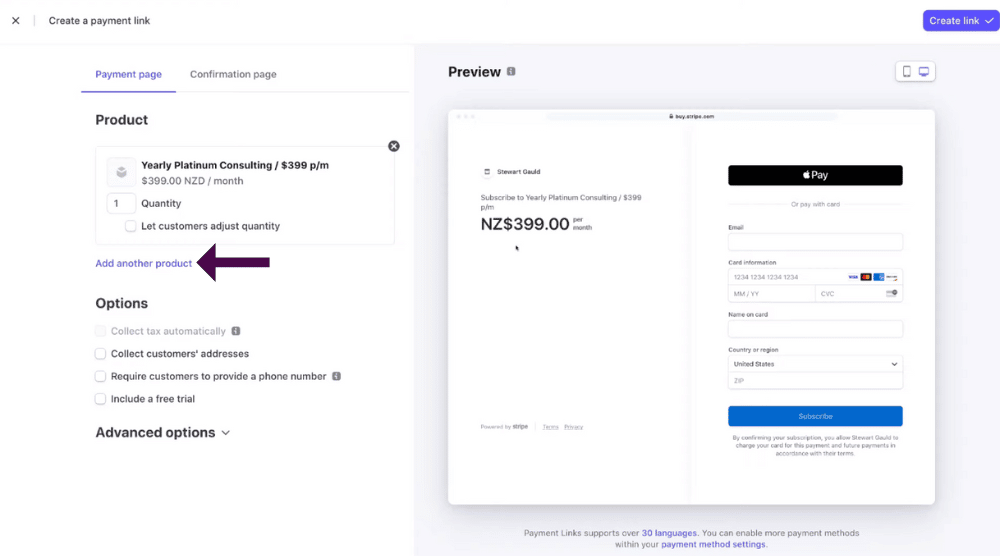
- Create a payment link for each of your products.
- Send the payment page link to your customers so that they can directly sign up and make the purchase.
- Add more products to this link.

On the payment page, you can:
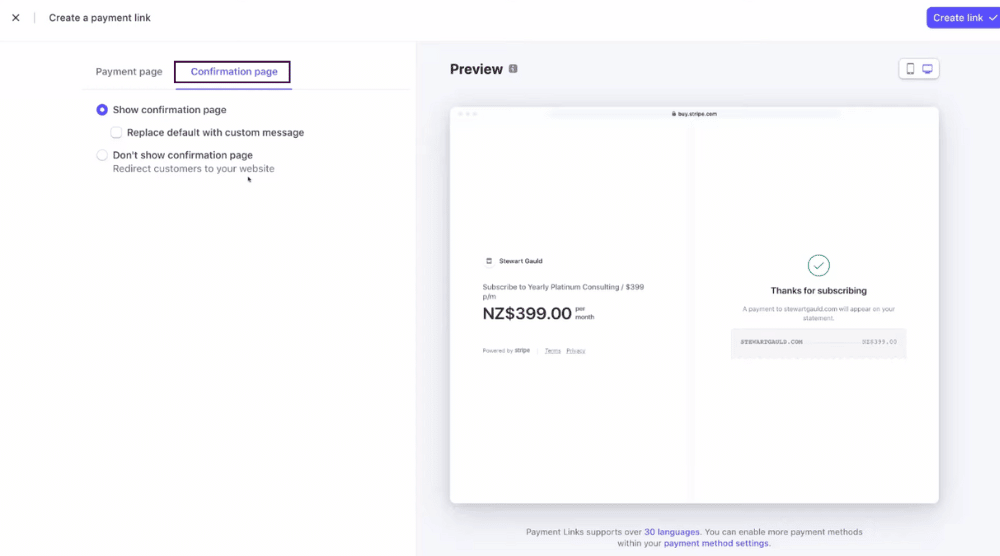
- Tap on ‘Confirmation page’ > select ‘Replace default with custom message’ and replace the message. You can also check the preview on your right.
- Choose not to show the confirmation page at all and instead redirect people to your website.
For the purpose of this Stripe automatic payments tutorial, we’re going to hit ‘Create link’ and copy the link on our Stripe dashboard.
Once you’ve done that, let’s show you how to create Stripe subscriptions:
4. Add Stripe Subscription Plan (#1 Method)

- Navigate over to ‘Customers’
- Select the customer that you wish to offer a subscription to

- Locate ‘Subscriptions’ and hit ‘Create’

- Under ‘Product’, choose your subscription plan from the dropdown
- Under ‘Subscription schedule’, choose the start and end date of the billing cycle.
- You can also click on ‘Forever’ and choose ’12 cycles’ since this is a yearly subscription plan.
- You don’t need to choose an end date for your plan. It will continue forever until you or the customer decides to end the subscription.

- Scroll down to ‘Payment method’
- Choose ‘Email invoice to the customer to pay manually’ if the customer’s payment method is not on file.
- Select the ‘Invoice payment page’ checkbox.
- You can manage payment methods, add a memo, and set up advance options like adding an invoice footer. The footer can include the terms & conditions of your service.
- Hit ‘Start subscription’ (top-right corner)
And congratulations! You’ve successfully learned how to use Stripe recurring payments!

You can also:
- Click on the Stripe subscription

- Tap on ‘Actions’ on the right
- Update the subscription, pause payment collection, cancel it, or reschedule cancellation (refer to the screengrab)
- Issue refund during the cancellation
5. Add Subscription Plan and Invoice

- Head back to the ‘Customers’ tab
- Select a customer

- Tap on ‘Actions’ again
- Select ‘Create an invoice’

- Under ‘Items,’ choose the subscription plan
- Hit ‘Save’
- Add additional items if needed
- Select the email invoice option under ‘Payment’
- Change the payment options if you like
- Add a due date
Navigate over to the ‘Payments’ tab (refer to the screengrab), and you’ll find all your subscriptions on the left-hand side(scheduled, ongoing, and canceled).
We have good news! There’s another way you can learn how to use Stripe for recurring payments.
6. Add Subscription Plan (#2 Method)

- Keep the Payments tab selected
- Tap on ‘Subscriptions’ on the left
- Hit ‘Create subscription’

- Add the customer
- Choose your subscription plan
- Set up your subscription schedule
- Select the email invoice option
- Add a memo and check out additional options like adding a footer, as explained earlier.
- Hit ‘Start subscription’ (top-right corner)
And that’s how you use Stripe for recurring payments!

To view all your payment links:
- Select the Payments tab again
- Choose the ‘Payment links’ option on the left
This is where you can locate all the Stripe payment links.
And there you go! That concludes our Stripe tutorial for beginners!
Stripe Tutorial for Beginners (Video Guide)
You can set recurring payments in Stripe for your customers to make payments on a schedule that you set.
Why set up Stripe recurring payments?
This is a great way to offer discounts to customers who make payments regularly or to charge a fee for a service that requires a monthly payment.
Plus, recurring payments help you set up a regular income for your business (which is the goal, right?)
You can create a monthly, weekly, yearly, daily, or custom payment schedule for your customers in Stripe!
It’s also an excellent way to establish a regular cash flow from your customer base.
After a visual guide explaining how to set up recurring payments?
Check out our full Stripe video down below!
Frequently Asked Questions
Can Stripe Do Automatic Recurring Payments?
Yes! The best thing about Stripe is that once it’s set up, Stripe’s recurring payments are all automatic, saving you time and money!
This makes it so easy for you to collect payments from your customers.
Can You Set Up Weekly Payments in Stripe?
Absolutely! Better yet, with Stripe’s recurring payment ability, you can set up daily, weekly, monthly or yearly payment options.
Plus, if you don’t want to make use of Stripe’s automatic payment choices, you can manually set up payments.
Which Is Better – Stripe Or PayPal?
Both Stripe and PayPal are awesome payment processing providers.
It all depends on what you want to get out of the service.
Stripe’s automatic payments, customization capabilities, and low transaction fees make the platform desirable.
PayPal is more simple to use and may be better suited for beginners.

