Through this HubSpot tutorial for beginners, we’re going to explain how to create a sales pipeline to help you streamline your sales process.
In other words, the process of converting your prospects into paying customers.
However, before we do this, it’s important we get started with the basics.
Read more: Top 5 CRM software for small business.
What is a Sales Pipeline?
Do you want to know how you can optimize conversions from leads into loyal customers, and how to manage your prospects in their buying journey?
That’s where sales pipeline management comes in.
Consider your sales pipeline as a bird’s eye view of your sales process.
By using a sales pipeline management software, you’re able to identify any problems in any stages of your pipeline , and optimize your sales process through a visual sales pipeline.
With that said, what does a sales pipeline actually look like?
Sales pipelines may visually look slightly different depending on your business, but this is what a standard sales pipeline will look like:
Prospects > Qualified lead > Presentation or meeting > Define prospects needs > Offer sent > Negotiation/final proposal > Closed won > Closed lost
Sales Pipeline Management with HubSpot
Now that you’re familiar with what a sales pipeline is, let’s walk you through one of the best sales pipeline management software in the market, HubSpot.
If you haven’t heard of HubSpot before, you’re missing out!
Get started with HubSpot for FREE here.
*The link above is an affiliate link, which means we will get a commission if you upgrade to a paid plan (with no extra cost to you). This helps support our education-based website and we thank you in advance!
HubSpot is an amazing CRM (customer relationship management) software various dynamic and easy-to-use features that offers for anything customer related.
One of the reasons we absolutely love HubSpot is that they offer an abundance of these features all on their FREE plan!
You can track the progress of your leads, identify any issues, nurture issues with relevant activities, and close deals faster by moving them through the pipeline.
Moreover, you can further optimize your sales process with email marketing activities, activity logs, tasks, and more.
That’s right- all for free!
So for the purpose of this tutorial, we’ll be using HubSpot’s free CRM plan.
This is an all-in-one tool that allows you to manage and track your leads all in one place for free.
Haven’t heard of HubSpot before and want to learn more about it’s features?
Read our complete HubSpot CRM for beginners guide here.
This will walk you through how to sign up, sign in and make the most of HubSpot’s free CRM.
Now, once you’ve completed the initial sign-up process, you’ll arrive at the HubSpot CRM dashboard.
Read More: How To Use HubSpot CRM.
How To Get Started With Sales Pipeline Management
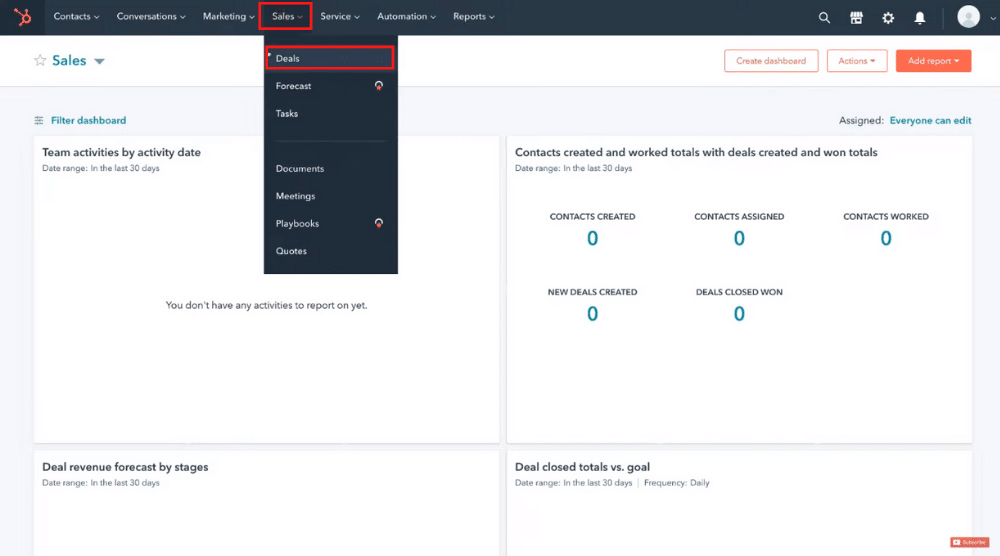
To understand how to manage the sales pipeline in HubSpot, you’ll need to:
- Click on ‘Sales’ located on the menu above.
- Select ‘Deals’(refer to the screengrab).
This is where you can view and manage the sales pipeline stages within HubSpot.
- Here, next to ‘Deals’, you can switch between the board view and the list view of your sales pipeline.
We’re going to choose to view our pipeline in the board view in this HubSpot tutorial, as it offers a better visual representation.
Within your sales pipeline, you can view each stage of the deal, the close date, client information and the value that the deal is worth.
This allows your sales team to further plan and optimize their marketing activities.
Each stage can also be customized according to your sales process.
As your prospects move through each sales pipeline stage:
- Simply drag and drop each deal to the next stage.
- Continue to do this until they become a customer (or reach the end of your pipeline).
However, there will be instances when you don’t close a deal, like if you lose the customer.
If that happens:
- Move that particular deal to ‘Closed Lost’.
How to Customize Your Sales Pipeline
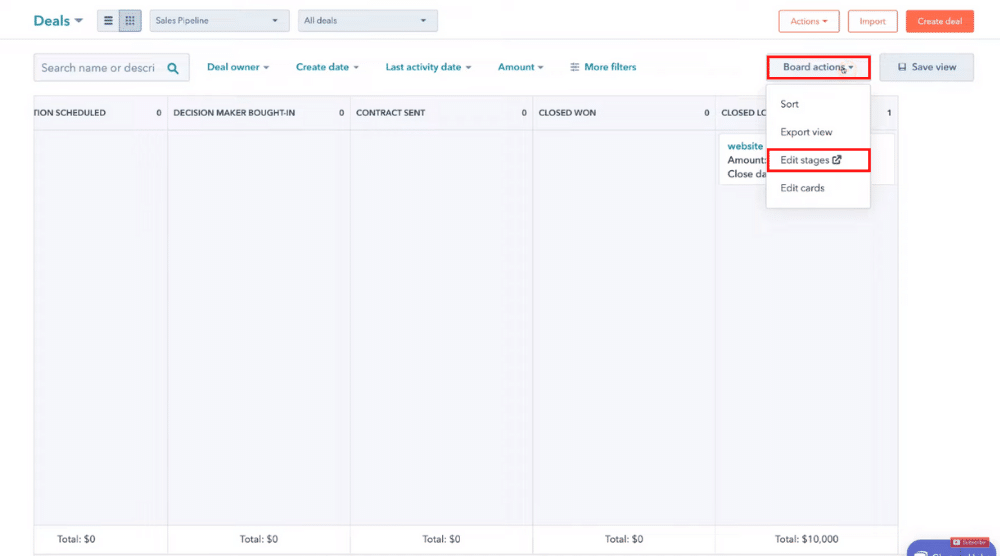
In this section, we’ll cover how to edit your sales pipeline within HubSpot.
To do this, follow the below steps:
- Click ‘Board actions’ in the top-right corner.
- Select ‘Edit stages’.
- Head over to ‘Select a pipeline’.
It’s important to note that with HubSpot’s free CRM software, you’re only able to access to one sales pipeline.
However, this is sufficient for small businesses!
If you upgrade your plan, you’ll be able to create more than one sales pipeline.
How To Customize Deal Stages
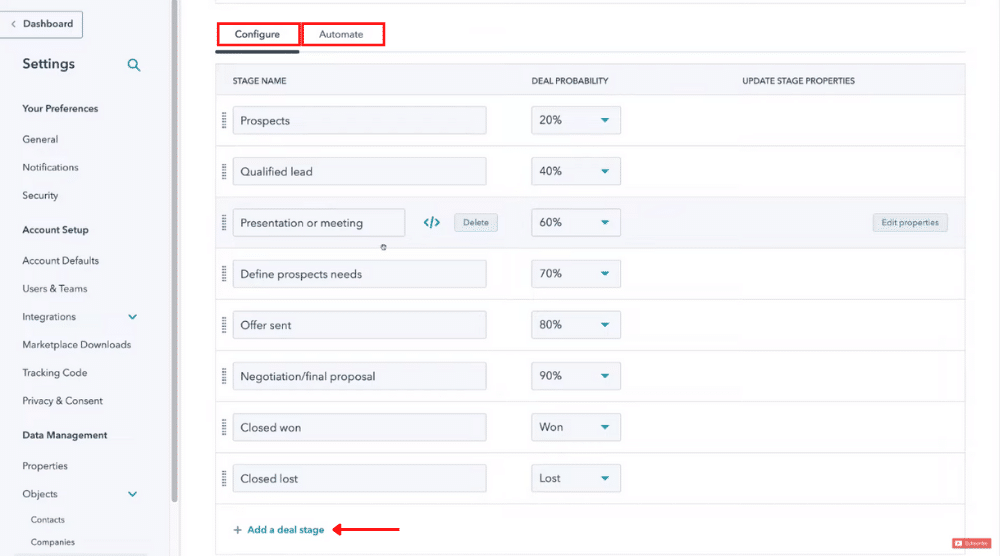
Now let’s dive into the rest of this HubSpot tutorial for beginners and show you how to customize your deal stages.
To do that:
- Under ‘Configure’, proceed to edit your stage names.
For example, we’ll name our first stage ‘Prospects’ (these could be unqualified leads generated through a landing page).
Want to learn how to create free landing pages with HubSpot?
Next:
- Select the deal probability for each stage.
- As a prospect moves towards the final stage of the sales pipeline, the deal probability will increase.
- You can also delete any sales pipeline stage or
- Change their sequence if you like.
Here’s what the pipeline looks like:
Prospects > Qualified lead > Presentation or meeting > Define prospects needs > Offer sent > Negotiation/final proposal > Closed won > Closed lost
Notice the increasing deal probability with each progressing stage. [Refer to the screengrab]
- Click ‘Add a deal stage’.
- Change the probability.
- Drag the new deal to any position within the sales pipeline.
- Hit ‘Save’ in the bottom-left corner.
Your sales pipeline in HubSpot has now been updated!
If you wish to automate your sales pipeline:
- Navigate over to ‘Automate’ next to ‘Configure’.
However, this is a paid feature, and therfore is only available on paid plans.
How to Create a Deal within HubSpot
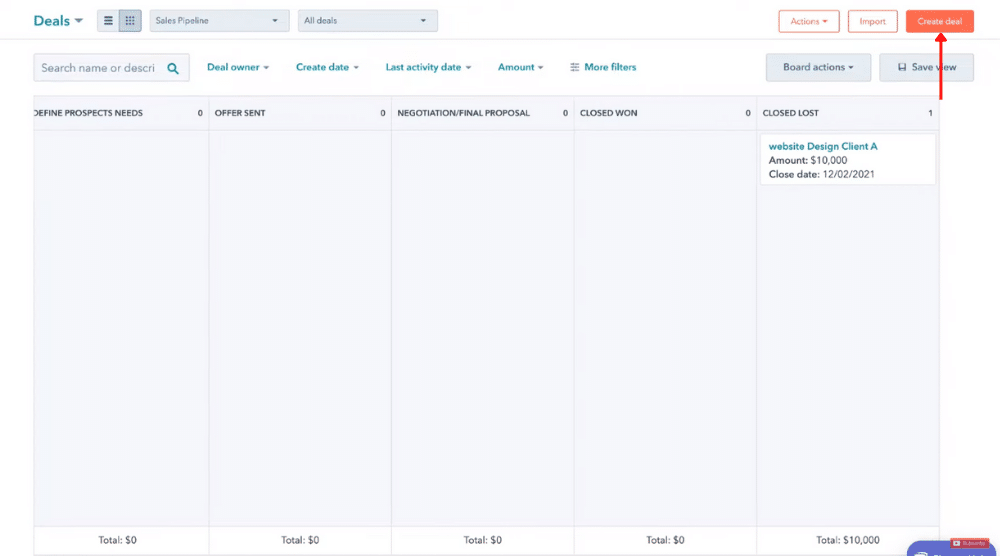
To create a new deal:
- Click on ‘Create deal’ in the upper-right corner (Back over on your pipeline).
- Fill in your information, such as deal name, deal owner, amount, and close date.
- Select the pipeline, deal stage, deal type, and priority.
- Under ‘Associate deal with’, you’ll see the activities for the last 30 days.
- Add the point of contact below ‘Company’.
- Click ‘Create’.
Record Details
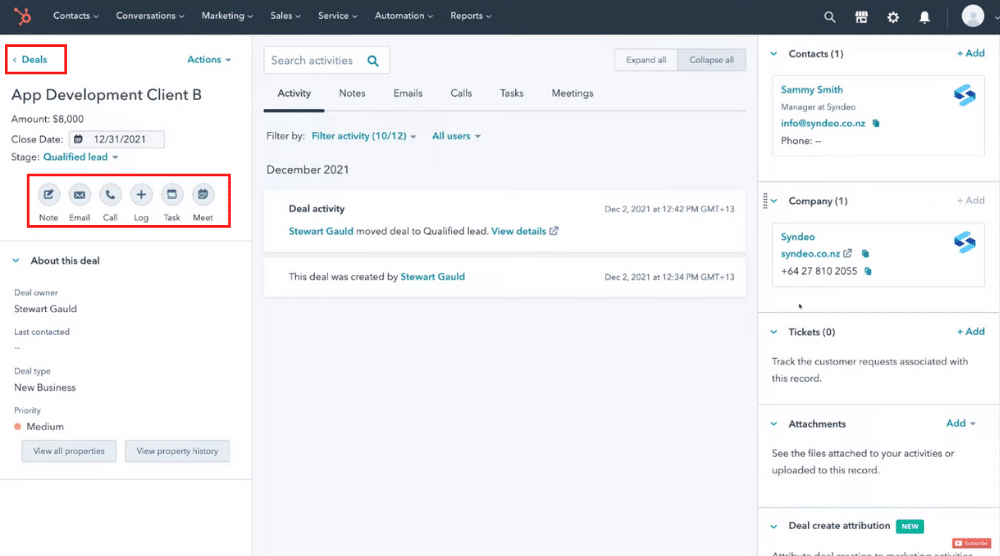
In every deal, you’ll find a few options on the left, such as:
- Create a new note.
- Send an email.
- Dial a phone number.
- Schedule a meeting.
- Add a task.
To find your newly created deal:
- Click ‘Deals’ in the upper-left corner,.
- You’ll then see your new deal under the second stage called ‘Qualified Lead’.
- This will generate basic information on the right-hand side.
- You can then customize this information.
Next, to view and edit the entire record:
- Click ‘View record’ in the bottom-right corner.
Fundamental Activities
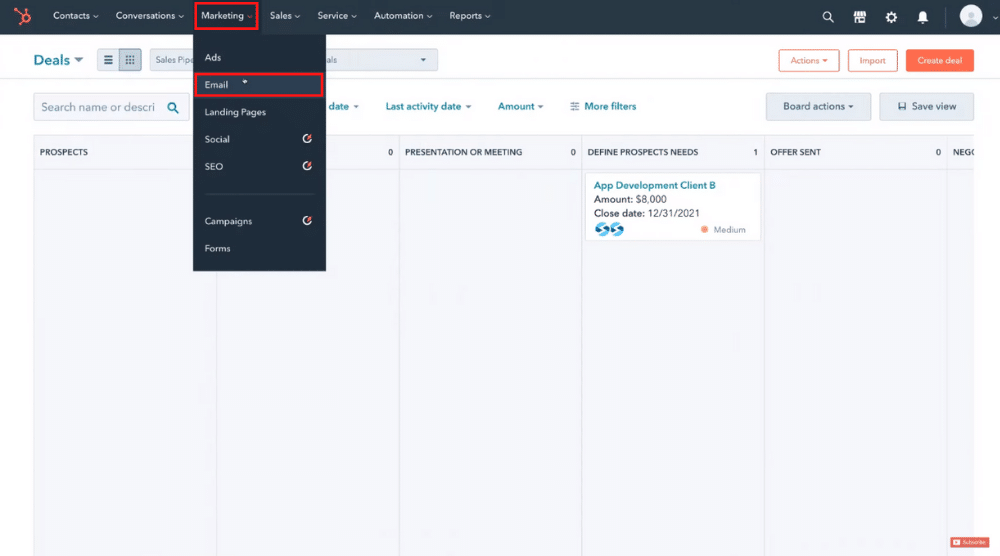
An indispensable part of a sales pipeline management software is to follow up with your prospects through email, phone call, or text.
One of the features we additionally love within HubSpot CRM is the email marketing feature.
You can access this feature by:
- Clicking on ‘Marketing’ at the top.
- Selecting ‘Email’.
Within this feature, you can provide immense value to your audience by creating captivating newsletters, sales campaigns, or other email broadcasts.
Want to learn more about email marketing via HubSpot? Watch this tutorial!
Also Read: Top 5 FREE Email Marketing Software
However, that concludes our HubSpot tutorial on how you can get started with sales pipeline management!
You should now be well equipped to streamline your sales process and ultimately boost your business’s revenue by leveraging HubSpot’s CRM software.
Create a Sales Hubspot Pipeline (Video Tutorial)
If you would like to watch our video tutorial on how to create a sales pipeline you can do so here:

