Table of Contents
Are you part of a church, charity or other not-for-profit organization and are looking to set up and collect online donations on your website?
Well, you’ve come to the right place!
It’s super easy to set up and collect online donations on any website.
In this tutorial, we will show you you can add a donation button on your website and collect online donations on any website for FREE with the PayPal donations button feature.
How to collect online donations through Paypal?
Let’s go ahead and show you how to enable PayPal donations on your donation page on your website so that you can start collecting donations for your organization!
1. Getting Started With Paypal
If you’re completely new to PayPal and you want to learn how to actually navigate through all the different elements that PayPal has to offer, you can check out our beginners tutorial here.
If you don’t already have a PayPal account, we recommend you go ahead and sign up for (ideally) the business account.
2. PayPal Giving Fund

If your organization is a registered charity within your country, you can sign up for the PayPal giving fund.
This is designed and built for charitable organizations.
It’s important to note that the regular PayPal account (either personal or business) will charge you a small fee for every transaction or donation.
However, if you’re a registered charity and you sign up for the PayPal giving fund, then there will be zero fees on the donations that you collect.
Once you’ve set up an account, we’ll meet you inside your PayPal account.
Read more: How To Set Up Recurring Payments in PayPal
3. PayPal Donations Buttons

From here, you can start setting up and collecting donations on your website!
Firstly, you’ll need to set up the PayPal donations button by following these steps:
- Navigate up to and click on ‘Pay & get paid’.
- Navigate across and click on ‘PayPal buttons’.
- Simply locate ‘Donate’.

You’ll have the option to either:
- Create a link (or)
- Customize a button.
If you just want to create a link and then embed this link on your website, you could add it to a button.
You could also use this link in email marketing activities or in your social media content.
If this sounds like the best option for you, go ahead and simply create a link.
For the purpose of this tutorial, we’re going to go ahead and create a custom button that we can then embed on our website.
- Simply click the ‘Customize a button’
- Over on the right-hand side, you’ll see a preview of your donate button.
Also read: How To Use Stripe To Collect Online Payments
4. Customize The Button

- If you navigate over to the left-hand side, this is where you can customize your button including the size of your button (see screengrab).
We’re happy with our button being large, however, you can adjust it to your liking.
Below this:
- Select the country or region that you’re based in.
We’re going to be a charitable organization located in New Zealand, so we’re going to keep ‘New Zealand’ selected for the purpose of this tutorial.
Below that, you’ll see ‘Language’. What you want to do is:
- Select the language that your audience uses.
- Scroll down further and click on ‘Show accepted card logos’.
That’s going to automatically generate acceptable cards that people can make donations on the right-hand side. (see screengrab).
If you continue to scroll down, you can choose to use your own button style.
- Click ‘Use your own button style’.

This allows you to create a button in these different formats down here
Then you can simply upload the button that you’ve created.
You can easily create a professional and unique button with a tool like Canva.
Canva is a completely free graphic design tool that can help you with anything from buttons, logos, social media posts, flyers, posters, eBooks, and more!
If you’d like to learn more about how to get started with Canva, you can watch our complete beginners guide tutorial here.
- Click ‘Use the PayPal button style’.
- Navigate down and click on ‘Continue’.
Read more : Canva Free Logo Maker
5. Customize Donation Name

You’ll then be taken to this page.
You can see we have our organization name here i.e Syndeo media (see screengrab).
If you’re signing up to PayPal for a charity and you’re creating a donation button for that charity, then you want to make sure that you’re using that organization’s name.
Follow these steps:
- Turn on ‘Display your logo’.
- Come down and click on ‘Upload logo’.
For the purpose of this tutorial, we’ll upload our agency logo.
This is the logo that we’re going to use (see screengrab).
Once you’ve uploaded your logo:
- Come down and click ‘Save logo’.
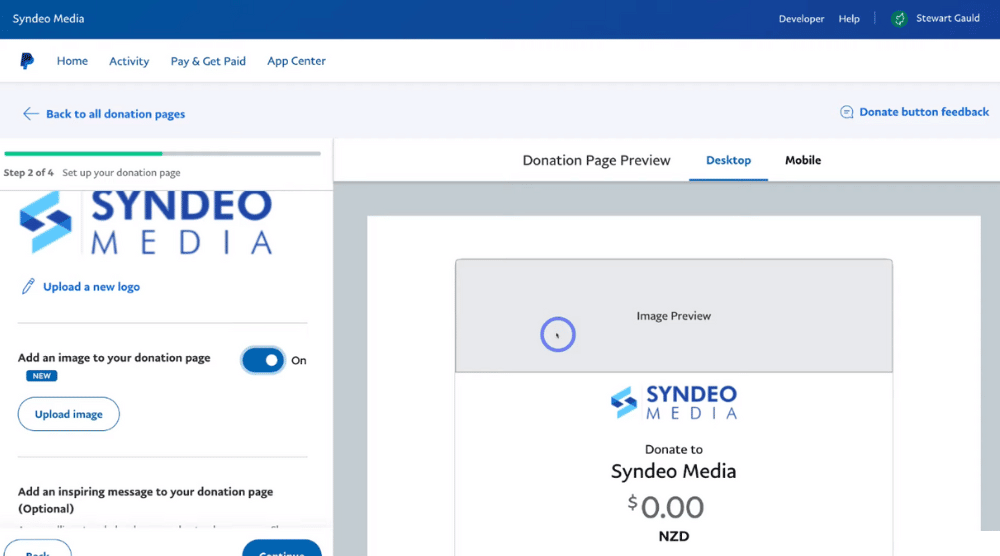
- Navigate down further and select ‘Add an image to your donation page’ if you like.
If you turn it on, you have the option to essentially add a cover image for this donation page on the right-hand side (see screengrab).
This means that when someone clicks on the donation button, they’re going to be taken to this donation page.
For the purpose of this tutorial, we’re going to keep this turned off for now.
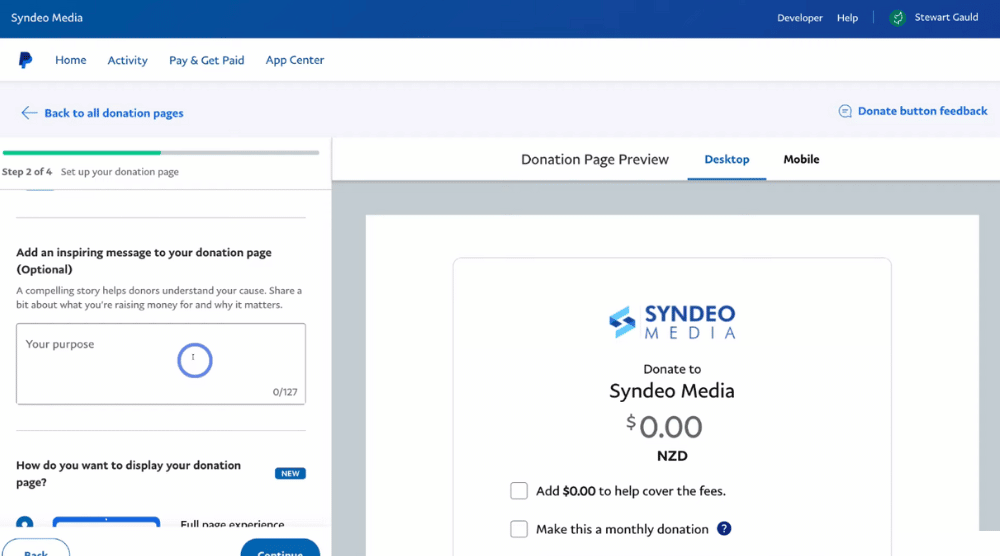
- Navigate down the page. Here you can add an inspiring message to your donations page.
For example, you could share exactly what the money is going to be used for within your organization, or this could even be your organization’s vision.
Go ahead and take the time to add an inspiring message of your choice.

Once you’ve chosen your message, scroll down further and either select:
- Full page experience.
- Pop-up experience.
For the purpose of this tutorial, we’re going to keep ‘Full page’ experience selected.
- Navigate down further and click ‘Continue’.
Also read: How To Set Up Recurring Payments in Stripe
6. Customize Donation Details

- Navigate up to the right-hand side and click ‘Mobile’ or ‘Desktop’ to preview what your donation page will look like on these different devices.
- Head over to the left-hand side over to ‘Currency you’ll receive donations in’ and select the appropriate currency.
For example, because this is a New Zealand organization, for the purpose of today’s tutorial we’re going to keep ‘NZD’ selected.
Down here we have the option to add how much we want donors to give
Here you can select: (see screengrab)
- Any amount.
- Exact amount.
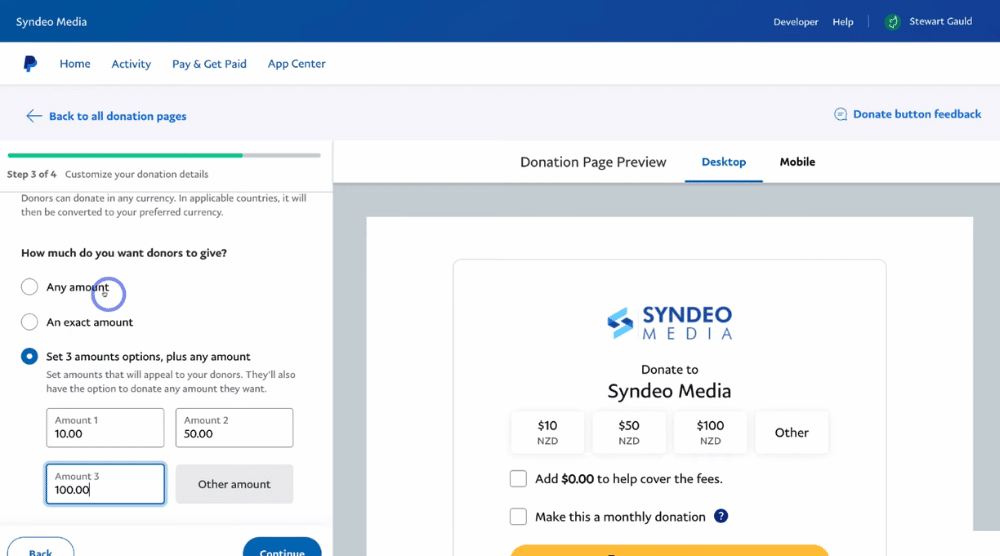
- Set three amount options plus the option to select any amount.
For example, we’ll add $10 then $50, and $100 for three different amount options.
This means that each donor can either select $10, $50, $100 or click on ‘Other option’ if they want to add a custom amount.
This is the ideal option because it gives your donors an idea of how much they should donate.
We’re going to keep the set three amounts option selected.

Once you’ve chosen what options work for you, navigate down to find a few options that you can turn on or off by simply selecting or deselecting.
- The ‘Let donors make monthly recurring donations’ button.
This means they can set up monthly recurring donations, resulting in saving them time (rather than accessing this form over and over again).
We’re going to keep that turned on as an option.
- The ‘Give donors the option to increase their donation amount to help offset the cost of fees’ button.
This is completely up to you if you select this option.
- The ‘Let donors choose specific programs for their donation’.
If we turn it on, you can add multiple programs.
For example, one program could be for our operation costs, another program could be for our children and another program could be for our families.
Depending on the nature of your charitable organization, you can have up to 10 programs that your donors can select and donate to.
We’re going to keep that off for now.
Once you’ve worked your way through all of these details:
- Navigate down to ‘Continue’.
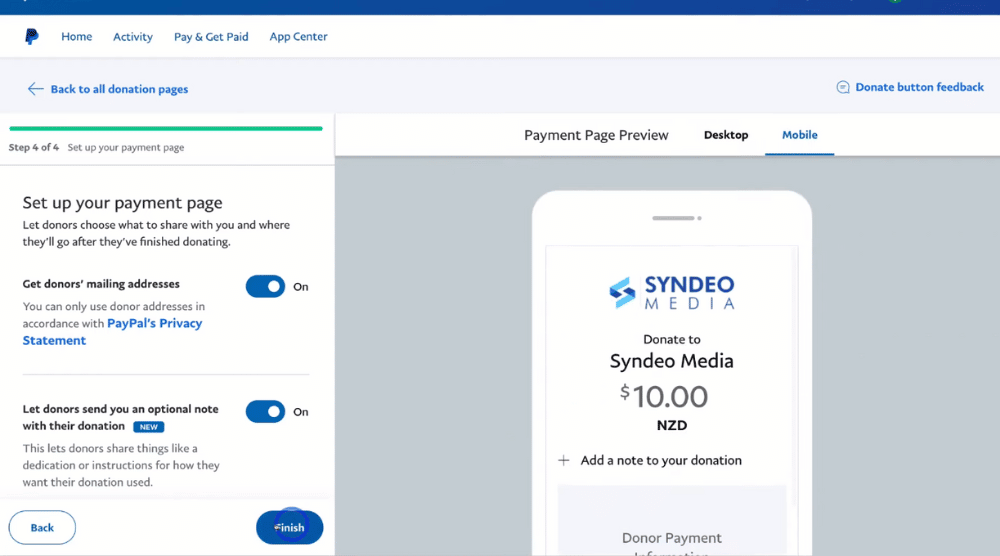
You’ll then be taken to the last portion to complete the setup of your payment page with some more options to turn on or Turn off.
- The ‘Get donors mailing addresses’ button. We recommend keeping this turned on (see screengrab).
This is important to know where your donations are coming from.
- The ‘Let donors send you an optional note with their donation’ button.
We’re going to keep that turned on.
This just gives your donors an option to leave a specific note about their donation.
Once you’ve turned that on or off, you can again preview your payment page across devices.
When you’re happy with that:
- Simply navigate down and click ‘Finish’.
7. Share And Embed

Once you’ve clicked ‘Finish’, you’ll be taken to a page where you can either share or embed your donation link for your donors.
Firstly, you’ll see your shareable link. (see screengrab).
This is the link that you can simply copy and then send it to your donors, or you can use it in other channels (such as social media content email) or in other business materials.
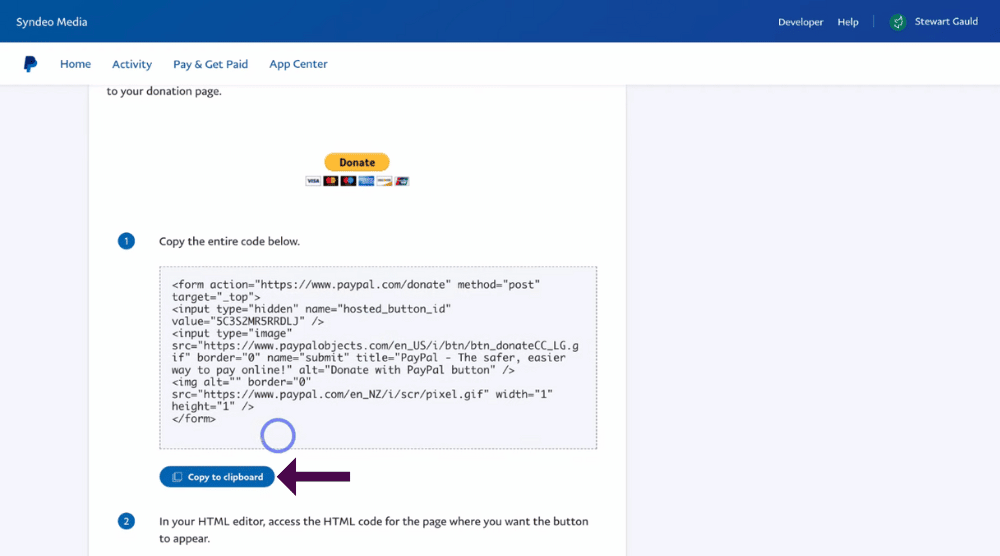
Next, you’ll see the ‘Donate’ button.
This is the PayPal donations button that you want to embed on your website.
- Simply navigate down and click ‘Copy to clipboard’. To copy the entire piece of code (see screengrab).
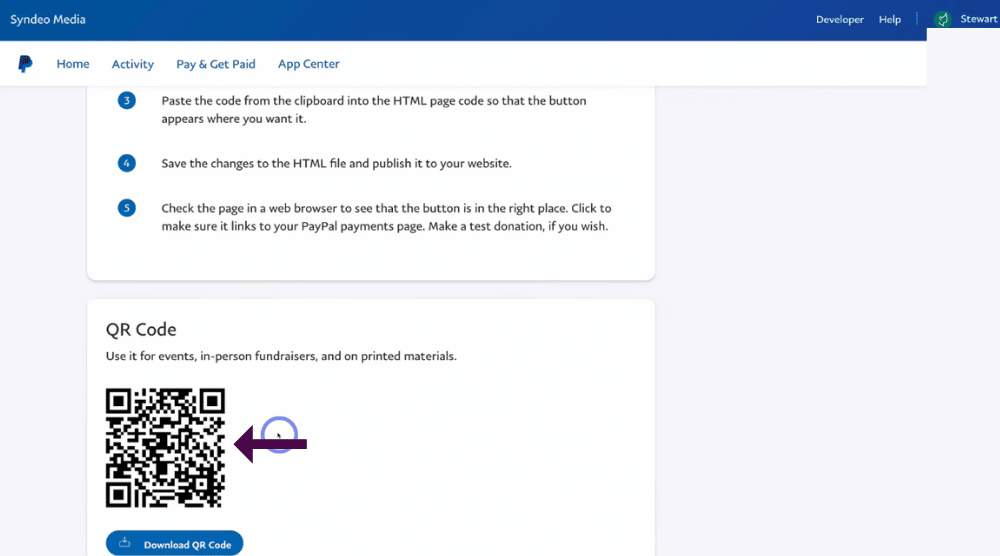
Finally, you’ll see this QR code (see screengrab).
A QR code can be used at events, you can add it to business materials, and printed materials or you can add it to your website.
Donors can simply use their phones to scan this QR code and make a donation.
Again, you have three options to share or embed your donation link:
1) QR code.
2) The option to embed the ‘Donate’ button.
3) Shareable link.
Read more: How to create a QR code for free.
8. Add a PayPal Donations Button On WordPress

If you have a WordPress website and you want to add the PayPal donations button to your website page, we’ll show you how to add this button to WordPress.
If you don’t have a WordPress website but want to create one, or you’d like to familiarize yourself with navigating your way around WordPress, we suggest checking out our Ultimate WordPress beginners tutorial.
To add the donation button to your WordPress website page, all you need to do is:
- Simply create a donation page (or)
- Use an existing website page for your donation page.
As you can see we’ve gone ahead and created a ‘Donation website’ page for the purpose of this tutorial.
Once you’re on your new or existing page, follow these steps:
- Simply navigate up to the ‘+’ icon to add a block element.
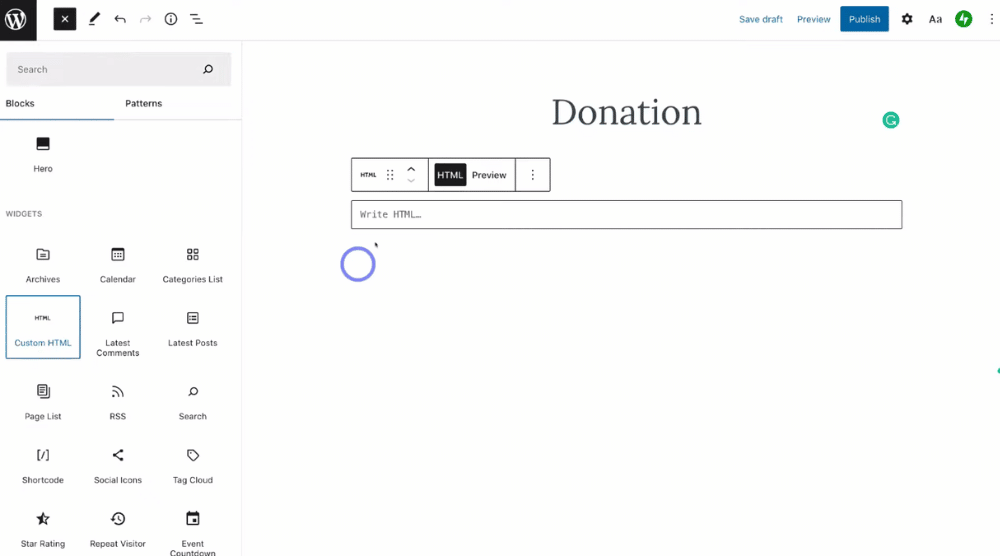
- Navigate down and locate the ‘Custom HTML’ under ‘Widgets’, or
- You can type ‘Custom HTML’ in the search bar.
- Then go ahead and click on the HTML the custom HTML.
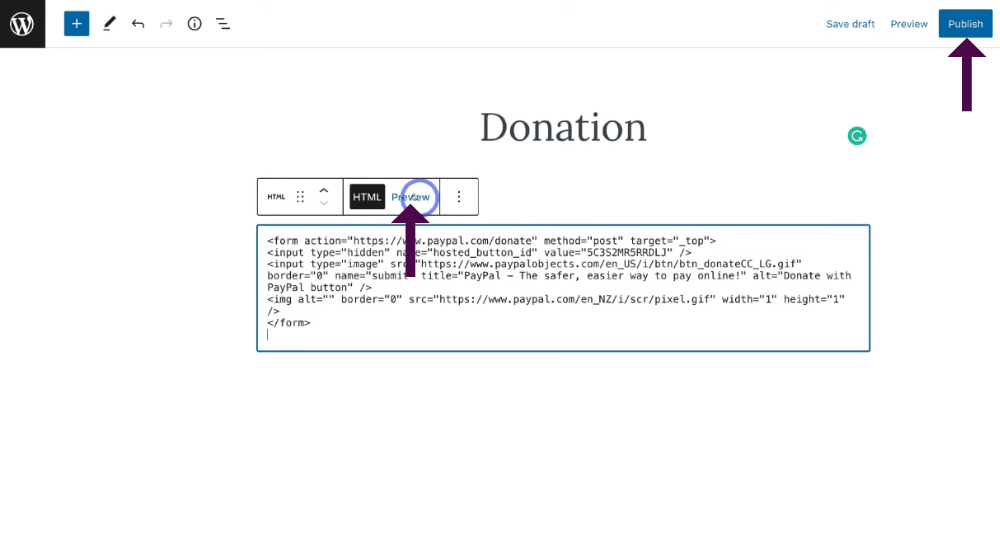
- Simply navigate over to ‘Write HTML’ and paste in that button code that we copied earlier (see screengrab).
- You can also navigate over to ‘Preview’ to see what your button will look like.
- Simply navigate up to ‘Preview’ to preview what your website page will now look like with the button.
- Beside ‘Preview’ you can select ‘Publish’ to publish your new change by adding this new donation button.
Then your website visitors can simply click on ‘Donate’ on that page to take them to the PayPal donation page (which we’re going to dive into shortly).
9. Add a PayPal Donations Button On Google Sites

Now we’re going to share how you can embed this donation button into a Google Sites website.
Google Sites is an amazing easy-to-use website-building product by Google.
If you’d like to get started with creating a website for free using Google Sites, we recommend reading our How-to beginners guide on Google Sites here.
We’ve quickly gone ahead and created a donation page for a Google Sites website (see screengrab).
To add a donation through the PayPal donation button to your Google Site website:
- Simply navigate up to and click on ‘Embed’ on the right-hand sidebar.
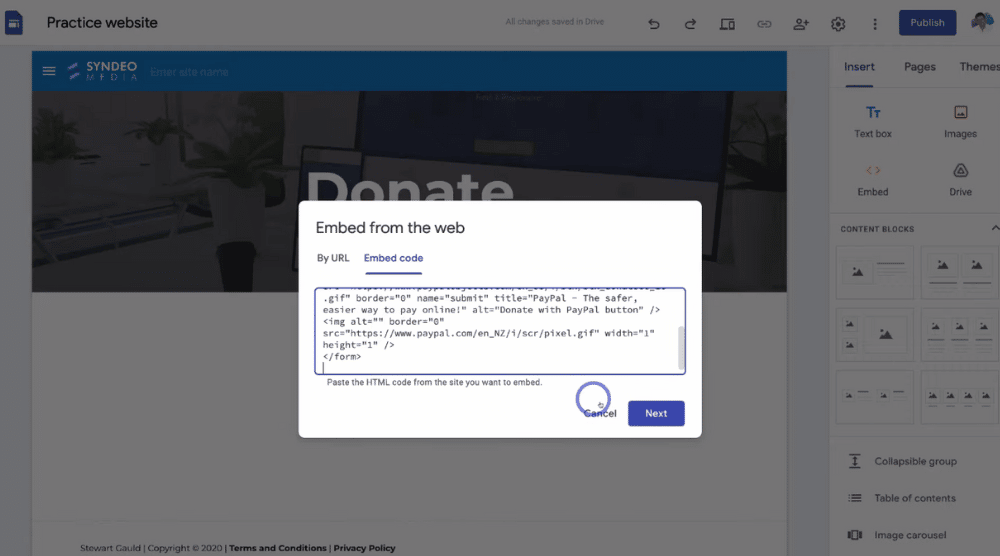
- Head over to ‘Embed code’ and add the code we copied earlier here (see screengrab).
- Come down and click ‘Next’.
- Then click ‘Insert’.
That’s going to add that donation code to your website page.
Read more: How To Create a ONE-PAGE Website for FREE
10. Add a PayPal donation button on Wix

Next, we’re going to quickly share how you can embed a donation button onto your Wix website.
You can read more about Wix and how to create a website with Wix here.
Once you’re inside your Wix website, follow these steps below to embed a PayPal donations button onto your Wix website.
Note: We’re using the ‘Wix editor’, not ‘Wix ADI’.
- Navigate over to the left-hand sidebar and click ‘+’.
- Scroll down to locate ‘Embed code’.
- On ‘Embed code’, you can go ahead and select ‘Embed HTML’.
- If you click on ‘Embed HTML’,

- That’s going to generate the option to simply paste in the donation button code we copied earlier (see screengrab).
- Once you’ve pasted this code, click ‘Update’.
- If you exit out of these settings, you can simply click on your donation button and drag the donation button to any position you like on your Wix page.
Read more: Create A Free Website and Sell Products on Wix Online Store
11. PayPal Donations Page

Now we want to share what the PayPal donations page looks like when an online visitor (a potential donor) clicks on this donate button.
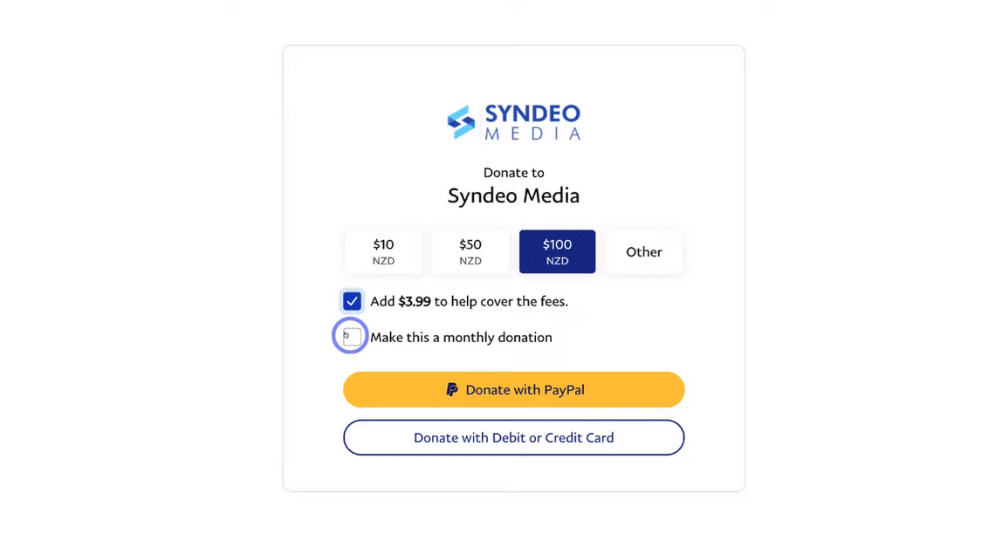
The potential donor will be taken to this PayPal donations page (see screengrab).
Here you can check to see if everything you chose earlier is displaying correctly on your PayPal donations page.
For example, let’s check if our customized details are correct below:
They can either choose:
- The amount they want to donate (or)
- Select ‘Other’.
We’ll go ahead and select $100NZD.
Additionally, they can also choose to add $3.99 to help cover the fees.
We’re going to go ahead and select that.
The potential donor can also turn this into a monthly donation or recurring donation.
Then the donor can come down and select to donate with:
- Paypal
- Debit or credit card.
We’re going to go ahead and select this one of the options.
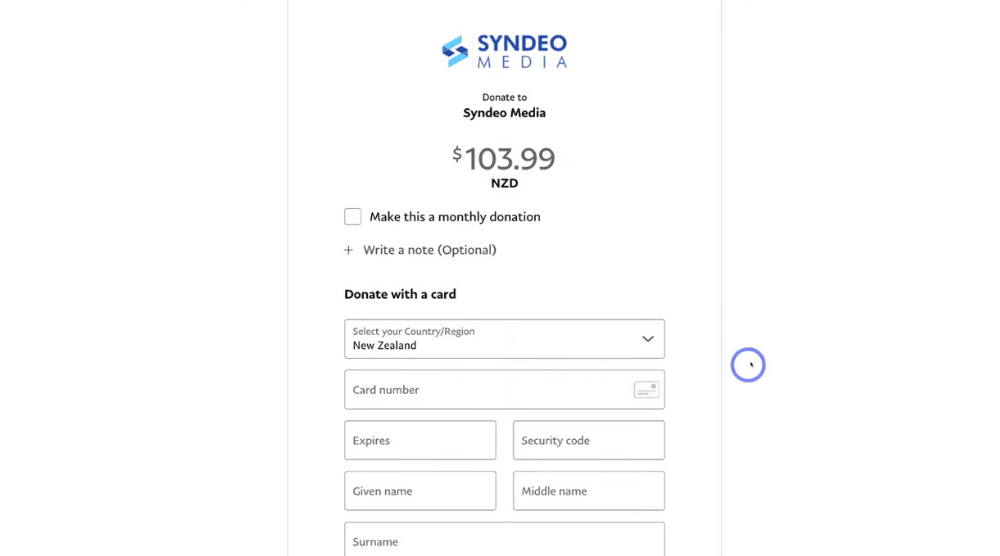
That’s going to take the potential donor to this landing page (see screengrab).
Here, they can turn their donation into a monthly donation, add a note and add their details down below.
12. Other Ways To Collect Online Donations

We’re now going to show you other ways to add the donation link on your website to show you how to collect online donations on any website.
Head back to your PayPal account and follow these next steps to find out how:
- Navigate down to ‘Donate button’.
This is the button you embedded on your website.
If you don’t like the look of it or if you think it doesn’t look very professional, what you can do is:
- Go ahead and copy this link (see screengrab).
- Then on your website page you can simply create your own donation button!
- Next, simply add the link to that button, and that button that you created will take your potential donors to that donation landing page.
And it’s as simple as that!
That’s how you set up and collect online donations on any website using the PayPal donations button.
That is it for this brief PayPal donation button tutorial.
We hope you gained value and are now confident in this process of adding and setting up a PayPal donation button to collect online donations on any website.
In-depth PayPal Donation Button Video Tutorial
You can also check out our video explaining this process in depth below!

