Do you have a WordPress website and engage in email marketing using MailChimp but you’re not too sure how to connect both these platforms together?
Integrating your website with your email marketing software can be done quickly and with ease, and can be a powerful tool to kickstart and grow your email list.
In this brief tutorial, we’re going to dive in and guide you through how you can grow your email list by connecting MailChimp with your WordPress website so that your website visitors can subscribe to your MailChimp email list directly through your WordPress website.
How To Connect MailChimp to WordPress?
Let’s go ahead and connect your MailChimp account with your WordPress website!
1. Getting Started With MailChimp

To get started follow these steps:
- Simply sign in to your MailChimp account or create a new free account if you don’t already have one.
If you don’t have a MailChimp account, we recommend checking out our complete MailChimp step-by-step beginners guide here.
- Once you’ve arrived inside MailChimp.
- Simply navigate down to the bottom very left-hand corner and click on your account (see screengrab).
- From here, select ‘Account and billing’.
2. MailChimp API keys

We’ll show you how to connect your email list inside MailChimp with your WordPress website:
- Navigate up to ‘Extras’.
- Come down and click ‘API keys’.

What are API keys?
In simple terms, API keys are a unique bit of code to your account that make it easier to link two online platforms together.
- Scroll down until you see the header ‘Your API keys’.
- Under this, you’ll see the ‘Create a key’ button. Select this.
- Again, navigate down the page.

All we need to do is copy this API key over here (see screengrab).
- Once you’ve copied the new API key that you just created inside MailChimp, now you need to log into your WordPress dashboard in a new tab or window.
3. WordPress Dashboard

You can learn more about setting up and maintaining a WordPress account if you’re still new to WordPress by reading our Ultimate WordPress 101 step-by-step tutorial here.
Once you’ve logged into your WordPress dashboard:
- Simply head over to the left hand side bar and find ‘Plugins’ near the bottom.
- Click ‘Add new’.
This will bring up a page with all available plugins you can install.
We’re looking for MailChimp plugins.
- Navigate up to ‘Search plugins’ in the top right hand corner search bar.
- Type in ‘MailChimp for WordPress’.
- You should then see a plugin popup first on the list called ‘MC4WP: MailChimp for WordPress’. (However, scroll down if you can’t find it).
This MailChimp plugin has over 2 million active installations!
Important things to note:
- Make sure that it’s compatible with your version of WordPress. It should say ‘Compatible with your version of WordPress’.
- Although not essential, It’s also best practice to back up your WordPress website before you go ahead and install any plugin.
4. Installing the MC4WP:MailChimp For WordPress Plugin

- Go ahead and click ‘Install now’.
- Give WordPress a moment to install your new plugin, and then click ‘Activate’.

Once you’ve installed the new plugin:
- You’ll find the new plugin named ‘MC4WP’ navigate down to the bottom left hand corner of your side-bar.
- Then simply click ‘MailChimp’.
- All you need to do is head up to your MailChimp API key (see screengrab).
Remember how we copied the API key that we created inside MailChimp?
- All you need to do is paste that same API key in here.
- Then simply click ‘Save changes’.
- You should then see a ‘Connected’ header next to ‘Status’.
And just like that you have now connected your WordPress website with your MailChimp account!
5. Creating a Form to Embed On Your WordPress Website

We’ll show you how to create a form to embed on your website.
This will mean you can then start capturing your visitors’ contact information and building your email list.
From there, you can start engaging in email marketing activities with Mailchimp.
To create a new form to embed on your WordPress website:
- Simply navigate down and click on ‘Form’ under MailChimp near the bottom of the left hand side bar.
- Head up to ‘What is the name of your form’ and add the name of your new form.
For the purpose of this tutorial, we’re going to call this ‘Newsletter form’.
If you have a paid MailChimp account, this means that you can create and manage multiple audiences. (Audiences within MailChimp is just another name for an email list)
As you can see we only have access to one email list (see screengrab).
This is because we’re just using a free MailChimp account.
However, like we mentioned, if you’re using a paid MailChimp account and you have multiple email lists:
- Go ahead and tick the email list that you want to send your new subscribers to when they sign up to this particular form.
Once you’ve selected your email list:
- Go ahead and click ‘Add new form’.
Congratulations! Just like that you’ve created your first form.
6. Customizing Your Form

Once you’ve selected ‘Add new form’, you’ll be taken to the ‘Edit form’ page.
- If you navigate up just below the ‘Edit form’ header, you can go ahead and change the name of your form (that you selected earlier) if you like.
- Below this, you’ll see the short code that we can use to embed on our website (see screengrab).
You can display the form inside two options:
1) A post page
2) A text widget.
We’ll show you how to do that shortly once we’ve finished guiding you through these four customizable settings for your form
1.1 Fields

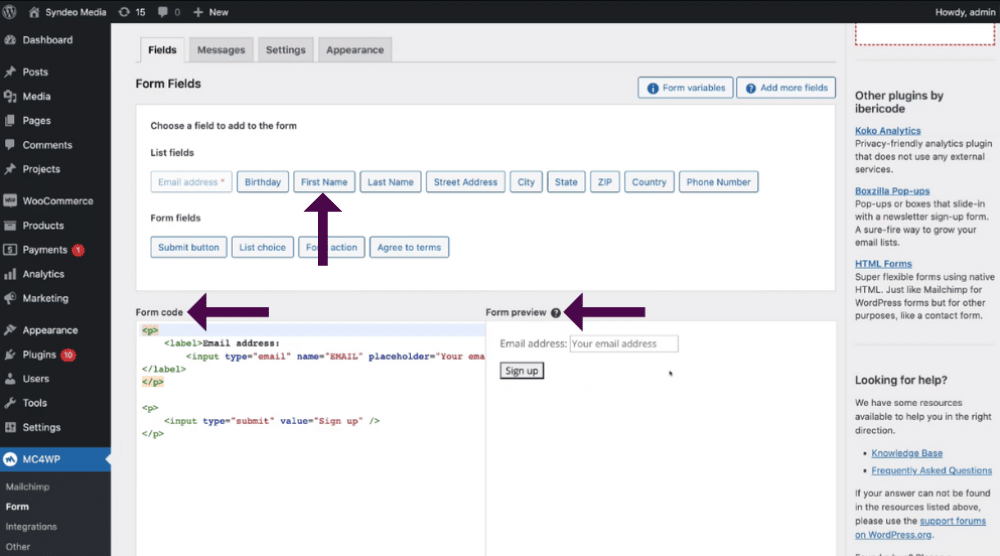
Under the header ‘Fields’, you’ll see the sub-heading ‘Form fields’:
These are the different form fields that you can add to your form
- Form code: This is the code of your form.
- Form preview: This is how your form is going to look.
The first thing we want to do is add a first name.
- Find and select the ‘First name’ form field. A popup window will appear.

- Next, you want to customize the ‘Field label’.
- It will automatically display ‘First name’.
- You can change this if you like by simply typing in a name you want.
- However, we’re happy with ‘First name’.
Below that, you’ll see ‘Placeholder text’.
We’re going to type in ‘Your first name’.
- You can type in what you want your placeholder text to be.
- This is also an optional field, you don’t have to type anything in if you don’t want to.
- Then you can add an initial value.
- We’re going to leave this blank.
- Then, tick ‘Is this field required?’.
Once you’ve customized those fields, come down and click ‘Add to form’.

As you can see (see screengrab) we have ‘First name’ and ‘Email address’.
With the first name, there’s a capital letter for ‘First’ and a capital letter for ‘Name’.
With the email address, there’s a capital letter for ‘Email’ but a lowercase for ‘address’.
What you can do is:
- Navigate over to ‘address in your form code and change this to a capital ‘A’.
- You can also change the ‘placeholder text’ in your form code here to change those ‘Your first Name’ and ‘Your email address’ fields if you like.
If you require your subscribers to add anything else, you can go ahead and add those fields if you like. Some of these important fields include:
- Last name.
- Street address.
- City.
- State.
- ZIP.
- Country.
- Phone number.
However, because we are creating just a basic newsletter form, we want to keep it as simple as possible for our visitors to fill out, so we’re just going to keep the first name and the email address.
Once you’ve made any changes:
- Navigate down to the bottom and click ‘Save changes’.
2.2 Messages

To customize your messages:
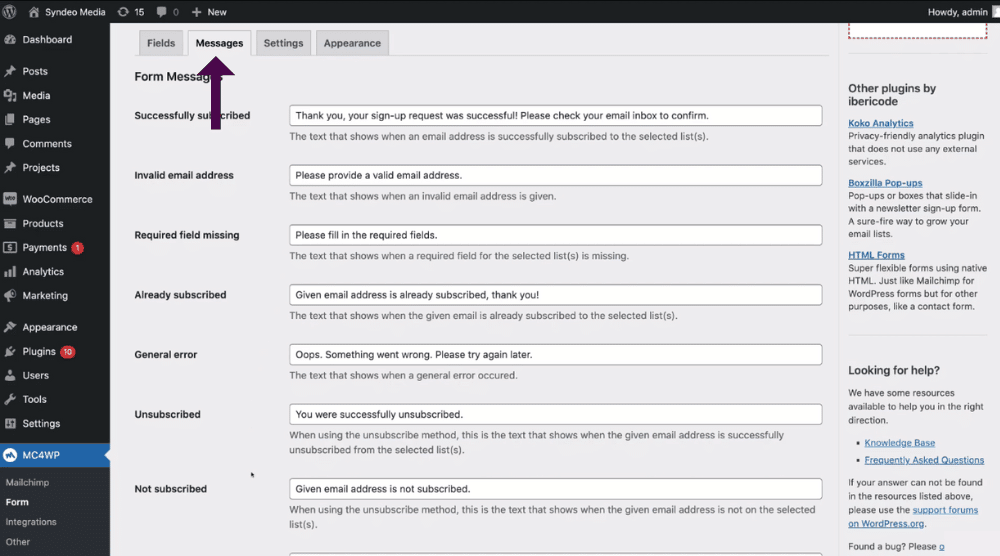
- Navigate over from ‘Fields’ to ‘Messages’.
Here you will see your ‘Form messages’ that you can customize to your liking (see screengrab).
For example, let’s have a look at the ‘Successfully subscribed’ message: This is when a form has been submitted and has been successful.
Your visitors will see this message ‘Thank you, your sign-up request was successful! Please check your email to confirm that the form has been submitted successfully.
Under ‘Successfully subscribed’, you’ll see other messages that you can customize if you like.
We’re going to keep these messages all as default for now.
3.3 Settings

- Navigate across from ‘Messages’ and click on ‘Settings’. (see screengrab).
- Under ‘Form settings’, you can navigate down and customize settings the way that you like
- Firstly, you’ll need to check that you have the right ‘List’ selected (remember, you can only have multiple lists when you opt for a paid plan).
- Below that, you’ll see ‘Use double opt-in’. We’ll keep this selected (which is recommended).
- We’re going to keep ‘Update existing subscribers’ selected as ‘No’.
- Below this, you’ll see ‘Subscriber tags’. These are the tags that will be applied to all your subscribers through this specific form.
For example, if you wanted your form to appear only on a specific page on your website, and it’s only for subscribers that are interested in a specific topic, then you can add that topic as a tag.
What are tags?
Tags are used to associate or identify your specific subscribers. We’re not going to add any tags for now.
- Scroll down to ‘Form behavior’ (see screengrab).
- You can select ‘Yes’ if you’d like to hide the form after a successful sign up.
- Under this, you can choose whether you want to ‘Redirect to a different URL after a successful sign up’. This means that if a visitor signs up and becomes a subscriber, you can then send them to another website page.
However, we’re not going to change any of these.
4.4 Appearance

The last option (next to ‘Settings’) is ‘Appearance’. This is where we can change the ‘Form style’.
- Select the drop-down menu next to ‘Form style’ and customize to your liking.
- We’re going to select ‘Blue theme’.
Once you’re happy with your form style,
- Head down and click ‘Save changes’.

Once you’ve customized your form to your liking:
- Navigate back over to ‘Fields’.
- Under ‘Form preview’, you can see how your form will look.
You can customize your form even further in terms of the form style, font colors and more, however we’re not going to talk about that in this tutorial, as this is a beginner’s tutorial.
7. Embedding Your Form Onto Your WordPress Website

The next step is to embed your form onto your WordPress website.
- Simply navigate up to the shortcode (see screengrab).
- Copy this shortcode.

Let’s say that you want to embed this newsletter form onto a post on your website.
- Simply navigate over and click on ‘Post’ near the top of your left-hand sidebar.
- Click on ‘All posts’.
- Select the post to that you want to add this form to.

- Navigate down to the bottom of that post.
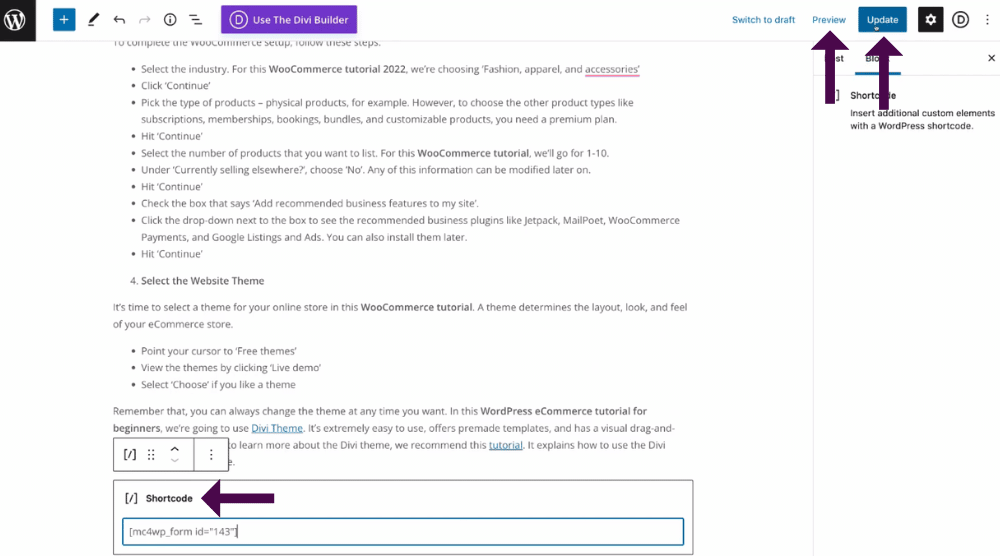
Then using ‘Gutenberg’ all you would do is:
- Come down and paste in the shortcode.
That’s automatically going to add that short code (see screengrab).
- Next, scroll back up to the very top of the page and select ‘Update’ in the top right corner.
- You can then select ‘Preview’ next to ‘Update’ to see what the new form will look like on your post!

From here, if you scroll down you’ll be able to see the new form that you just created.
Take a look at our new form that we just created below (see screengrab).
You can do the same on all your different website pages, or you can use one of WordPress’s incredible visual page builders like ‘Divi’ or ‘Elementor’.
If you’re interested in learning more about Divi to create beautiful website pages, you can read our step-by-step beginners guide here.
You can also check out our how-to article on how you can use Elementor to easily create stunning, visual website pages.
Not sure which one to use? Take a look at our Divi vs Elementor comparison guide here.

Let’s head back up to the top of your form page.
- You’ll notice you now have a right-hand sidebar with all of your posts. (see screengrab).
You can actually embed this form on every post within this right-hand sidebar by using a widget.
Every time you create a new post (in addition to all your older posts), the form will always appear on this right-hand side.

How can you embed your new form into the right side of your post using a widget?
- Simply navigate to your dashboard by clicking the ‘W’ in the upper left corner of your screen.
- Once you’re on your dashboard – navigate down the left-hand sidebar until you see ‘Appearances’.
- Click on ‘Appearances’.
- Select ‘Widgets’ from the drop-down menu.
This is where we can add the form to our sidebar.
- Scroll down the page. Let’s add our form below ‘Categories’ (see screengrab).
- Click the ‘+’ icon (add block) to the right of the ‘Categories’ header and then select ‘Short code’.

As we showed you earlier, all you need to do is:
- Paste in that shortcode.
- Navigate up to the top right-hand corner and click ‘Update’.
You can do the same with your ‘Footer’ area if you like.
For example, within your Footer, you can also add the shortcode so that this form appears on every website page in the Footer.
However, we’re going to leave that, head back to the post and show you what our form will look like in the right-hand sidebar.
Let’s meet you back over in the post.

Over on the right-hand side in our sidebar, you can see that we have our form (see screengrab).
Because we added the code as a widget, this form will appear in the same spot in the right-hand sidebar for all our future and past posts.
8. Testing Your Form has successfully connected with MailChimp

Let’s quickly test our new form and see if the subscriber is going to be added to our email list inside MailChimp.
- Go ahead and add a name on your form on the right-hand sidebar. (see screengrab).
- Add an email address (a different email than you use to sign up for MailChimp).
- Come down and click ‘Sign up’ on your new form.
As it will display the success message ‘thank you your sign-up request was successful please check your email inbox to confirm’
Remember, you can customize this message if you like.

Because we added a two-step opt-in, each subscriber has to confirm.
- Jump into your email and confirm this email.
- Log into MailChimp to see if this information has been added to your email list.
We’re going to go ahead and do that now.
As you can see, this is what the two-step opt-in email will look like if you enabled this option Each of your subscribers needs to:
- Click ‘Yes, subscribe me to this list’
- Then ‘Confirm humanity’ and then ‘Subscribe’.

Then your subscribers will be directed here (see screengrab).
As we mentioned, you can turn off this two-step opt-in if you like, however it is recommended that you keep this enabled.

Head back into your MailChimp account and see if this person has been subscribed!
We’ll meet you inside your MailChimp account.
And just like that, you can see that this person has subscribed successfully! (see screengrab).
- If we head across, you can see under ‘Source’ the source of your new subscriber is through ‘API connection’ that we enabled.
- Here you’ll also see the date and time when this contact was added.
Congratulations, just like that you have now learned how to connect MailChimp to your WordPress website!
This is a great way to start building your email list and capturing your visitors’ contact information when they arrive on your website.
Finally, that brings us to the end of this brief tutorial guiding you through how to connect WordPress and MailChimp together.
We hope you enjoyed it, gained value, and are now ready to grow your email list!
Connect Mailchimp & WordPress: A Complete Step-By-Step Video Tutorial
If you’d like to check out our detailed video on how to easily connect MailChimp to your WordPress website, you can check it out below.

