Home Website builders How To Create Website Pages in WordPress | Divi Builder Tutorial

How To Create Website Pages in WordPress | Divi Builder Tutorial

by Stewart Gauld
Last updated on April 15th, 2023
How To Create Beautiful Website Pages in Minutes with WordPress

Are you tired of seeing the outdated and unresponsive pages of your WordPress website?

Do you wish to upgrade your pages but feel like you don’t have the web design experience?

Don’t worry, this WordPress Divi theme tutorial is for you!


Why Use Divi Theme to Build Website Pages?

Divi is a user-friendly WordPress page builder that requires zero coding to create website pages.

Divi offers an easy-to-use drag-and-drop visual builder that allows both professionals and beginners to simply create beautiful website pages within minutes.


How to Use the Divi Theme?

One of the best things about using Divi to build your website pages is that you get access to 1000s of professionally-built website page layouts.

You can simply pick any one of these and start customizing the layout using the visual builder.

That’s what today’s comprehensive Divi theme guide is all about.

We will walk you through how to use the Divi theme to create stunning web pages.

Let’s begin!


1.       Log In to WordPress

Log In to WordPress

The first action that you need to take is to log in to WordPress.

After doing so, you’ll arrive inside the dashboard.

Now, to use the Divi theme in WordPress, you need to install it onto your WordPress site.

That’s what we’ll do next.

Read more: How To Backup Your WordPress Website


2.      Access Divi

Access Divi

Get started with Divi Theme here

 *The link above is an affiliate link, which means we will get a commission if you upgrade to a paid plan (with no extra cost to you). This helps support our education-based website and we thank you in advance!

  • Head over to ‘Pricing’.
  • You can either choose the yearly access at $89 (paid annually of course) or lifetime access at a one-time fee of $249.

If you are a complete beginner, we advise selecting the yearly plan which comes with a risk-free guarantee.

That means you get your money back after 30 days if you aren’t totally satisfied with the Divi theme.

No questions asked!

Since we’ve already purchased and installed the Divi theme, we’ll move ahead with the next steps.

But if you want to learn how to download and upload the Divi theme to your WordPress website, we recommend watching this beginner’s tutorial that guides you through this process.

This tutorial also breakdowns the impressive features that the Divi theme has to offer (if you are interested)!

Once you have Divi connected with WordPress, follow the rest of this Divi theme tutorial for beginners.

We’ll meet you inside the WordPress dashboard.

Read more: Best WordPress Theme for Beginners


3.      Create a Website Page

Create a Website Page

In this part of our Divi theme tutorial, we’ll explain how to create website pages.

Navigate through the following steps once you have arrived inside your WordPress Dashboard.

  • Click on ‘Pages’ (see the left-hand sidebar)
  • Select ‘Add New’

3.1

  • Name your page. For this guide, we’re creating an About Us page.
  • Hit ‘Save draft’ because we don’t want to publish it yet – not until it’s fully ready
  • Tap the ‘Edit With The Divi Builder’ button

You now have three options:

3.2

  • Build from scratch
  • Choose a Divi theme layout
  • Clone an existing page

In this Divi theme tutorial for beginners, we’ll go with the second option because that’s how you create a professional web page in minutes!

(The other option is to clone an exciting website page and simply change the content)

Click on ‘Browse Layouts’ to begin.

Read more: Best WordPress Hosting for Small Business


4.     Choose a Page Layout

Choose a Page Layout

Once you select ‘Browse Layouts’, you’ll be greeted with thousands of Divi theme layouts.

  • Go through the categories on your left
  • Select the categories that best describe your website. Since we’re creating a digital marketing and media website, we’ll select the business category.

That action generated 84 layout packs and 619 total layouts (subject to change).

Since we’ve filtered the relevant Divi theme layouts, choosing one will become easier.

For this Divi theme tutorial, we’ll go for the ‘Design Agency’ layout.

4.1

Take the time to view the live demo and then choose the ‘About Us’ page (or any page that you wish to build).

If you like the look of it, tap on ‘Use This Layout’.

The layout will be automatically transferred to your new website page.

Read more: Best Web Hosting for Small Business


5.      Understand the Page Structure

Understand the Page Structure

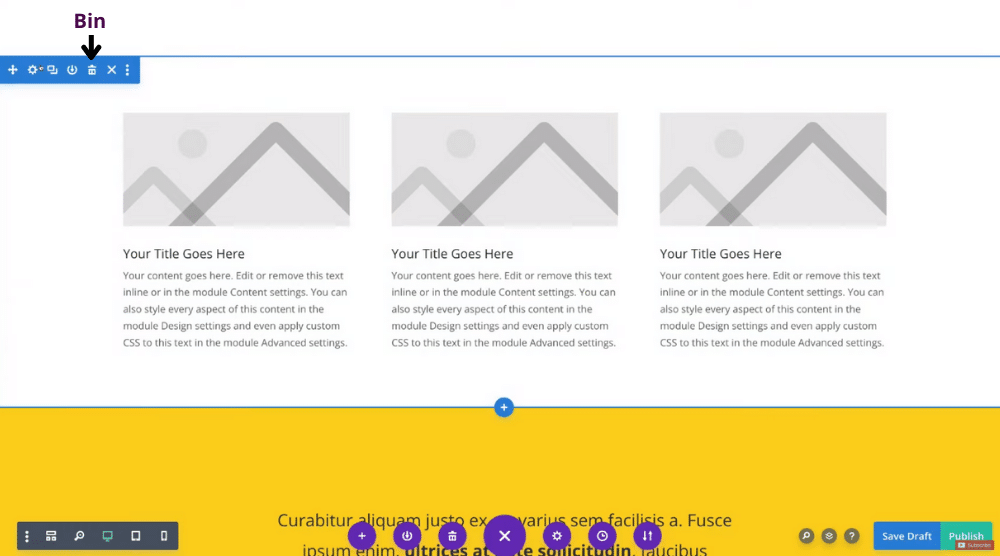
Before we customize the Divi theme layout and add our new and original copy and media, you must understand the page structure first.

Pay attention to the following points:

  • Each web page is made up of sections (the blue boxes). Refer to the screengrab to see what we’re talking about.
  • Within each section, we have Rows (the green boxes). This is how you structure your website page sections in columns.
  • Within each row, we have modules (the grey boxes). Think of modules as features that you can use to add images, videos, texts, online forms, and more inside your rows.
Read more: Ultimate WordPress Tutorial for Beginners


6.      Customize the Page Layout

Now that you understand the structure, let’s begin the customization process using the Divi theme builder:

Customize the Page Layout

Customizing the Text Module

Suppose you want to modify the page name from ‘About Us’ to ‘About’, these are the actions you’ll require:

  • Select the module
  • Click on the existing content
  • Add or delete content

6.1

Let’s edit another text module called ‘Building The Future’ using a second method (refer to the screengrab):

  • Select the module
  • Hit the gear icon (settings)

6.2

  • You can increase/decrease the size of the settings box by dragging it
  • Under ‘Content’, you’ll find the default text
  • Click on it and modify the content
  • Notice the general text formatting options up above

6.3

You can also alter the design of your text element by:

  • Clicking on ‘Design’ next to ‘Content’
  • Changing the text font, font weight, font style, text color, text size, etc.
  • Hitting the green tick after making the changes

6.4

  • Clicking ‘Save draft’ (if you’re customizing a live page, hit Publish)

Of course, you can always customize from the frontend like the first method we explained in this Divi theme tutorial.

Customizing the Background Image

6.5

See the background image behind the second text element?

That’s a “section.”

Here’s how you can change it:

  • Click on the section
  • Select Settings (the gear icon again)

6.6

  • Tap on ‘Background’
  • Click on the image icon. You can see the current background image here.
  • Hit the gear icon on the image
  • Pick an image from your media library or upload it

The new image has replaced the section background.

Alternatively, you can remove the image altogether and add a background color.

Refer to the screengrab.

Choose the right color based on your website’s branding.

Customizing the Modules

6.7

Scroll down to see the six modules on the Divi theme layout.

To edit them:

  • Select a module
  • Click on module settings
  • Customize the module’s content and design
  • Hit the green tick and select ‘Save Draft’

Spend a generous amount of time navigating the customization options, making changes, and saving them.

Read more: How To Create a WordPress Website using Elementor Cloud


7.      Add New Sections, Rows, and Modules

7.      Add New Sections, Rows, and Modules

Besides modifying the existing elements, you can also add new sections, rows, and modules using the Divi theme builder.

Here’s how:

  • Notice the ‘+’ sign between two sections
  • Click on it
  • Under ‘New Section’, select ‘Regular’
  • Insert rows next
  • Add a module for each row

7.1

The module could be a blurb, call to action, button, divider, email optin, countdown timer, image, testimonials, etc.

Remember – modules are features that you need on the web page.

For this Divi theme tutorial, we’ll choose blurb.

That’s going to generate the settings for the blurb that we can customize and then save changes.

You can then change the default image, add a title, and write new content for the module.

Generating Identical Modules

7.2

Did you know you can duplicate sections, rows or modules?

This is a simple way to quickly create your pages.

Listed below are the steps you’ll need to follow to change modules:

  • Select the module
  • Click on ‘duplicate’ (refer to the screengrab). An identical module has been generated.
  • Reposition the module by dragging and dropping it

Using the duplication method, we’ll add another module to the row i.e 3 in a row.

Check the Below screengrab to see what that looks like.

Take the time to customize each module, row, and section!

Removing an Element Remove The Element

Using the Divi theme builder, one can also remove an element.

Let’s say you want to delete a section, here’s what you’d need to do:

  • Click on the section
  • Tap the bin icon 

And that’s it!

Read more: How to Create a Free Website with WordPress


8.     Publish the New Website Page

Publish the New Website Page

Once you’ve made all the customizations, click on ‘Publish’ in the bottom-right-hand corner.

You can also preview the WordPress website page for different devices (see bottom-left-hand corner).

Make sure that your page is responsive across various devices like desktops, mobiles, and tablets.

You can choose not to publish it right now and save it as a draft.

8.1

Click ‘Exit Visual Builder’.

Read more: How To Get A Free SSL Certificate for WordPress


9.      Add Page to Menu

9

On the website menu, you’ll notice that it does not have the newly created About Us page yet.

We want to add it between ‘Home’ and ‘Shop’.

To do that:

9.1

  • Visit your WordPress dashboard
  • Select Appearances > Menus
  • Locate the ‘About Us’ page (or the page you’ve created) under ‘Pages’
  • Hit ‘Add to Menu’. The new page has been included in the primary menu
  • Drag to reposition it below ‘Home’ and above ‘Shop’
  • Tap on ‘Save Menu’

To view the newly created menu item (the About Us page), select ‘Visit Site’ from the top-left corner.

Read more: Create an eCommerce website on WordPress 


Related Resources

We have created a beginner’s tutorial on how to make the most of the Divi theme builder.

It’s a more comprehensive tutorial on customizing web pages using Divi.

You must check that out!

Also, if you’re building a new website from scratch, we highly suggest watching this tutorial.

It explains how to build a premium site from start to finish using the Divi theme and WordPress.

That includes:

  • Choosing a domain name
  • Setting up hosting
  • Installing WordPress
  • Using the Divi theme builder to create a stunning website
Read more: How To Make A Premium Small Business Website


Divi Theme Tutorial for Beginners! (Video Guide)

Creating WordPress web pages using the Divi theme builder and layouts is ideal for beginners.

You just need to choose a Divi theme layout and then customize the modules, rows, and sections based on your branding.

It’s that simple!

That concludes our Divi theme tutorial for beginners!

Check out our full video guide below.

You may also like

Leave a Comment

Subscribe for More!

Join us to receive actionable tips, tutorials and tools to grow your small business online

My name is Stewart Gauld. I’ve been helping small and local businesses with digital activties over the last 7 years.