Did you know that you can tag Shopify products on your Facebook Business Page?
This means your customers can quickly find your products on Facebook and then purchase them on your Shopify store!
This tutorial explains how to connect Shopify to your Facebook Shop.
By the end of this tutorial, you’ll be able to sell products through your Facebook Business Page through the Shopify Facebook Integration.
How do I Link my Shopify products to my Facebook page?
Let’s begin with this Facebook shop Shopify tutorial by understanding the process for integrating Shopify with your Facebook page.
1. Getting Started (Essentials)

Before we cover how to connect your Shopify store to the Facebook shop, you need to make sure you have a few things first:
- Facebook Business Page
- Business Manager
- Facebook Ad Account
- Facebook Pixel
If you don’t already have a Facebook Business Page, we recommend watching this beginner’s tutorial on how to create one.
Also, you’ll need to connect your Facebook Business Page to a Business Manager.
If you aren’t familiar with this process, we suggest watching this video.
This guide will walk you through the process of linking your Business Manager and Facebook Business Page and explains what the Business Manager is and how it works.
Additionally, it covers how to set up a Facebook Ad Account, which is also a prerequisite for creating a free Online eCommerce Store.
The final requirement is to connect Facebook Pixel with Shopify, which is covered in this tutorial.
However, lets continue with this How to connect Shopify to Facebook guide.
Read more: How To Create a Facebook Business Page
Other Requirements
To connect your Facebook Shop to Shopify, you’ll need to meet other eligibility criteria, including:
- You need to have admin access to your Facebook business page
- Your Facebook Business page must be published
- Your Facebook business manager must be connected to your Facebook business page.
- You must, at the minimum, have the Basic Shopify plan or above to set up Facebook Shop Shopify.
- Even if you’ve never run Facebook ads, you will need a Facebook ad account (again with admin access) within the Business Manager.
After meeting these four requirements, log in to the backend of your Shopify store to continue with the Shopify Facebook integration!
Read more: How To Add Admin to Facebook Page
2. Add Facebook Sales Channel

- On the Shopify backend, click on ‘Sales channels’
- If you don’t have the Facebook Shop already connected, tap on the ‘+’ icon next to ‘Sales channels’.
- Locate Facebook and click the ‘+’ icon next to it.
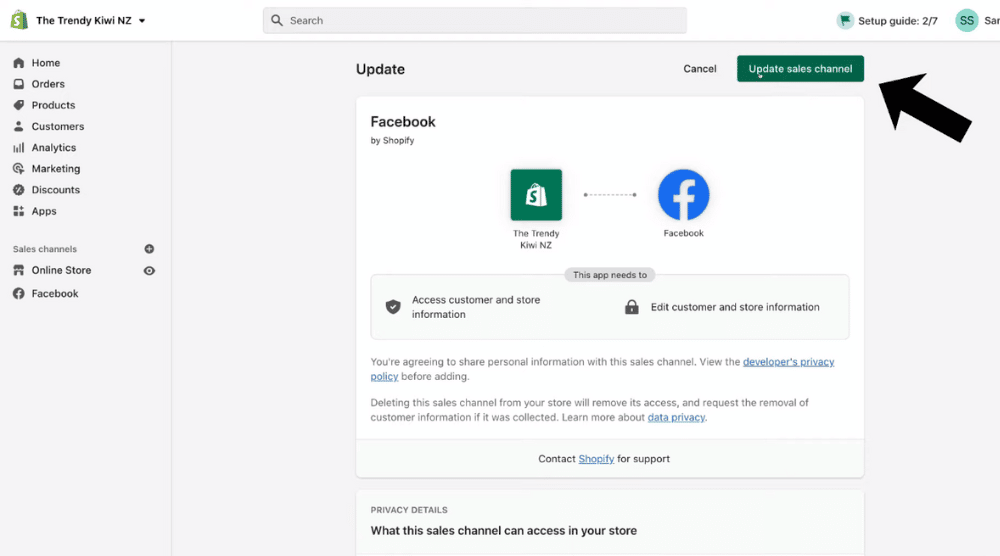
- Hit the ‘Update sales channel’ button in the top-right area.
Read more: How to Install Facebook Pixel on WordPress
3. Set Up Facebook Shop

- Scroll down to ‘Facebook Shop’
- Select ‘Start setup’

- Click ‘Connect account’
- Continue with your personal account that’s associated with your Facebook Business Page.
- Hit ‘Continue’

And there you go! You’ve successfully connected your Facebook account with Shopify.
- Now, connect the appropriate Business Manager that’s associated with your Facebook Business Page.

- Verify your primary domain
- Hit ‘Confirm’
- Connect your Facebook Business Page to the Shopify store
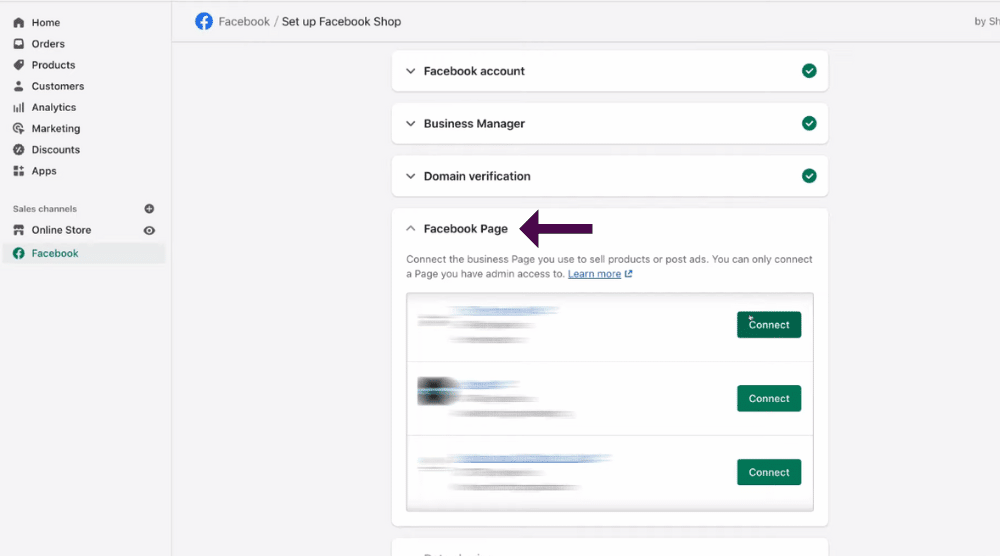
If you’re struggling to connect your Facebook Business Page with Shopify, it’s because your page is connected with a different Business Manager.
Hence, you want to make sure that you have the correct Business Manager connected.
This should make connecting Shopify to Facebook a lot easier.
You can also remove a Facebook Business Page from an existing Business Manager and then reconnect it with a different Business Manager.
Moreover, you can verify your Shopify domain with only one Business Manager.

Now, let’s proceed with these actions in this Facebook Shop Shopify tutorial:
- Turn the data-sharing option on

- Under ‘Choose Preference’, make sure that ‘Enhanced’ is selected
- Connect the Facebook Pixel. If you don’t have a Facebook Pixel yet, you can create one
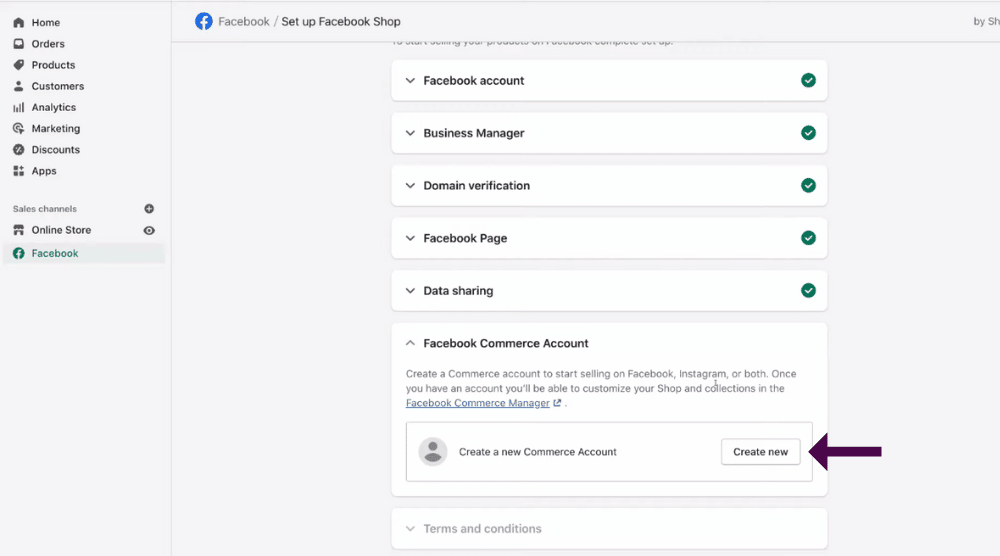
- Under ‘Facebook Commerce Account’, hit ‘Create New’
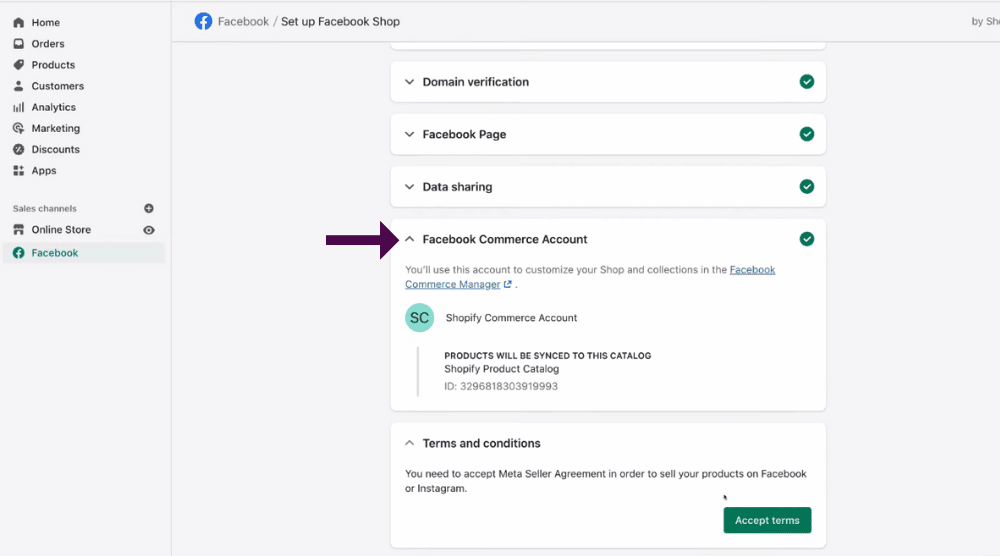
Before we finish setting up your Facebook Shop with Shopify, navigate over to Facebook Commerce Account again.
Notice that the products within your Shopify Commerce Account will be synched to this category.
You can also see the ID below it.
Refer to the screengrab.
To customize your shop and collections, you need to visit the Facebook Commerce Manager (more on that later).
Click on the ‘Accept terms’ button.
When you arrive at the Seller Agreement, tap on ‘Accept terms’ again.
Click on ‘Finish setup’.
And that’s how you connect your Facebook Shop to Shopify!
Once you’ve connected Shopify to Facebook, you’ll want to check if all your products are synched correctly with your Facebook Shop.
- Click ‘Got it’
Read more: How to Create and Grow an Engaged Facebook Group
4. Check Status

- Navigate over to ‘Product status’
- Hover over to ‘Connected Product Catalog’ on the right
- Notice that your Shopify Product Catalog is now synched.
Note that the product changes might take as long as 15 minutes to sync to Facebook.
Click on ‘View all products’ to view the synced products.
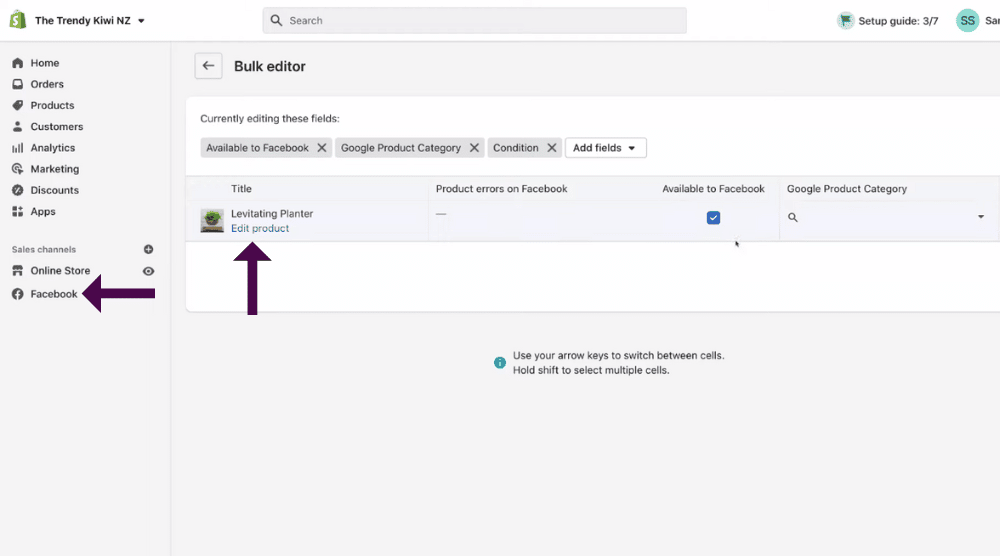
We’ve just used a test account for this Facebook Shop Shopify tutorial so we just have one product.
You can now head back to ‘Facebook’ under ‘Sales channels’ on your left.
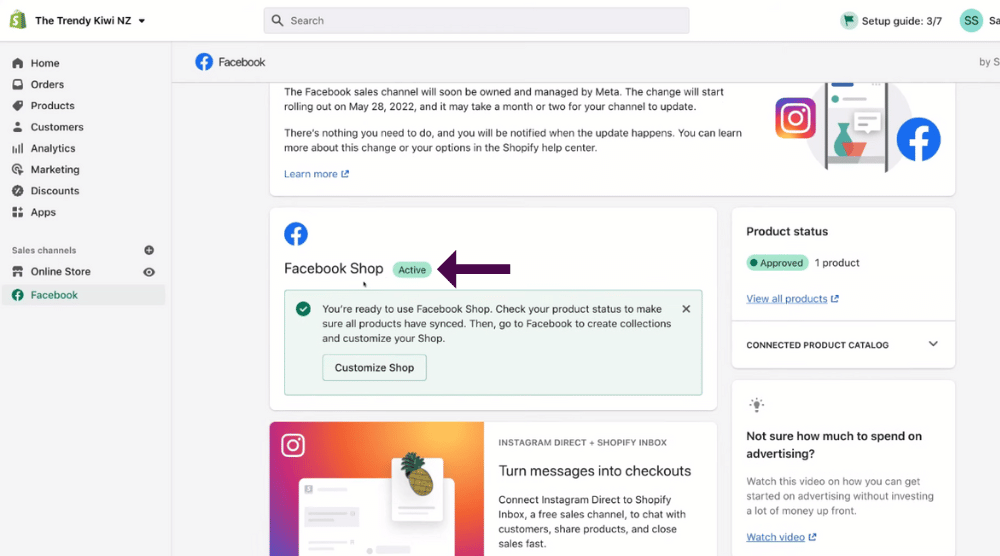
Now, take these steps:
- Scroll down to ‘Facebook Shop’
- Select the ‘Customize Shop’ button
You’ll arrive at the Facebook Commerce Manager.
Read more: How To Use Facebook Business Suite
5. Visit Facebook Commerce Manager

Next to the Facebook Shop, you’ll find the status.
The status is currently inactive as it can take some time (up to 48 hours) for tagged Shopify products to appear on Facebook.
In case your products aren’t approved, contact Facebook for help.
All the products sold must adhere to Facebook’s Commerce Policies.
Let’s say you add a new product to your collection. If it’s found to be violating any of these policies, Facebook will remove it.
But if you think any of your products were incorrectly removed, you can file a review with Facebook Support.
Once your collection has been reviewed and approved, you can start editing your Facebook Shop.
To do that:
- Click the ‘Edit Shop’ button (refer to the screengrab).
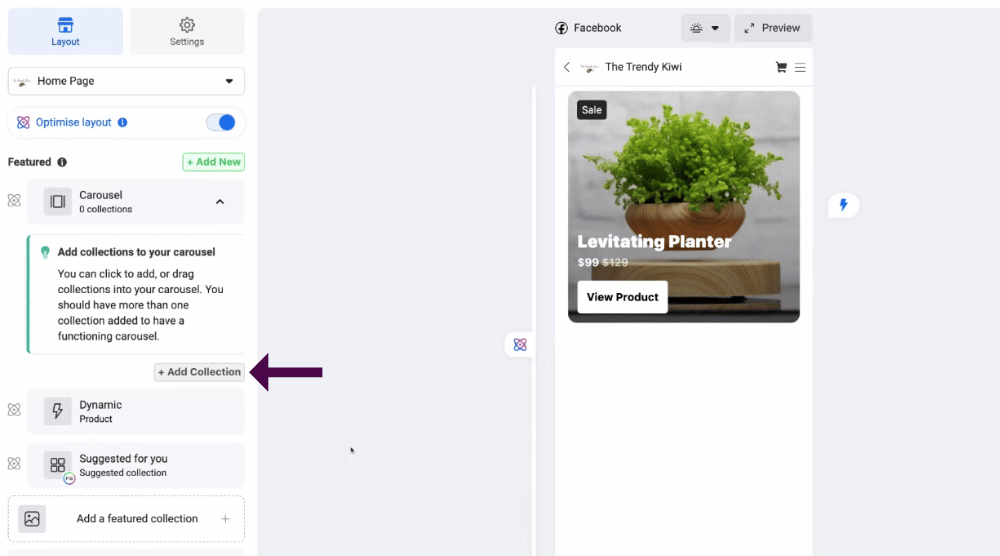
- Start customizing the way products appear on your Facebook shop, add and manage collections, and more.
- After making the changes, click on ‘Publish Updates’ (bottom-right corner)
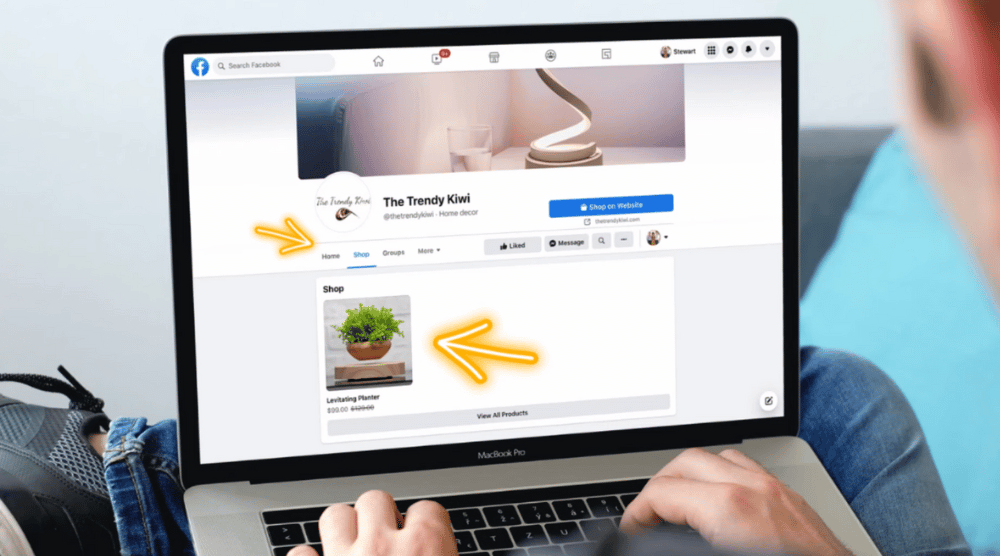
Once your Facebook shop is approved, you can tag products on your Facebook Business Page.
Moreover, customers can view the ‘Shop’ tab which will display your collection on the Facebook Business Page (refer to the screengrab).
That covers everything you need to know to connect your Facebook Shop to Shopify!
You’ve now successfully installed the Shopify Facebook Integration and connected your shop.
You can now start selling your products on Facebook to reach a different audience through this channel.
Read more: How To Use Meta Business Suite
Connect Shopify to Facebook Shop (Video Tutorial)
Check out our full video on how to connect Shopify to Facebook below:
