How To Create a Facebook Group
In this brief Facebook group tutorial, we’ll walk you through the process of creating a Facebook group in 2022.
Creating a Facebook group allows you to establish an engaging online community.
The members that belong to this community typically have a similar interest in a specific topic, brand, product or activity.
If you open Facebook today, you’ll find dedicated groups that you can access and engage in.
By learning how to create a Facebook group, you can build credibility and authority amongst your community.
This can be a powerful activity for businesses.
Sharing valuable content, answering questions, solving problems, and interacting with group members is how you can create an engaging and loyal community on Facebook.
Here’s how you can build your own Facebook community:
1. Get Started with Facebook
To create a Facebook group, you need a Facebook account. If you don’t have one already, you can create it for free.

- Login to your Facebook account
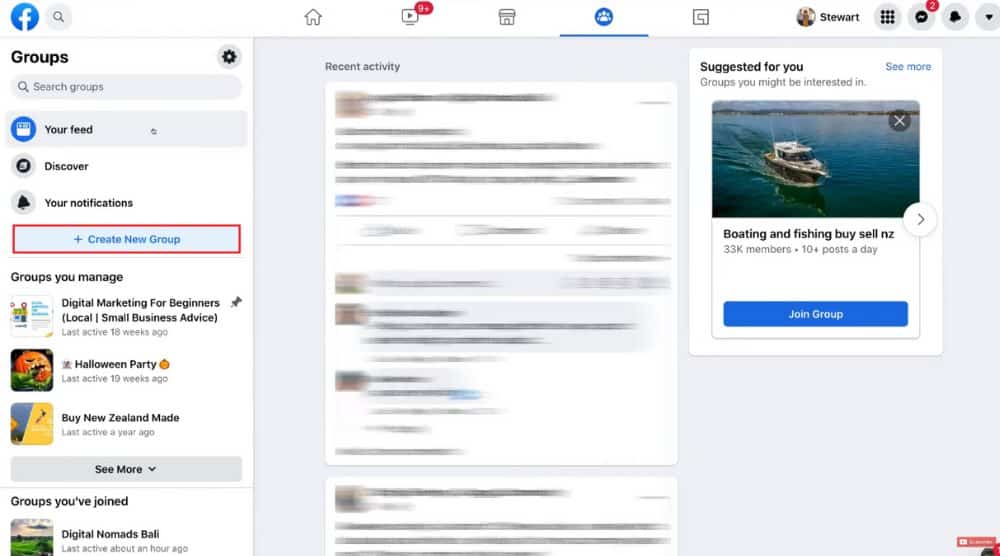
- Locate ‘Groups’ on the left-hand side
- Click on it
If you’re unable to find that option, click on ‘See more’ and you should be able to locate it.
Once you click on it, you’ll see all the Facebook groups that you’re currently part of (that is if it’s not a new account).
You will also notice a section named ‘Groups you manage’ if you’ve created Facebook groups in the past.
Read more: How to Connect Facebook to Instagram
2. Create a New Facebook Group
For this Facebook group tutorial, we’ll create an educational group for helping people on how to use Google Ads, targeted at small business owners.

- Tap on the ‘Create New Group’ button on your left
- Name your group. We’ll name it ‘Google Ads for Small Business’ in this Facebook group tutorial. Make sure that the group name has important keywords that people will use to find it.
- Next, choose privacy, which can either be public or private. In a public Facebook group, anyone on Facebook can view group members and the posts. In a private Facebook group, only members can view the content and other members of the group. We recommend choosing the ‘Privacy’ (think about your members privacy).
- Below ‘Privacy’, you have the option to hide the group or make it visible. If you choose to hide it, only members can find the group. It means that you can only invite people to join your group. If you choose to make it visible, anyone on Facebook will be able to find this group.
- Lastly, you can start inviting your friends to the newly created Facebook group. We’ll skip this for now in this Facebook group tutorial.
- Hit ‘Create’
Congratulations!
You’ve successfully learned how to create a group on Facebook.
But there’s plenty left to do. In the upcoming steps, we’ll help you properly set up your new Facebook group.
3. Add a Cover Image

- Navigate up to the default cover image.
- Click ‘Edit’ in the bottom-right of the cover image.
- Choose ‘Upload photo’ from the drop-down.
- Drag the image to reposition it.
- Hit ‘Save changes’
You’ll, of course, need to create a cover photo first.
The dimensions should be 1640 × 856 px.
If you need help designing a Facebook cover photo, we recommend watching this tutorial.
In that, we show you how to use a free graphic design tool called Canva, using this tool you can simply design your own cover photo.
Make sure your cover image is fully visible across mobile devices and desktops.
The good news is beginners don’t need prior design experience to use Canva.
This brings us to the next step of our Facebook group tutorial.
Read more: Canva Free Logo Maker
4. Add a Group Description
To allow Facebook users and group members to understand what this group is all about, it’s important to add a description.

- Click on ‘Add a Description’ (see right-hand side)
- Type in a brief description
- Hit ‘Save’
Your group description has been successfully added.
In the next step of our Facebook group tutorial, we’ll help you navigate through other important options.
5. Explore Facebook Group Navigation

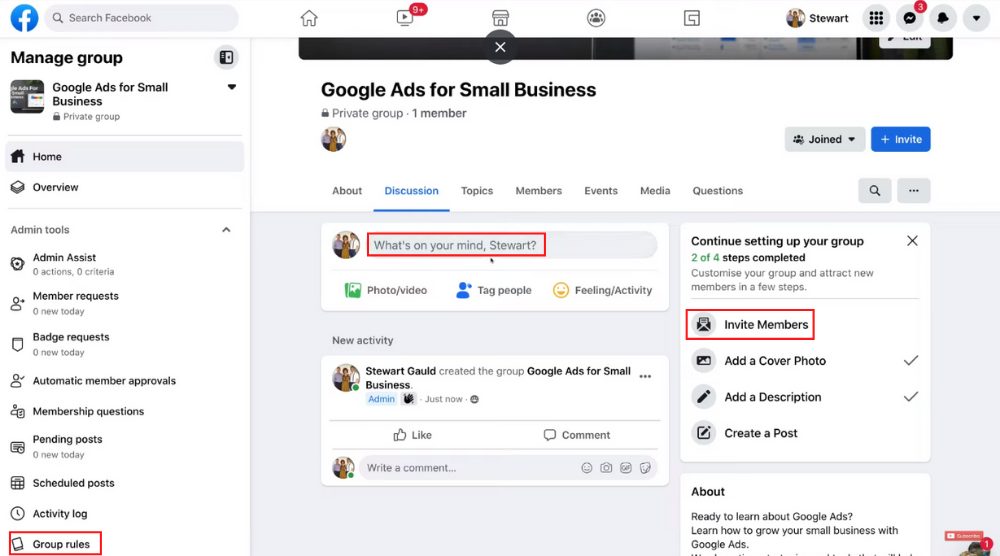
- Tap on ‘About’ at the top. This is where you’ll find more information about the group such as privacy, visibility, history, members, and description
- Next to ‘About’, click on ‘Discussion’. Here, members can create posts as well as engage on posts/discussions with others.
- Click on ‘Topics’ next to ‘Discussion’. This section allows you to discover new topics based on the hashtags used in posts.
- Adjacent to ‘Topics’, we have ‘Members’. Here, you’ll find all the group members. By clicking ‘Add Experts’, you can add experts to your Facebook group. This allows you to allocate badges to specific members who can help answer questions.
- Next to ‘Members’, select ‘Events’. In this part of your Facebook group, you can see the upcoming events or organize one by clicking ‘Create Event’.
- Select the ‘Media’ tab from the top menu. This is where you can add and manage all the media (photos, videos, albums) within the group.
- The last option on the top menu is ‘Questions’. As the name indicates, this is where you can post questions in the Facebook group.
Establish Group Rules

- Scroll down the left-hand-side navigation panel
- Locate ‘Group rules’ and click on it
- This is where you can lay down rules for your newly created Facebook group
And that’s how you set up a Facebook group!
You can now head back to ‘Home’ (again from the navigation panel).
By clicking ‘What’s on your mind’, you can go ahead and create your first post.
Your first Facebook group post could be about welcoming the new members or information about the group itself.
The process of creating a Facebook group post is the same as creating a public Facebook post, both from a Facebook Business Page or a personal account.
Also, by clicking ‘Invite’ (refer to the screengrab), you can start inviting people to this group.
Read more: How To Create a Facebook Business Page
How To Use Facebook Business Suite App | Free All-In-One Social Media Management App
6. Group Example

As you can see by visiting the link, the group is managed by an experienced marketer named Corey Hinde.
This group offers valuable updates on all things related to digital marketing – targeted toward beginners and small business owners.
Notice the relevant keywords in the group name, which is essential for the group’s discoverability we talked about earlier.
This is an exclusive community of 1.4K members (as of now) where you can learn about how to grow your small business through the power of digital marketing.
Similarly, by creating a Facebook group like this, you can build a brand, increase awareness, and improve credibility over time.
Over time your established community will get to know more about you and your business.
Then, when your community wants to buy a product or service that you offer, they will most likely come to you over the competition due to the relationship you have built with your community.
Therefore, by familiarizing yourself with how to create a Facebook Group, you build a loyal and engaging community of business fans!
Facebook Group Tutorial (Full Video Tutorial)
Check out our complete video tutorial below on how to create a Facebook Group for your business:

