Have you ever been in a position where you’ve had to teach a team member or a client how to use something or perform a specific action online over and over again?
We definitely have, and it can be incredibly frustrating, repetitive, and time-consuming!
This is why setting up simple systems is so important for the long-term productivity of any business.
In this tutorial, we are going to guide you through the step-by-step process of how to use Scribe, so you can easily create free guides online!
Are you ready to streamline your processes, training systems, and your business with Scribe and learn how to create how-to guides for your team members or clients to follow?
Read more: Top 5 FREE Productivity Apps for Small Business.
How To Create How-To Guides With Scribe?
Let’s go ahead and get started with how to use Scribe, one of our favorite free productivity and how-to or step-by-step creator apps.
We will walk you through exactly how to create how-to guides within Scribe that anyone can easily follow!
1. How To Use Scribe – Getting Started

To arrive at Scribe:
- Simply head over to your browser and type in ‘Scribehow.com’ or Click here
2. Scribe Pricing

In this tutorial, we’re just going to focus on Scribe’s completely free plan, which is sufficient enough for small teams.
As you can see, the free plan offers great features such as:
- You can create unlimited ‘Scribes’ (How-to-guides).
- You can create Scribes from any web app.
We’ll show you what we mean shortly.
One of the main advantages of upgrading to a paid plan is that you can actually record and create step-by-step guides from desktop apps as well as web apps.
Scribe has both a browser extension (that you can leverage to quickly create Scribes), as well as a desktop app.
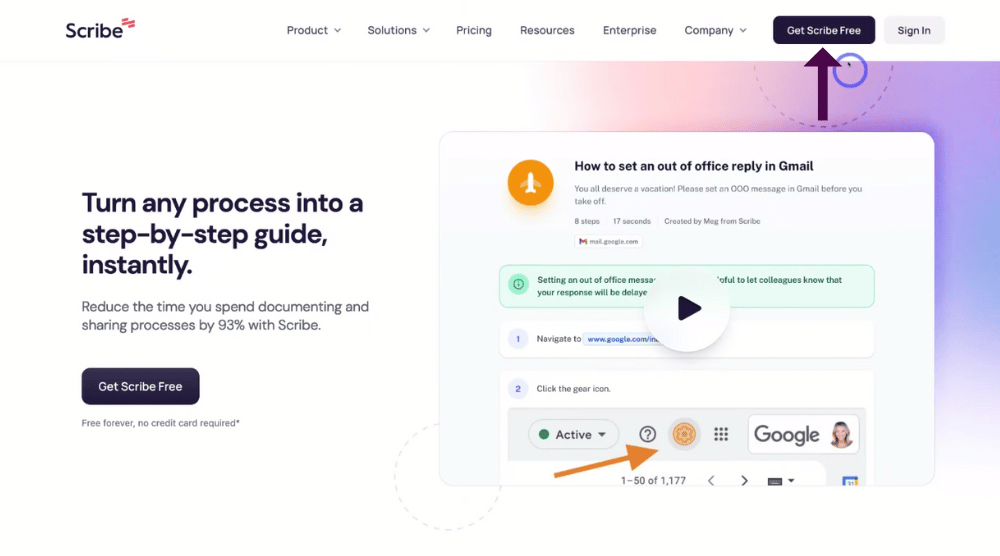
Once you’re on Scribes homepage:
- Simply navigate up to ‘Get Scribe free’.
- Go ahead and sign up.
We’ll meet you inside to walk you through how to use Scribe!
3. Scribe Dashboard

Once you arrive inside your free Scribe account, your dashboard will look like the screenshot above.
Here you’ll see on the right-hand side a bit of information about your Scribes.
- The number of Scribes you’ve created. : We’ve already gone ahead and created five Scribes.
- The total number of views for your Scribes.
- The total number of Claps. : People have the option to engage with your Scribes with claps.
- Your team members.: You can invite team members to join you on Scribe.
4. How To Create How-To Guides With Scribe

You can now create free guides with Scribe, and share these guides with your clients!
Firstly, you’ll need to learn how to use Scribe to create your how-to guide.
For the purpose of this tutorial, we’ll show you how to create a how-to guide or step-by-step guide for our clients.
Our clients always ask us how they can add additional users to their WordPress website, and often we’ll have to send our clients a text message or an email that outlines the instructions for completing this process.
This is a perfect opportunity to show you how to create a how-to guide on how to add a new user to WordPress.
You can read Our ultimate guide on how to use WordPress for beginners.
To create your first Scribe, simply follow these steps:
- Navigate up and click on ‘New +’ in the right-hand side of your dashboard.
- Click on ‘New Scribe’.
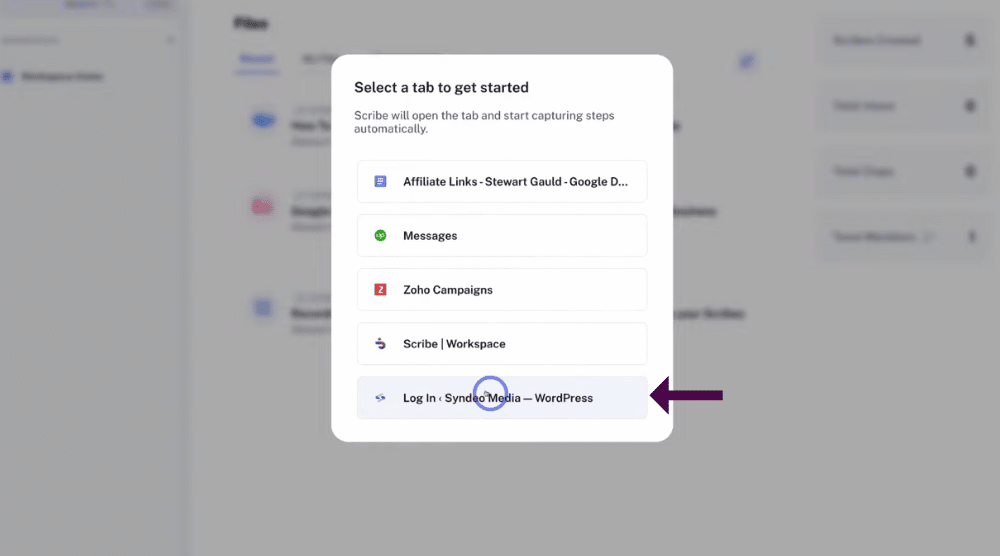
- You’ll then have the option to select ‘New tab’ to open a new tab, or
- Choose from the existing tabs you have open.
We’re going to go ahead and open up this tab to initiate our Scribe i.e Login Syndeo Media – WordPress

When you do this, you’ll see ‘Capture has started’ to indicate that your Scribe has started.
You’ll also notice a recording icon down in the lower-right-hand corner to show your Scribe is recording.
From here, you can edit, end, and pause your recording.
- Click on ‘Show controls’ next to the recording icon.
- Click on ‘Complete recording’ to end the recording.
- Select ‘Move controls’ to move your controls around. You can place them in different locations on the screen.
- Select ‘Delete’ to delete your Scribe.
- Click ‘Pause’ to pause the recording.
We’re going to continue with our WordPress how-to guide that we mentioned earlier.
Our Scribe will show our clients the process of adding a new user by explaining the following steps:
- Log into your WordPress account.

- Simply navigate over to the left-hand side & Click on ‘Users’.
- Click on ‘Add new user’.

- Come down and add a username.
- Come down and add an email.
- Navigate down to ‘Password’ and add a password.
- Come down to ‘Subscriber’.
- Click on ‘Administrator’.
- Click ‘Add new user’.

It’s as simple as that to add new users to WordPress.
We’ve just completed this step-by-step guide for our clients!
To finish your Scribe:
- Click on ‘Show controls’.
- Click on ‘Complete recording’.
5. Editing Your Scribe

That’s going to take you to your new Scribe.
You can view information about your new Scribe on this page.
- How many steps your Scribe has: You can see our Scribe (the how-to guide we just created) has 14 steps
- How many minutes it took to create your Scribe: It took us a total of four minutes to create this Scribe. It could take a lot less time, however, because we walked you through the process, it took a bit longer.
- Who created the Scribe?
Next, you can identify your Scribe by adding an icon.
- Click on ‘Edit’.
- Come down and add a suitable icon.
We’re going to go ahead and add this icon and then change the color to blue (see screengrab).
You can go ahead and choose what icon and color you want.
- Click out of your icons.
- Come down and add a title for your Scribe by clicking the ‘Pencil’ icon.
We’re going to name ours ‘How to add a user to WordPress’.
Once you’ve chosen a suitable title:
- Navigate down to view all of your steps that Scribe has recorded in order to create your ‘How to guide’.
- Navigate back up to the top.
Take some time to make your way through one by one each of your steps to make sure they’re correct.
You can also customize each of your steps.
Let’s take a look at each of our current steps and customize some of these steps:
Step 1) Navigate To..

As you can see, the URL has been generated for step 1 (see screengrab).
You can actually customize the URL.
- Click the Pencil icon next to your URL.
- Navigate over next to ‘Navigate to’ and change this text to what you want.
We’re going to change ours to ‘Navigate to your website login page for example’.
Then next to that, we have the URL. We’re happy with that.
Once you’ve edited your URL, click out of that.
You can also add an image if you like. To do this:
- Click the Image icon (next to the Pencil icon).
- Select ‘Choose a file’ to upload an image.
You can further edit each step.
- Click on the three dots next to the Image icon.
- Click ‘Delete step’ or
- Click ‘Copy link to step’.
Additionally, you can:
- Navigate down between steps.
- Click the ‘+’ icon.
This will bring up a few different options you can add in between steps.
For example, let’s click on ‘Tip’ and type in ‘Find our login information from our first email interaction’ (see screengrab).
This will now be added to our Scribe.
Go ahead and play around with all these options and add anything you want to add value to your Scribe.
Step 2) ‘Click This Button’

This step indicates that our clients should click the highlighted button (see screengrab).
You can change this if you want, however, we’re happy with step two.
Step 3) ‘Click Users’

This step explains that once the client’s logged in, all they need to do is click on ‘Users’ again (see screengrab).
Again, we’re happy with this step.
Step 4) ‘Click Add New’

Again, we’re happy with that.
However, if we wanted to customize this text, all you would do is:
- Click the pencil icon.
- Add the content you want to add in this step (see screengrab).
Let’s zoom in on this step.
- Navigate down.
- You can click ‘Zoom in’.
That’s going to zoom in on that specific click action that you did when recording your Scribe (see screengrab).
To crop your screenshot:
- Click on ‘Edit’.
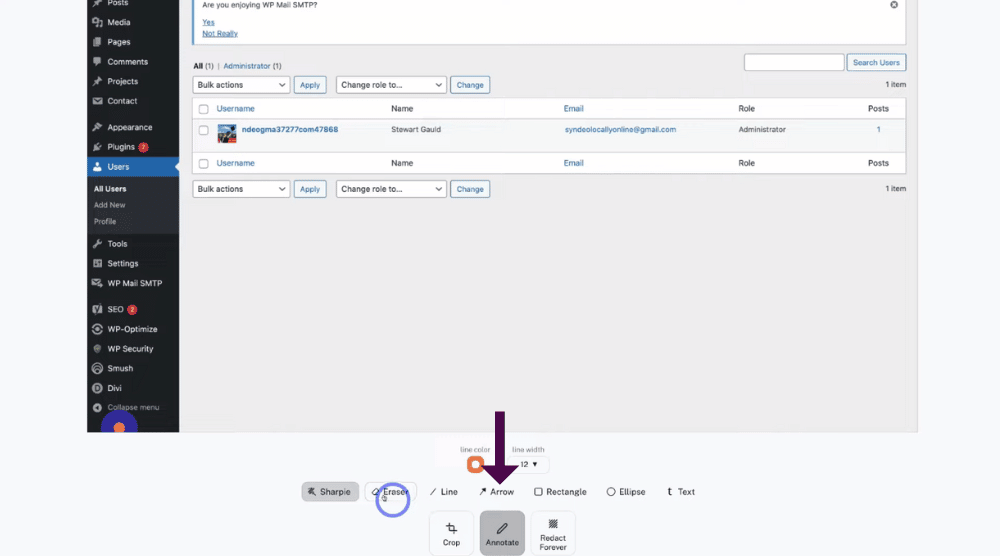
To erase, add a line, arrow, rectangle, ellipse or text:
- Click on ‘Annotate’ within ‘Edit’ (see screengrab).
- Simply select what action you want to take on that step.
Let’s add an arrow pointing to where we’re clicking for this step.
- Click on ‘Arrow’.
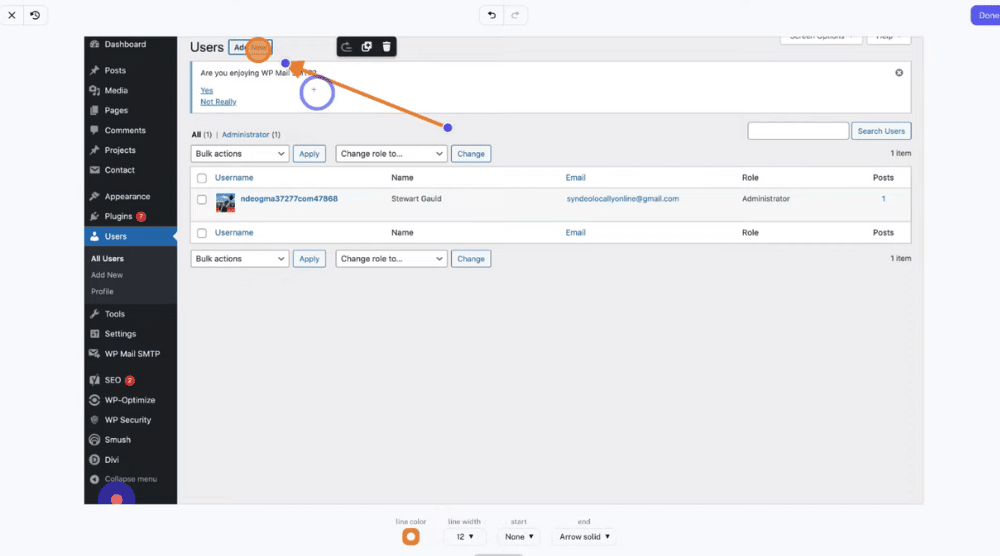
- Click where you want the arrow to start.
- Drag where you want the arrow to end (see screengrab).
- Unclick when you’re happy with where the arrow ends.
Additionally, you can:
- Click on ‘Delete’ to delete the arrow.
- Click on ‘Duplicate’ to duplicate the arrow.
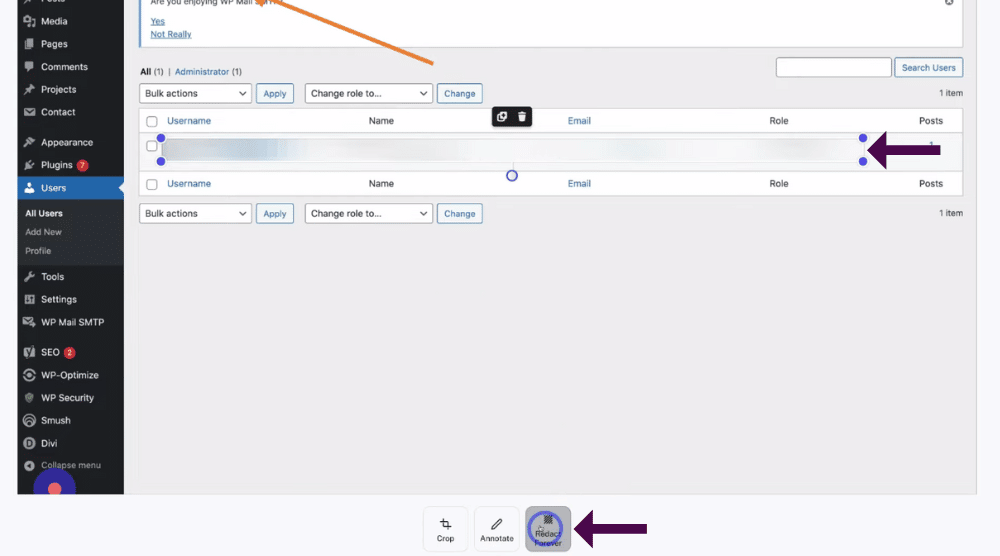
To blur out any information on any step, follow these steps:
- Navigate down and click on ‘Redact forever’.
For example, we’ll blur out this information here about this administrator.
- Simply drag out the ‘Blur’ element to cover that personal information (see screengrab).
If there’s any personal information that you want to cover or remove on the different screenshots, you can.
We’re happy with that.
- Navigate up to ‘Done’.
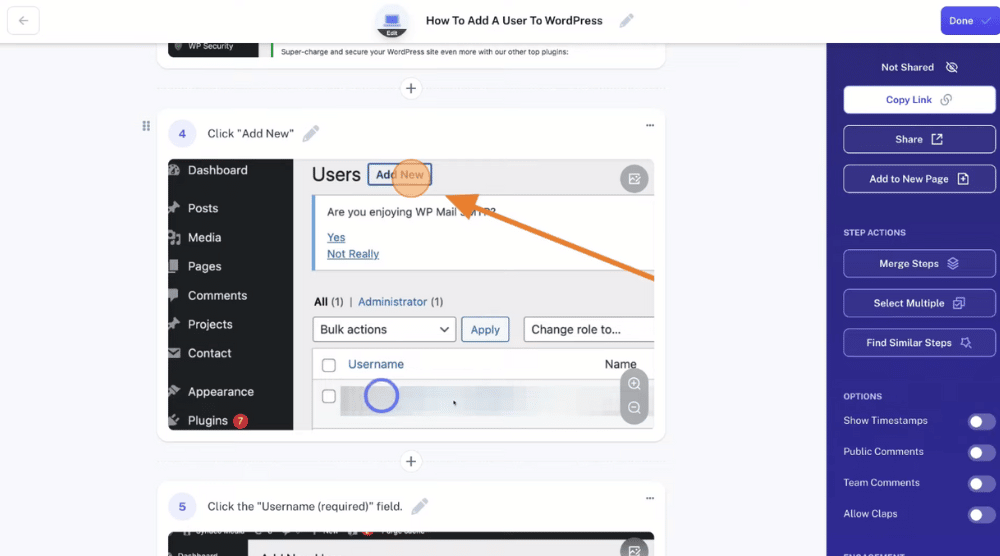
That’s going to take us back to step 4.
You can now see the screenshot that we just edited.
We now have an arrow and down here we have a blur section that covers the personal information that we want to cover (see screengrab).
Step 5) Click The Username (Required) Field

We’re going to add some additional information for the client to follow.
Again, to do this:
- Click the pencil icon.
- Simply type any additional information.
We just added ‘and add your new username’.
Now the title of our step 5 becomes:
‘Click the Username (required) field and add your new username’.
Again, you can zoom in or zoom out or edit this screenshot if you like.
We’re happy with stage five
Step 6) Type ‘Samsmith’

We’re going to remove this step because we don’t need it.
- Navigate over to and click on those three dots.
- Click ‘Delete step’ (see screengrab).
- Select ‘Delete’.
For some reason, Scribe has gone ahead and duplicated this 2 step
Now Step 7 becomes, Step 6
Step 6) Click The “Username (Required)”Field (See Screengrab)
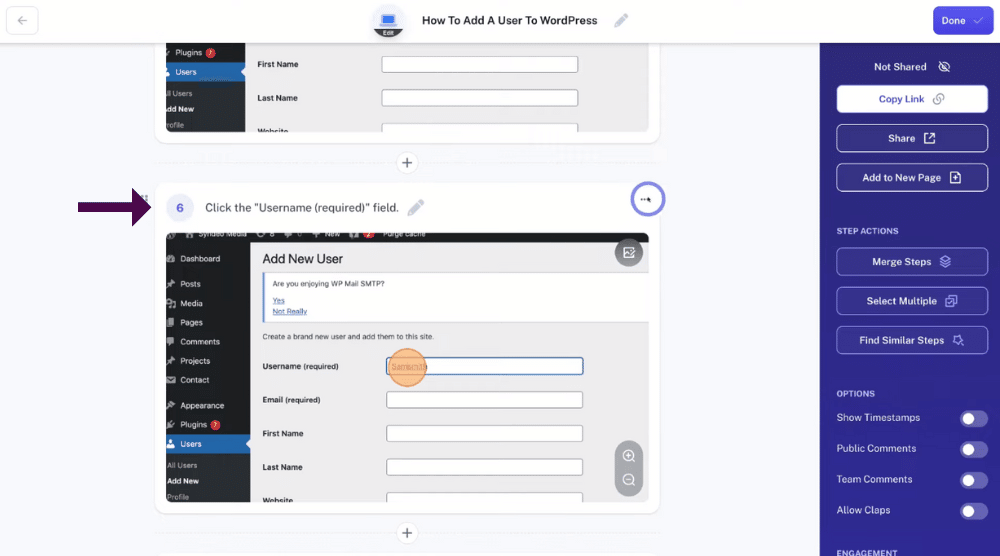
so we’ll delete both again.
Now that both steps is deleted, our new step 6 becomes:
New Step 6) Click The “Email (Required)”Field
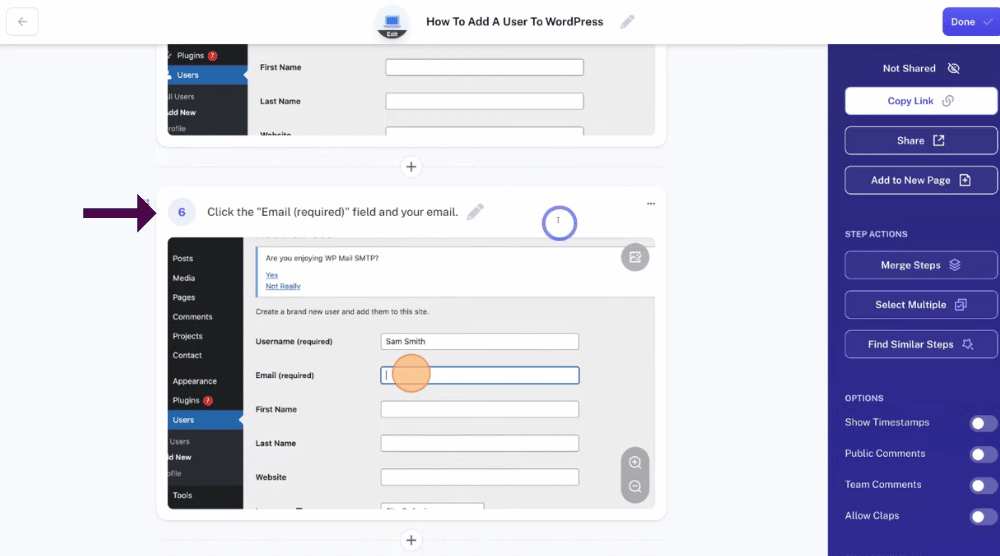
This time, we’re going to add ‘And add your email’, so our new step becomes:
Click the email (required) field and add your email (see screengrab).
We’re now happy with step six.
We’re going to go ahead and delete step seven.
Our new step 7 is:
Step 7) Click The Password (Required) Field

We’re happy with that (see screengrab).
Step 8) Click This Dropdown.

Again, we’re happy with this step.
Step 9) Click This Button

We’re going to change this to ‘Click Add new user’.
We are now happy with these nine steps for how to add a user to WordPress!
And that is how to use Scribe to create how-to guides!
Now our clients can easily learn how to add a user to WordPress.
When you’ve completed editing and customizing your Scribe:
- Simply navigate up to and click on ‘Done’ in the upper right-hand corner.
However, before you do that, make sure you go through the options on the right-hand sidebar (see screengrab).
You can turn these options on or off:
- Select the ‘Timestamps’ button to turn on timestamps.
That’s going to enable timestamps to your steps (see screengrab).
We’re going to turn this off.
Additionally, you can select to turn on or off:
- ‘Public comments’
- ‘Team comments’.
- ‘Allow claps’.
These three options essentially allow people that are viewing the Scribe to engage with your Scribe.
Below these options, you can turn on notifications for any engagement.
- Click on ‘Notify me’.
- Click on ‘Enable notification’.
Once you’ve made your way through all these options:
- Navigate up to the top.
- Click on ‘Done’.
6. Share Scribe With Your Clients or Staff

To share your Scribe with your team members or your clients, follow these steps:
- Simply click on ‘Share’.

- Under ‘People’, you have the option to add the email address of the recipients that you want to share the Scribe with (see screengrab).
- Above this, you can also click on ‘Copy link’.
That’s going to copy the link that we can now add to our different marketing materials, or we can simply add the link to other online destinations for people to access.
- Next to ‘People’, click ‘Smart Embed’.
- You can simply embed this Scribe onto different platforms (see screengrab).
For example, if your website is built from WordPress, Webflow, HubSpot, or even Squarespace, you can simply embed the Scribe onto your website!
If you had a blog post that covered a lot of ‘How-to guides’ or step-by-step guides, or want to easily create free guides that are available on your website, you can embed your step-by-step guides onto your website.
You can also “Add a new page” to your scribe.
Read more: How to use Webflow for beginners
Read more: HubSpot CMS guide
7. Download Scribe

Additionally, you have the option to physically export your guide!
- Next to ‘Smart Embed’, click ‘Export’.
- Navigate over to ‘Export as PDF’.
- Click ‘Export’.
That’s going to generate a full PDF document of your new how-to or step step-by-step guide.
- Simply come down and click ‘View PDF’.
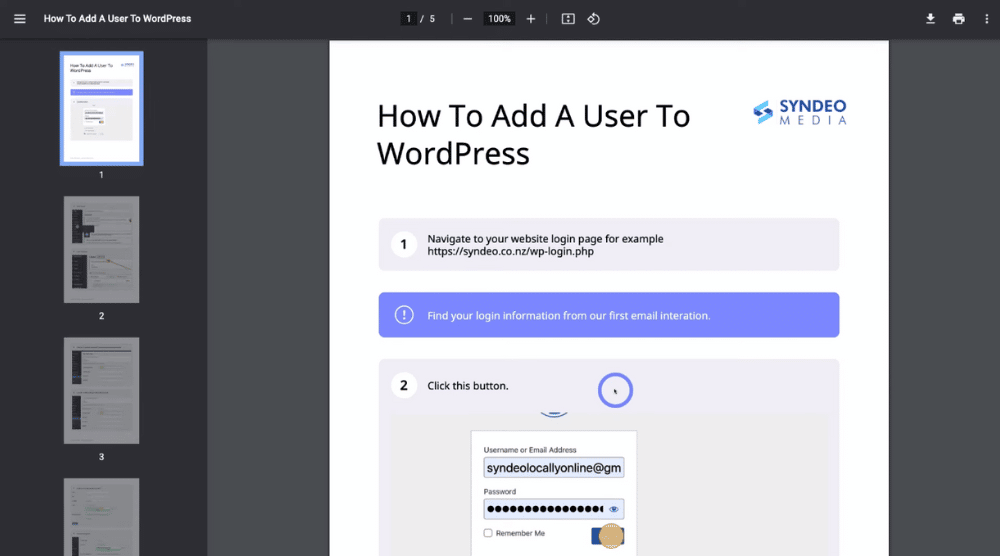
This is what the PDF guide will look like (see screengrab).
You can then download this PDF or send this PDF to your clients.
- Navigate back.
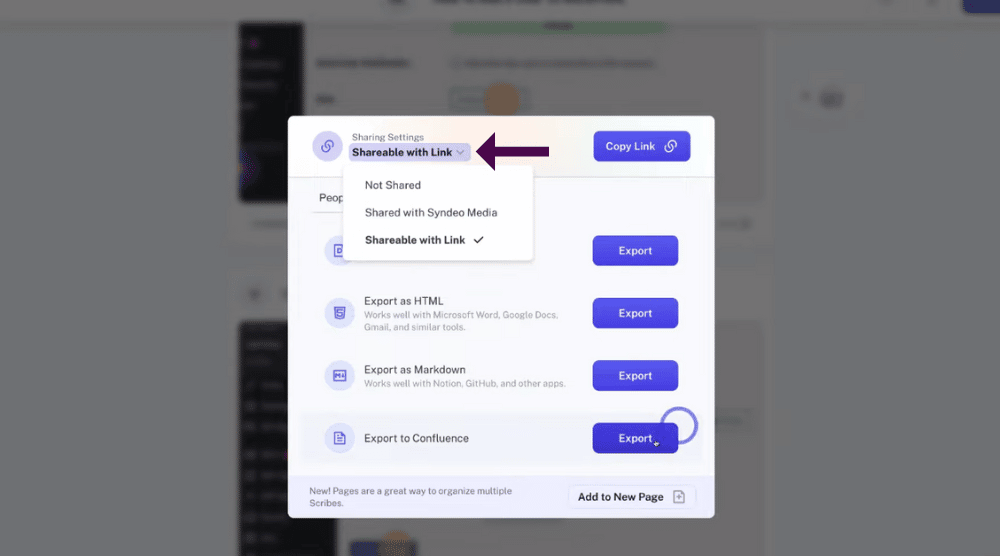
- Come up to and click on ‘Shareable with link’ drop down.
You can keep it like this or change your sharing options to:
- ‘Not shared’ or
- ‘Share with (your company). For us, ‘Syndeo media’
For example, We can choose to ‘Share with Syndeo media’ only (see screengrab).
8. Add new Pages

- Navigate down the page and click on ‘Add to new page’.

This is where you can organize each of our different Scribes (see screengrab).
- Navigate up (see screengrab). We could change this page and call it ‘WordPress’.
- You can then add all your Scribes that are related to navigating WordPress.
Once you’ve organized each of your Scribes:
- Navigate up to ‘Done’.
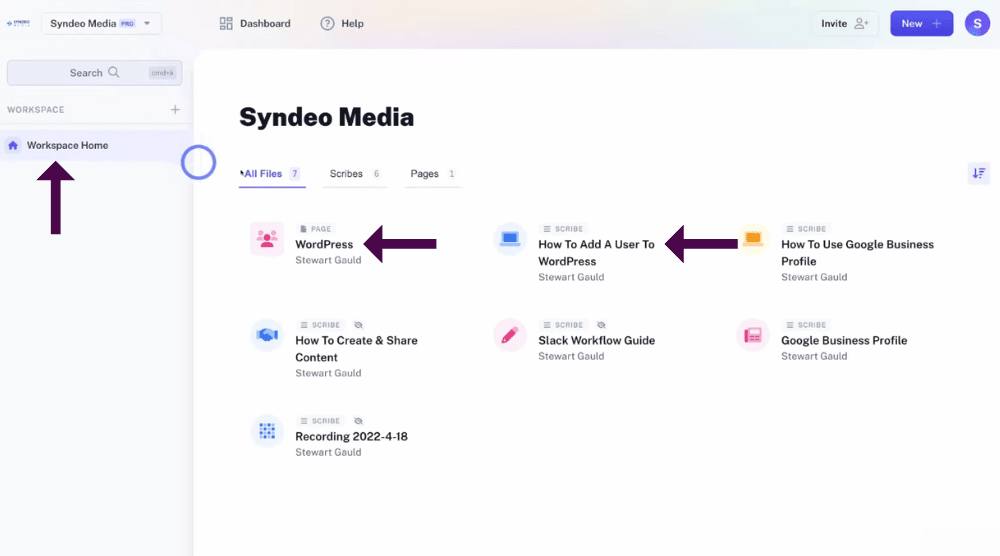
- Navigate over to ‘Workspace Home’ over on the left-hand side.
That’s going to take you back to your dashboard.
As you can see, we have our new Scribe over i.e How to add a user to Wordpress here that we can simply access, and over here we have the page i.e WordPress that we just created (see screengrab).
Remember, you can create pages to organize your different Scribes based on different topics, categories or even departments.
And that is how to use Scribe to streamline your training systems and processes by using Scribe to create free guides for your team members or for your clients to follow!
This is a powerful productivity app that’s going to help you save time, money and energy when it comes to creating systems within your business.
How to Use Scribe to Create Free Guides (Video Tutorial)
We have now come to the end of this brief productivity tutorial on how to use Scribe and how to create how-to guides online!
We hope you gained value and love using Scribe as much as we do.
Check out our comprehensive video tutorial for beginners below and get started with Scribe!
