Are you looking for an alternative free project management software to popular platforms such as Jira, Trello and monday.com?
This ClickUp tutorial for beginners on how to use ClickUp is perfect for you and your small business.
If you haven’t already heard of ClickUp, you’re missing out!
They are an all-in-one, free project management software that offers visually impressive and easy-to-use features that cover everything you need in order to streamline your project management, collaboration, communication, and other activties inside your business.
In this ClickUp tutorial for beginners, we will walk you through how to use ClickUp, including how to set up, implement and navigate through all of ClickUps impressive team and project management features, so that you can ultimately drive productivity in your organization!
How To Use ClickUp?
Let’s get started with this ClickUp review so you can get up and running with ClickUp today!
*The link above is an affiliate link, which means we will get a commission if you upgrade to a paid plan (with no extra cost to you). This helps support our education-based website and we thank you in advance!
The first thing you’ll need to do to get started is to head over to ClickUp’s homepage here.
If you don’t currently have a ClickUp account, you’ll need to sign up first.
Navigate over to ‘Enter your email address’ on the homepage and add the email address that you use for business.
The purpose of this ClickUp tutorial for beginners is to show you how to use ClickUp and help you set up, implement and navigate through all the free features that ClickUp up has to offer!
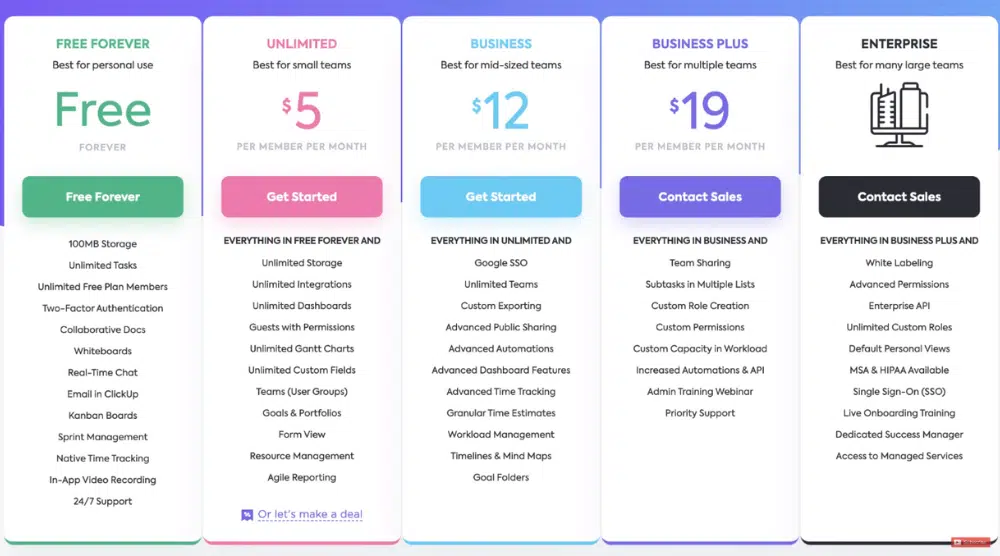
ClickUp’s free plan is jam-packed with impressive features that are more than sufficient for both small businesses and personal use.
Personally, we think ClickUp ups free plan is the best on the market in terms of other free project management software and team management, collaboration, and communication platforms such as monday.com
ClickUp ups free plan allows you to collaborate with unlimited members and create unlimited tasks.
You also have access to other collaboration features including real-time chat and email integration.
Additionally, you can access time tracking, 100 automations per month, and 24/7 support.
ClickUp stands out from the crowd of other free project management software for the amount of incredible completely free features they offer!
The best part is, if you outgrow the free plan, you can always upgrade your team to one of the premium plans (at any time) if you require more custom or advanced options and features.
With that out of the way, let’s launch straight into this ClickUp review!
Navigate over to the upper right-hand side and select ‘Invite’.
This is where you can simply manage, add and delete your different team members that are part of this workspace.
As you can see, we’ve gone ahead and added two team members.
You can go ahead and add as many team members as you want here.
Once you’re happy with you team:
Navigate back to your workspace.
6. Getting To Know Your ClickUp Account
Before you go ahead and start engaging in team and project management activities, we’ll take you through and show you how to use ClickUp’s different features.
You’ll see this navigation bar over on the left-hand side of your account (see screengrab).
You can either keep it like this or collapse it if you’d like more space to work on your projects.
To do this:
Click the ‘<<’ button at the top of the sidebar.
You can go ahead and expand that bar again by clicking the 3 lines up in the very upper left-hand corner of the screen.
Your navigation bar is broken into different sections.
1. Home
This is where you can see important information about your work.
2. Notifications
This is where you can see notifications in regards to your activities.
3. Pulse
This cool feature gives you a visual overview of who’s online and what they’re currently working on.
4. Goals
This allows you to establish goals for your organization. This will not only motivate your team but also allow you to visually track your progress in real time.
5. Favorites
6. Spaces
This is where you can add a new space.
7. ClickUp Project Structure
Think about your spaces as projects.
These could be different team projects you’re working on or client projects.
These can be used for other areas, like managing your CRM, tickets, or other important areas and projects within your organization.
Let’s break down the structure of ClickUp so you can easily understand how to use ClickUp
The top level is your workspace: Your workspace is your organization or your company.
Within your workspace, you have spaces: These are projects that you’re currently working on.
Within your projects (spaces), you have lists: Lists allow you to better manage your tasks within your spaces.
Within lists, you have tasks: This is where you can create and manage your tasks.
Within tasks, you can also create subtasks: We’ll dive deeper into managing projects with spaces shortly.
Let’s head back to the left-hand navigation bar.
8. Custom Dashboards
Below spaces, you have dashboards.
To create a dashboard:
Click on ‘Dashboards’.
Select the ‘+’ button next to ‘My private dashboards’.
With the free plan, you can create a simple dashboard like this .
If you want to create more custom and advanced dashboards like reporting dashboards and time tracking dashboards, you’ll need to upgrade to at least the business plan.
Select ‘Use template’ under ‘Simple dashboard’.
We’re going to keep ‘Hidden’ under the location selected because this is our personal dashboard.
And now you’ve created a visual dashboard that you can customize (in terms of the important elements that you want to view on your dashboard)!
9. Collaborate On Documents
Head back again to your navigation bar.
Below ‘Dashboard’, you have ‘Documents’.
Click on ‘Docs’.
Select ‘Add new’.
This is where you can add a new document.
These are documents that you could use for notes, or you can actually collaborate with your team on these documents.
10. Quick Actions
Next, we’ll take a look at and show you how to use ClickUp’s ‘Quick actions’ that you can easily access from your homepage.
1. Tasks
Exit out of your document.
Simply navigate down to the bottom right-hand corner and click on ‘+ Task’.
This is where you can quickly create tasks to simply allocate to a list within a specific space.
You can go ahead and quickly add this information for a specific task
Once you’ve finished adding all relevant information for your task:
Click ‘Create task’.
Navigate up to ‘Exit’.
2. Screen Recording.
Head down and select the button next to ‘Task’.
Click on ‘Record clip’.
3. Track Time.
Click up on ‘Track time’.
You can add a new activity, or you can select an activity (or a task) that already exists.
You can also bill the time, however, this is only available with a premium plan.
4. Reminders
Navigate back down and click on the button next to ‘Task’ again.
Click on ‘Reminder’ to set a reminder.
5. Notepad
Select ‘Notepad’ to activate the notepad, which allows you to add your own notes
6. New Doc
Select ‘Create a new document’.
7. Calendar
Additionally, you can ‘Pin’ each of these different quick actions.
Let’s say you often track time.
Simply click the ‘Pin’ next to ‘Track time’.
That’s going to pin ‘Track time’ as a quick action down here that you can quickly access (see screengrab).
We’re going to do the same with the notepad and the calendar.
You can go ahead and pin what elements work best for you.
11. Create a Space (Project)
Let’s go ahead and create our first project inside ClickUp!
Simply navigate over to the far left-hand side of the navigation bar.
Come down to ‘Spaces’.
Click on ‘+ New space’.
Here you have the option to select a template or create your space from scratch.
Remember, first you have your workspace (which is your organization or company) than below the workspace, you have spaces.
These are your projects.
Think about the project that you want to manage and that you want to create tasks for.
ClickUp offers a range of premade space templates to help you get started. To access these:
Click on ‘Templates’ (next to ‘New’) just above where you typed in your space name.
This is where you can simply browse all the premade space templates that are available, and then customize the way that you like to represent your own project.
To find a template you like, you can either:
Head up to the search bar and type in a specific keyword related to your project or
Simply just browse all these different template projects
Additionally, there are more advanced project management templates you can pick from, such as ‘Agile project management,‘Backlogs and sprints’, and ‘Product requirements’.
As this is just a ClickUp tutorial for beginners and the purpose is to show you how to use ClickUp, we’re going to show you how to create a space from scratch.
Come down under ‘New’ and enter in your space name under ‘Space name’.
We’re going to go ahead and call this ‘Client A – branding’.
Click ‘Next’.
Add a logo and a color to your space avatar.
We’re going to select one of the color and this icon from down.
Click ‘Next’.
Select to either share your new space or project with your entire workspace or
Select ‘Private’ for a space.
We’re going to go ahead and keep our workspace selected so our whole team can view our space.
Select ‘Next’.
You can start adding your statuses here, however, we’re not going to do this until we’ve created our space
Click ‘Next’.
This is where you can simply select or deselect apps to choose the different ClickUp apps that you want to enable.
Once you’ve selected what apps you want to enable:
Go ahead and click ‘Next’.
Depending on the nature of your space, you can now go ahead and enable different view types.
Select the different options that you want to view your project in (within your space)
Come down and click ‘Review space’.
Remember, you can change any of these settings once you’ve created your space.
Click on ‘Create space’.
As you can see, if you navigate over to the left-hand side, you’ll see under ‘Spaces’ that we have our first space! i.e. ‘Client A – branding’
You can also now create more spaces (say for another client) using the same process.
For example, we could create ‘Client – B’ for a web design project.
Think about how you want to structure your spaces for your projects.
Let’s continue with this ClickUp review.
12. Manage Lists For Grouping Statuses And Tasks
Your spaces are made up of lists.
Firstly, you can rename your list.
Click on ‘List’ under your space on the left-hand navigation bar.
Navigate up to and click on ‘List’.
Simply rename your list.
We’re going to rename ‘List’ as ‘Logo’.
As you can see, we’ve gone ahead and changed the list name to ‘Logo’ within our workspace
Once you’ve renamed your lists within your spaces, you can edit and customize your list.
Click on your list i.e ‘Logo’ we just renamed.
This will bring up all these optionsdown here
If you want to create a new task, list, document or whiteboard:
Select ‘+ Create new’
Select either ‘Task’, ‘List’, ‘Doc’ or ‘Whiteboard’.
You can also choose ‘From template’.
Additionally, you have a bunch of other options to edit or customize your list, such as
Add to favorites.
Duplicate.
Move.
Templates.
Sharing and permissions and more.
You can also:
Exit out of this.
Navigate over to the list on the left-hand side for the same options under ‘List settings’.
Navigate over to your space in the navigation bar i.e Client A – Branding
Click the ‘+’ icon next to your space name.
Here you can:
Create a newlist, document, whiteboard, or folder that you can use to manage your spaces and your different activities within this project.
13. Add Tasks
Within your lists i.e ‘Logo’, you can add tasks.
We’re going to go ahead and add our first task(and three more tasks) to this list.
Click on your list through the right-hand side.
Add your new task by simply typing in your new task name.
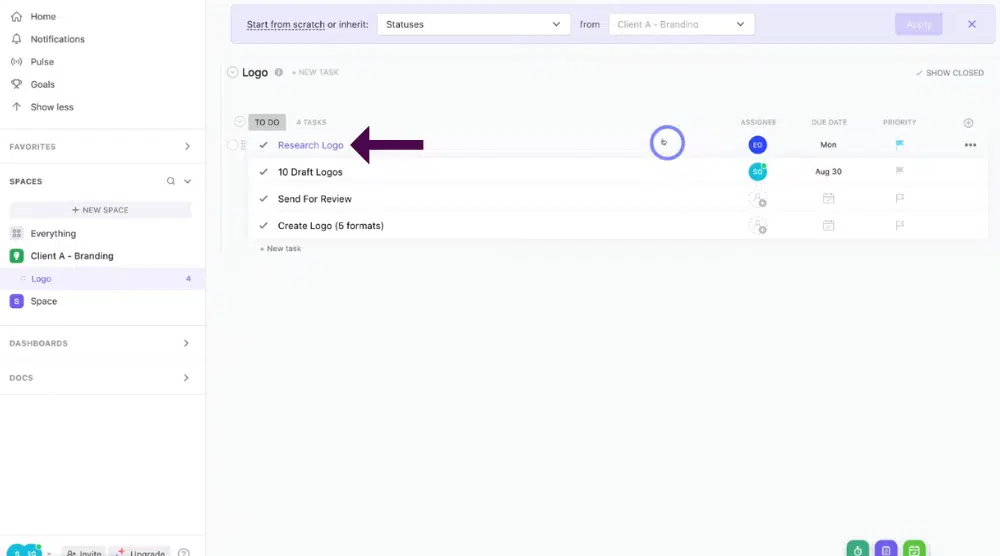
As you can see, we’ve gone ahead and added four tasks.
14. Add And Manage Columns
You can assign a team member to each task.
Click on ‘Assignee’ next to the relevant task.
We’re going to go ahead and assign ‘Emma’ i.e ‘EG’ for our first task and me, ‘Stewart’ i.e ‘SG’ for the next (see screengrab)
Next to that, click on ‘Due date’ to add a due date.
We’re going to come down and select ‘Next week’ for our first task. i.e ‘Monday’
We’ll select ‘2 weeks’ for our second task. i.e ‘Aug 30’
Navigate over and select ‘Priority’ to set a priority.
You can select:
Urgent
High
Normal
Low
Clear
This is all dependent on the nature of your projects and your tasks.
Additionally, you can add additional columns by following the below steps:
Simply Click ‘Add column’.
This will bring up a list of additional columns you can add.
Hover over each heading to see a preview over on the left-hand side.
For example, if one of your spaces was a CRM and you were collecting contacts or leads, you can add an ‘Email’ field.
If it was a client that you needed to follow up on, you could add the email in the email field.
Additionally, you can add files, formulas, labels, and more.
You can also choose more fields from the library.
15. Task Details And Features
To view more about your tasks:
Simply click on each of the tasks. For ex, if we click on: ‘Research logo’.
We’ll go ahead and click on our first task ‘Research logo’.
That will take you over here where you can add a description for this specific task.
Navigate down below this to ‘Subtasks’ to add a subtask to your task.
On the right-hand side of the screen, you can see the recent activity for this specific task.
Navigate up to the three dots next to ‘Share’ to see your task settings.
Next to that, you can see when the task was created.
You can also start time tracking.
Next to ‘Created’ Click to start the timer.
That’s going to enable time tracking.
This means that if you’re working on a specific task, you can enable time tracking.
Once you’ve completed that task you can go ahead and stop the timer by:
Simply click the same button you clicked to begin the timer.
Remember, you also have the option down below to enable the time-tracking feature.
There are also some other features within your task that you can edit. Follow the steps below to navigate through these:
Next to ‘Time tracking’, you can select ‘Due date’ to add the due date.
Next to ‘Due date’, you’ll see an eye icon. This shows you how many people are watching this specific task.
Scroll to the bottom of the screen.
This is where people can leave comments or
Upload specific files that are relevant to this task.
Once you’ve finished and are happy with your task details and features:
Exit out of this task.
16. Enable Features (ClickApps)
If you can’t find the ClickApps feature ‘Time tracking’, we’ll show you how you can find it:
Navigate over to the left-hand side and click(see screengrab).
Select ‘ClickUp’ apps.
This is where you need to enable specific apps.
For example, if you don’t have ‘Automations’ turned on, you won’t be able to use automations.
This is the same with ‘Collaborative editing’, you need to turn on these specific apps.
If we want to make sure we have ‘Dashboards’ on, turn it off.
You can also turn off any of these apps if you don’t use some of these features
For example, if you don’t use ‘Milestones’, simply disable that app.
Again, we have time tracking. Make sure that this is enabled to make use of it!
Let’s continue navigating around our workspace.
Navigate back to your space and onto your list.
17. Manage Statuses (For Grouping Tasks)
Remember we created our ‘Logo’ list as an example.
Within our ‘Logo’ list, we have one status, which is ‘To do’.
Below that, we have the four tasks that we created.
If you want to manage and create additional statuses, all you need to do is:
Simply navigate up to and hover over the area underneath your list title.
This will bring up ‘Add new status’.
Click ‘Add new status’, or
Navigate over to a status.
For us, we’ll navigate over to ‘To do’.
Click ‘Group options’ next to your status.
Come down and click on ‘Manage statuses’.
Click ‘Add status’
Type in your new status name.
We’re going to call ours ‘In progress’ .
Click the button next to your new status name to change the color.
Let’s go with blue.
Add a new status by clicking ‘Add new status’.
We’re going to call this ‘Final review’.
Change your new status to another color.
We’re going to change our ‘Final review’ status to this green color here
Navigate down and click ‘Save’.
That’s going to create two additional statuses!
You can go ahead and add as many statuses as you like for each list following this process.
If you can’t see your statuses within your list, follow these steps:
Simply navigate up to ‘Show’ in the top right- hand corner.
Come down and make sure that ‘Empty statuses’ is enabled
We can now see ‘Final review’,‘In Progress’ and ‘To do’ as our three statuses.
You can edit each of these statuses by:
Clicking ‘Rename’ next to each statuses name.
We’re going to change the color to ‘Yellow’ of our ‘To do’ status here.
Once you’re happy with each status:
Click ‘Save’.
We now have ‘Final review’ ‘In progress’ and ‘To do’ within our ‘Logo’ list.
18. Move Tasks
If we started working on our ‘10 draft logo’ task, then we can move this to another status.
To move our ‘10 draft logo’ task, we can:
Simply drag and drop this task from ‘To do’ to ‘In progress’.
Alternatively, you can:
Simply click on any of your tasks. For ex, the ‘Research logo’
Navigate up to the status up here
Click ‘Next status’.
That’s going to move your task to the next status.
For example, now this task is within ‘In progress’.
Let’s exit this and check to see what our list now looks like.
Now we have two tasks within ‘In progress’.
19. ClickUp Project View Options
At the moment, we’re viewing our list in a list view. However, you can also view your lists in different formats
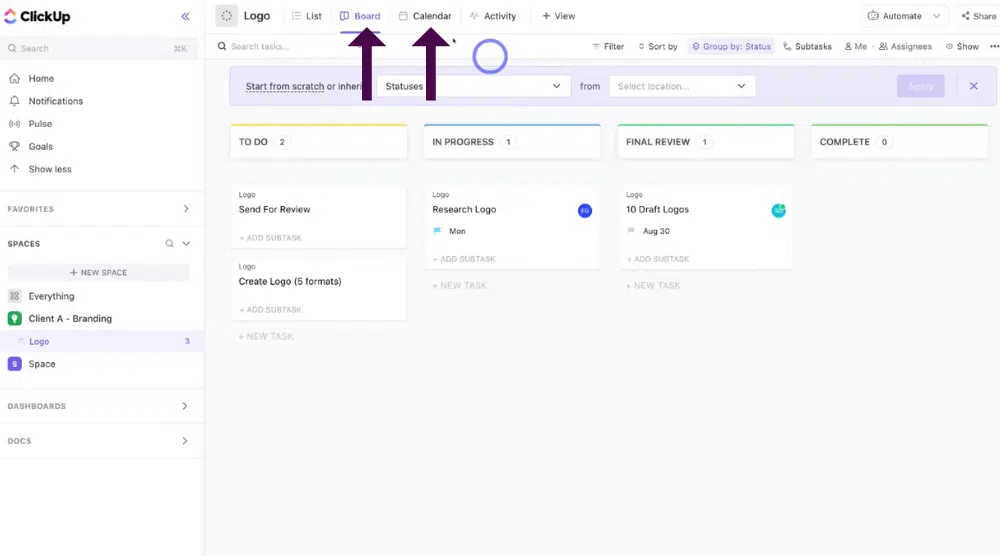
There are two other popular views – ‘Board’ and ‘Calendar’.
1. Board
Navigate up to the top of the page
Click on ‘Board’.
This now means you’ll view your list or project in this board structure
Simply drag and drop each of the different tasks into the right status.
2. Calendar
Navigate across and click on ‘Calendar’.
This is an ideal view for if you have a time frame that you want to track for your project
If you don’t want to use List, Board or Calendar view:
Navigate over to ‘Add view’ to add additional views.
Most of these views are free, however, if you want to use a ‘Box’ or ‘Form’ view, you will need to upgrade to a paid plan.
Let’s go ahead and add a ‘Gantt’ view as an example.
To do this:
Select ‘Gantt’ from the drop-down menu under ‘Add view’.
Click ‘Add view’.
And it’s as easy as that!
As you can see, we now have a ‘Gantt’ view
We’re going to navigate back over to ‘Board’ because we prefer a visual layout and view.
Select what view works for you, your team, and your project.
Next, we’re going to show you how to add an additional list.
We’ll add an additional list under our project ‘Client A – Branding’ so to do that:
Come down and click on these three dots next to your list name. i.e “Logo’
Click on ‘ + Create new’.
Click on ‘List’.
Simply type in your new list name.
Our new list is going to be called ‘WEBSITE’.
Once you’ve typed in your new list name:
Click ‘Create list’.
As you can now see, within ‘Client A – branding’ we now have two lists. i.e ‘Logo’ & ‘WEBSITE’.
These different lists could be projects or components within your project.
Depending on the way that you organize your projects, you can break them down into spaces, lists, statuses, tasks, and subtasks.
20. Automate
You also have the option to automate your spaces, lists, statuses, and tasks.
Click back on your list on your left-hand navigation bar.
We’ll go back and click on ‘Logo’.
Navigate up to the upper right-hand side and click on ‘Automate’
Come down and click ‘+ Add automation’.
This is where you can save time by creating automation for each of your projects.
For example:
When a specific action happens (this could be when a status changes), then this action will happen (this could be to move the task)
You can actually create your own automation.
Simply click ‘+ Custom Automation’ over on the upper left-hand corner within your automation.
Alternatively, there are many different automation that you can create from templates that ClickUp provides. For example:
Click on ‘Move’ under ‘Categories’ on the left-hand side.
These are templates that you can use when something moves
With each of these templates, all you need to do is:
Click on the automation on the right-hand side
Navigate over here on the left-hand side
Click the drop-down to choose your automation.
For example,
Click on ‘Status changes’.
Change ‘From’ to ‘Active’.
Click on this little arrow
Untick ‘In progress’ and ‘Final review’.
Click ‘Confirm’.
Change ‘To’ to ‘Active’.
Untick ‘To do’ and ‘Final review’.
Click ‘Confirm’.
So, when the status changes from ‘To do’ to ‘In progress’, you can change the assignee.
Or, you have other options such as ‘Create a task’, ‘Create a subtask’, ‘Add a comment’, ‘Delete task’ and more.
For example, you can:
Select ‘Change an assignee’.
Add the person in here
You can also add an additional action by clicking ‘Add action’.
Once you’re happy with your automation:
Come down and click ‘Create’.
We now have ‘one active automation’ that we can manage
Navigate back over to ‘Browse’.
Again, you can go ahead and browse these different automations or
You can create your own custom automation.
And that concludes how to use Clickups’ incredible automation feature!
Creating automations is going to save you a lot of time and energy rather than jumping between different tasks manually which can create a lot of time friction!
Hi! My name is Stewart, I have a strong passion for digital marketing, business software and small business strategy.
My #1 goal is to provide simple, understandable and actionable information for small businesses located all over the world.
I'm a lover of travel, water sports and spicy food!
We use cookies on our website to give you the most relevant experience by remembering your preferences and repeat visits. By clicking “Accept”, you consent to the use of ALL the cookies.
This website uses cookies to improve your experience while you navigate through the website. Out of these, the cookies that are categorized as necessary are stored on your browser as they are essential for the working of basic functionalities of the website. We also use third-party cookies that help us analyze and understand how you use this website. These cookies will be stored in your browser only with your consent. You also have the option to opt-out of these cookies. But opting out of some of these cookies may affect your browsing experience.
Necessary cookies are absolutely essential for the website to function properly. These cookies ensure basic functionalities and security features of the website, anonymously.
Cookie
Duration
Description
cookielawinfo-checkbox-analytics
11 months
This cookie is set by GDPR Cookie Consent plugin. The cookie is used to store the user consent for the cookies in the category "Analytics".
cookielawinfo-checkbox-functional
11 months
The cookie is set by GDPR cookie consent to record the user consent for the cookies in the category "Functional".
cookielawinfo-checkbox-necessary
11 months
This cookie is set by GDPR Cookie Consent plugin. The cookies is used to store the user consent for the cookies in the category "Necessary".
cookielawinfo-checkbox-others
11 months
This cookie is set by GDPR Cookie Consent plugin. The cookie is used to store the user consent for the cookies in the category "Other.
cookielawinfo-checkbox-performance
11 months
This cookie is set by GDPR Cookie Consent plugin. The cookie is used to store the user consent for the cookies in the category "Performance".
viewed_cookie_policy
11 months
The cookie is set by the GDPR Cookie Consent plugin and is used to store whether or not user has consented to the use of cookies. It does not store any personal data.
Functional cookies help to perform certain functionalities like sharing the content of the website on social media platforms, collect feedbacks, and other third-party features.
Performance cookies are used to understand and analyze the key performance indexes of the website which helps in delivering a better user experience for the visitors.
Analytical cookies are used to understand how visitors interact with the website. These cookies help provide information on metrics the number of visitors, bounce rate, traffic source, etc.
Advertisement cookies are used to provide visitors with relevant ads and marketing campaigns. These cookies track visitors across websites and collect information to provide customized ads.