Are you a business owner that sells subscription-based products or services?
If the answer is yes, then you are in for a real treat.
In this tutorial, we’ll show you how to set up recurring payments in PayPal for free.
This will allow you to create a predictable and stable revenue stream.
As a business owner, you no longer need to chase payments which can be time-consuming as your audience and business grow.
Once you set up the recurring payment system in PayPal, your customers can simply sign up through a link that you can also embed as a button on your website.
Think about the time you and your customers will save!
What’s more, is your customers don’t need a PayPal account to sign up for your subscription plan. They have the option to add their credit card details to make these recurring payments.
Where Can PayPal Recurring Payments Be Used?
When we say ‘recurring payments’, we don’t necessarily mean monthly PayPal payments.
You can manage and customize your recurring timeframes as well as other settings.
You may need to set up PayPal automatic payments for:
- Selling monthly consultation packages
- Creating an exclusive paid group
- Creating a membership site
- Creating and sending out a paid monthly newsletter
- Selling monthly products or services (the billing duration can be changed)
Let’s walk you through the PayPal recurring payments setup!
How to Set Up Recurring Payments in PayPal?
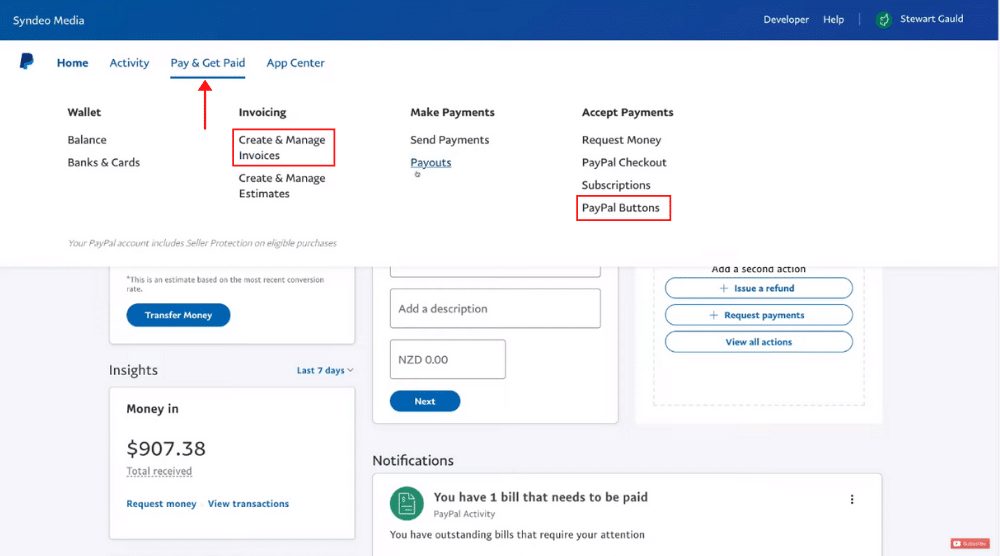
You’d, of course, need to sign up to your PayPal business account to begin.
If you are completely new to PayPal, we recommend watching this beginner’s tutorial on how to use PayPal to learn all the valuable features and understand how to navigate through your PayPal account.
Feel free to watch the above tutorial and come back here to learn how to enable PayPal subscription payments.
Now, to set up PayPal recurring payments:
- On your PayPal dashboard, click on ‘Pay & Get Paid’.
- Under ‘Invoicing’, you can select ‘Create & Manage Invoices’ to set up PayPal recurring payments. But for this tutorial, we’ll click on ‘PayPal Buttons’ under ‘Accept Payments’.
- We want to create a button as well as a link that our customers can sign up through. To set up recurring payments, click on ‘Subscribe’
You’ll now be taken to a multi-step process of creating the PayPal payment button (that will be embedded on your website or as a link you can send to your audience).
Read more: How To Use PayPal
Step 1: Setting up PayPal Recurring Payments
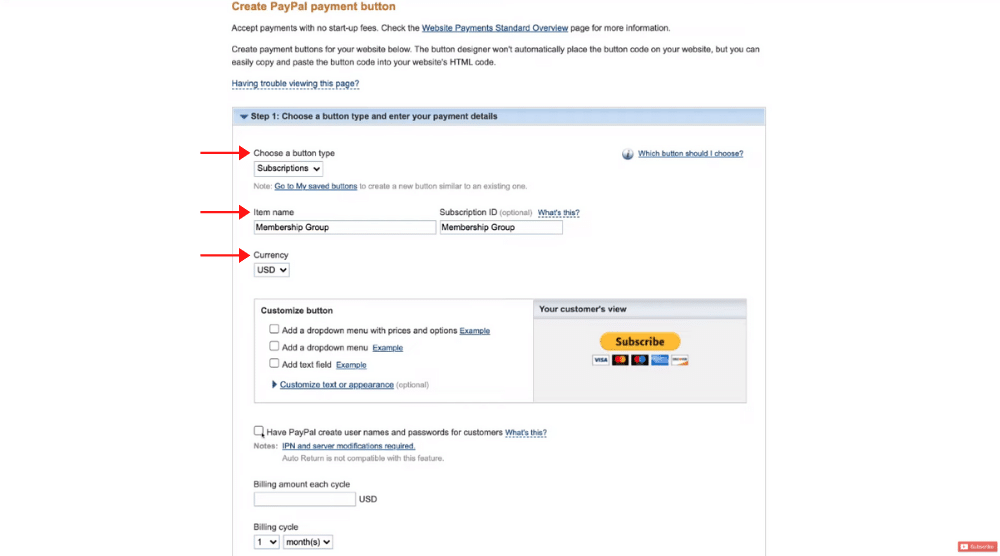
To complete step 1, follow the instructions below:
- Choose a button type from the drop-down menu, which is obviously going to be ‘Subscriptions’ for this tutorial.
- Enter the ‘Item name’. We’re going to call it ‘Membership Group’.
- If you want to set up tracking, you need to add the subscription ID. We will add the same item name under the subscription ID.
- Select the currency that your customers will be paying in. For this PayPal tutorial for beginners, we’ll select USD.
- Below currency is where you can customize the button. Remember, this is what your customers will see on your website. Alternatively, you can simply set up a link that you can directly share with your customers. Hence, you don’t need a website (and hence, a button) to set up PayPal recurring payments.
- If you do decide to create a button, check out the various customization options. For example, if you select ‘Add a dropdown menu with prices and options’, you’ll need to add different menu names as well as their corresponding amount (in USD), and the frequency of the billing cycle. You may choose to skip the customization step for now.
- Below that we have the ‘Have PayPal create user names and passwords for customers’ option. It’s recommended to keep this unselected.
- Mention the billing amount for each cycle. We’ll keep it $30 for example.
- Next, choose a billing cycle from the drop-down (every month, every two months, every three months, and so on). This can also be days, weeks, or years.
- You may also select when the billing cycle should stop. For this PayPal recurring payments tutorial, we’ll keep ‘Never’ selected.
- Under ‘Merchant account IDs’, select ‘Use my secure merchant account ID’.
We’ve finally completed step one.
Step 2: Tracking Profit & Loss (Optional)
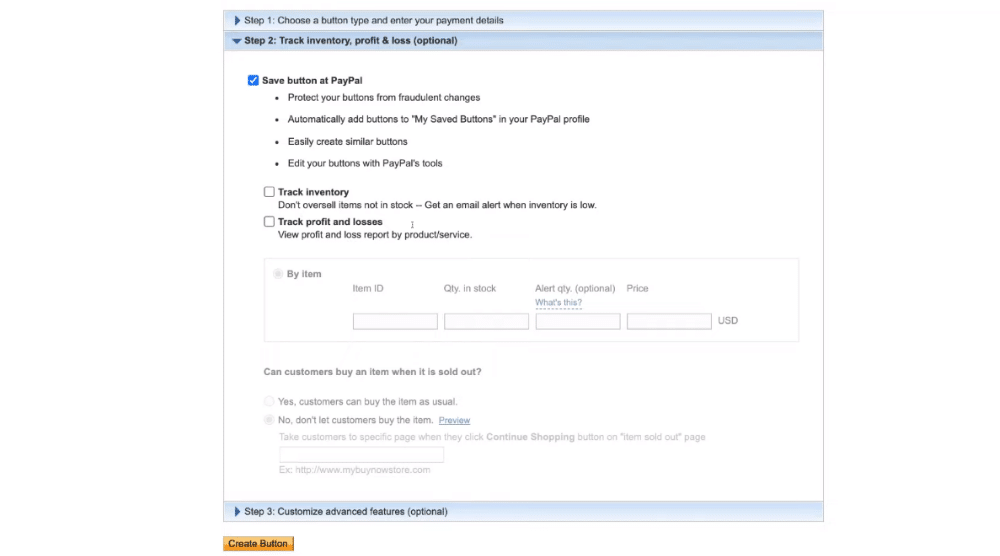
Step 2 is optional.
It’s important for those who want to track inventory, profit, and losses (refer to the screengrab). We will, therefore, skip this step.
Step 3: Creating PayPal Automatic Payments
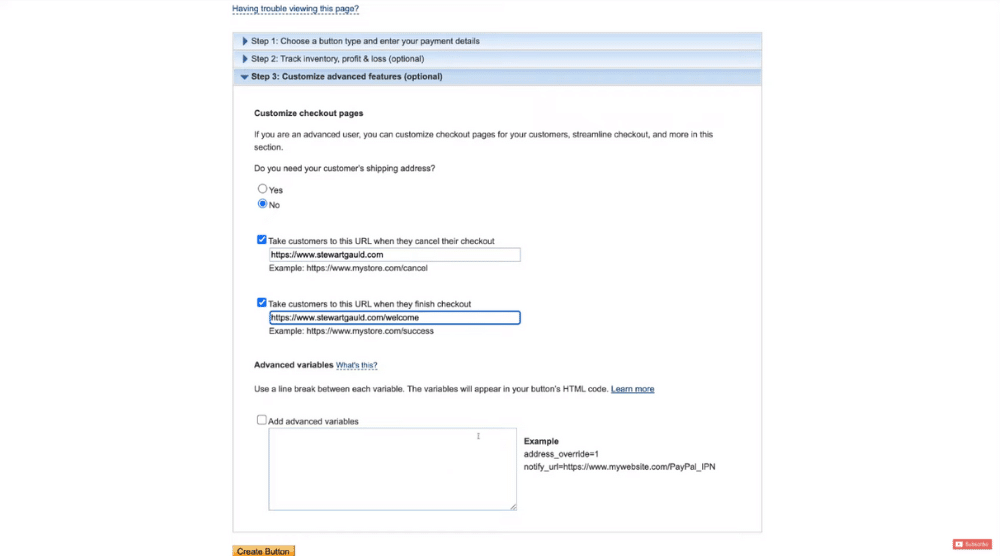
Let’s move on to step 3 of creating PayPal automatic payments:
- You need to choose if you need a customer’s shipping address. Since we’re setting up recurring payments for a membership group subscription, we don’t need a shipping address. Hence, we’ll select ‘No’.
- Next, you need to enter URLs where you want to take customers to when they either finish or cancel their checkout. For example, if someone decides to cancel the checkout, they can be redirected to the cancel page or the home page. And we want people who successfully finish the checkout process to be redirected to a welcome or thank you page. Hence, we’ll add appropriate URLs in the given fields.
- Click ‘Create Button’ at the bottom.
You can now copy the website code and embed this button on your website.
Alternatively, you may navigate over to the ‘Email’ tab, click ‘Select Code’, and then embed this link on your website or use this link in different social media campaigns, email campaigns, organic and paid marketing activities.
The purpose is to ultimately drive conversions in the form of sign-ups to your PayPal recurring payments channel.
When customers click this link, they’ll be taken to the PayPal sign-up page.
After this, they’ll need to sign up using their email or mobile number and proceed with the next steps.
And if they don’t have a PayPal account, they can pay with a card.
To do that, they just need to enter their email address and click ‘Continue to Payment’.
Next, they need to enter their payment information to sign up for your subscription plan.
Or they can just cancel the checkout process instead (they will be taken to the home page or the cancel page depending on the URL you added earlier).
And that’s everything you need to know about setting up PayPal subscription payments!
PayPal Recurring Payments: Video Tutorial for Beginners
This tutorial on how to set up recurring payments in PayPal will greatly simplify and streamline your entire payment process.
Your customers will find it super easy to pay for your recurring package offerings and this will ultimately save you manual time and increase your subscription-based income stream.
Check out our full video tutorial here:
