In this Stripe tutorial 2022, we’ll show you exactly how to use Stripe to collect online payments.
Stripe is a leading payment processing software for all types and sizes of businesses.
After setting up Stripe payments, you can use Stripe as a standalone tool for collecting payments.
You can also simply integrate Stripe with other third-party applications.
Connect tools such as your accounting software, website builders like Wix, eCommerce platforms like Shopify, scheduling tools, and more.
Moreover, you can leverage Stripe’s API for custom integrations.
Essentially, Stripe is an all-in-one payment processing software that allows you to easily collect and manage online payments.
Key features we like about Stripe:
- Easy to integrate with our platforms.
- Simply set up automatic payments (for collecting recurring payments).
- Switch between different accounts for each of your businesses/platforms.
- Create a payment form to send to customers and collect payments with ease.
How to Use Stripe?
1. Understanding Stripe

Before we dive into our Stripe tutorial for beginners, it’s important for you to know that this payment processing software is designed for developers.
This means that you can develop your own payment infrastructure online.
Stripe has the necessary APIs and tools to help you do so.
However, in this Stripe guide, we’ll focus on its essential, easy-to-use features to help small businesses collect and manage their payments online.
Think of Stripe as a middleman for connecting all the different platforms that you use to collect payments online.
You won’t need to access your Stripe account regularly as your payments will be automatically sent to your connected bank account.
Once you integrate Stripe with other applications, let’s say, website builders like Ecwid, Wix, Squarespace, or WordPress, your payments will be processed efficiently without you having to log in and check frequently.
You can, of course, log in anytime to manage your customers, approve refunds, and more.
Now, let’s talk about pricing!
Also read: How To Use PayPal to easily send and recieve online money
2. Stripe Pricing Options

- Head over to Stripe
- Click on ‘Pricing’
On the Pricing page, you’ll find that Stripe uses a pay-as-you-go model.
As you can see in the screengrab, there is a flat 2.9% + NZ$0.30 per successful transaction.
There is no monthly fee, hidden fee, or setup fee.
Next, we’ll help you create your Stripe account.
Also read: How To Set Up Recurring Payments in PayPal
3. Get Started with Stripe

- Below pricing, tap on ‘Get Started in Minutes’ (given that you don’t have a Stripe account already)
- Enter your details: email, name, password, etc.
- Follow the easy, step-by-step process as guided by Stripe to set up your account
Once you do that, you’ll be inside your Stripe account.
4. Verify Email & Enter Your Profile Information

If it’s your first time using Stripe, you’ll need to activate payments as well as verify your email.
After verifying your email, select ‘Activate payments’ on the Stripe dashboard.
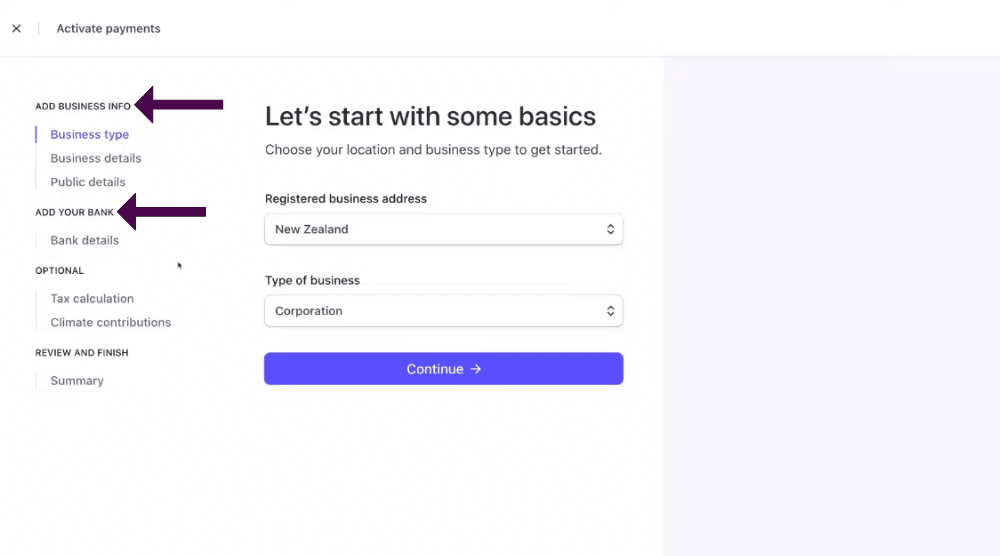
Now, go ahead and:
- Add your business information
- Connect your bank account (refer to the screengrab). This step is crucial for collecting payments through Stripe.
The above two steps should only take a few minutes.
After entering your profile information, head back to your Stripe dashboard.
Did you know that you can create multiple accounts within Stripe?
It’s super easy!
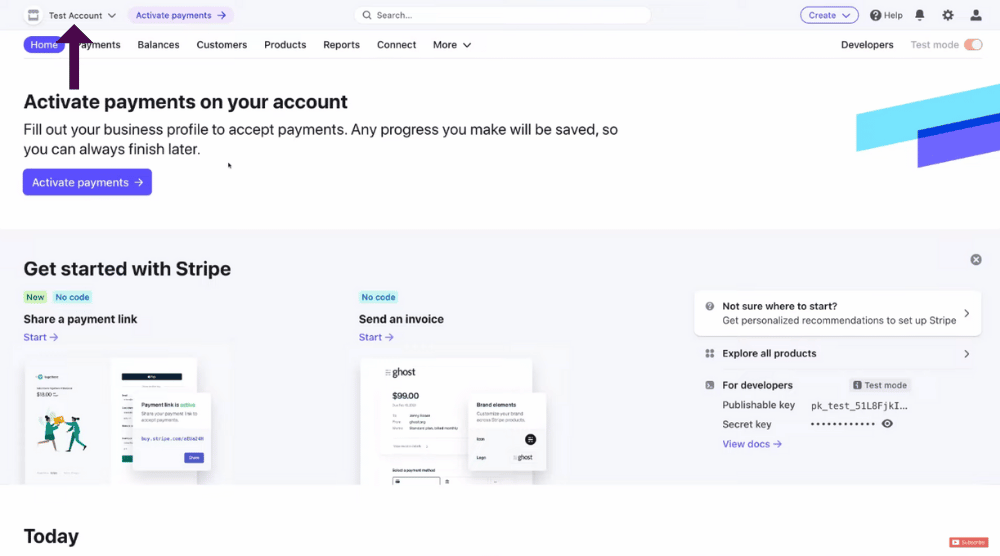
All you need is to do is take these actions:
- Click on ‘Test Account’ (top-left corner): this is just our account name for this Stripe review/tutorial
- Choose ‘New account’ from the dropdown
It’s that simple!
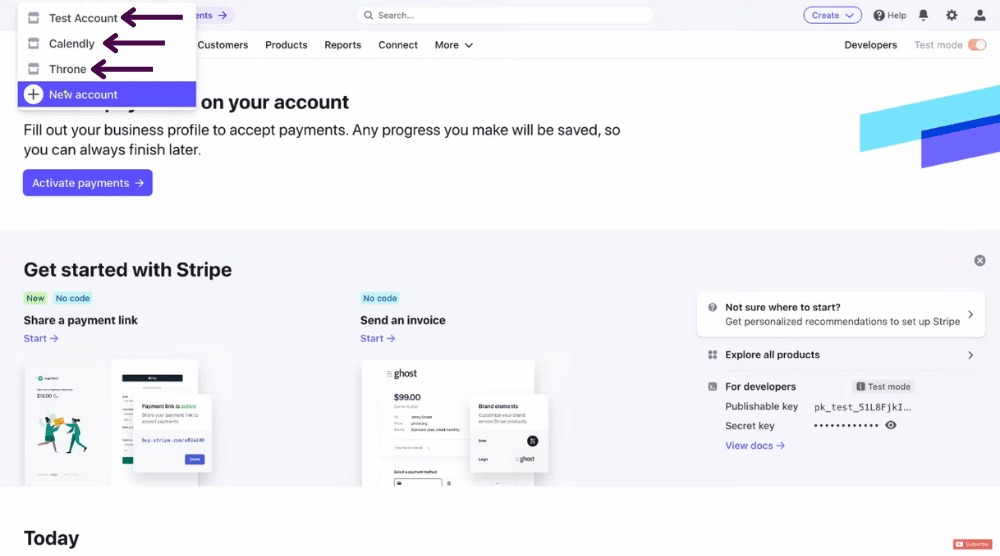
We currently have three accounts for three software that we have integrated with Stripe (Refer to the screengrab).
For this Stripe tutorial 2022, we’ll switch to our Calendly account.
As a small business, most likely, you won’t need to create more than one Stripe account to manage your customers, products, and payments.
5. Explore Stripe Dashboard

On the Stripe dashboard, we have ‘Home’ selected.
Scroll down the home dashboard to view basic analytics, such as net volume from sales, gross volume, successful payments, spending per customer, high-risk payments, new customers, etc.
Next, we’ll explain how to add and manage customers in Stripe.
6. Manage Customers in Stripe

- Select the ‘Customers’ tab
- Notice the ‘Test mode’ in the top-right corner. Here you can test your purchases before you go live.
As of now, we see zero customers in our Stripe account. But when you integrate it with third-party applications such as your website, you’ll see your customers here.
To add your first customer manually:
- Turn off the test mode
- Click ‘Add customer’ and enter the account name, email, description, billing information, shipping details, time zone, language, currency, etc.
- Press the ‘Add customer’ button
There is a third way to add customers in Stripe – by sending a Stripe payment link directly to your customers (more on that later).
7. Add Products in Stripe

- Tap on ‘Products’ (see the screengrab)
- Select ‘Add Product’
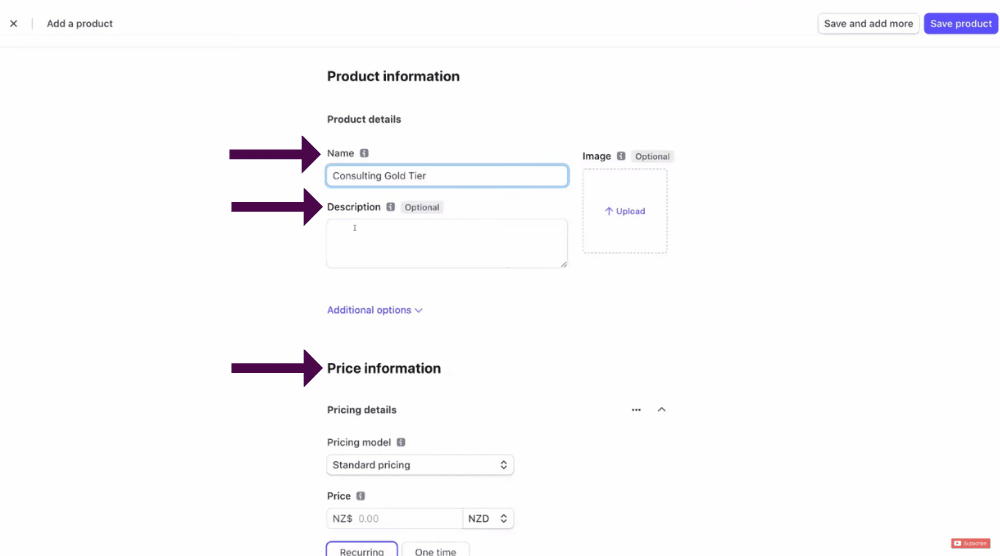
- Type in product details: name, brief description, price information
- Upload a product image
- Add additional details like a unit label and statement descriptor
Think about adding products in Stripe as a way to collect payments for specific products/services that your business offers.
To understand how to use Stripe for payments, you must select a pricing model under ‘Price information’.
Stripe offers volume pricing, standard pricing graduated pricing, and package pricing.
You can learn more about each pricing model by clicking the ‘i’ icon.
For this Stripe tutorial for beginners, we’ll keep the standard pricing model selected.
Next, you can choose between a one-time price and a recurring price.
Setting a recurring price is great for selling subscription plans.
You can also add a price as well as a price description. Hit ‘Save product’.
Similarly, you can add more products to Stripe.
8. Create Stripe Payment Link

Now, let’s understand how to collect online payments with Stripe using the product link feature.
This is a new feature launched by Stripe.
Using it, you can generate a link for your product and send it to your customers.
- Click on ” Create payment link’ (Bottom-right corner)
When customers click on the link, Stripe will take them to the payment page as you can see in the screengrab down below.
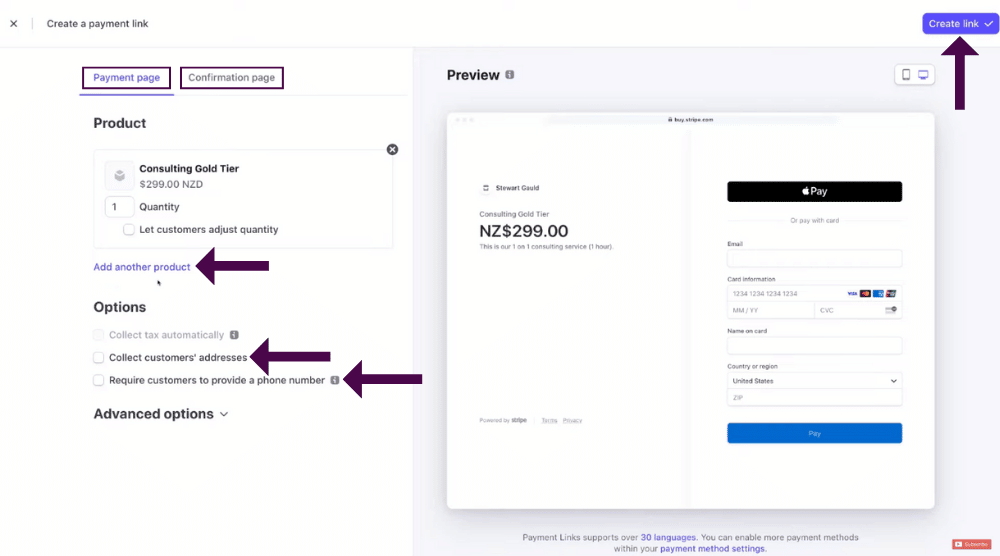
Next, they can enter their information and proceed with the purchase.
Within Stripe, you also have the option to customize the payment page.
- You can also add another product on the payment page and check options like collecting customers’ addresses and requiring their phone numbers.
- Head over to the ‘Confirmation page’.
- Preview the confirmation page on desktop and mobile
- Replace the confirmation message if you like.
- Alternatively, you can choose not to show the confirmation page and instead, redirect customers to your site. You can also redirect them to other locations.
- Hit ‘Create link’
Your Stripe payment link has been successfully generated!
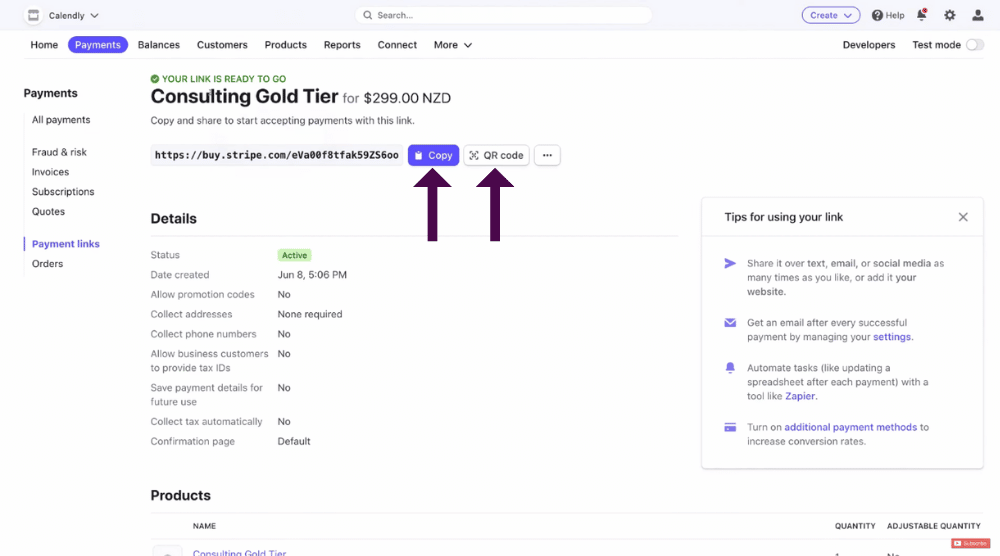
Copy the link and embed it on your website as well as other marketing materials.
You can also create a QR code.
When customers scan the code through their smartphones, they will be taken to your product or payment page.
9. Manage Payments

- Hit the ‘Payments’ tab next to ‘Home’
- Select ‘All payments’ from the left
- Click ‘send an invoice’ on your Stripe dashboard
This is where you can accept your first payment through Stripe.
For that to happen, you need to create an invoice first.
That’s what we’ll cover next.
10. Set Up Invoices in Stripe

- Choose a customer. Alternatively, add a new one
- Under ‘Items’, select a product or create one
- Hit Save/Save and add another
- Add more items (or billing hours for a specific project)
- Customize the memo
- If the customer already has a payment method on file, they can be automatically charged. You just have to tick the checkbox under ‘Payment’
- You can also email the invoice with the Stripe payment link (important for new customers)
- Hit ‘Save’ and review the invoice (top-right corner)
- Add additional emails if needed
- Tap ‘Send invoice’
We hope you’ve understood how to use Stripe for collecting payments!
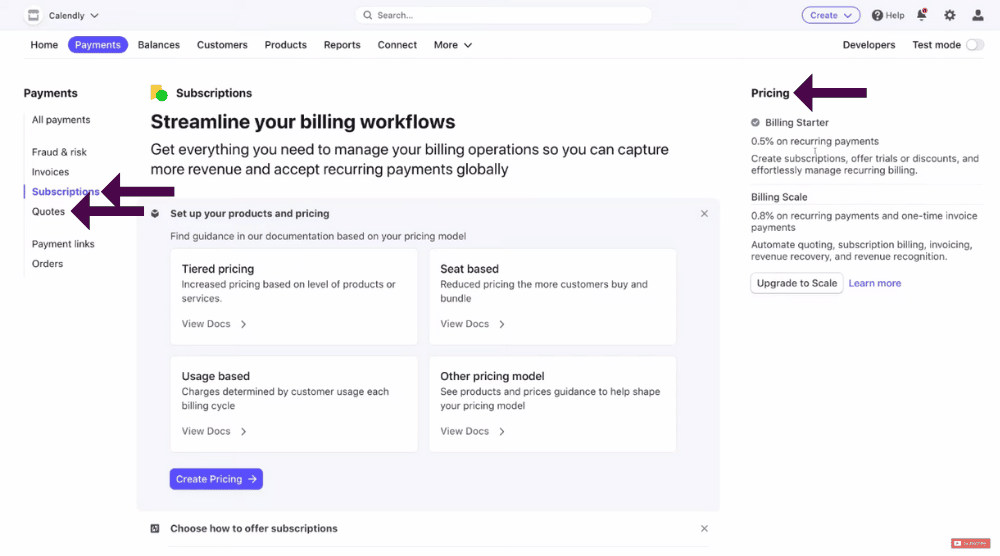
Now, check out these options:
- Below ‘Invoices’, choose ‘Subscriptions’ (see the screengrab). This is where you can create subscriptions.
- Notice the pricing information for subscriptions on the far-right
- Next, tap on ‘Quotes’ below ‘Subscriptions’. This is where you can create quotes within Stripe.
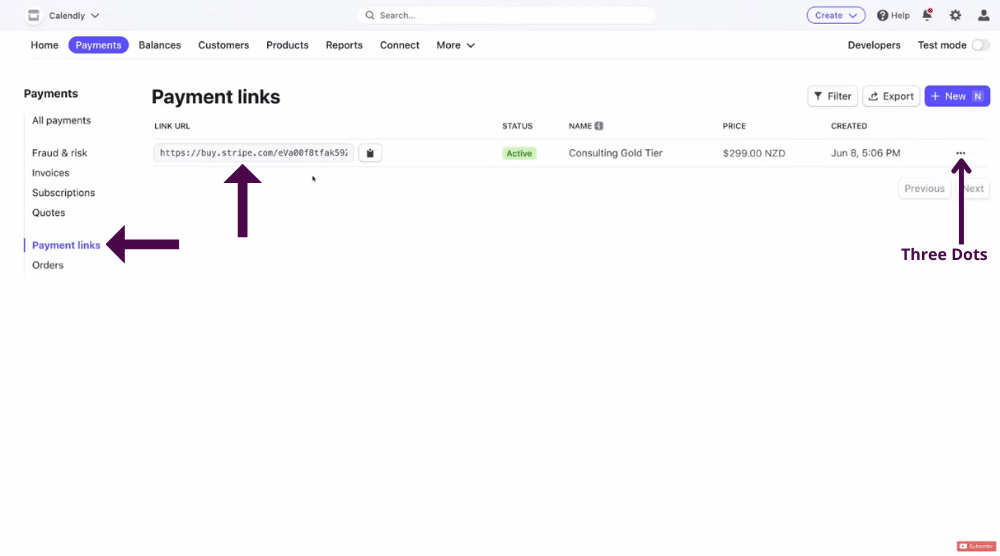
- Below ‘Quotes’, we have ‘Payment links’. This is where you can manage all your Stripe payment links. As you see in the screengrab, we have one active payment link as of now. Next to the link, you can also view the related details like price, date created, product name, and status.
- You can deactivate the payment link by clicking the three dots and selecting ‘Deactivate’.
Next, we’ll reveal how to check your payouts within the Stripe account.
11. View Balances

- Select the ‘Balances’ tab adjacent to ‘Payments’
- Check your Stripe account balance
12. Analyze Reports

Click on the ‘Reports’ tab to the right of ‘Products’.
This is an advanced feature, using which you can generate financial reports through Stripe.
13. Connect Stripe with Other Platforms

- Select ‘Connect’ on the top
- Integrate your Stripe account with third-party applications. Top partners include Wix, WooCommerce, and Squarespace.
- You can locate other third-party platforms by clicking ‘Find a partner’ (refer to the screengrab)
- Click ‘Create’ to quickly create a new payment link, subscription, or invoice
That concludes our Stripe tutorial for beginners!
Stripe Tutorial For Beginners (Video Guide)
By following this Stripe guide step by step, you can start collecting online payments and growing your business online!
Check out our complete video below!

