Table of Contents
If you want to build a strong professional relationship with your customers, Shopify email marketing is the way to do it.
It helps you expand your digital reach to potential buyers and nurture your audience through education and special offers.
This free email marketing software for Shopify allows you to send and track email campaigns.
Shopify email marketing is a basic, easy-to-use tool that allows you to start your email marketing journey.
How to Create and Send Email Marketing Campaigns with Shopify?
In this Shopify email marketing tutorial, you’ll learn how to create and send emails campaign for free:
1. Email Marketing with Shopify – Getting Started

When you surpass the free limit, you’ll be charged only $1 for every 1000 emails sent through Shopify (incredibly affordable!).
To get started:
- Log in to your Shopify store
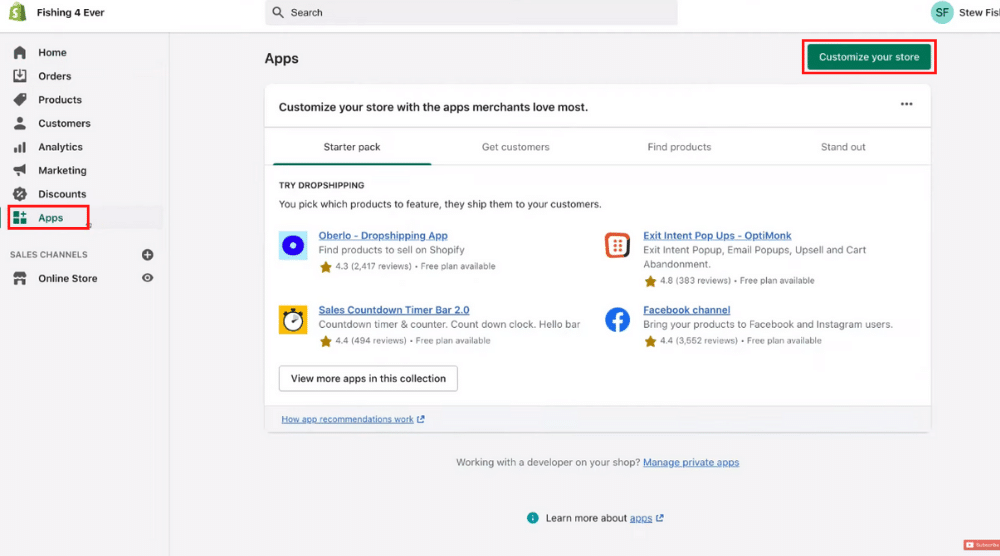
- Move your cursor to ‘Apps’ on the left
- Click ‘Customize your store’ on the right
- Type in ‘Shopify email’ on the search bar
- Locate the Shopify email app and select it
- Select ‘Add app’
- Scroll down and click ‘Install App’
Read more : How To Setup & Automate Abandoned Cart Email in Shopify
2. Create Your First Email Campaign

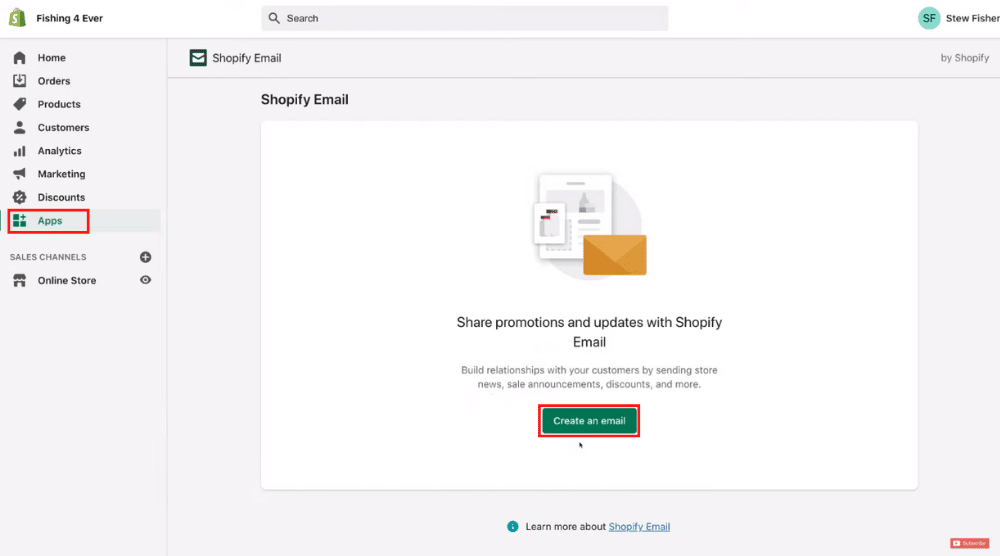
To create your first campaign, click ‘Create an email’. Now, select any of the given Shopify email marketing templates based on the goals you want to achieve.
It could be the announcement of the sales, product restock, new arrival, etc.
For this email marketing tutorial for Shopify, we’ll select the ‘Sales announcement’ template.
We’re going to create an email campaign that focuses on promoting a sale.
Just remember that you can send email campaigns only through paid Shopify accounts. You can now proceed to customize the email template.
In the next step, add the following information:
- To (Receiver’s email) – ‘All subscribers’ or click on it and select ‘Customers page’ to create a new subscriber group. You can also send emails to people who are not your customers yet (but you have their email addresses). For example, someone who visited your Shopify store but didn’t go through with the purchase. Or you can send this email to your returning customers who have already purchased a product from your Shopify store.
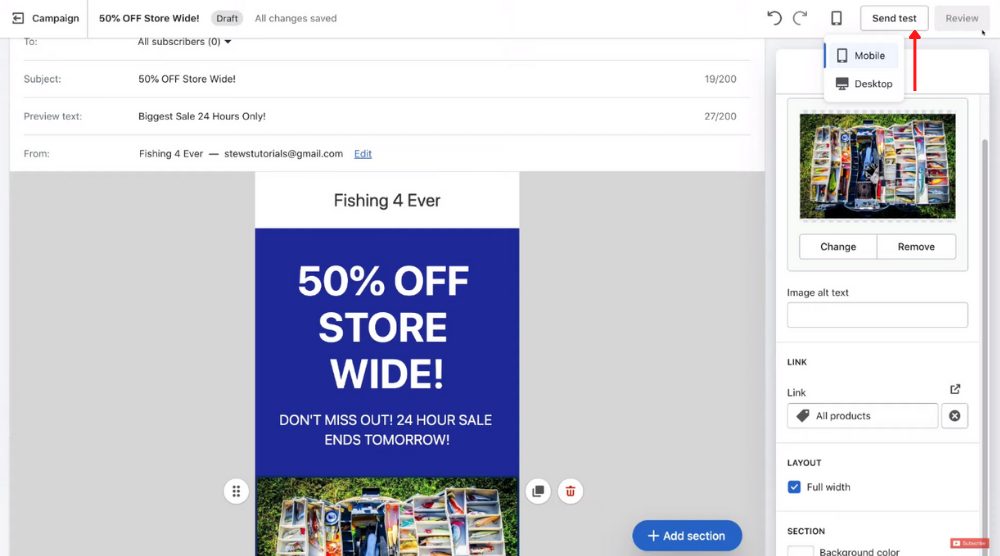
- Subject: Before they click on your email, this is what your target audience will see. Therefore, you need to enter a compelling subject line here. For this email marketing tutorial for Shopify, we’ll add ‘50% OFF Store-Wide!’
- Preview text: Add a summary of your email here.
- From (Sender’s email): This is where you enter your email address. Click ‘Edit’ to add a different email.
You’ll notice that the template is made up of block sections.
You can duplicate, drag, or move these sections within this template.
If you click on any of these sections, you’ll find the customization options on the right.
For example, you can click on the first section, highlight the text, delete and replace the default text.
It is that simple! Also, you’ll find other formatting options such as font size, font style, text color, alignment, background, etc. on the right-hand side.
Similarly, you can add a logo in the header section if you have one.
To add a new section, simply click ‘Add section’. And, a section will be added above the footer.
Now, let’s say you want to add a section below a pre-existing section.
All you need to do is hover your cursor to the bottom edge of that section and click the ‘+’ icon.
Now, you can select any of these options – text, button, image, product, gift card, discount, and divider. Since we don’t have any products to show (this is just a sample store), we’ll add an image for this email marketing tutorial for Shopify.
Upload an image from your system in the subsequent step. On the right-hand side, you can link this image to a particular product if you want.
You can also change the layout and background color if needed. On the top-right, you’ll find the options to undo or redo the changes.
Next to that, you’ll see a desktop icon. Click on it to see how your email campaign will look on mobile and desktop.
Read more : How to Install Facebook Pixel on Shopify
3. Send a Test Email

Click ‘Send test’ on the top-right. Enter an email address where you want to receive the test email and hit ‘Send’.
However, we won’t be able to do that with this practice Shopify store.
If you navigate back to the campaign, you’ll be able to see your newly created campaign under ‘Marketing’.
Here, you can also see the basic metrics such as sessions, orders, sales, and cost.
To learn how to create discount codes within Shopify (and add it to your email campaign), watch this tutorial.
And if you’re looking to dive deeper into email marketing, we suggest watching this tutorial on Klaviyo – a powerful email marketing and automation tool that works wonderfully with Shopify.
Read More: How To Use Shopify Discount Code
SHOPIFY EMAIL MARKETING Tutorial for Beginners (Video Tutorial)
Email marketing with Shopify allows you to engage with your target audience through email.
Build a brand that your customers trust by providing informative content through emails campaigns. And, boost conversions by sending sale-focused campaigns to your different subscriber groups!
We also have a complete Shopify video tutorial for individuals looking to deep dive into Shopify email marketing. Enjoy!

