Grow Your Business With Twitter
Using this Twitter ads tutorial for beginners, we’ll explain how to launch Twitter ad campaigns in 2022.
With a 400-million-strong user base, Twitter is one of the most popular social media networks in the world.
The United States alone has around 73 million Twitter users.
The core of its popularity lies in the fact that people can engage with highly influential people online.
Specialized individuals working in various fields put out valuable tweets, share articles, engage in Twitter spaces, and more.
Twitter also allows you to create and launch ads to build your follower list, drive leads and sales, and increase engagement using the platform’s abundant ad formats.
Twitter Ads Campaigns: How to Setup Twitter Ads?
1. Get Started with Twitter Ads
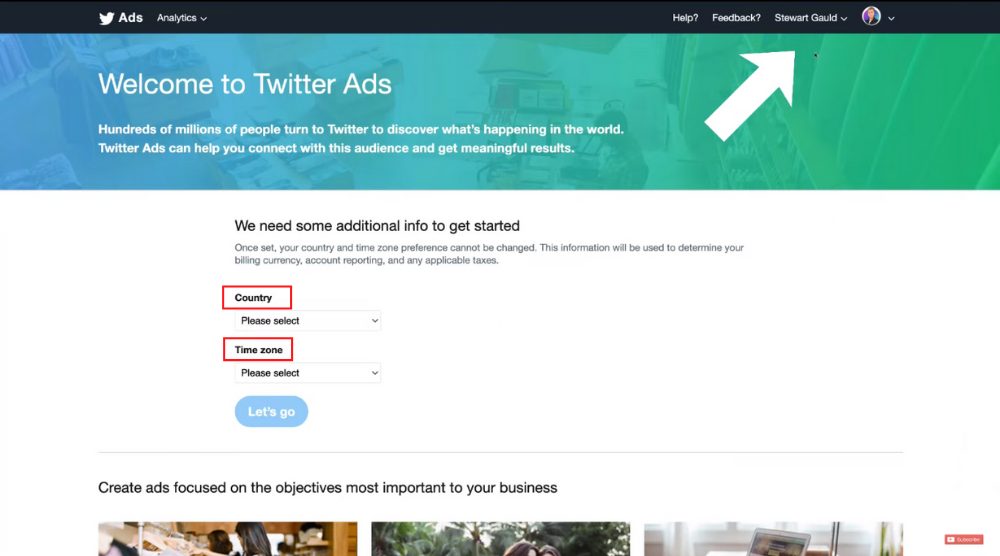
- Visit Twitter Ads web page
- Ensure that your Twitter account is logged into (see the profile in the upper-right corner)
- Select the country from the drop-down. This will automatically add the bidding and billing currency, which is NZD for this Twitter ads tutorial.
- Make sure that the time zone is correct
- Click ‘Let’s go’
2. Select a Campaign Objective (Goal)
What goal do you intend to achieve with the Twitter ads campaign?
That is your campaign objective.

You may choose any of the following campaign objectives:
- Awareness: This goal is about reaching the maximum number of people with Twitter Ads
- Consideration: Within ‘Consideration’, there are many goals you can choose from, including building your followers, garnering engagement on your tweets, driving website traffic, boosting app installations, pairing your ad with premium content, and increasing the number of views on your video.
- App re-engagements: Through this campaign objective, you get people to take specific actions in your app.
For this Twitter ads tutorial, we’ll go for ‘Website traffic’.
Through this Twitter ads campaign, we want to drive people from Twitter to our website or a specific page on our website.
Therefore, we’re going to hit ‘Next’ to proceed.
3. Add a Payment Method

- Visit your profile from the upper-right-hand corner.
- Choose ‘Add new payment method’ from the drop-down
Go ahead and add a payment method.
Note that, you won’t be charged anything until your Twitter ad is live and running.
It’s time to add the campaign details for our Twitter ad campaign.
4. Complete the Campaign Details

For this Twitter ads tutorial, we’ll name it ‘Triple Threat Strategy – Campaign’.
We want people to click our ads and visit a booking page on our website where they can schedule a consultation call for understanding the strategy.
The process of creating a Twitter ad is quite similar to that of a TikTok ad and a Facebook ad.
Once you’ve named your campaign:
- Add a daily budget, which for this tutorial is NZD 10.
- Specify a start date as well as an end date. Not adding an end date to your Twitter ads campaign can become a costly mistake that many beginners make if you forget to turn your ads off (this is a common mistake that people do with Facebook ads too).
- Type in the total budget, which is NZD 100 for this Twitter ads guide (however, you can add any budget that suits you)
- Under ‘Advanced’, make sure that you have the standard pacing selected. This enables Twitter to efficiently deliver your ads based on your daily ad spend.
- Hit ‘Next’
Read more: How to Advertise on TikTok
► Facebook Ads Tutorial | How To Create A Facebook Ad
5. Create Ad Groups
Think of ad groups as audience targeting.
Within each ad campaign, you can add multiple add groups.
Let’s say, you want to test three types of audiences in a single campaign.
This will help you determine the top-performing ad group in your campaign.

- Enter the ad group name in the given field. For this Twitter ads guide, we’re naming it ‘Triple Threat Strategy – Ad Group #1’
- Under ‘Delivery’, add the total ad group budget.
Since we’re only creating one ad group, we don’t need to set a total ad group budget.
But if we were to create four ad groups, we could evenly distribute the $100-total-campaign-budget with $25 for each group.
At the end of the campaign, you’ll find out which ad group performed the best because you had the same budget allocated across all your ad groups.
Next, you can select the start and end date by clicking ‘Specify time’.
However, you don’t need to if you’re only creating a single ad group.
Now, proceed with the following actions: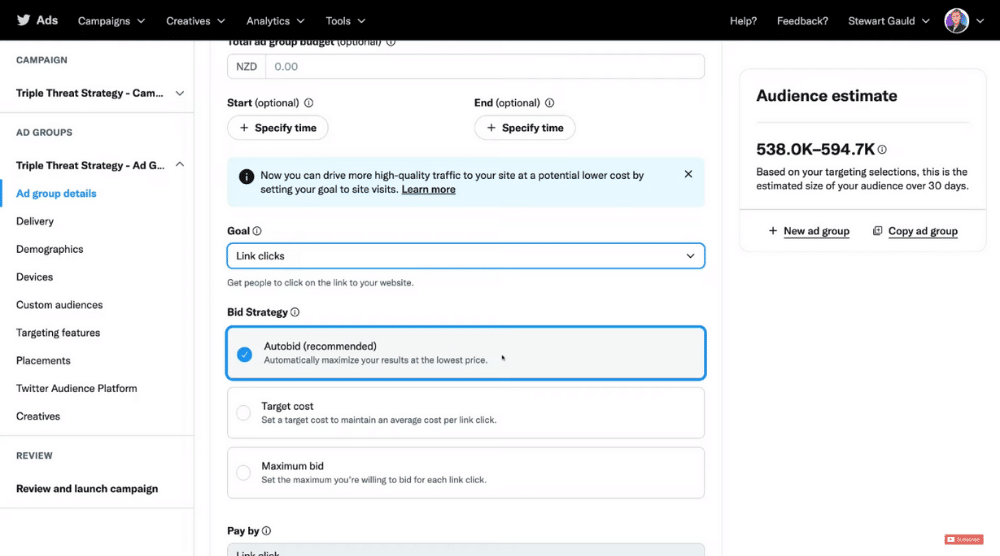
- Choose an ad group goal from the drop-down. For this Twitter ads tutorial, we’ll pick the ‘Link clicks’ goal.‘Site visits’ is a goal that tracks specific events on your website, which is a subject of a more advanced tutorial that we will produce in the future.
- Under ‘Bid Strategy’, select ‘Autobid’. This will allow Twitter to maximize your results at the lowest price. It’s also the recommended bid strategy if it’s your first time learning how to create Twitter ads.
- Scroll down to ‘Pay by’ and make sure that ‘Link click’ is selected. It means that we’ll pay every time someone clicks on our Twitter ad
- Below ‘Pay by’, we have the ‘Measurement options’, which we will cover in a more advanced Twitter ads
Choosing the Demographics:
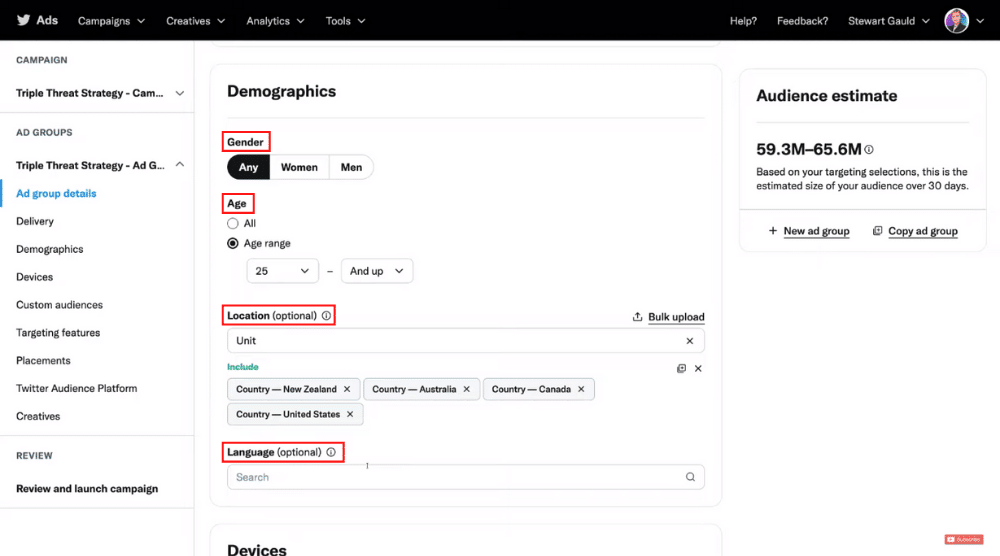
Next, we have ‘Demographics’, which is all about audience targeting (refer to the screengrab).
- Go ahead and select a gender. For this Twitter ads guide, we’ll choose ‘Any’
- Choose an age range. Since we’re targeting business owners, we’ll choose an age range of 25 and above.
- Add regions, cities, or states that you wish to target. We’ve included four countries, namely, the United States, Australia, Canada, and New Zealand (You could also create separate Ad groups per country that you want to target and measure the performance between each country).
- Next, you can choose languages if you like. But we’ll opt out of this as just want to target English.
Choosing the Devices:
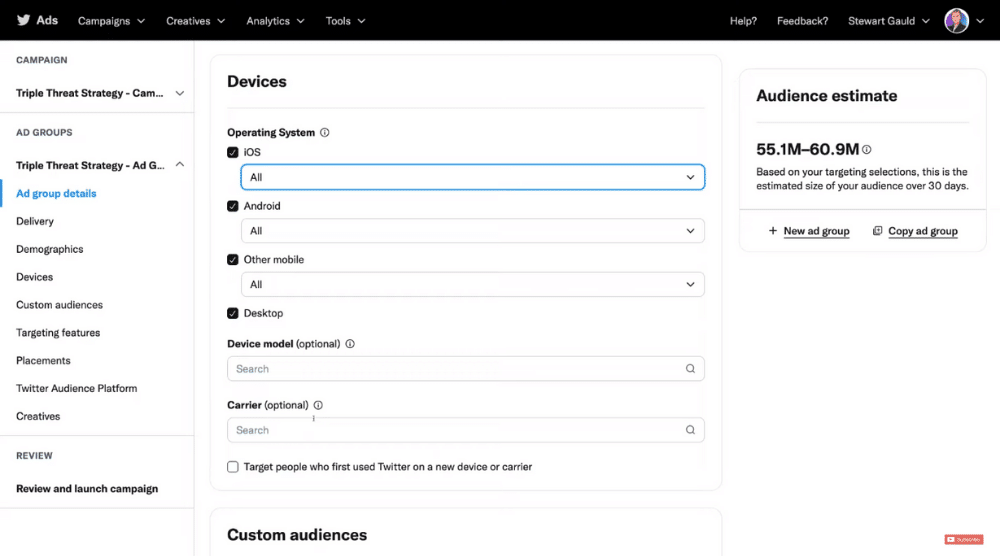
- Under ‘Operating Systems’, tick the boxes next to the operating systems you’re targeting. For our Twitter ads campaign, the operating system doesn’t really matter as our sole purpose is to drive people to our website. So, we’ll tick all the boxes.
- For each operating system, you can even choose specific versions. But we’ll keep ‘All’ selected.
- If necessary, choose a specific carrier. However, it’s not needed for this campaign.
So, when would you actually target specific operating systems?
Let’s say, you want to drive app installations through Twitter ads.
But your app is only designed for iOS.
In that case, selecting iOS as the operating system makes sense.
Below ‘Devices’, we have a ‘Custom audiences’ section.
However, we haven’t created any custom audiences. Hence, we’ll skip this for now.
Choosing the Targeting Features:
Below ‘Custom audiences’, we have the ‘Targeting features’ section.
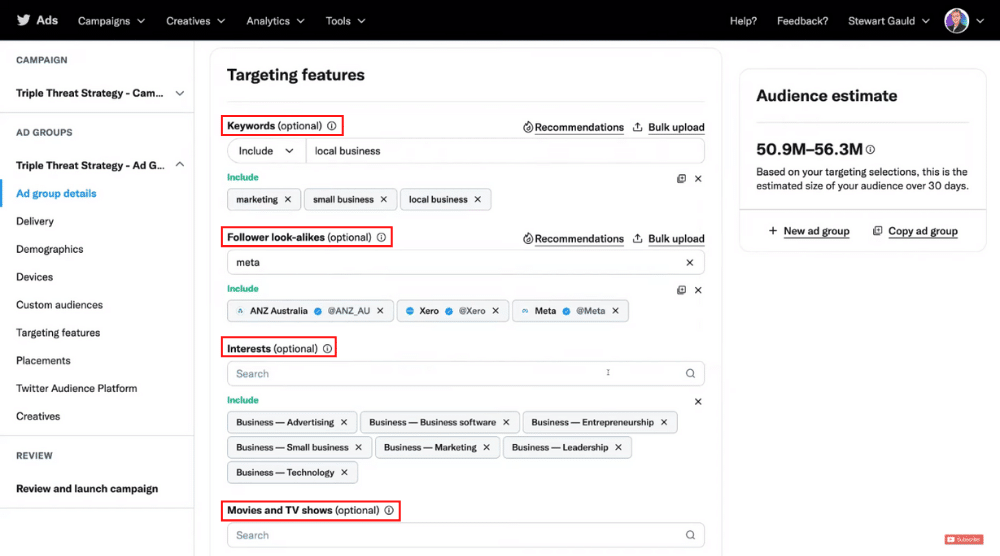
- Add relevant keywords that your audience is using. For each keyword, Twitter will show you the global audience size. We’ll select marketing, small business, and local business. All of these keywords have a large audience size.
- Under ‘Follower look-alikes’, you can add other accounts that the target audience is most likely following. Twitter will then target people who follow those accounts or similar. We’ve added ANZ Australia, Xero, and Meta for this Twitter ads tutorial.
- Choose the interests of your target audience. There are plenty of options like beauty, gaming, health, education, business, etc.
- Select specific movies or TV shows. This is important if you want to show your ads to people who watch certain movies or shows
- Add events and conversation topics if you wish to target people who are engaging with particular content/topics or events
Under additional options, you can:
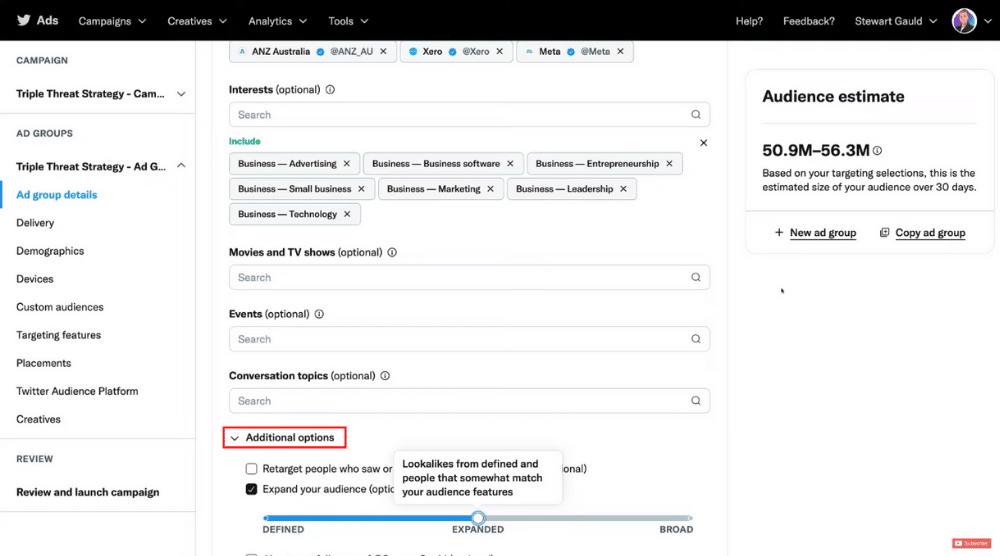
- Retarget people who engaged with your Tweets before
- Expand your audience by targeting people who share similar characteristics that you’ve selected
- Target the existing followers of your Twitter account
We’ll pick the second option and move the bar to ‘Defined’ (refer to the screengrab).
It means that we’re targeting look-alikes that most closely match our audience.
If you also select ‘Expanded’, Twitter will show your ad to people who somewhat match your target audience’s features.
Remember, you can always create multiple ad groups within a single Twitter ads campaign.
Ideally, you should have at least three ad groups.
Choosing Twitter Placements
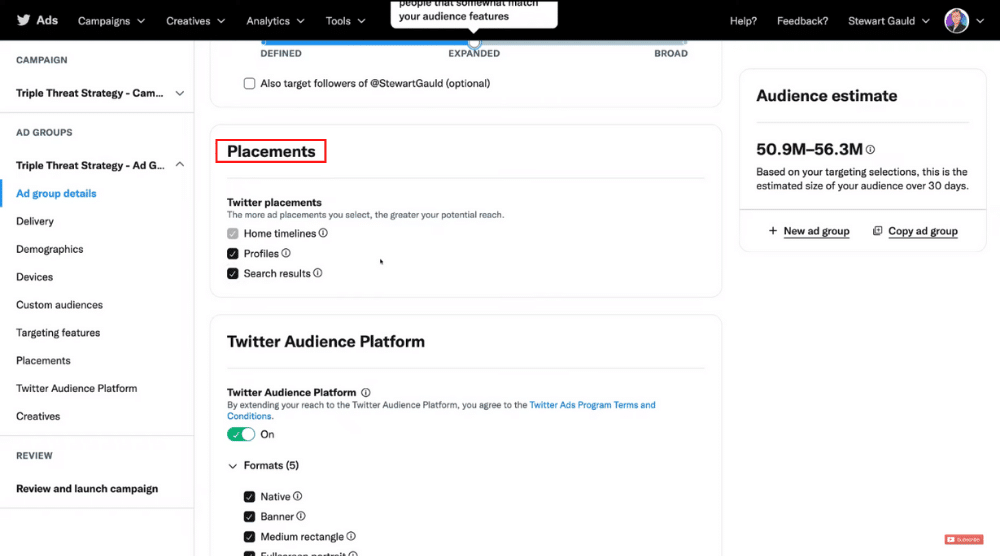
Here, you want to select all Twitter placements:
- Home timelines
- Profiles
- Search results
Choosing the Twitter Audience Platform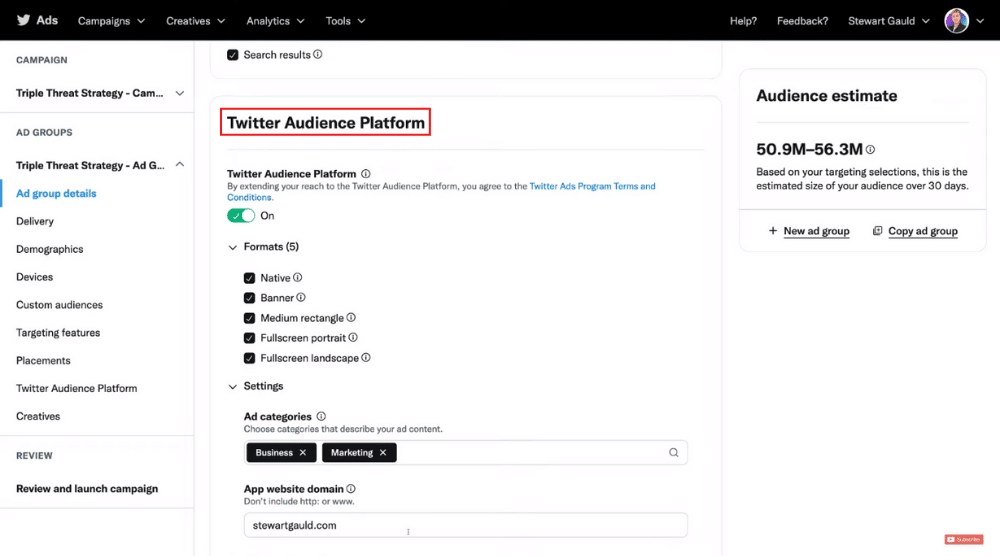
You’ll see a toggle in this section.
It’s recommended to turn it on.
This allows you to reach your audience across different apps.
Moreover, as a beginner, you want to keep all the formats selected:
- Native
- Banner
- Medium rectangle
- Fullscreen portrait
- Fullscreen landscape
Next, you need to pick categories that best describe your ad content.
For this Twitter ads guide, we’ll pick ‘Business’ and ‘Marketing’.
You can then add your website domain.
This brings us to the next step of our Twitter ads tutorial.
6. Create a Twitter Ad
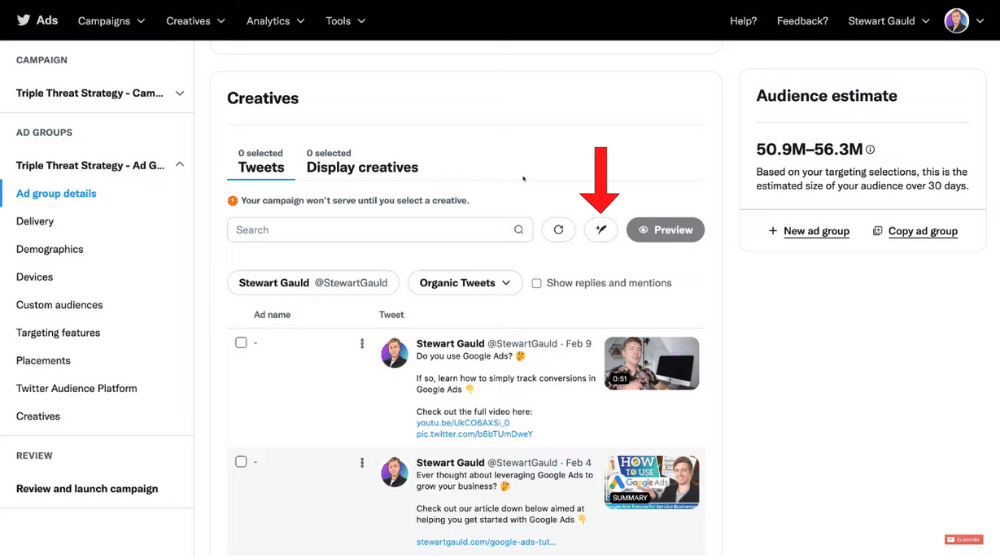
You can either create a Tweet or use an existing Tweet composed earlier.
We will recreate an older Tweet on the Triple Threat Strategy and this time include a link to our website.
- Select the Older Tweet
- Click ‘Create Tweet’ (refer to the screengrab)
7. How To Use The Tweet Composer

- Enter the ad name – The Triple Threat Strategy Promotion
- Compose the Tweet, including the link. Make sure that the ad is compelling enough for users to click.
- Notice the ad preview on your right. The ad will have a small ‘Promoted’ tag at the bottom
- Click on ‘Carousel’, and upload photos or videos
- Add a headline. We’ll use ‘Best Small Business Strategy’ for this Twitter ads tutorial
- Enter the website URL, which is the final destination where you aim to drive traffic
- Check the box that says ‘Apply to all media’. It means, if a user clicks on the image or video, it will redirect them to the website.
- Once you’re happy with your ad, click the downward arrow next to ‘Tweet’ (see top-right corner).
- Select either ‘Save draft’ or ‘Schedule’ from the drop-down. You can also click on ‘Tweet’
- Navigate over to ‘Creatives’ (topmost menu) and tap on ‘Tweets’. You’ll be able to see your ad here.
Head back to your Twitter ads campaign:
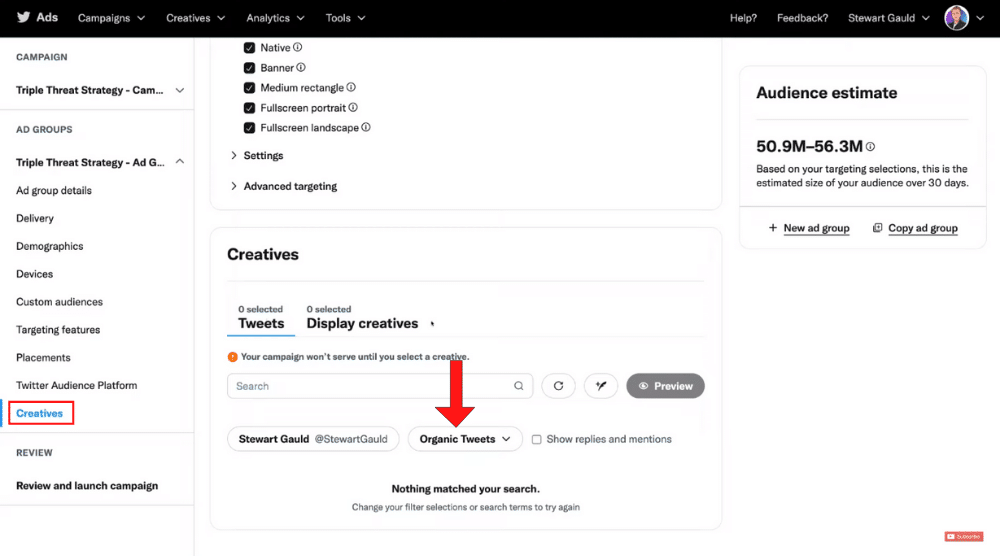
- Under ‘Creatives’, make sure you have zero Tweets and zero Display Creatives selected
- Click on ‘Organic Tweets’, and select ‘Promoted-only Tweets’ from the drop-down. It will generate the newly created ad
- Tick the box next to the ad and tap on ‘Preview’ to check what your Twitter ad looks like on desktop and mobile.
- Hit ‘Next’
8. Review the Campaign

By clicking ‘New ad group’, you can also create an additional group.
Alternatively, you may copy the current group and change the targeting features to create another ad group quickly and easily (If you’re creating multiple ad groups, it is best practice to only change one targeting option so that you can easily measure and qualify the differences between each group).
After reviewing the campaign, hit ‘Launch Campaign’ at the bottom.
That’s going to take you to the Twitter ads manager, where you can see this new campaign.
Moreover, you’ll find other details, such as:
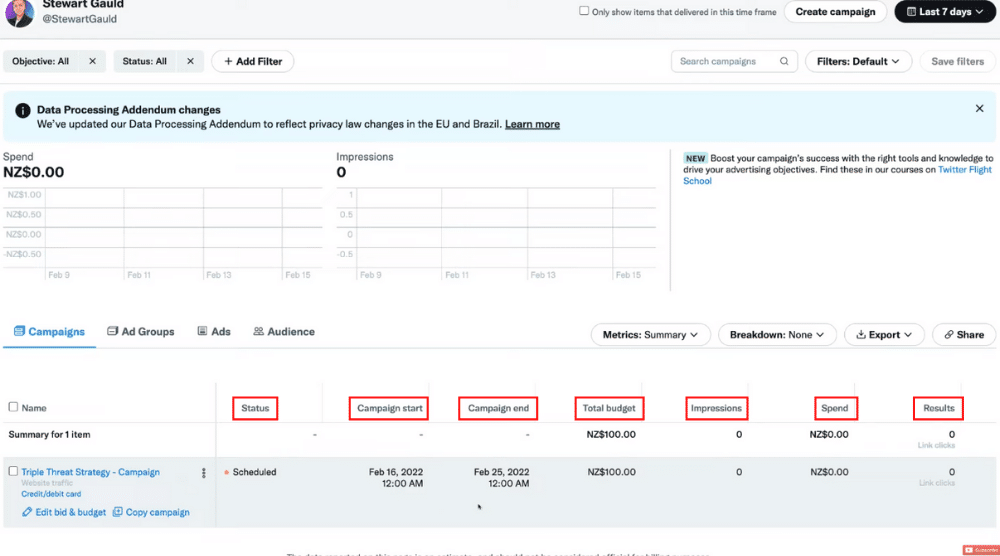
- Status
- Campaign start
- Campaign end
- Total budget
- Impressions
- Spend
- Results (you can see the link clicks in this column)
- Results rate
- Cost per result
- Remaining campaign budget
That wraps up everything we wanted to cover in this beginner’s Twitter ads guide.
Twitter Ads Tutorial (Video Guide)
Check out our full Twitter Ads video tutorial down below to help you get started.

