The Ultimate Guide for Understanding WordPress
In this WordPress tutorial for beginners, we’ll walk you through the incredible CMS step-by-step.
The idea of this guide is to help you navigate WordPress and understand everything you need to know to get started with WordPress to build and maintain your website.
This guide is for complete beginners!
Launched in 2003, WordPress has now become a leading website building platform globally.
The latest findings suggest that WordPress now powers about 43% of the websites that exist.
Undoubtedly, it’s one of the most powerful content management systems (CMS – Content Management Systems) out there.
Every day, more than 500 websites are built using WordPress while 60-80 websites are built using other website builders like Squarespace and Shopify. (Source)
Here’s why the WordPress website builder is so popular:
- Over 50,000 plugins that allow users to improve their site functionality.
- Thousands of free and paid WordPress themes.
- Ease-of-use for beginners.
- Sites built using WordPress are highly customizable.
- Many free features to leverage.
- SEO-friendly supports many SEO plugins.
- User-friendly block editor called Gutenberg
WordPress.com vs WordPress.org
Before we begin this WordPress tutorial for 2022, we need to clarify the difference between wordpress.com and wordpress.org.
The latter requires you to sign up with a hosting provider like HostPapa after which you need to install wordpress.org to then build your website.
On the other hand, wordpress.com is an all-in-one website builder that allows you to sign up and start building your website.
Everything else is taken care of within wordpress.com.
If you are familiar with WordPress and ready to start building your site using either of the two options, we recommend watching this complete wordpress.com tutorial for beginners.
However, if you wish to build your wordpress.org website from scratch, we advise watching this tutorial instead.
Read more: How to Create a Free Website with WordPress
How to Use WordPress (WordPress 101)?
1. Login to WordPress
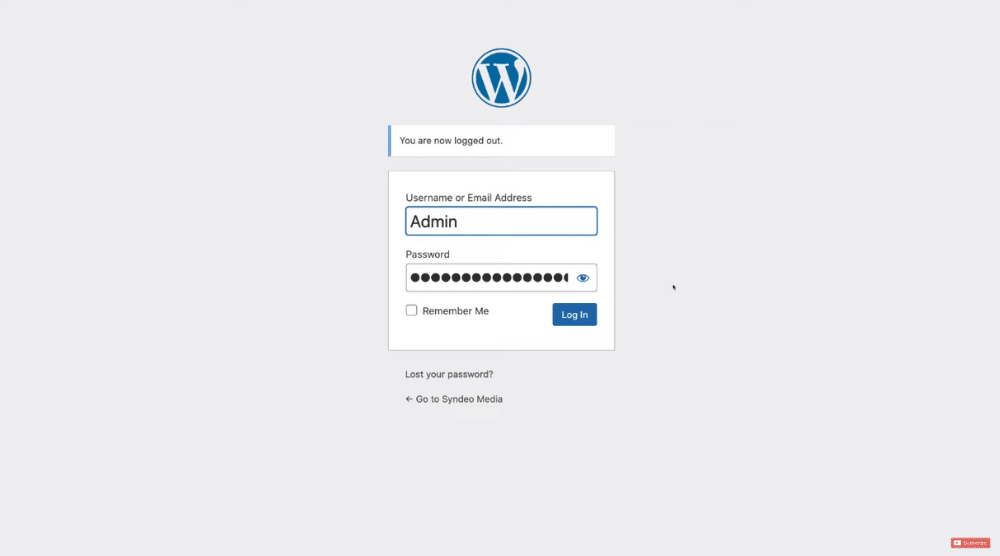
To learn how to use WordPress, you first need to log in to your dashboard.
- Head over to your browser.
- Type in your URL in the following manner: website.com/wp-admin. You will be welcomed by the WordPress login.
- Add your email or username.
- Enter your password and hit ‘Log In’
Welcome to the backend of your WordPress.org website!
2. Navigating the WordPress Dashboard
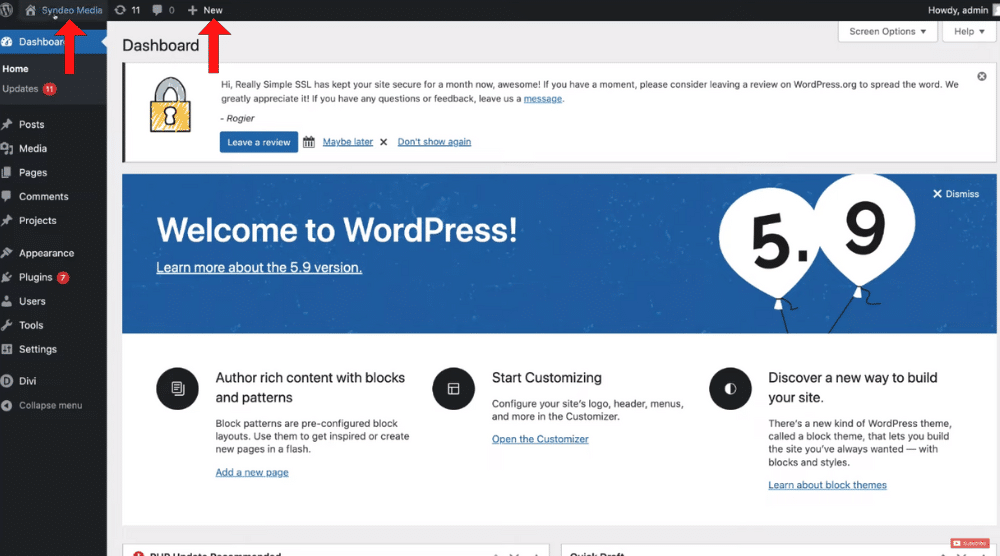
Right after you complete the WordPress login, you’ll arrive at the dashboard.
The steps below will help you navigate it:
- To view your site, hit ‘Visit Site’ (see top-left corner).
- Navigate over to ‘New’ (top menu). Click on it. This is where you can quickly create a new page, or a new post, add media, start a new project, and add more users.
3. Discover the WordPress Updates

To check for updates:
- Hover your cursor over to the left-hand side navigation panel.
- Click on ‘Updates’ below ‘Home’
As you can see in the screengrab, we have 11 updates.
If you scroll down a little, you might see a new version of WordPress.
Below that, we have the installed WordPress plugins.
By clicking ‘Update Plugins’, you can update them.
Below plugins, you’ll find WordPress themes.
To update them, you just have to tap the ‘Update Themes’ button.
We currently have the Divi theme installed, which is our favorite theme and page builder for building WordPress websites.
The reason why that is because it’s extremely easy to use.
Moreover, using the Divi theme, you can build your site from the frontend rather than the backend without any coding.
Divi offers dozens of templates that you can choose from and customize to your liking.
But before you go ahead and update anything, we strongly suggest backing up your WordPress website.
In the event that your site crashes because of the clash between plugins and themes, you can just upload a new backup.
Read more: How To Backup Your WordPress Website
4. Create WordPress Posts

- Locate ‘Posts’ on the navigation panel.
- Click on it
This is where you can create blog posts.
Here, you can either use the WordPress editor or the Divi Builder.
Another alternative is Elementor, which is also a page builder and can be installed as a plugin.
*The links above are affiliate links, which means we will get a commission if you upgrade to a paid plan (with no extra cost to you). This helps support our education-based website and we thank you in advance!
These visual drag-and-drop builders are ideal for both beginners and advanced users.
- Learn how to use Elementor here.
- Learn how to use Divi Theme builder here.
You can now head back to your WordPress dashboard.
Read more: Elementor Tutorial for Beginners
Read more: Best WordPress Theme for Beginners Divi
5. Add & Manage Media

- Locate ‘Media’ (again on the navigation panel).
- Click ‘Add New’
This is where you can add additional media that you wish to use within your WordPress website.
Here, you can also manage all the media files (documents, photos, or videos) that you’ve already uploaded to your site when creating the web pages.
6. Create & Manage WordPress Pages
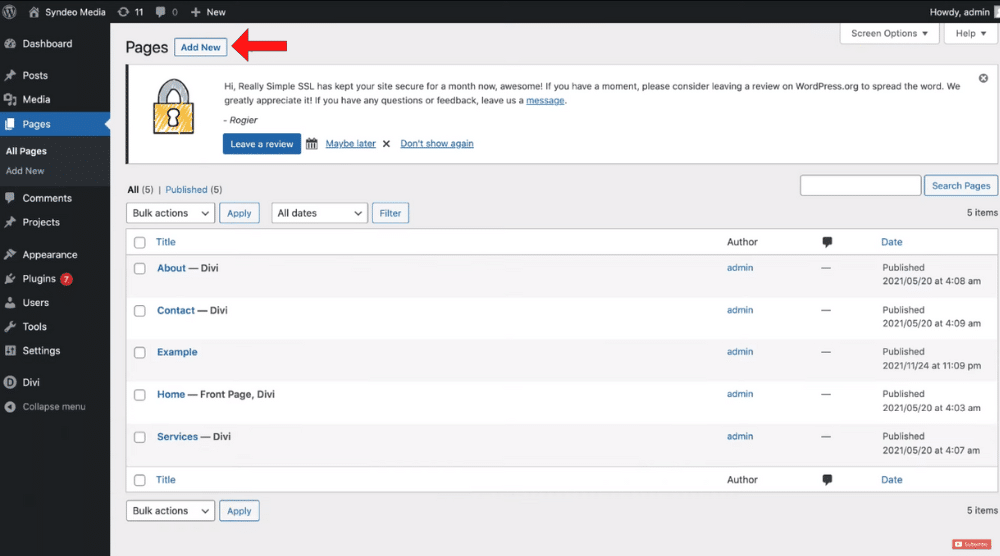
- Navigate over to ‘Pages’.
- By clicking ‘Add New’, you can create new WordPress pages.
- Below is the list of pages that have been already created (refer to the screengrab)
Again, for creating a new WordPress page, you can use Divi, Elementor, or the WordPress editor.
Read more: How To Create a WordPress Website using Elementor Cloud
To use the WordPress editor:
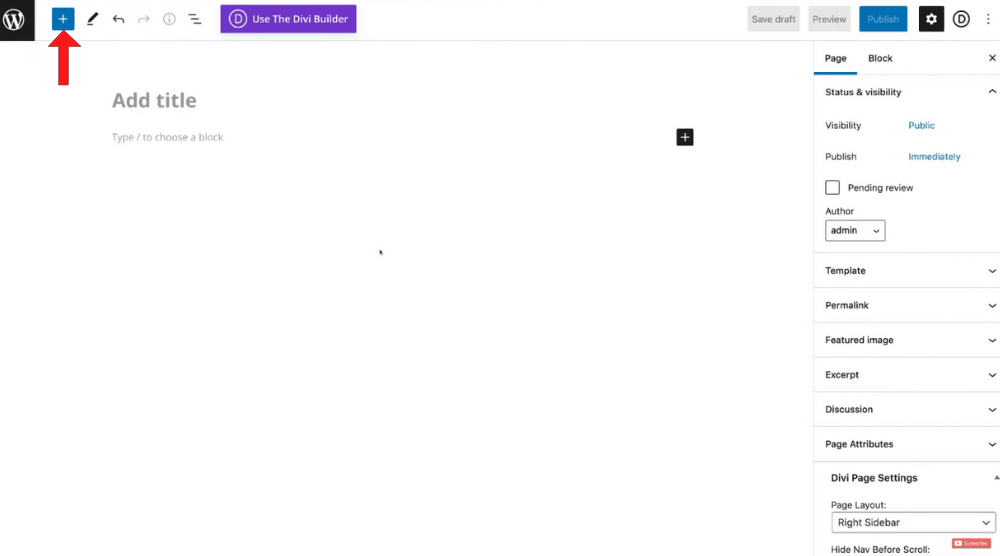
- Tap the ‘+’ sign (refer to the screengrab).
- Choose the block elements that you wish to add.
- Drag and drop those elements on the WordPress page
For instance, select the Image block, and drag-and-drop it on your right.
Now, click ‘Upload’ to upload an image or choose one from your media library.
Using the WordPress editor can still be quite tedious.
Hence, we recommend using the Divi theme builder or Elementor.
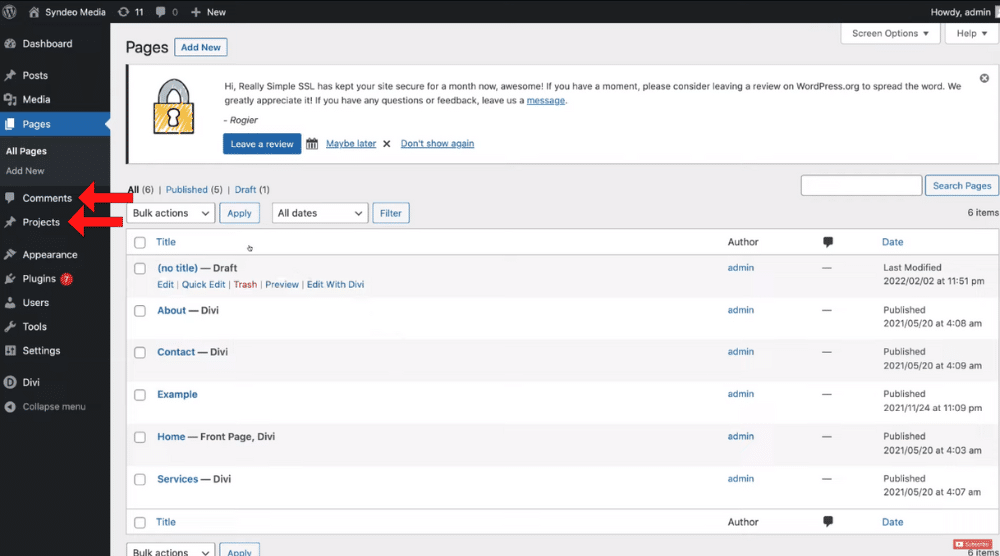
Back on the dashboard, we also have ‘Comments’.
This is where you can manage all the comments left by people on your blog posts.
Below ‘Comments’, we have ‘Projects’.
This is where you can create specific projects to add them to your WordPress website.
7. Manage WordPress Themes

Themes are the overall design layout of your website.
- Below ‘Projects’, we have ‘Appearances’. Click on it.
- Select ‘Themes’
This is where you can manage your WordPress themes.
As you can see in the screengrab, we have Divi Theme activated.
To add additional themes, click on ‘Add New’, install the theme, and activate it if you wish to change the current theme.
Read more: How To Get A Free SSL Certificate for WordPress
8. Customize Your Website

This is where you can customize the overall look and feel of your entire website.
For example: website fonts, buttons, colours and more.
- Below ‘Themes’, we have ‘Customize’. Click on it.
- Go ahead and customize the overall look, theme, and style of your WordPress website.
- For instance, click on ‘Header & Navigation’ (see left).
- Select ‘Primary Menu Bar’ to customize the menu bar of your site.
- For instance, you can change the menu height, logo height, text size, letter spacing, etc.
- After making the changes, click ‘Publish’
Similarly, you can change the buttons. Head back to the general settings and select ‘Buttons’ this time.
- Click on ‘Buttons Style’.
- Go ahead and modify the text size, text color, background color, border width, etc.
Take the time to check all the customization options and head back to your WordPress dashboard.
9. Add & Manage WordPress Plugins

Think about plugins as features that you can add to your WordPress website.
- Below ‘Themes’, we have ‘Plugins’.
- To add a new plugin, click ‘Add New’ >Find the plugin using the search bar > Install it > Hit ‘Activate’.
- Try installing the Facebook Chat Plugin using this method. This will install Messenger on your WordPress website, allowing visitors to interact with you.
- Below is the list of WordPress plugins that are already installed. You can deactivate, activate, update, or delete them at any time.
Most WordPress plugins offer a free plan that is adequate for most users.
10. Add & Manage WordPress Users

- Below ‘Plugins’, we have ‘Users’. This is where you can add and manage your WordPress users.
- To add a new user, click ‘Add New’.
- Add their details.
- The new user can now login to your WordPress website
The new user could be a developer who can help you manage your WordPress website, an SEO expert who can assist you with the SEO side of things, or an admin to organize messages.
Read more: How To Make A Premium Small Business Website
WordPress 101 Tutorial Guide (Video Tutorial Here)
That wraps up all the basic features that we wanted to cover in this WordPress 101 guide.
You should now feel comfortable managing your WordPress backend.
Check out our full video guide below to help you get up and running with WordPress.
