
Table of Contents
In this guide, you’ll learn how to use Calendly to schedule a meeting which is the best Appointment Scheduling Software.
Think about the time you’ll save by streamlining your day-to-day scheduling and meeting processes.
Do you have trouble scheduling time to meet up with your clients?
Do you often have to cancel on your clients, or have them cancel on you, because of scheduling conflicts?
If yes, then this Calendly tutorial is for you.
Calendly is a web-based service that allows you to share and book your availability with prospective clients, and automate the scheduling process.
Thanks to Calendly, you don’t need to engage in messy, back-and-forth emails with your prospects and clients.
Also read: How To Add a Contact Form on Google Sites
How to Use Calendly to Schedule a Meeting?
Let’s begin our Calendly tutorial 2022!
1. Get Started with Calendly

- Visit Calendly
- Tap on ‘Pricing’
Read more: How To Embed Calendly on WordPress
2. Explore Calendly Pricing

- Scroll down to view the Calendly pricing options
- Notice the free plan which is perfect for small business owners
There are only a few key differences between the free plan and the Professional plan.
The former, for instance, allows one calendar connection per person.
That means if you use multiple calendars for your business, you can only connect one of those with Calendly.
On the other hand, you can connect up to six calendars using the Professional plan.
Also, you can only activate one event type with the free plan.
But you have unlimited event types under the Essentials and Professional plan.
They also facilitate group events while the free plan doesn’t.
One main feature that differentiates the Professional plan from the Essentials plan is that the former also allows you to collect payments using PayPal and Stripe.
Let’s say, you offer one-on-one consultations to your audience.
Using this feature, people can pay for booking a consultation with you.
Therefore, you need to evaluate your business requirements before learning to use the best appointment scheduling software for small businesses.
We recommend getting started with the free plan, and scaling up when you grow out of it.
3. Sign Up for Free

- Tap on ‘Sign up’ under the Free plan
- Enter your business email or sign up with Microsoft or Google account.
- Select your account. The calendar associated with your account will automatically sync with Calendly. However, you can change the calendar later on if you like.
- Click ‘Allow’

- Create your Calendly URL by adding your business name. In our case “Stewstutorials”
- Choose your time zone. Remember, you can change any of this information later on.
- Hit ‘Continue’.
- Notice that your calendar is now synched with Calendly. The online appointment scheduling software can now add events and check for conflicts (i.e., avoid double-booking your events, meetings, or consultations)
- Select ‘Continue’
- You can now set your availability or click on ‘Set up later’. While explaining how to use Calendly to schedule a meeting, we’ll also show you how to set your availability.
- Select your day-to-day role. For this Calendly tutorial 2022, we’ll pick ‘Leader + Entrepreneur’
- Tap on ‘Finish’
Once you do that, you’ll be inside your Calendly account.
Also Read: How to create email templates in Gmail
4. Calendly Home Dashboard

On the Calendly dashboard, notice that you have a default booking page already.
Now, tap on ‘Account’ (top-right corner).
- choose ‘Calendar Connections’ from the dropdown.
5. Connect Your Calendar to Calendly

- You may find that your calendar is already connected. If not, click on ‘Add Calendar Account’ and follow the simple process. Remember, the free plan lets you link only one calendar.
- Tap on Account > Billing to see your subscription. When you sign up, you’ll be automatically added to the Teams plan. On the billing page, you can also see the timeframe when you will be downgraded to Calendly’s free plan.
- Head back to ‘Home’

- Tap the gear icon on the default booking form (see the screengrab)
- Choose ‘Delete’ and hit ‘Yes’.
We’ll now create a booking form in the next step.
You can not only embed the form on your website but also send it to your prospects and clients.
Also Read: How to use Proofhub
6. Create Calendly Booking Form

- Click on ‘New Event Type’. Remember, the free plan allows you to have only one active event type at a time.
- For this Calendly tutorial, we’ll create a one-on-one event
- Hit ‘Create’
7. Create Calendly Event Type
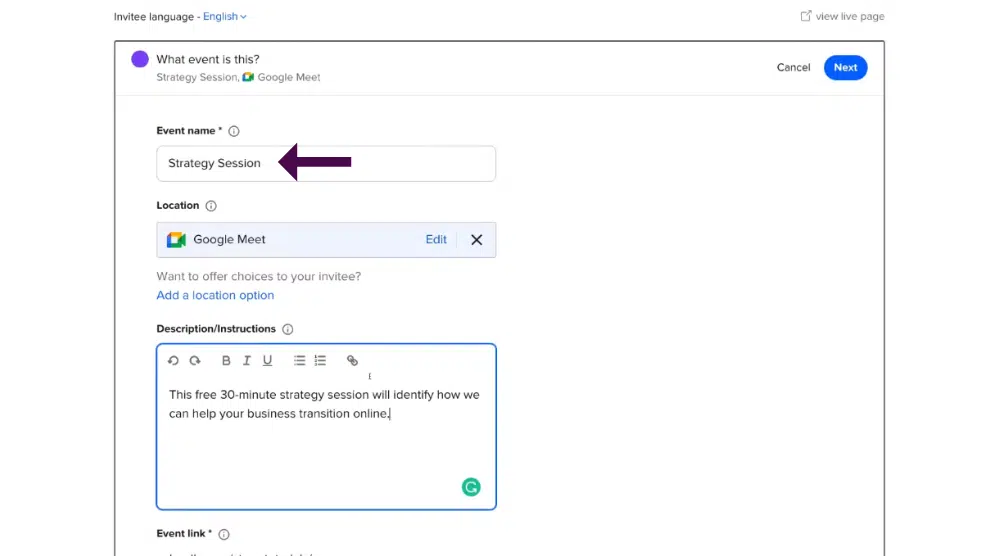
- Add the event name. We’ll use the name ‘Strategy Session’.
- Choose your meeting location. If you pick an in-person meeting, for instance, you’d need to add an address. You can also select Zoom, Microsoft Teams, Google Meet, phone call, Webex, etc. For this Calendly tutorial 2022, we’ll go for Google Meet.
- You can also offer location options to invitees.
- Enter the meeting description/instruction.
- Edit the event link (add the event name).
- Pick an event color for your form.
- Hit ‘Next’
8. Edit Availability
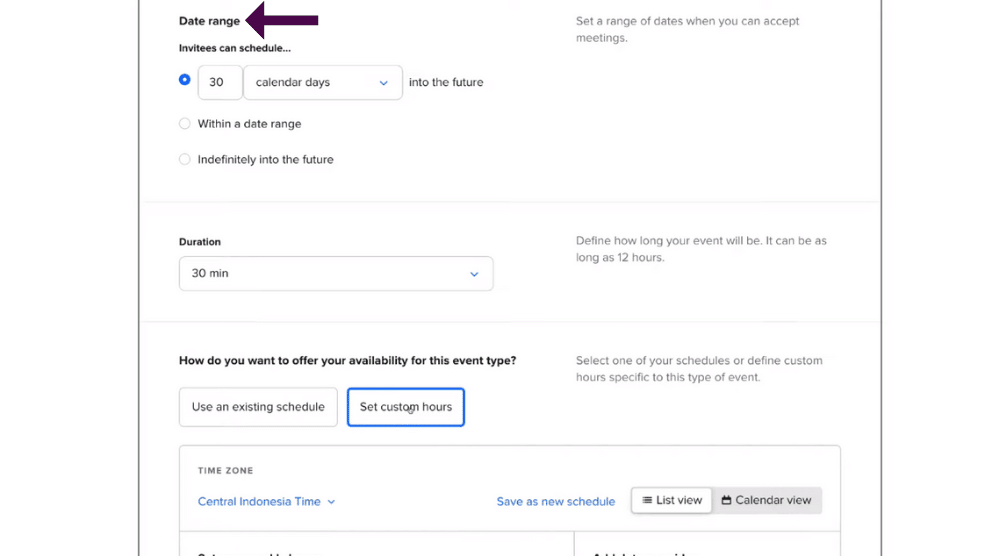

- Customize the date range. For this Calendly tutorial, we’ll change it to 30 days.
- Choose ‘business days’ instead of ‘calendar days’ if you like.
- Set the meeting duration.
- Create a schedule by selecting the ‘Set custom hours’ option. This is where you can set up your availability for every day of the week. You can also remove certain days from the schedule. (Refer to the screengrab).
- Click on ‘Save as new schedule’ to use this schedule for other custom events. Name your schedule and hit ‘Save’.
- Add a buffer time to prepare before the event or to wrap up after the Calendly event.
- Click on ‘Additional rules for your availability’.
- Set the start time increments, which is currently 30 minutes

- Navigate over to ‘Scheduling conditions’
- Under ‘Invitees can’t schedule within’, enter 24 hours. This means your invitees can’t book the strategy session within 24 hours of booking the event.
- Enter the maximum number of events per day. Since this is a free consultation event, we’re going to limit it to three consultations per day (check the screengrab).
- Under ‘Time zone display’, keep ‘Automatically detect and show the times in my invitee’s time zone’ selected. This is crucial for online meetings.
- For in-person meetings, you can lock the time zone instead.
- You can also turn this into a ‘secret’ event, which means only invitees with the Calendly link will be able to schedule the consultation.
- Tap on ‘Next’
- Click on ‘View live page’ in the top-right area to check what your Calendly booking page looks like.
- You can also copy the URL, embed it on your site, or share it with your invitees.
9. Add Invitee Questions

To prepare for the meeting, you can create questions for the invitees.
For that:
- Click on ‘Invitee Questions’
- Notice the default fields: name and email
- Tap the pencil icon to modify the fields
- Here you also have the option to allow participants to add more guests if required
- Hit ‘Apply’
- Enter the question that you’d like your invitees to answer
- Check the ‘Required’ box
- Choose the answer type: one-line answer, multiple lines, checkboxes, etc.
- Click ‘Apply’
- Hit ‘Save & Close’
Similarly, you can add more questions.
But try not to bombard your invitees with too many questions.
Otherwise, they might not book the consultation at all.
Add only the most essential questions you need for your preparation.
10. Set Up Workflows

Below ‘Invitee Questions’, we have ‘Workflows’.
This is where you can automate emails and text notifications before and after your event.
However, the free plan doesn’t offer access to workflows.
11. Head Over to Notifications

- Below ‘Workflows’, we have ‘Notifications and Cancellation Policy’
- Click on it
- By selecting ‘Personalize’, you can start customizing your calendar invitations. Add invitee name, event time, location, event description, questions and answers. You can also add variables.
- Turn on email reminders
- Choose the timing. For this Calendly tutorial 2022, we’ll enter 12 hours.
- We recommend using a no-reply email address if you don’t want invitees to respond to your emails
- Turn on text reminders
- Click on ‘Show Cancellation Policy’
- Type in your cancellation policy
- You can also check the box that says ‘Include cancel and reschedule links in notifications’ (refer to the screengrab)
- Hit ‘Save & Close’
12. Confirmation Page

- Below ‘Notifications and Cancellation Policy’, we have ‘Confirmation Page’
- Click on it
- You can choose to display a Calendly confirmation page or redirect invitees to an external site. We’ll keep the confirmation page selected for this Calendly review.
- Hit ‘Save & Close’
- Head over to ‘Collect Payments’. This is where you can set up Stripe and PayPal to receive payments. But as mentioned earlier, you need a Professional plan for it.
- You can see an example of a payment Calendly form here: Stewart’s Strategy Session.
Your first event within Calendly has been successfully created.
13. Preview Your Booking Form

- Tap on ‘View live page’
- Preview your form

Notice that you have Calendly branding on the form.
You’ll need to upgrade your plan to remove it.
Invitees can select the date & time, enter their information, and book the meeting with you using this form.
Now, head back to the Calendly homepage.

On the newly created booking form:
- Click on the gear icon
- Hit ‘Edit’ to make changes in the event
- Select ‘Clone’ to duplicate the form
- Save as template
- Delete the form if required
- Disable or enable the form by clicking the ‘on/off’ toggle
- Tap on ‘Copy link’ and share it across social media, via email or add it to your site
- You can also add this link in your email signature. This way, all your emails will have the booking link.
- Click on ‘Share’
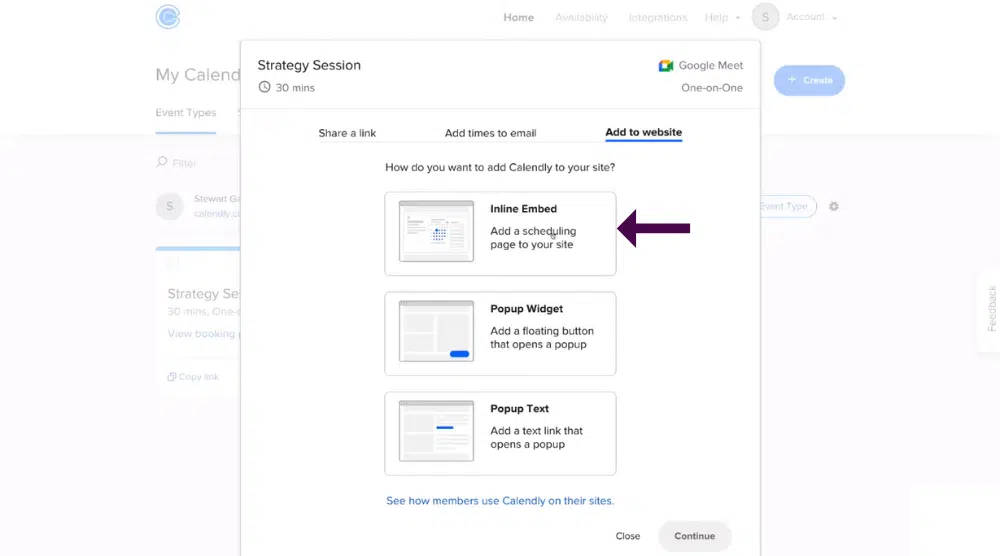
- Navigate over to ‘Add to website’. This is where you can embed the Calendly form on your website. Alternatively, you can add a popup text or popup widget.
- Select ‘Inline Embed’
- Customize the color of your booking page
- Copy the HTML code and embed it on your website. You can refer to Calendly’s guides on how to do so on WordPress, Squarespace, and Wix.
That wraps up our Calendly tutorial 2022!
Best Appointment Scheduling Software (Video Guide)
Life is hard.
There are never enough hours in the day to do all the tasks we need to get done.
But, thanks to free online appointment scheduling software like Calendly, life just got a little easier by automation the process of scheduling appointments.
Whether you are a small business owner, a freelancer, or a busy mom, Calendly will greatly simplify your life.
You can set up a meeting without wasting your time with back-and-forth messy emails.
Moreover, you can also use Calendly to schedule a meeting in a different time zone.
Go ahead and streamline your meetings with Calendly!
Check out our full video guide below.
