If you’re looking for an all-in-one social media management platform, Hootsuite is as good as it gets.
You can create, schedule, engage, monitor, and connect social media channels and content in a single, streamlined, and user-friendly online dashboard.
Through this blog post, small business owners can learn about how to get started with Hootsuite and leverage its integrations, tools, and features. Growing your business online will be easier than ever after reading this Hootsuite tutorial.
Social Media Management Tool for Small Business
Let’s walk you through the entire process in the following steps:
Step 1: Getting Started with Hootsuite
First things first, you need to head over to their official website.
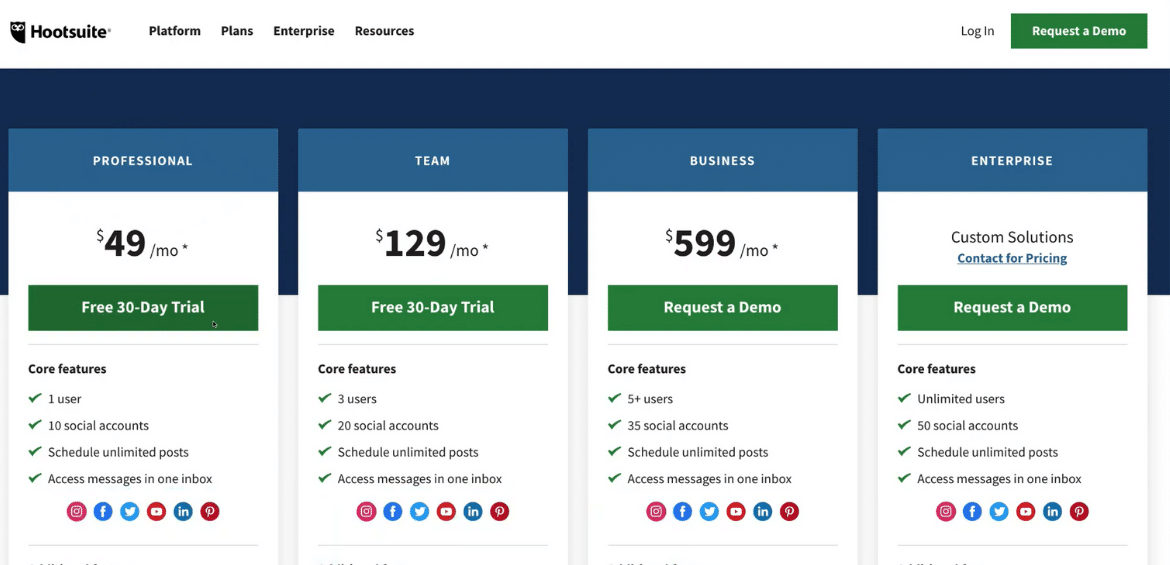
Once you arrive, navigate to “Plans”. In this blog post, we’re going to stick to the Professional plan ($49/month) since it’s more appropriate for small business owners.

However, you don’t need to pay right away as you can begin with a free 30-day trial offered by Hootsuite.
Depending on the size of your team, you can always upgrade to the $129/month Team plan.
With the team plan, three users can get access to Hootsuite’s social media management platform.
Once you hit the “Free 30-day trial” button, fill up your personal details such as full name, email address, and password. After creating your account, you will need to enter your billing information.
You can choose any of the following billing cycles for the Professional plan:

- Annual: US$49/month
- Monthly: US$75/month
It’s important to note that you won’t be charged anything until the end of your free trial.
In the next 30 days, you will have plenty of time to test everything to determine if this social media management platform is perfect for your small business needs.
Once you enter the billing information, you can begin the free trial.
Step 2: Connect Your Social Accounts
In step two, you need to add three social media accounts to Hootsuite.
For the purpose of this tutorial, you can go ahead and add your Facebook business page.
You will be guided through a series of steps by Hootsuite to add your social accounts.

Since we are only focusing on organic marketing in this Hootsuite tutorial, you can skip the part where you have to link your Facebook ad account.
You can follow the same process to connect Instagram and LinkedIn.
There are many other social media accounts that you can add such as Pinterest, Twitter, and YouTube.
However, we’re going to stick to Facebook, LinkedIn, and Instagram in this tutorial.
Step 3: Understand Your Hootsuite Dashboard
After the initial setup is complete, you will be taken to the Hootsuite dashboard.
In this third step, you can navigate to streams on the left-hand side. Click “Ok, got it” and now you will be able to see the all-in-one social media management interface.

- At the top of your dashboard, you can see the option to add more social accounts than you’ve already added in the initial setup. You can follow the steps laid out in the preceding section to add any account to Hootsuite.
- There is another method of doing this. On the bottom left-hand corner, you will find your Profile section. Click on “Social networks and teams” and then “private account” to connect to more social channels. You can now exit out of that and navigate back to streams.
For this tutorial, we will stick to the three social media channels added in step 2. Under your “streams” dashboard, you can see the three boards for Facebook, Instagram, and LinkedIn.
Here, you can rename each of your boards to make them more presentable and easier to understand.
You can select any of the three boards, says LinkedIn, to notice three streams on the right-hand side of your Hootsuite dashboard. These are live activities taking place on your LinkedIn company page.
You’ll notice:
- LinkedIn company page updates
- Scheduled posts
- New streams on the far-right side
Depending on the information you want to access, you can add a fourth stream:
- Mentions
- Activity
- Messages
Moreover, by hovering over to the “View as” option, you can also change the layout of the dashboard by selecting standard, compact, or comfortable. We can keep the standard layout for this tutorial.
Step 4: Engage with Your Streams
In the fourth step, you can go ahead and engage with each of these streams.
For instance, you can reply to comments on your company posts, send emails, or create a comment stream. Apart from that, you can create scheduled posts within the steam.

For your Instagram and Facebook boards, you can follow the same method.
Moreover, you can click on “new board” and select the social media channel that you want to create the new board for.
Since you’ve already created the boards for existing social media channels, you can skip this step for now. Besides, in each of these boards, you can add or delete streams that are relevant or not relevant to your social media platforms.
Before you go ahead and schedule a post, you want to make sure that your account settings are correct. You will find the account settings option in your profile section.
Next, you need to navigate down to the time zone and make sure that it’s correct. You can also verify other account details such as billing, privacy, security, and authentication.
Step 5: Create a New Post
For this step, you can simply navigate to “create” and then click on “post”.
Select the social media accounts that you want to simultaneously post to. You can then enter the text and a link to the video that you want to share as soon as the post goes live.

Since links don’t show up as media on Instagram, this post won’t look very attractive on this platform. Hence, you can remove Instagram as a channel that you want to post to.
Hootsuite also has a media library from where you can select any media that you like.
Moreover, you can shorten the link with Ow.ly link shortener to make your post more attractive from the audience’s perspective.
If you want to add images and videos, you can either drag and drop files or upload them on Hootsuite.
Once you complete these steps, you can go for any of the following options:
- Schedule for later (Monday, April 26 at 2:20 p.m., for instance)
- Post now
- Save as draft
- Post and reuse accounts
- Post and duplicate
You can then navigate to “Publisher” on the left-hand side of your dashboard which is basically your social media calendar.
Here, you have the option to edit, delete, duplicate, or move any of your scheduled posts to drafts.

You can also see your drafts, past scheduled, require approval, expire approval, and rejected posts here.
If you navigate down to “Inbox”, you can see all your messages and comments from different social media channels connected to Hootsuite in one place.
In the final step, you can navigate up to the “App Directory” under your profile section.
To get the most out of Hootsuite, you can integrate apps such as Google My Business to interact with your customers.
Hootsuite Video Tutorial for Beginners
Hootsuite is one of the best social media scheduling tools out there. It can be your go-to, all-in-one destination to manage the interactions with your customers, prospects, and audience across all your social media channels.
In the long run, you can save a heap of time by scheduling your posts and managing all social channels in one place!
Watch the Hootsuite beginner’s tutorial below to help you get started with (in our opinion) the best social media management platform.

