In this Google Sites Ecommerce tutorial, we’ll walk you through step-by-step process how to create a free online store with Google Sites.
Google Sites is an easy-to-use, free website builder offered by Google.
Many people are aware that Google Sites allow anyone to create a responsive website (in minutes!)
But if you’re an eCommerce business and wondering…….can you sell stuff on Google Sites? I have good news for you!
You can build a Google Sites eCommerce store by leveraging another tool called Ecwid.
That’s right, if you’re an eCommerece brand, you can list and sell products on your Google Sites by embedding an online store!
And the best part? You can create an online store for FREE with Google Sites and Ecwid.
Let’s find out how.
Also, read about our top 7 AI website builders for small business owners here.

Conversion-focused Google Sites Template
Ready to launch your online store and need a conversion-focused website? Get our stunning and responsive customizable Google Sites Ecommerce template and start selling online! *Claim 15% off each template at checkout: 15OFFGSITES
Create A FREE Online Store with Google Sites
Are you ready to make a Google Sites eCommerce store?
1. Get Started with Google Sites

The first step is creating a website from scratch using Google Sites.
We’ve covered this in another detailed beginner’s tutorial/guide.
I’ve also shared a second method for building a website with Google Sites using premade templates.
Check out that tutorial to understand how to create a website with templates.
Visit Google Sites and follow any one of the tutorials linked above (if you haven’t already created a website with Google sites).
But let’s get back to guide on how to create an online store for free with Google Sites!
On the homepage of your Google Sites website, you’ll notice a menu on the left-hand side.
There reside the pages and sub-pages of our website.
The site that we’re using for this Google Sites eCommerce tutorial has five pages:
- Contact page.
- YouTube tutorials page.
- Homepage.
- Services page.
We also have sub-menu items under ‘Our Services’, including online workshops, web design, and digital marketing.
We’ll explain how to sell products on Google Sites in the next steps.
Stew’s #1 Recommended eBook for every small business owner.
Go Digital Now - The ULTIMATE Small Business Playbook
The one book that every small business owner must own… Actionable ebook to launch, navigate and transform your small business online so that you can absolutely THRIVE in a digital world!
2. Create an Online Store Page

The next step in this Google Sites eCommerce tutorial is to create an online store page.
To do this:
- Hover over to the right-hand side of your Google Sites website
- Tap on ‘Pages’
- Click on the ‘+’ icon
- Select ‘New page’
- Name your page. For this Google Sites eCommerce tutorial, we’ll call it ‘Store’
- Click ‘Done’

Now if you revisit the menu, you’ll find that the Store page has appeared on it.
Since the page is new, it’s currently empty.
Now you need to add your products, customize the store, integrate the online store.
Then, you’ll be ready to launch the new online store for your customers to purchase your products!
To do this, we need to take advantage of another free platform called Ecwid.
This tool allows us to design an online store for free (and list up to 5 products), after which we can simply embed this onto our Google Sites website.
Read more: How To Create a Free Website with Google Sites
3. Sign Up with Ecwid

Get started with Ecwid for FREE here
*The link above is an affiliate link, which means we will get a commission if you upgrade to a paid plan (with no extra cost to you). This helps support our education-based website, and we thank you in advance!
- Once you arrive on Ecwid, click ‘Get started for free’.
- Follow the easy step-by-step process of creating an Ecwid account
After completing the signup process, you’ll arrive inside your Ecwid account.
The free plan lets users list up to 5 products and create two categories
If you have more than 5 types of products you want to sell, you can always upgrade to a paid plan at any time.
4. Add Products

- Locate ‘Catalog’ on the menu and click on it
- Tap on ‘Products’
- Delete the sample products by selecting all and choosing ‘Delete Selected’ under ‘Mass Update’.
- To add your first product, tap on the ‘Add New Product’ button
- Upload product images.

The first product we’ve added for this Google Sites eCommerce tutorial is a “vertical bar necklace” (refer to the screengrab).
Now, follow these steps:
- Enter the stock-keeping unit (SKU)
- Add the product weight
- Write the product description
- Customize the description using the formatting options
- Type in the product price, ex: 49.99$ (Refer to the screengrab). There are additional pricing features that you don’t have access to in the free plan. Some of these features include bulk discount pricing and “compare to” price.
- Navigate over to ‘Product availability’. Turn on the toggle that says ‘Enabled’.
- Save changes
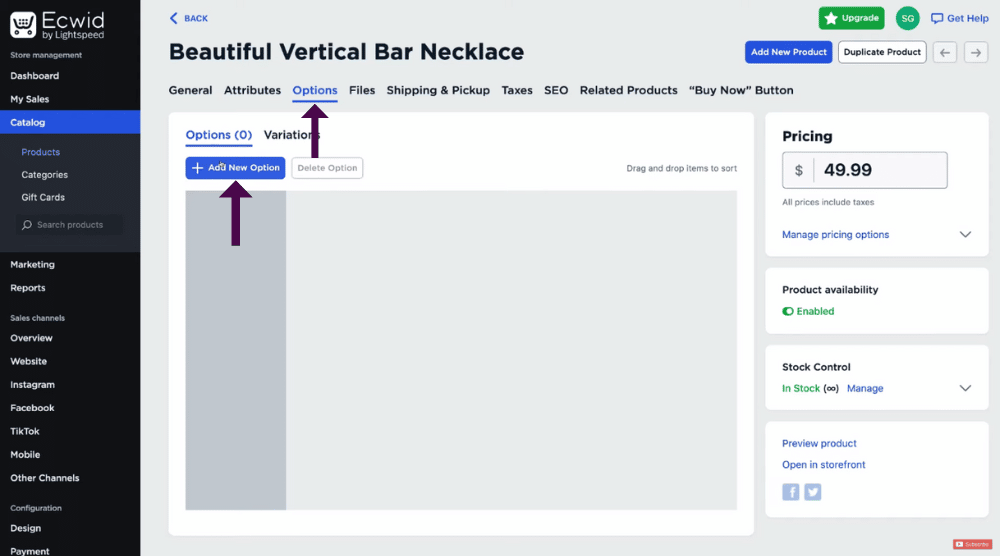
- Tap on the ‘Options’ tab next to ‘Attributes’ and hover over to ‘Variations’. As the name indicates, this is where you can include product variations. The free Ecwid plan, however, allows you to add options but not variations.
To add options:
- Select ‘Add New Option’
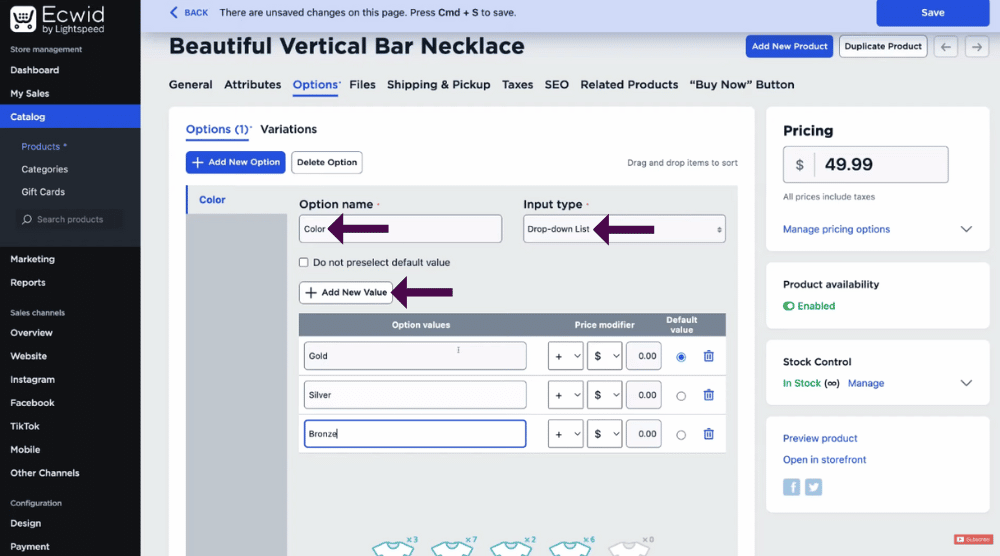
- For this Google Sites Ecommerce tutorial, we’ll add color options for the first product. Start by entering the option name ‘Color’.
- Choose the ‘Input type’ as a drop-down list (see the screengrab). However, you can pick other options, such as checkboxes and radio buttons.
- Every time you make a change, you can see how it looks by clicking ‘preview product’ on the right.
- Hit the ‘Add New Value’ button and enter the option values. We’ll quickly add three colors: gold, silver, and bronze
- Set the price modifier for each value. Since these are just color differences, we’ll not use the price modifier.
However, if you were using different materials, for example, you’d enter different prices for each of them.
Since gold is more expensive than silver, the price of the gold vertical bar necklace will be set higher than silver (example).
- Save changes and preview the product. Refer to the screengrab.

- You’ll notice the price, color options, description, social media sharing buttons, etc., on the product page.
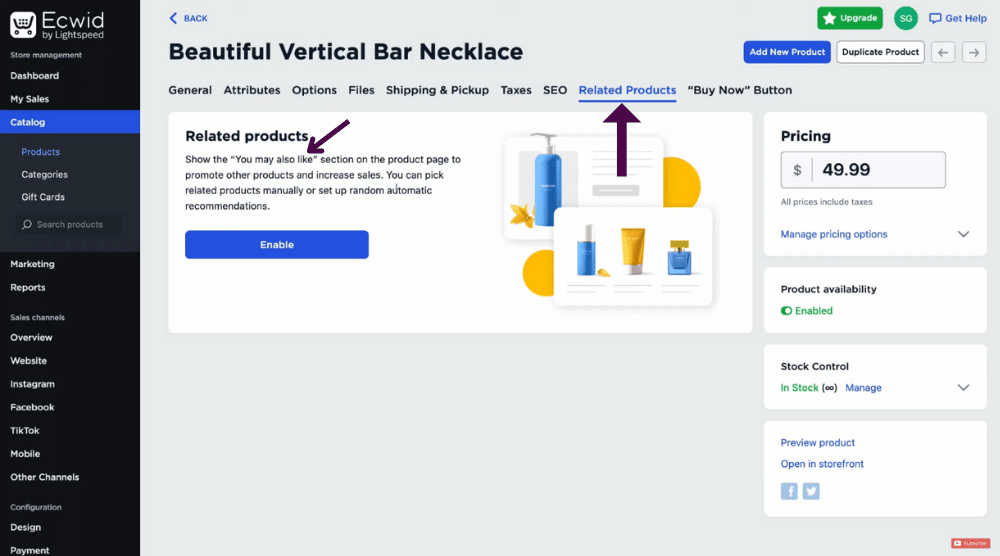
Now, select the ‘Related Products’ tab.
This is where users can enable the ‘You may also like’ segment on their product page.
Unfortunately, it isn’t available under the free online store builder plan.
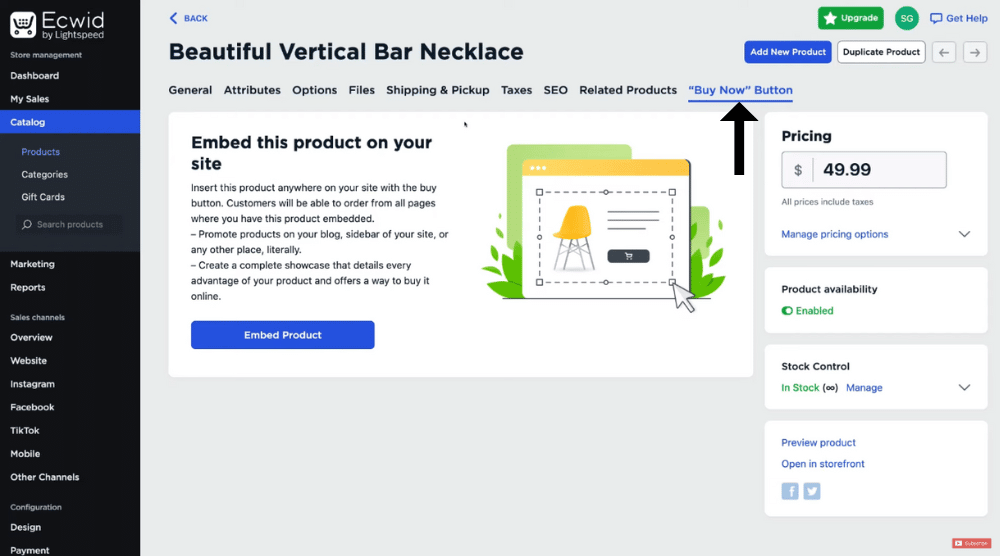
Next, tap on the “Buy Now” Button section. Here, you can embed the product on your Google Sites online store.
So, instead of embedding the entire store on your website, you can embed each product one by one to appear on separate pages.
This is a great feature to leverage if you only have 1-3 products.
Again, this isn’t available under the free Ecwid plan.

If you wish to learn more about Ecwid, consider watching this tutorial. This will guide you through the process of creating a website through Ecwid.
However, let’s get back to creating an online store for FREE!
We’ve successfully added the first product i.e ‘Beautiful Vertical Bar Necklace’, to Ecwid. (Refer to the screengrab)
If you click on the dropdown arrow next to ‘Edit Product,’ you’ll find options like:
Whenever you wish to change any product information, simply click on ‘Edit Product’ next to the vertical bar necklace.
- Edit Options
- Edit Attributes
- Add Images
- Duplicate Product
- Delete Product, etc.
The fastest way to add similar products is to use the ‘duplicate product’ feature and make the necessary changes.

By following the exact process explained above, we’ll add three more products to the Ecwid store. Remember, you can only add up to 5 products for free.
Read more: Ecwid Tutorial for Beginners
5. Add Categories

- Select ‘Catalog’ from the menu
- Pick ‘Categories’ from the options
- Tap on ‘Add Root Category’
- Add a description and products to your category
- Include subcategories if necessary
Adding categories is beneficial if you have more than 10 products.
Since we’re covering the free plan, I won’t add any categories in this Google Sites eCommerce tutorial.
Read more: How To Use, Setup & Start Selling on Etsy
6. Set Up Payment Methods

- Select ‘Payment’ from the menu
- Notice that the ‘Pay by cash’ method has already been enabled.
This payment method is ideal for local businesses with brick-and-mortar stores but not so much for international businesses.
We’ve turned this off for this Google Sites eCommerce tutorial.
However, if you sell in a geo-specific location and customers come to your location, then this could be a relevant payment option for you.
- Go ahead and add multiple payment methods like Stripe, Afterpay, and PayPal.
We recommend connecting as many payment methods as possible for the convenience of your customers.
The process is pretty straightforward, and all you have to do is click on ‘Enable PayPal’, ‘Connect Afterpay’, and ‘Connect with Stripe’.
That said, if you want just one quick and easy payment method to set up, it’s best to get started with PayPal.
It’s easy to set up and allows customers to pay through debit and credit cards; you can also set up invoicing using PayPal.
Make sure your Ecwid email is associated with your PayPal account.
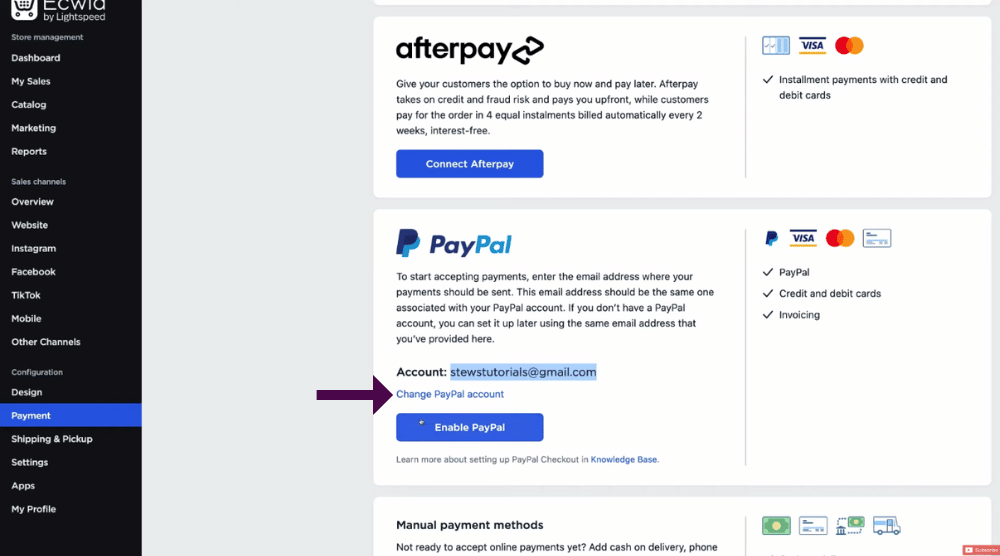
If the email you see on the dashboard isn’t your PayPal ID, click on ‘Change PayPal account’ before connecting the payment method.
Now, let’s talk about shipping in this Google Sites for eCommerce tutorial!
Read more:
7. Set Up Shipping Methods

- Choose ‘Payment’ from the menu
- Select ‘Shipping & Pickup’
- Add multiple shipping methods depending on where your customers are based
Setting up shipping methods with Ecwid’s free online store builder is quite easy.
Let’s say our Google Sites online store only sells products within New Zealand.
In that case, you can:
- Click on ‘Add Delivery’ under ‘Local Delivery’
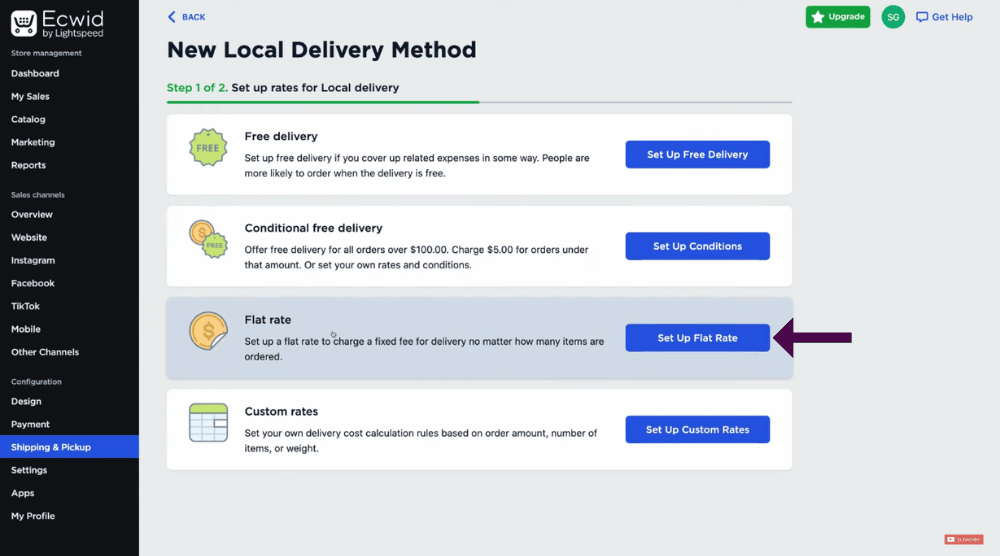
- Choose a local delivery method like free delivery, conditional free delivery (for example, free delivery on orders above $100), flat rate, and custom rates. Refer to the screengrab.
For this Google Sites e-commerce tutorial, we’ll explain how to set up a flat rate.
- Tap on the ‘Set Up Flat Rate’ button
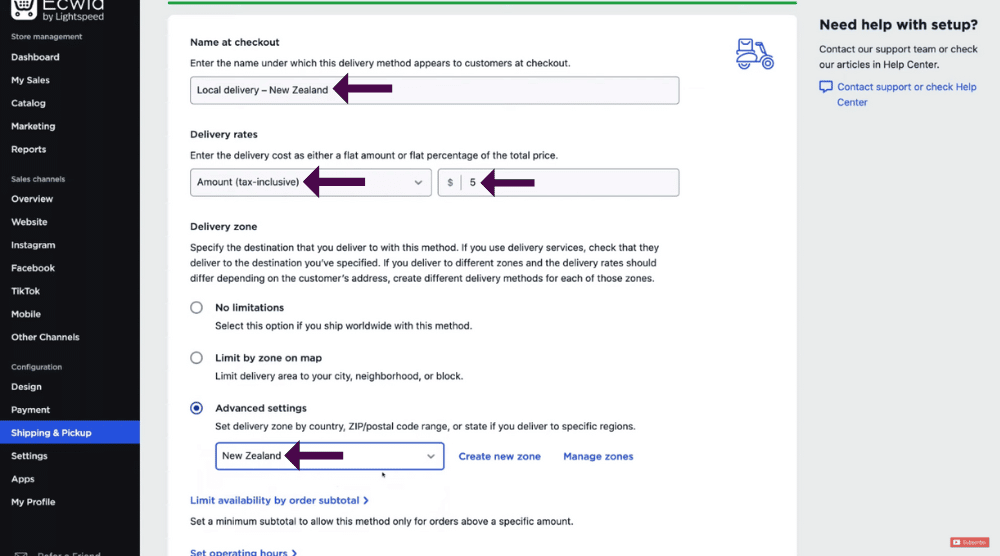
- Name the delivery method: Local delivery – New Zealand
- Under ‘Delivery rates’, keep ‘Amount (tax-inclusive)’ selected
- Enter the flat rate of $5 for everyone in New Zealand
- Under ‘Delivery zone’, tap on ‘Advanced settings’
- Choose New Zealand from the dropdown
- Hit ‘Save & Finish’
- Ensure all shipping and delivery details are accurate
- Click on ‘Back’
You’ve successfully enabled the first delivery and pickup method.
Similarly, you can set up a separate shipping & pickup method for other types of customers, like international customers.
Now, before we embed our online store on Google Sites, we’ll customize it.
Let’s do that now!
Read more: How To Create a ONE-PAGE Website for FREE
8. Customize Your Online Store

- Locate ‘Configuration’ on the menu and click on it
- Select ‘Design’. This is where you can customize the appearance, look, and feel of your Ecwid online store.
- Notice that we have the customization options on the left and preview on the right
- Choose an image size, which will determine how your products would look on the eCommerce store. We’ll pick ‘medium’ for this Google Sites ecommerce tutorial.

- Next, select the desired image aspect ratio (square 1:1, for instance)
- Enable or disable the ‘Darken image backgrounds’ option
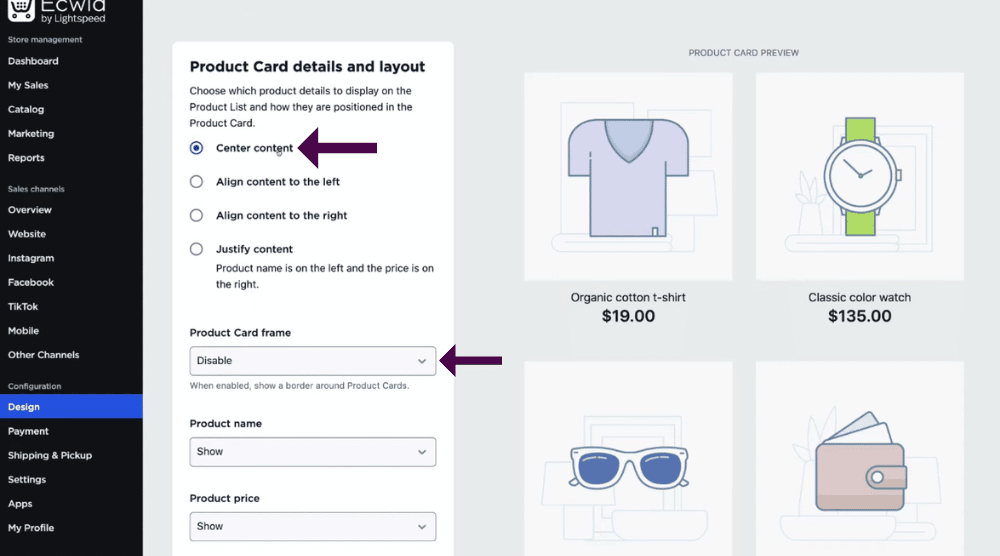
- Hover over to ‘Product Card details and layout’. We have ‘Center content’ selected at the moment.
- You can change it to left alignment, right alignment, or justify.
- Disable or enable the product card frame
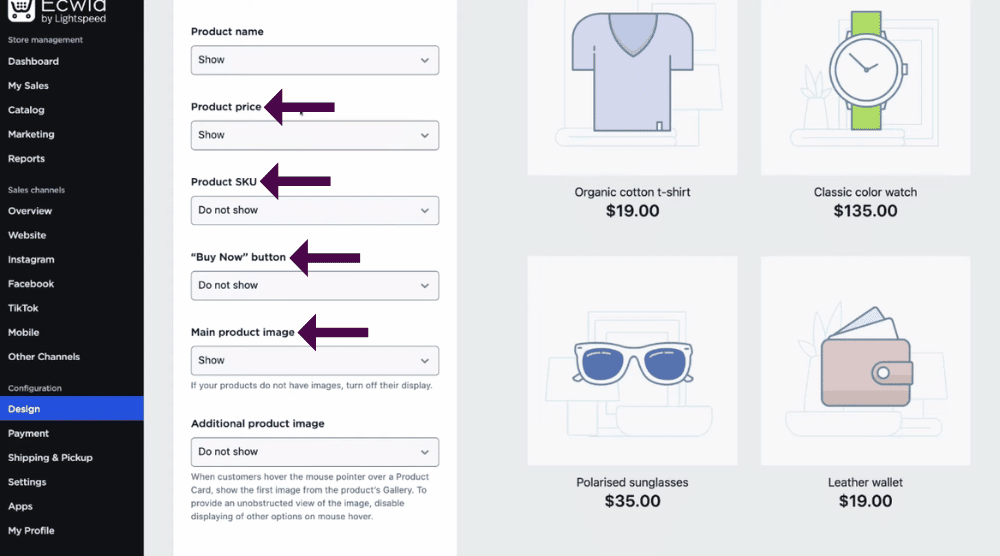
- Choose to hide or show the product price, SKU, image, etc. However, we recommend keeping the default ‘Show’ button on for these options.
- There are two display alternatives for the Buy Now button: ‘Show’ (it will appear below the content) and ‘Show on mouse hover’.
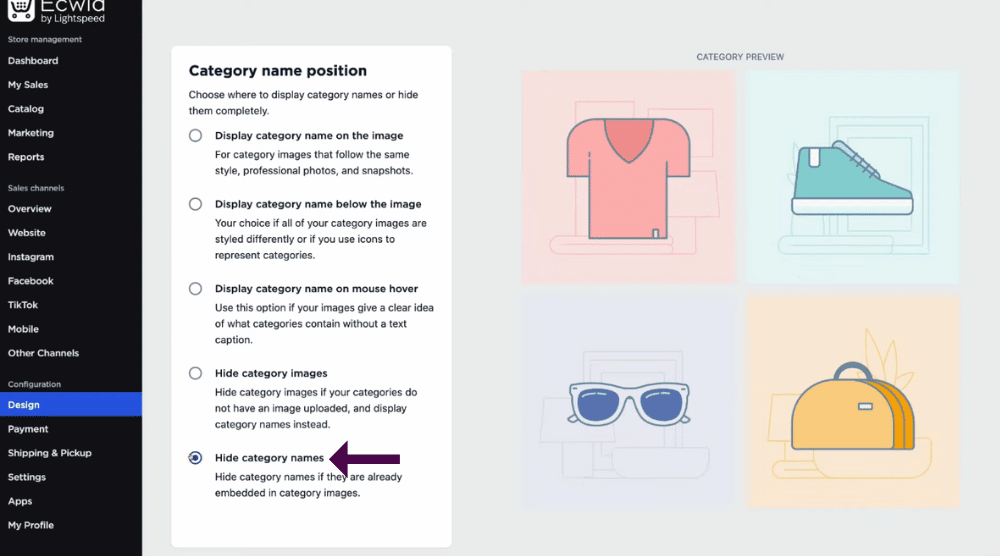
- Customize the ‘Category name position’. For this free online store tutorial, we’ll hide it for now.
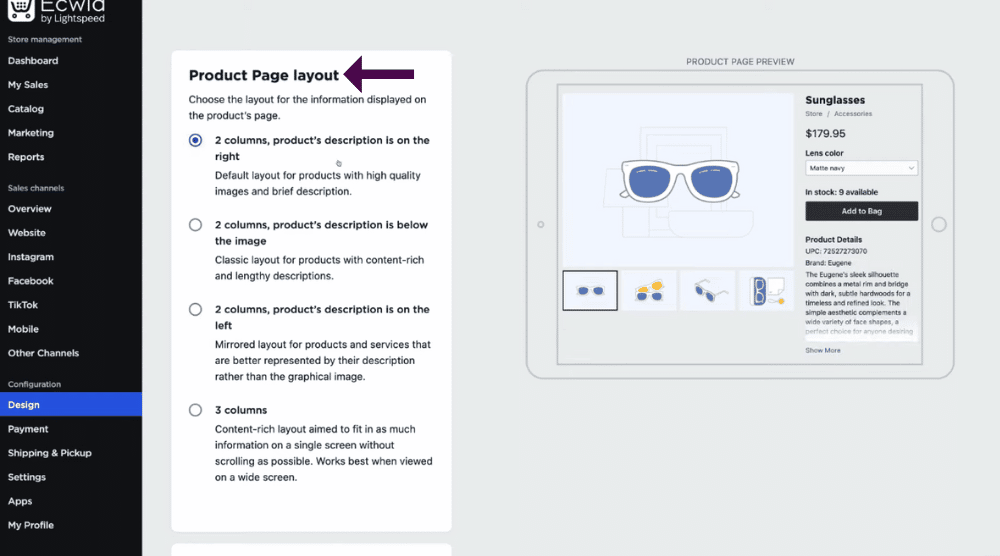
- Pick the desired product page layout. Keep checking the preview.
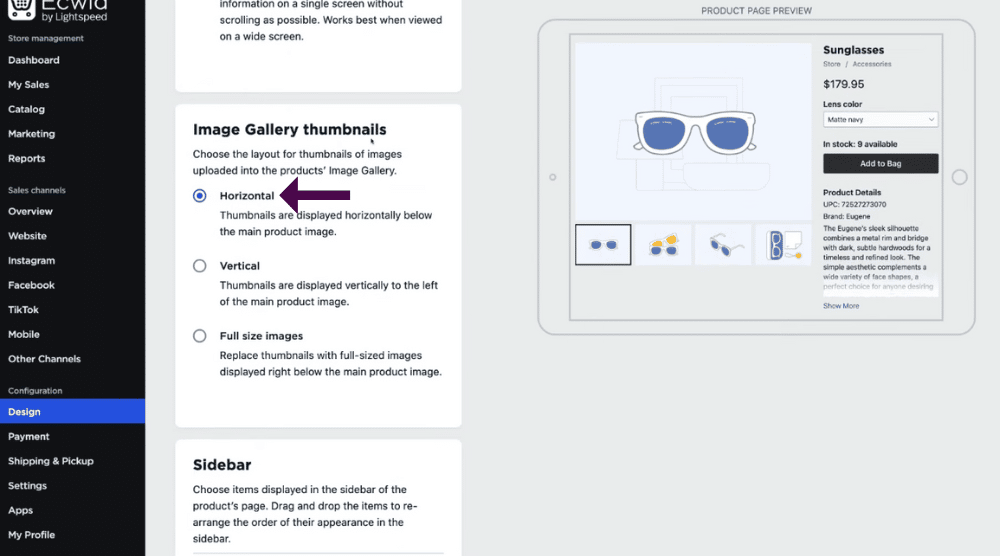
- Select the layout for image gallery thumbnails. We’ll keep ‘Horizontal’ selected for this Google Sites ecommerce tutorial.
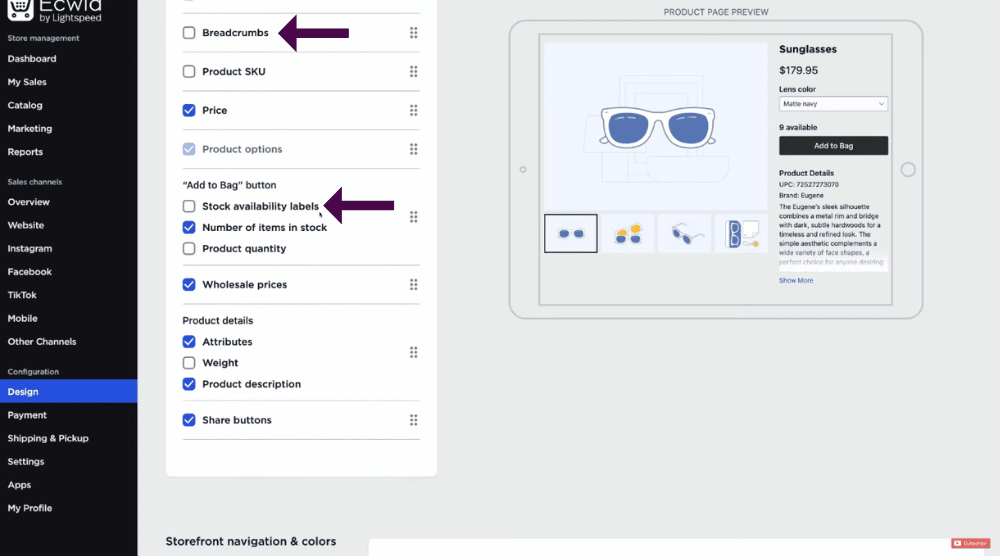
- Next, check the items that you wish to display on the sidebar. We’ll uncheck breadcrumbs and stock availability labels.
Remember, if you don’t like how these changes look after you launch the store, you can always customize them later.
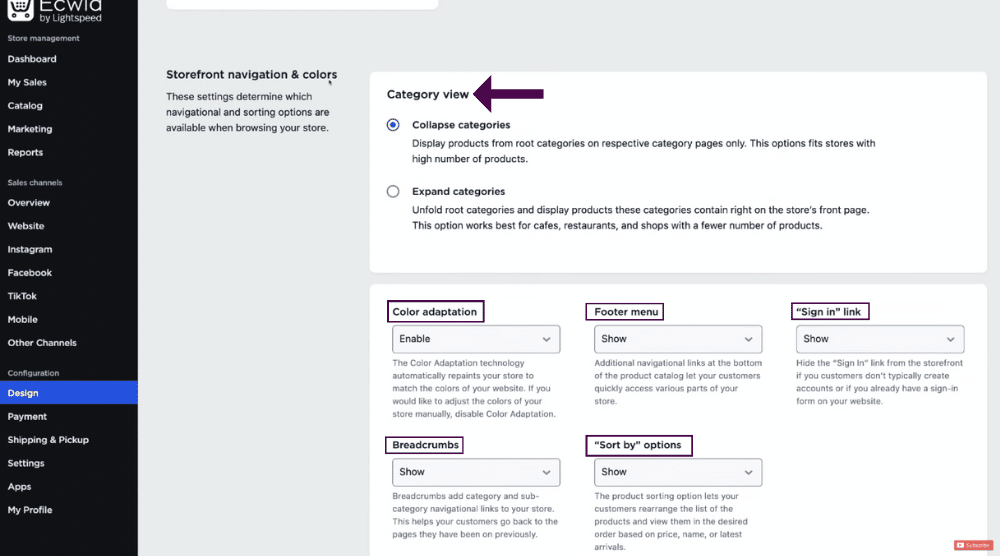
Now, scroll down to ‘Storefront navigation & colors’ and follow these steps:
- Under ‘Category view’, keep ‘Collapse categories’ selected.
- Enable color adaptation. It will help automatically ‘repaint’ the store to match the colors of your Google Sites website.
- Choose to hide or show the footer menu, breadcrumbs, “Sort by” options, and “Sign in” link.
You’ve successfully completed the customization!
Now comes the final step…embedding your store front to create a Google Sites eCommerce store!
Read more: How To Make an E-commerce Website for FREE
9. Embed Online Store onto Google Sites

- Locate ‘Overview’ below ‘Sales channels’ on the menu.
- Click on it
- Navigate over to ‘Custom website’
- Hit ‘Learn more’
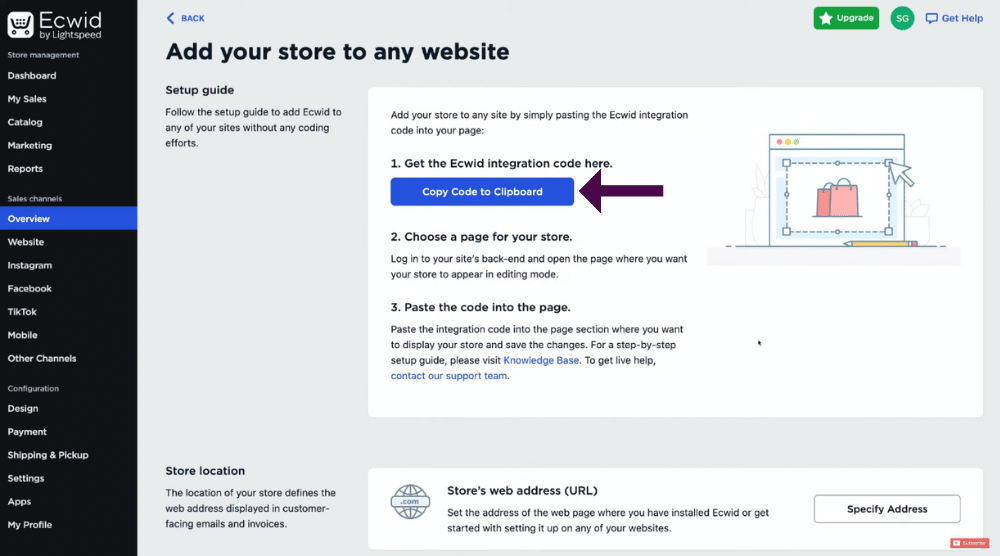
- Click ‘Copy Code to Clipboard’
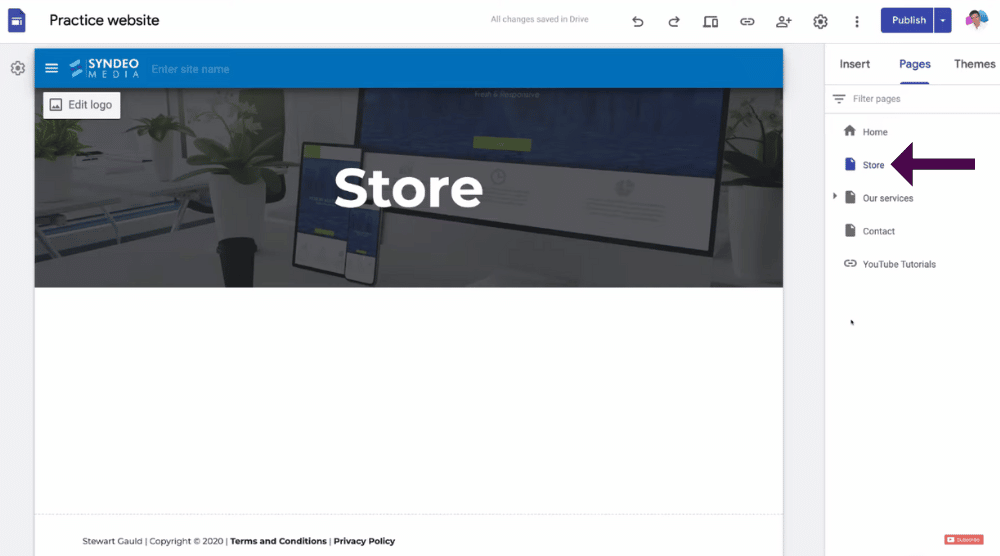
- Revisit your Google Sites website
- Keep the Store page selected
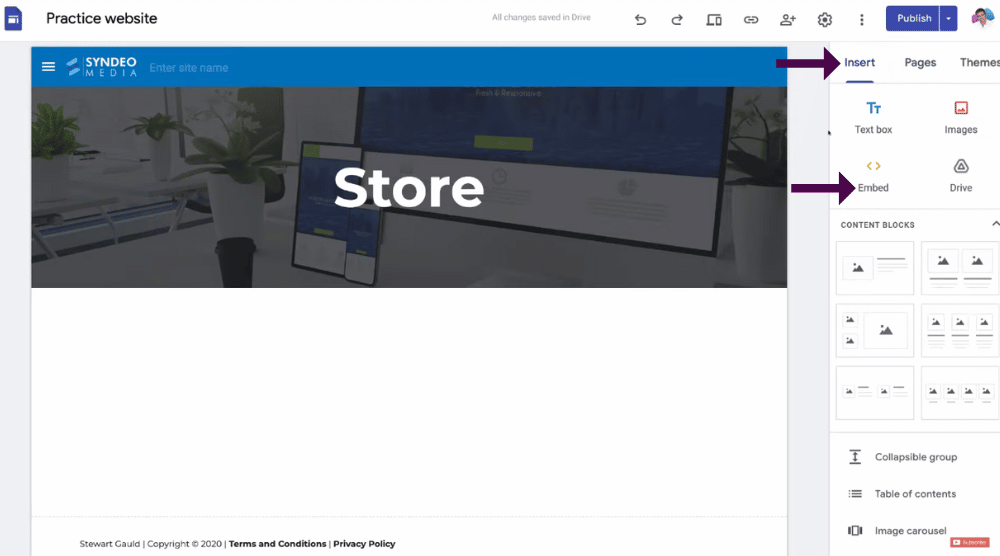
- Tap on ‘Insert’ and choose ‘Embed’
- Click on ‘Embed code’ and paste the code
- Hit ‘Next’ and then ‘Insert’
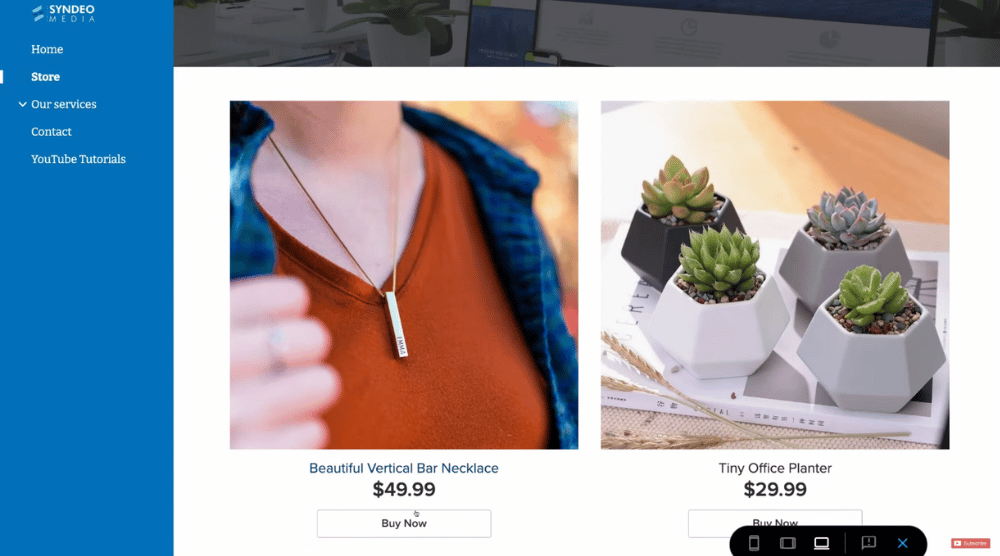
The Ecwid online store has been successfully embedded in Google’s e-commerce website builder.
You’ll have to drag the corners and sides of the layout to make the store more responsive and fit on the page perfectly (refer to the screengrab).
To preview what the newly built Google Sites online store looks like (Video Guide):
- Hit the preview button (refer to the screengrab)
- Check the preview for different devices
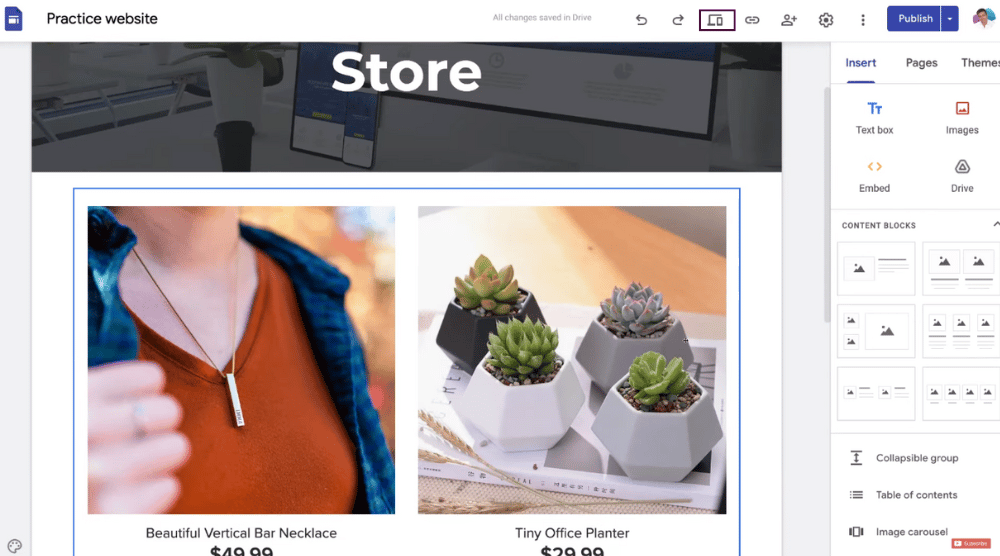
- Click on the products to see what individual product pages look like
- Add a product to your cart to check the appearance of your checkout page
- If you feel like you want to customize the layout of your online store before publishing, simply head back to Ecwid and change the layout.
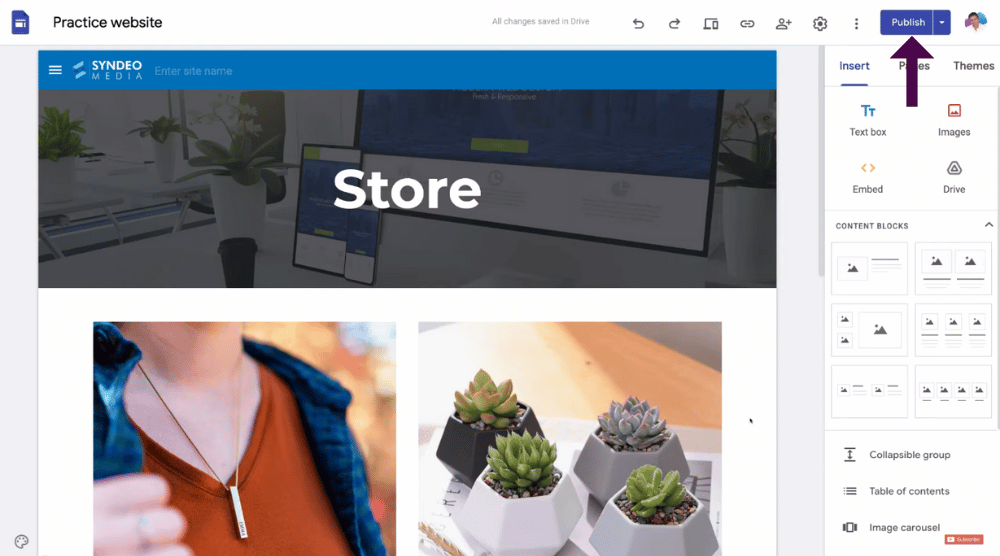
When you’re ready to launch your Google Sites online store and start receiving orders, hit ‘Publish’.
Congratulations! You’ve created an online store!
Google Sites Ecommerce Tutorial for Beginners (Video Guide)
Just like that, you’ve turned your Google Site into an online store!
That wraps up everything we wanted to cover in this Ecwid and Google Sites tutorial.
You can now start selling products online using the Google Sites eCommerce store.
And the best part is, you can create your online store for FREE!
Check out our full Google Sites eCommerce video guide down below.
Frequency Asked Questions
Is Google Sites Free?
Yes, Google Sites is a completely free website builder.
And with the incredible online website builder Ecwid, online stores can also use Google Sites for free!
Can You Sell On Google Sites?
In addition to the free online store builder Ecwid, Google Sites integrates with premium online store builders like Shopify and WooCommerce.
Can You Use Google Sites For Your Small Business?
Absolutely.
Google Sites is the perfect website builder for small businesses as it’s easy to use, integrated with your Google account, and completely free!
Whether you’re an small online store or service based business, Google Sites is a great choice.
